
Likes
Comments
Share


@Fa5Venom
Follow
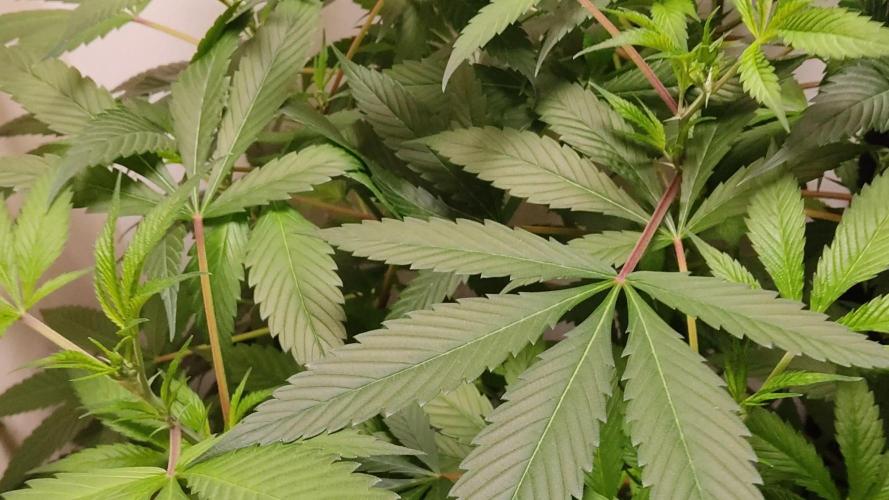
Good growth on them little bit of nutrients burn on the northern lights. Won’t get much out that small one but I just couldn’t let it go

Likes
16
Share


@Mrg7667
Follow
Still see nitrogen toxicity so im going cut biogrow down to half dose and see how it goes! Besides that all looks well
Smells are stepping it up in a couple pheno!
On the Chocolate Marshmallow side we have a intense sour fruity pebbles on a pheno that is just unreal
And on the double d side we have some rotten tooth chem smells coming through!

Processing
Likes
42
Share


@MadeInGermany
Follow
Hey everyone 😃.
Another wonderful week is over and they are developing really well 👍😃.
I think I'll put them in the flower chamber for about the next 2 weeks.
until then I wish you all the best 😋
You can buy this Strain at :
https://sweetseeds.es/de/cream-caramel/
Type:
Cream Caramel
☝️🏼
Genetics:
Blue Black
x
Maple Leaf Indica
x
White Rhino
👍
Vega lamp:
2 x Todogrow Led
Quantum Board 100 W
💡
Bloom Lamp :
2 x Todogrow Led
Cxb 3590 COB 3500 K 205W
💡💡☝️🏼
Soil :
Canna Coco Professional +
☝️🏼
Fertilizer:
Green House Powder Feeding
☝️🏼🌱
Water:
Osmosis water mixed with normal water (24 hours stale that the chlorine evaporates) to 0.2 EC. Add Cal / Mag to 0.4 Ec Ph with Organic Ph - to 5.5 - 5.8 .

Likes
9
Share


@Belivitez
Follow
25. 7. Plants are still under the sun 😎 i cut 4 of 6 main branch. Buds looking supreme/ milky trichomes, but with some white pistils ( maybe fox tails).
29.7. I put dry buds into paper bag for week and than into the jar 💪 i cut down all plants ❤️

Likes
5
Share

@PEAKYPLANTERS
Follow
Hello grower friends, how are you?My little girl is growing more and more and I'm very happy about it and I wanted to share this recovery with you... greetings to all

Processing
Likes
5
Share


@Mr_nugs_lover_David
Follow
She's being grown without any training method,just 100% natural and organically grown,in her soil mix she has guanokalong seaweed powder,complete organics and grow and flo by florians living organics which is full of humic and fulvic acids and 10 different types of mycorrizae and beneficial fungus,plus I'm watering with guanokalong extract and also my lactobacillus liquid made by myself,she looks super happy and green,she's definitely a big lady and she loves her house 😍💚🌱 #organicmedicine ✌️

Likes
29
Share


@DaddyPrime
Follow
8/10 buds are fattening up nicely. Moved plants under growlight to attempt to take better pictures. Cant wait to see what she looks like at the end
Likes
4
Share


@victortripp
Follow
Week 3 Plant Growth Summary:
Lighting: Increased PPFD from 250 to approximately 350 µmol/m²/s midway through Week 2, aligning with recommended levels for the vegetative stage.
Watering: Conducted three wet-to-dry cycles.
Soil Testing: A slurry test on Day 6 indicated a pH of 6.39 and an EC of 2.9 mS/cm.
Nutrient Introduction: Began adding nutrients at 50% of the manufacturer's recommended levels during the third watering on Day 6. The nutrient solution had an EC of 0.53 mS/cm and a pH adjusted to 5.2. Runoff measurements showed a pH of 6.5 and an EC of 1.97 mS/cm. Optimal pH for nutrient uptake in hydroponic systems typically ranges from 5.5 to 6.5.
Plant Training: Planning to top all plants near the end of Week 4.
Irrigation System: Received all Tray2Grow components. With leaves now reaching the pot edges, plan to activate the system on Day 2 when plants require watering.
Overall, plants are progressing well, with environmental parameters maintained within optimal ranges.


Likes
2
Share


@Maddadog
Follow
From this week we started to give some extra nutrients to the plant. I used half of the quantity suggested from the fertilizer in order to reduce the overfert risks. She is growing day by day. I used to give water one time each 2 or 3 days during the night hours.

Likes
6
Share


Likes
2
Share

@Maddadog
Follow
This Week we started to change the fert always using the 50% of the suggested quantity. We start the lst technique but some hours after the top side of the plant turns the heads up towards the light again. From day 25 we reduce the daylight time o about 30 min per day. On monday I expect to have 18/6 to start the flowering weeks :)
Likes
16
Share

@GERGrowDesigns
Follow
Welcome to Flower Week 10 and harvest of Sensi Seeds Mandarine Jam
I'm excited to share my grow journey with you from my
Sensi Seeds Project . It's going to be an incredible ride, full of learning, growing, and connecting with fellow growers from all around the world!
For this Project , I’ve chosen the Feminized Photo Strain Mandarine Jam:
Here’s what I’m working with:
• 🌱 Tent: 225x150x150
• 🧑🌾 Breeder Company: Sensi Seeds
• 💧Strain Info : 20-23%
• ⏳ Flowering Time: 7-8weeks

Likes
17
Share


@GreenHouseLab
Follow
And another one from BarrieGrower that going to be absolutely fire.
Likes
88
Share


@ILoVeThiSpLaNt
Follow
Day 73 Ho tolto entrambe le Watermelon Zkittlez. Non sono contento per come le ho trattate e per non essermi accorto dei problemi mostrati fin da inizio fioritura della Watermelon Zkittlez #2 (quella tutta gialla con foglie secche). Pensavo a una carenza e quindi ho continuato ad aggiungere calmag quando molto probabilmente era un blocco di ph e conseguente mancato assorbimento dei nutriente. Morale della favola?Fiori piccoli con resina che non ha minimo odore. Dagli errori si impara e finalmente mi sono comprato una pennetta Ph (Adwa Ad12) e non le solite cazzate che trovo su amazon e mi durano qualche giorno per poi rimanere senza e inciampare sempre in questi problemi.
L'altra pianta stava bene fino a quando sono stato bene io. Alla fine loro vanno seguite e se ti assenti un attimo tante volte rischi di mandare tutto il lavoro all'aria. Fino al 60esimo giorno era perfetta poi per tre giorni sono stato male e non ho dato da bere alla pianta. Quando riapro il box la trovo tutta floscia e le cime molli e senza quell'odore che tanto mi stava colpendo nei giorni precedenti. Ora la lascio chiusa nei barattoli e vediamo se riesce a regalarmi un piccolo sorriso 😊
Grazie del passaggio. Due tre settimane aggiorno diario con qualche bella foto 🖐️

Likes
9
Share


@Unnamed
Follow
Chopped her on day 83, sadly the last day is not on timelapse due to a camera firmware update and after the reboot it returned its angle to base and I didn't notice it.
Stem and Buds turned slightly purple in the last days.
The ORP probe is not calibrated and values are to be taken with a grain of salt.
Values are average of the day.
DATE - °C - RH% (Tent Temp/RH)
20240912 20.8 57.9
20240913 21.3 58.5
20240914 21.0 57.1
20240915 22.2 59.9
20240916 23.4 56.1
20240917 22.7 62.7
DATE - PH
20240912 5.86
20240913 5.85
20240914 6.03
20240915 5.97
20240916 5.94
20240917 6.04
DATE - ORP (mV)
20240912 17
20240913 16
20240914 11
20240915 11
20240916 49
20240917 46
DATE - EC(us/cm)
20240912 2119
20240913 2178
20240914 2097
20240915 2185
20240916 2257
20240917 2208
DATE - CF
20240912 21.19
20240913 21.78
20240914 20.97
20240915 21.85
20240916 22.57
20240917 22.08
DATE - °C (Reservoir)
20240912 18.5
20240913 18.9
20240914 18.3
20240915 19.1
20240916 20.3
20240917 20.4

Likes
14
Share


@myterpygarden
Follow
Mimosa x Orange tiene unos cogollos increíbles
Ayahuasca y Runtz empiezan a coger color!
Barney's sois unos cracks
Likes
28
Share


@Kitties_and_Colas
Follow
The Critical Purple are about as tall as me at this point and buds are stacking up very quickly,.. had i known these plants would take so long to flower i definitely would have opted for a larger pot size, but these things happen i guess ....I pulled a GWS, a finished CP and another GG auto this weeks as well :)

Likes
7
Share


@stonermamba13
Follow
since the end of last week I have started to untie the branches later in the growth. always trying to give more light to the shoots that arise from the joints, to then direct these too towards the light. All this while I lower the plant by about fifteen centimeters so that the elongation given by the change of light favors the spacing. From day to day I checked the situation and, after three days, I installed a very rudimentary net in order to re-fit the highest branches and spacing them, both between them, and being careful to leave light and space the new throats. now I am just waiting for it to start to equalize in height while it will enter, I hope very soon, in the pre-flowering and then definitively blossom. just stress if not some tying to the new thrown that will decide to come up. I will increase with fertilizers at this time when the plant will recharge to the maximum to overcome yet another change. we hope for tasty buds, this cultivation is becoming more and more interesting as it is difficult.

Likes
2
Share

@ThatsmyGrow
Follow
Sie scheint mit bisschen Lichtstress zu haben, aber da schauen wir einfach weg.
Likes
9
Share

@Borberad
Follow
Woche 4 beginnt Etwas zu nass. Die Umstellung von Floragard Growmix mit organischer Flüssigdüngung auf Herbis Livingsoil ist immer noch herausfordernd speziell in den noch kleinen Töpfen, ansonsten stand die vierte Woche ganz im Zeichen der erfolgreichen Etablierung im neuen Setup (Neues Zelt, neue Beleuchtung neuer Topf (3l Stoftopf) mit neuem Substrat.
Das strategische "Tiefersetzen" aus der Vorwoche war ein voller Erfolg: Der Stamm hat enorm an Stabilität und Dicke gewonnen. Die Pflanze steht nun völlig eigenständig und kerzengerade, ohne dass sie gestützt werden musste. Die gewonnene Energie wurde direkt in das Wachstum der Fächerblätter investiert, die sich aufgespannt haben, um die Lichtintensität im neuen "Vegi-Palais" optimal auszunutzen. Keine Anzeichen von Lichtstress jedoch ist das feuchte managment im ungewohnten Substrat ist noch verbesserungsfähig.
Likes
36
Share

@MadeInGermany
Follow
Info:
Unfortunately, I had to find out that my account is used for fake pages in social media.
I am only active here on growdiaries.
I am not on facebook instagram twitter etc All accounts except this one are fake.
Have fun with the update.
Hey everyone 😊.
The lady was repotted 4 days ago and has developed very well since then :-).
I let them take root for a few more days before I start training (topping) and add their GHSC Powder Feeding bio Grow 👍.
Otherwise, as always, the tent was cleaned and the humidifier refilled :-).
I wish you all the best ☺️ stay healthy 🙏🏻
You can buy this Strain at
https://www.barneysfarm.com/blue-cheese-34
Type:
Blue Cheese
☝️🏼
Genetics:
Blueberry
X
Original Cheese
👍
Vega lamp:
2 x Todogrow Led
Quantum Board 100 W
💡
Bloom Lamp :
2 x Todogrow Led
Cxb 3590 COB 3500 K 205W
💡💡☝️🏼
Soil :
Bio Bizz Coco
☝️🏼
Fertilizer:
Green House Powder Feeding
☝️🏼🌱
Water:
Osmosis water mixed with normal water (24 hours stale that the chlorine evaporates) to 0.2 EC. Add Cal / Mag to 0.4 Ec Ph with Organic Ph - to 5.5 - 5.8