The Grow Awards 2026 🏆 


Likes
Comments
Share
@Ksouth1
Follow
Last week went well. She seems to be done with the major part of the stretch and is stacking on bud now. I upped the cal-mag a mL per gallon because of the light intensity. Had to adjust the light upwards to avoid damage to the plant. I began to see some signs so had to take care of it but she is happy with the environment. She is growing some nice long buds just like the gelato next to her. Glad I have clones from both. Had to do some supercropping and defoilation. Did it to keep the branches at a good level and to keep the canopy level. She would have been taller if it wasn't for the lst. Will update as she progresses. Until next time you growing to everyone!

Likes
2
Share
@OGTrauma
Follow
After 14 days of burying the popped seeds these were the results using the bac germination method, but on a substrate experiment the, interesting results shows that on the 28 seeds, up to 14 days the decimation was ambient factors, nowadays 9 are thriving on light mix unlikely coco coir that damped off way more , i can't say coco is bad as the freebie i received shall be very welcomed if is not as good to germinate , is more gtg to to clone some interesting black roses pheno and the good karma part will be present on the next run, just with prone cuts tried to be converted to side plants. There is a slight chance that there can be more or less plantlings with the course of the weeks as some had grown but didn't drop of the shell . Heat was oven like at some moments and had a negative influence, as i fight 30c at peak hour temperatures trying to keep them fresh with the humidifier at 75% ambient, and 26c average . There is a reduced chance that some plants can still damp off but , i just need 8 as i intend to use 7 or 11lt plastic pots , buts that no reason to treat them bad, the weather is fortituous and i can't control it more , so I MUST STATE, THESE SMALL CREATURES EAT BETTER THAN ME. they will be feeded with biobizz, bac, atami, and top crop, the products i use to keep my hair fabulous. shoutout to tanu mapu because they will be a repeater when i need to provide myself with quality soil.
Likes
7
Share
@MediciGrade
Follow
11/15 - Day 43 - I've changed the light schedule on the timer from 20/4 to 18/6. I will be heading out of town for 10 days on December 25th and so I'll need to harvest and hang to dry by the 24th at the latest. I've read in a few forums that decreasing the lights on/lights off ratio can speed flower maturation on auto-flowers. The other growers also mentioned that the decrease in light also reduces yields, but on such a tight timeline I'd trade total yield for more fully ripened buds any day of the week. Would certainly be interested if anybody has experience/knowledge that contradicts what I've read. Plants stretched another 2 inches in the last 24 hours putting them 22 inches from the light. I still have room to raise my light another 2 inches, but if these girls stretch more than 6 more inches they'll be < 18 inches from the light which I'm assuming would cause light burn based on the research i've done on this 600W ViparSpectra reflector series. Here's hoping they don't stretch more than 6 inches from here.
11/17 Day 45 - Haircut day. Left a few fan leaves on the shorter/lower shoots, but took almost everything else. Tallest tops had stretched another 4 inches in the past 48 hours, and were 18 inches from the light. I raised the light the final 2 inches I had available, which places it back to 20 inches from the tallest bud sites. Hopefully the haircut I gave the plants slows down the stretch, but either way it looks like I'll have to do a lot of retraining before I head out of town tomorrow for 5 days.
11/18 Day 46 - Fed nutes. Cal mag + advanced nutrients (micro, grow, bloom), and MKP. 4 Litres of water per plant. A lot of runoff in the saucers, but I'm out of town for the next 5 days so I'm leaving it to be absorbed throughout the week.

Likes
11
Share
@StonedandSteady
Follow
Hang Drying 7-14 days before the #TotalDryYields $ #SmokeSesh's! 63rd Day #HarvestTime 9th week of Flower Update of my Fastbuds 2fast4buds.com Genetics looking Great, Gorgeous, Magnificent, Phat and Finishing out Super Strong! I Applied the #AncientArtofStemSplitting for more #FrostedTerpyBuds on 3/19/22 #Trichomes are Ripened and Ready for Steady! #ChopCity is underway! #FadeTime I Can't wait to Blaze Up these Beauties! I started thier #FlushingPhase on 2/23/2022 with Declorinated Tap Water Ph'd-6.0! I #Lollipopped the Lowers on Sunday 2/6/22 after posting to #GrowDiaries They received thier 5th #Feeding of #DivineSeeds #DivineGrow but this is thier 1st #Feed of #LongFlowering 3.0G. Mixed into a Gallon of water, Ph'd to 6.5 on 2/20/22! #BudzForming into Frosted #ChronicColas w/ #PistilsPoppin everywhere looking Pristine!!! I've been implementing some #LSTtraining at the beginning of 10 week's back by bending them over with #PipeCleaners to the sides of thier pots, pulling down thier side branching and #LeafTuckin the Biggest leaves under each other to Expose the Bud site's and Branches to more lighting w/ some #LiteDefoliation 9 weeks back as well! I introduced the #SpinningStemzStrengthing technique a few weeks ago to thier main Stocks and Side branching to make them Stronger and more Sturdy! They popped in under 24hrs in the wet paper towel method and now that they've busted out of thier ProMix potting mix medium, I've been watering them when dry with around 4 cups or 32 fluid ounces 64 Tbsp 192 tsp 948ml of Declorinated Tap water that's Ph'd to around a 6.4-6.3 using TNB ph Up$Down and watering thier whole pots these past couple of weeks! They're Growing under our Bodacious #BloomPlus1500w with the 150w Done driver in our 2×4.5×7ft. GrowTank Grow Closet with the 18/6 lighting schedule cause Everything needs a little rest! Team #Fastbuds recommends the 20/4 schedule as well!!! Our Grows also get Enhanced with #TNBNaturals The Enhancer with my Special Steady'z mix in their bottles!
Yo!!! Top-Notch and The Finest in AutoFlowers indeed! Let's Grow and Get it In from Team #Fastbuds @fastbuds_genetics on Instagram!!! Check it Out my fellow Growmies and Growmets! I'm very Thankful, Grateful and Appreciate these Fantastic, Famous, Fast-Growing, Flavorful and Fiery genetics! Spectacular and Superb Sponsorship package from my Broski Sir #Santi as I like call him and thier Award-Winning Company full of Great Growers, Bodacious Breeders and Pleasant People from All over the World! Your Strains are Phenomenally Pristine and Perfectly Priced! I Can't wait to Try, Test and Review these Crafted Cannabis Cup strains!!! Thanks Again Everyone and Everybody! I've also learned All sorts of Growing Tipz, Tricks, Techniques and Methods from you and your Detailed- How to Grow Instructional categories on your Website SeedBank! Your a Fantabulous Family and Terrific Team!!! It's my Pleasure and I'll do my Best!!! With the Help of my Broski #GallowGlas420 making my original Masterpiece's! I Made, Perfected and Hope Everyone Enjoys these New Introductions, Mail Call and Outros! I also Hope that Everyone will and Go Spread That Love to you Guys on your other social media's! I'll most definitely have their Link's posted Below⬇️! BudBrothers4-L!!! Cheers Famz!!! Much Props, Topz and Much Love!💯
https://youtube.com/c/FastBudsGenetics
https://instagram.com/fastbuds_genetics?utm_medium=copy_link
https://www.facebook.com/FastBudsMedia/
https://mobile.twitter.com/fast_buds
https://www.reddit.com/r/FastBuds_Family/
https://t.me/fast_buds_genetics
https://es.linkedin.com/company/420fastbuds
Remember "it's 4:20 Somewhere"!!! Bloom Plus BP-4000
CA:https://www.amazon.ca/dp/B08DTDP5FF/ref=cm_sw_r_cp_awdb_imm_86Q7H2D5BGFYB9B6PR9K
US:https://www.amazon.com/dp/B08DTN3B84/ref=cm_sw_r_cp_awdb_imm_4B7XWCAS09M4V3W0AFJH
Bloom Plus BP-2500
CA:https://www.amazon.ca/dp/B08DTCYV9Y/ref=cm_sw_r_cp_awdb_imm_YDNA8G16PH3TB002VKGE
US:https://www.amazon.com/dp/B08DS53THM/ref=cm_sw_r_cp_awdb_imm_SX3AEDKRVAYQECF32BE4
Bloom Plus BP-1500
CA:https://www.amazon.ca/dp/B082XYLHRJ/ref=cm_sw_r_cp_awdb_imm_XEBFV7790EHT53B2J9B5
US:https://www.amazon.com/dp/B082XYLHRJ/ref=cm_sw_r_cp_awdb_imm_MB3PYZEVSQRZY096AB79
BloomPlus Instagram Link:
https://instagram.com/bloomplusled?utm_medium=copy_link
Thanks Again Broski #SmokinPlantaz for Hosting your Bright and Tight Amazon Prime Day #BloomPlus-1500w Giveaway! I'm still Blinded by the Light!!! Lol (Song Pun) it's Ultimately Lit, Extremely Powerful and Brilliantly Bright! I also Love and Appreciate Everyone out here! Please! Go Over and Spread That Love to my Bro's YouTube Channel and Team #BloomPlus on their Instagram! I'll have thier Links posted ⬆️⬇️! BudBrothers4-L!!! Cheers Famz!!! Much Props and Much Pars!💯
SmokinPlantaz YouTube Channel Link: https://youtube.com/channel/UCDKJthWoS6-miAhq_lLb_-w

Likes
27
Share
@ohserp
Follow
I’ll start out by saying I had to move plant 4 out because it was getting too big. So there’s three in the tent and one in a closet at the moment! May do some more moving around but not sure. So far plant 2 is flowering the hardest with plant 1 behind, then plant 3, and finally the monster plant 4. All same strain but different growth patterns, which is pretty cool

Likes
14
Share
@JerMeds
Follow
I did some LTS and they really grew both taller and wider. These girls are pretty massive. I'm thinking I might need to defoliate some big leafs, clean up some lower leafs and do some more LST.


Likes
95
Share
@Roberts
Follow
Northern light is looking good. She has gotten acclimated, and has started making progress in the grow. I am not a expert in soil grows by any means. Keeping the wet to dry cycle right has been my biggest challenge in soil. She is looking fine, and everything is looking great so far. Nothing else to report at the moment. Thank you Medic Grow, Pro-mix, and Divine Seeds. 🤜🏻🤛🏻🌱🌱🌱
Thank you grow diaries community for the 👇likes👇, follows, comments, and subscriptions on my YouTube channel👇.
❄️🌱🍻 Happy Growing 🌱🌱🌱
https://youtube.com/channel/UCAhN7yRzWLpcaRHhMIQ7X4g
Likes
8
Share
@youdan
Follow
una vera goduria, molto veloce, e i terp sono proprio quelli da me ricercati!, adoro il funk e l'og è questa fa veramente al caso mio! sicuramente una genetica da ricoltivare!

Likes
23
Share
@GreenthumbJacobs
Follow
Ich bin gespannt ! Die Blüten sehen schon gut aus und der Geruch ist super lecker 🤩


Likes
19
Share
@TopNotchBud
Follow
Very easy strain to grow. I grew the White Critical Express previous to this grow, I really liked it and wanted to try growing an Autoflower so I went for the Critical 2.0 and it was worth the grow.


Likes
86
Share
@Tropicannibis_Todd
Follow
Alright Then
REMINDER I DO 2 UPDATES PER WEEK 👉WEEKLYROUNDUP👈👉MIDWEEKLY UPDATE👈
We just hit week 5 and all is well , for the most part , having a little magnesium issue but hopfully with some adjustments I got under control 😃 .......
Middle of last week I have decided to start with her little sister and started a little training by pulling her over to the side 👌 And will continue to LST this week👈 And she's looking fantastic and she's already begun next faze by preflowering 😲
Pheno #2 is about 10 to 12 days behind
rain water to be used entire growth👍
Lights being readjusted and chart updated .........👍
I GOT MULTIPLE DIARIES ON THE GO 😱 please check them out 😎
Likes
6
Share
@Lomba610
Follow
I fixed the extraction fan, the roots are growing really fast, let's hope for excellent results 🤞🏼🤩
Likes
4
Share
@GroloCup
Follow
She's blown up and smells like grape kool aid mix poured into a cup of gasoline. Then look at that deep purple. Brother Geoff's selection is definitely a thing of beauty.We're adding some green sensation to the nutes and sticking to this autoflower feed and training schedule for the small tent I've put together that's really given me consistently quality harvests in limited space. Here's to another week of growth and flower development!

Likes
6
Share
@Lickey
Follow
They are stretching almost out of control. The lights are at their max height without modifying the hanging mechanisms, which I will definitely have to do. They still have another solid week of stretch yet.
Besides that they seem fairly healthy. The runt (1/4) drinks a little more slowly than the others.

Likes
106
Share
@StarLorr
Follow
Welcome to my autø Øpium Diary.
In this Diary:
Seeds: Sponsored by Ðivine Seeðs
Media: Pro~Mix HP *•ns
Nutrients: Remo Supercharged Kit *•ns
*•not sponsored
___________________________
Feeding:
Tue 05Nov: 2L Remo/Recharge pH'd 6.5
Fri 08Nov: 2L Remo/Recharge pH'd 6.5
___________________________
Buds are puffing up nicely
___________________________
Thanks for stopping by, likes and comments are appreciated!👊🏻😎
Keep on growin!
Keep on tokin!!!
😙💨💨💨💨💨
Likes
43
Share
@MadeInGermany
Follow
Hey everyone 🤗
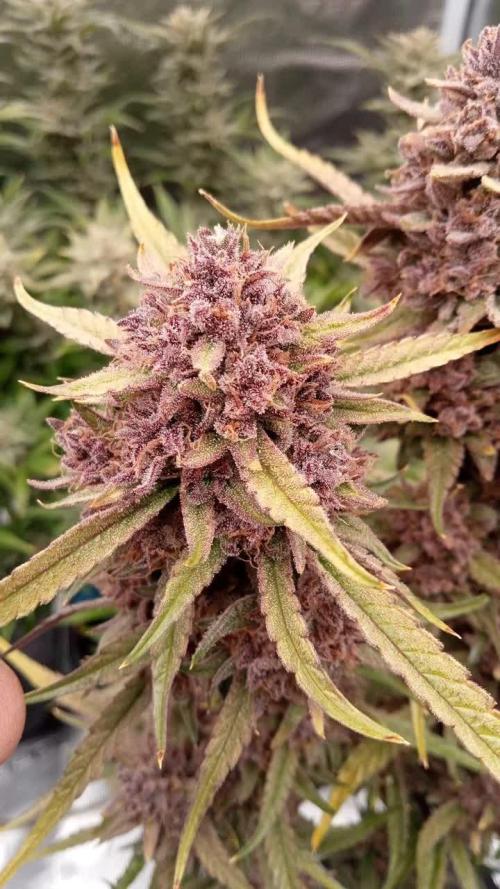
It's getting full of buds 😍. When you open the tent, an extreme smell of gelato wafts through the room 😍.
They develop super fast, look beautiful and hardly stop :-). Next week I'll go down a bit with the Ec.
I wish you a lot fun with the update, stay healthy and let it grow 🌱👌
You can buy This Strain at :
www.Zamnesia.com
☝️🏼☝️🏼☝️🏼☝️🏼☝️🏼☝️🏼
Strain
Gelato clone from mother (Zamnesia )
☝️
Genetics: Wedding Cake x Gelato x Gelato 33
👍
Vega lamp: 2 x Todogrow LED CXB3590 COB 55 W
1 x Sanlight S2W 62 W
💡
Flower lamp : 2 x Todogrow LED CXB3590 COB 55 W
1 x Sanlight S2W 62 W
💡 ☝️
Grow Aero System : Growtool 0.8
☝️
Fertilizer:
Canna Aqua Vega A + B , Canna Aqua Flores A + B , Rizotonic, Cannazym, CANNA Boost, Pk 13/14, Canna Cal / Mag, Canna Ph - Grow, Canna Ph-Bloom
☝️🌱
Water:
Osmosis water mixed with normal water (24 hours stale that the chlorine evaporates) to 0.2 EG. Add Cal / Mag to 0.4 Ec Ph with ph- to 5.5 - 5.8
💦 💧
Likes
6
Share
@justloveweed
Follow
Hello guys.I m in 4th week with this beauty and she looks fine.I was expecting to get more height this week and I think that she flowers too early.I hope I m wrong 😟


