
Likes
Comments
Share


@Roberts
Follow
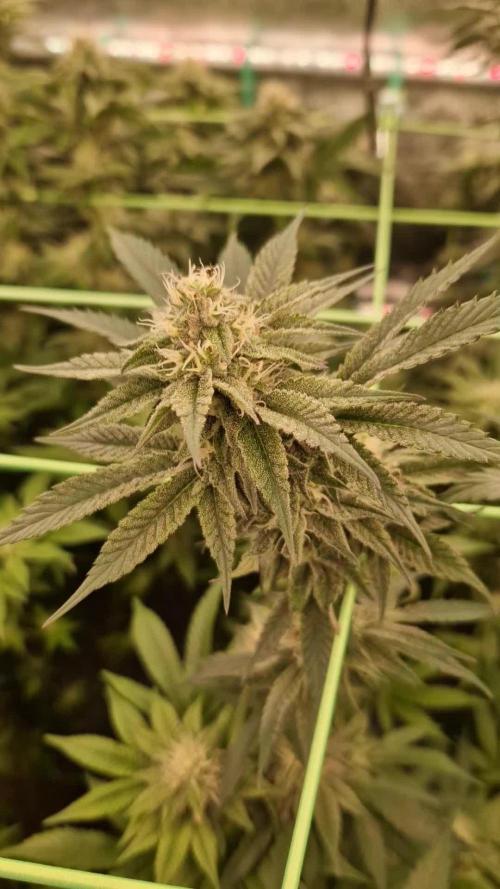
THC Bomb auto has been growing really well under the Spider Farmer 100 watt SF-1000 light. Well on its way to becoming a monster. Has been stretching all week and more signs of flowering are becoming present. Been raising the light as stretching continues. I have increased bloom and bloom booster. Will likely sep nutrition up more in a few days. Thanks again Spider Farmer. 🤜🤛
Thank you everyone in the GD community for your support. Please like, and follow along. Extra thanks to my YouTube subscribers as well. Stay safe everyone, and happy growing 🌱🌱🌱🌱🌱🌱🌱🌱

Likes
8
Share


@smoothbutter07
Follow
Started flush on the taller plant, smaller one is about a week behind from pistil/trichomes Appearance

Likes
24
Share


@ValleoGrow
Follow
So this was the first time doing lst, and the first time i trained Them was def to early, so i might have decressed my yield pretty much but, theyre doing really fine besides the lack of budsides, and i Think still 4 weeks of flower to get faat, and soo beautiful Colors showing already😍😍

Likes
26
Share


@Wicked_Stix
Follow
I really like the colors coming out in these buds. They are getting more purple every day. Looks like they are going to stack up pretty fat too. I spread the plants out a little this week so they get better light and air flow. Other than that I haven't done anything besides keep the reservoir full. Still pumping nutrients 1 minute on 20 minutes off. They are getting .5 tsp maxibloom per gallon. Not going to run any boosters this round. They dont look like they want or need it.

Likes
28
Share


@GrowInger420
Follow
This week was good, she grow nice, but very slow...have a nice week✌️✌️

Likes
39
Share


@Hashy
Follow
Week 6
Light cycle=12/12
Light Power=150w
Extractor controller settings
High temp= 25c
Low temp= c
Temp step=0c
High Rh= 56%
Low Rh= %
Rh step=0%
Speed max=8
Speed min=2
Smart controller settings (during lights on).
Lights on=10.01-21.59
Radiator on= below 21.5c
Radiator off= above 22.5c
Dehumidifier on= not in use
Dehumidifier off= not in use
Smart controller settings (during lights off).
Lights off=22.00-10.00
Radiator on= below 18c
Radiator off= above 19c
Dehumidifier on= not in use
Dehumidifier off= not in use
VPD aim=0.6-1.4
DLI aim=35-40
EC aim=1.9
PH aim=6.2
Tue 30/1/24
#4 (Day 36)(Day 2 flower)
📋
Wed 31/1/24
#4 (Day 37)(Day 3 flower)
📋 H=52cm D=40cm DLI=26.5
🚿 foliar sprayed (Sumo Boost 2ml/L).
Thur 1/2/24
💧💧💧💧💧💧💧💧💧💧💧💧💧💧💧💧
Method= automatic
Feed=water
Neutralise=0.1ml/L
Roots=0.2ml/L
Easy Ph down=0.ml/L
Ec=0.2 PH=6.6/6.6
Time start=12.00pm
Finish time=13.45pm
(11×5 minute runs with 5 minute gaps)
Total flow rate=181ml/min
Flow rate per plant=45ml/min.
Total volume made=14L
Total volume left=4L
Total volume used=10L
Volume per plant=2.5L (Est)
Runoff.
Total runoff=1L
Ec=2.0 PH=6.1/6.2
💧💧💧💧💧💧💧💧💧💧💧💧💧💧💧💧
#4 (Day 38)(Day 4 flower)
📋 H=54cm D=38cm DLI=29.5
Lifted light and increasd power to 196w.
H=54cm D=45cm DLI=31.5
Extractor controller settings
High temp= 25c
Low temp= c
Temp step=0c
High Rh= 56%
Low Rh= %
Rh step=0%
Speed max=10
Speed min=2
Fri 2/2/24
#4 (Day 39)(Day 5 flower)
📋 raised camera, nearly touching the roof.
Sat 3/2/24
#4 (Day 40)(Day 6 flower)
📋 Defoliate a lot of lower leaves.
Sun 4/2/24
💧💧💧💧💧💧💧💧💧💧💧💧💧💧💧💧
Method= automatic
Feed=bloom nutes.
Neutralise=0.1ml/L
Silicon=1.0ml/L
Calmag=1.0ml/L
Terra Bloom=4.0ml/L
Sumo Boost=1.0ml/L
Roots=0.2ml/L
Easy Ph down=0.115ml/L
Ec=1.9 PH=6.1/6.5
Time start=12.00pm
Finish time=13.45pm
(11×5 minute runs with 5 minute gaps)
Total flow rate=190ml/min
Flow rate per plant=47ml/min.
Total volume made=13L
Total volume left=2.5L
Total volume used=10.5L
Volume per plant=2.62L (Est)
Runoff.
Total runoff=1.75L
Ec=2.4PH=5.9/6.2
💧💧💧💧💧💧💧💧💧💧💧💧💧💧💧💧
#4 (Day 41)(Day 7 flower)
📋 HST 1 cola.
Mon 5/2/24
#4 (Day 42)(Day 8 flower)
📋 H=69cm D=30cm DLI=46.0
She has started flowering now. She has grown 20cm during this week, fairly confident I have a good grip on this one and I'll be able to keep her from getting to big. I have seen how this strain can produce massive plants.
Back soon.
Take it easy.


Likes
12
Share

@TrickzGrowz
Follow
Die Blätter sind sehr dunkel grün, der Frost ist beinahe überall! Hätte nicht gedacht das der freebie so lecker aussehen könnte. Wenn man die Finger an den Zuckerblättern reibt, riecht es ganz leicht wie diese künstlichen Melonen Geschmäcker in Süßwaren.
Likes
25
Share


@FrostyCloudzz
Follow
Finaler Grow-Report – Lemon Cherry Gelato
Mein erster legaler Grow mit Lemon Cherry Gelato von Barney’s Farm ist fast abgeschlossen – das Curing läuft noch, aber es ist Zeit für ein Fazit zum Anbau!
Setup & Bedingungen:
Ich habe in einer Spider Farmer 90x90x180 cm Growbox unter der Spider Farmer SF-G3000 (300W LED) angebaut. Als Medium kam BioBizz Light-Mix zum Einsatz, gedüngt wurde mineralisch mit Advanced Nutrients (Grow, Bloom, Micro). Um das volle Potenzial der Pflanzen auszuschöpfen, setzte ich auf Low-Stress-Training (LST) und ein ScrOG-Netz zur optimalen Lichtverteilung.
Keimung & Wachstum:
Die Keimung verlief problemlos – 4 von 5 Samen sind innerhalb von zwei Tagen aufgegangen. Während der Vegetationsphase entwickelten sich die Pflanzen kräftig und reagierten gut auf das Training. Die ScrOG-Methode half, ein gleichmäßiges Wachstum und eine bessere Lichtnutzung zu erzielen.
Blüte & Ernte:
Nach etwa 6 Wochen Vegetation leitete ich die Blütephase ein. Die Pflanzen zeigten eine starke Harzproduktion und eine beeindruckende Farbgebung mit einer Mischung aus dunklen Grüntönen, lila Highlights und frostigen Trichomen. Das Aroma war von Anfang an fruchtig und zitronig, mit phänotypischen Unterschieden in der Intensität.
Die Ernte fiel mit 300-350 g trockenen Blüten sehr zufriedenstellend aus – für meinen ersten legalen Grow ein starkes Ergebnis.
Curing (still in run ):
Aktuell lagern die Blüten in 24 Mason Jars (16oz) und einem 2L-CVault, um das Aroma weiter zu entwickeln. Derzeit dominiert eine zitronige Note, während die erhofften Kirsch-Terpene langsam stärker hervortreten. Mein Ziel ist es, die Haze-Noten möglichst gering zu halten und das volle fruchtige Profil herauszuarbeiten – der Prozess ist also noch nicht abgeschlossen.
Fazit:
Ich bin sehr zufrieden mit dem Grow – die Kombination aus hochwertiger Genetik, gutem Training und präziser Nährstoffversorgung hat sich definitiv ausgezahlt. Die Buds sind harzig, aromatisch und vielversprechend, und ich bin gespannt, wie sich das Curing weiterentwickelt.
Der nächste Schritt ist, das perfekte Terpenprofil zu treffen – und das Curing geduldig zu optimieren.

Likes
17
Share

@Hashy
Follow
Week 7
Light cycle=12/12
Light Power=196w
Extractor controller settings
High temp= 25c
Low temp= c
Temp step=0c
High Rh= 56%
Low Rh= %
Rh step=0%
Speed max=8
Speed min=2
Smart controller settings (during lights on).
Lights on=10.00am
Radiator on= below 21c
Radiator off= above 22c
Smart controller settings (during lights off).
Lights off=10.00pm
Radiator on= below 18c
Radiator off= above 19c
VPD aim=0.6-1.4
DLI aim=35-45
EC aim=1.9
PH aim=6.3
Fri 2/2/24
#1 (Day 43)(Day 5 flower)
📋 raised camera, nearly touching the roof.
Sat 3/2/24
#1 (Day 44)(Day 6 flower)
📋 Defoliate a lot of lower leaves.
Sun 4/2/24
💧💧💧💧💧💧💧💧💧💧💧💧💧💧💧💧
Method= automatic
Feed=bloom nutes.
Neutralise=0.1ml/L
Silicon=1.0ml/L
Calmag=1.0ml/L
Terra Bloom=4.0ml/L
Sumo Boost=1.0ml/L
Roots=0.2ml/L
Easy Ph down=0.115ml/L
Ec=1.9 PH=6.1/6.5
Time start=12.00pm
Finish time=13.45pm
(11×5 minute runs with 5 minute gaps)
Total flow rate=190ml/min
Flow rate per plant=47ml/min.
Total volume made=13L
Total volume left=2.5L
Total volume used=10.5L
Volume per plant=2.62L (Est)
Runoff.
Total runoff=1.75L
Ec=2.4PH=5.9/6.2
💧💧💧💧💧💧💧💧💧💧💧💧💧💧💧💧
#1 (Day 45)(Day 7 flower)
📋
Mon 5/2/24
#1 (Day 46)(Day 8 flower)
📋 H=69cm D=30cm DLI=41.1
Tue 6/2/24
#1 (Day 47)(Day 9 flower)
📋 Looks like the weather is turning cold again over the next few days.
Wed 7/2/24
💧💧💧💧💧💧💧💧💧💧💧💧💧💧💧💧
Method= automatic
Feed=water
Neutralise=0.1ml/L
Roots=0.2ml/L
Easy Ph down=0.ml/L
Ec=0.2 PH=6.6/6.5
Time start=12.00pm
Finish time=13.45pm
(11×5 minute runs with 5 minute gaps)
Total flow rate=190ml/min
Flow rate per plant=47ml/min.
Total volume made=13L
Total volume left=2.5L
Total volume used=10.5L
Volume per plant=2.6L (Est)
Runoff.
Total runoff=1.5L
Ec=1.74 PH=6.6/
💧💧💧💧💧💧💧💧💧💧💧💧💧💧💧💧
#1 (Day 48)(Day 10 flower)
📋 H=76cm D=23cm DLI=48.5
HST 1 cola.
Thur 8/2/24
#1 (Day 49)(Day 11 flower)
📋 H=79cm D=20cm DLI=50.
Raised light 5cm.
Lowered power from 200w to 180w
H=79cm D=25cm DLI=42.
HST 1 cola.
She is real bush. There is 1 cola that keeps stretching higher but I keep bending it down. Development is good and she is coming along at a decent pace. Was showing some signs of light stress. Lifted the light and Lowered the power. Hopefully she doesn't stretch much more because the light is almost touching its support bar.
Back soon.
Take it easy.


Likes
9
Share


@CanarianGrow92
Follow
Alright so i got some guanokalong products to try from my local grow shop, i hope it doesn't screw the plants 🙈 after the last update last week we placed some powders on the soil so lets see how it goes the next weeks!
The strain is doing great, lots of short internodes with big long branches, these plants are full of bud sites! I never tried a kosher strain before but i do think that this seed bank has a great genetics here, im thinking to monster crop this girls to continue the legacy 💪👌

Likes
12
Share


@CheeRz
Follow
Flower week 3 and Lady Runtz still happy af. From now on it'll be fun to watch 💚. I gotta admit that Plagron is so much better than Biobizz. I'll definitely stay with Plagron 💪🏼
Likes
6
Share


@Hemposapien
Follow
Top dressed at the end of week 3. I think I'm going to push these plants to 9 weeks. So I'm top dressing again and 3 weeks. Everything is going as smooth as butter right now..


Likes
12
Share


@Bud_vista
Follow
Welcome to last week, week 11!
Buds getting continuous bigger and she’s smells fantastic tangie-ish! I would loved to chop her in 2025 but the trichome ratio milky to amber is not really there yet.
Update 01.01.26: happy new year to y’all!
Trichomes starting turning amber. I think she’s ready in 2-3 days since m there a little less amber trichomes that I would like to see


Likes
142
Share


@MadeInGermany
Follow
Hi everyone 🤗.
The end of the last remaining women is slowly approaching 😍.
They all look beautiful and will all be ready in the next 6 - 12 days 😎.
I am very excited about the tastes 😍.
I wish you a lot of fun with the diary, stay healthy 🙏🏻 and let it grow 🌱😎


Likes
68
Share

@Roberts
Follow
Auto Northern Dragon Fuel is growing good. She was just lollipopped today. I also selectively defoliated her canopy. She was very bushy and dense with leaves. She is developing well, and should start bulking soon. Nothing more to report at the moment. Thank you Super Sativa Seed Club, and Medic Grow. 🤜🏻🤛🏻🌱🌱🌱
Thank you grow diaries community for the 👇likes👇, follows, comments, and subscriptions on my YouTube channel👇. ❄️🌱🍻
Happy Growing 🌱🌱🌱
https://youtube.com/channel/UCAhN7yRzWLpcaRHhMIQ7X4g
Likes
20
Share


@PureMedicin
Follow
It is getting real bushy in there and i have some thirsty plants. Tent is getting pretty packed and the stretch is on.
I might have to water almost everyday, I suspect them to be on the edge of rootbound. Should have went with 14 liter pots or might even 18.
Smell is amazing and they are starting to get sticky when i pick fan leaves. Defoliation is coming at the end of next week tho. But it is really bushy i have been picking tons of leaves so far. Tempted to strip them sooner than 21 days into flower but we will see.
Likes
7
Share


@HegauHillsFarmers_D23
Follow
In dieser Woche wurde die Pflanze nicht mehr besprüht und die Luftfeuchtigkeit ein wenig gesenkt 💦
Die RP43 ist in dieser Woche sehr gut gewachsen , deshalb wurde die Dünger Gabe erhöht . In der ersten Woche war es ca. die Hälfte ☘️🌱
Ich denke sie wird noch 1 -1 1/2 Wochen in der Veggi sein bevor ich das Licht umstelle 💡