Likes
Comments
Share
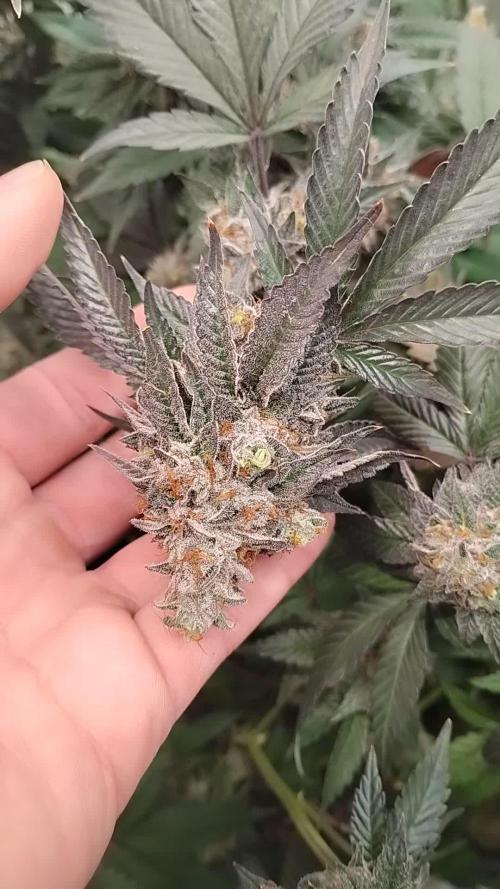
Well my beautiful ladies are stacking on the buds and there are some really lovely buds on there the trichomes are starting to turn cloudy and there are a few Amber but they are not quite ready yet I check them religiously everyday to make sure I don't miss the optimal time to crop there are 2 I believe will be ready first so my plan is to start a 48 hour flush as soon as they give the the final sign So excited to be able to see the finish line now going to decide what plants to do next this weekend. Stay blessed 💚
Likes
10
Share
All doing well added a bigger dehumidifier on day 68. Fed them day 68 will be last feeding for Banana #1 her trichomes are clear nearing cloudy.
Likes
57
Share
@nonick123
Follow
Día 69 (01/07) Riego con 1,25 Litro H2O + Regulator 0,15 ml/l + K-Boost 1 ml/l + CaMg-Boost 0,3 ml/I + TopBooster 0,3 ml/l - pH 6.2 Día 70 (02/07) Riego con 1 Litro H2O + Regulator 0,15 ml/l + K-Boost 1 ml/l + CaMg-Boost 0,3 ml/I + TopBooster 0,3 ml/l - pH 6.2 Día 71 (03/07) Riego con 1 Litro H2O + Regulator 0,15 ml/l + K-Boost 1 ml/l + CaMg-Boost 0,3 ml/I + TopBooster 0,3 ml/l - pH 6.2 Día 72 (04/07) Riego con 1 Litro H2O + Regulator 0,15 ml/l + K-Boost 1 ml/l + CaMg-Boost 0,3 ml/I + TopBooster 0,3 ml/l - pH 6.2 Está acelerando muy rápido la senescencia de las hojas a pesar de que sus cogollos no están maduros (revisión de tricomas con microscopio) También se nota que está llegando al final porque ha reducido ligeramente el consumo de agua a pesar de las altas temperaturas (32 ºC en las horas centrales del día) Día 73 (05/07) Riego con 1 Litro H2O + Regulator 0,15 ml/l + K-Boost 1 ml/l + CaMg-Boost 0,3 ml/I + TopBooster 0,3 ml/l - pH 6.2 Día 74 (06/07) Riego con 1 Litro H2O + Regulator 0,15 ml/l + K-Boost 1 ml/l + CaMg-Boost 0,3 ml/I + TopBooster 0,3 ml/l - pH 6.2 Reviso los tricomas y aún no está lista. A pesar de que que muestra senescencia en las hojas, los tricomas están en su mayoría trasparentes Día 75 (07/07) Riego con 1 Litro H2O + Regulator 0,15 ml/l + K-Boost 1 ml/l + CaMg-Boost 0,3 ml/I + TopBooster 0,3 ml/l - pH 6.2 💦Nutrients by Aptus Holland - www.aptus-holland.com 🌱Substrate PRO-MIX HP BACILLUS + MYCORRHIZAE - www.pthorticulture.com/en/products/pro-mix-hp-biostimulant-plus-mycorrhizae
Likes
7
Share
After a few days I sent the plants to bloom together with others that are in the grows, I am having problems with the insects that I brought with me from the old environment where I had germinated the plants, I am trying to eradicate them but I am not succeeding , the last solution that comes to my mind is to go look for ladybugs, they are predators of these insects, I just don't know where they sell them, if I don't act immediately the plants will freeze and go into crisis!
Likes
22
Share
Slowly tapered the nutes mainly just watering with 1/8 tsp per gal. of open sesame. Since I'm new I'm compiling everything I've read and making an educated guess at how I am supposed to flush these girls for 2 weeks. But simultaneously never just feeding plain water... What do you guys think? How close are we. Need tips
Likes
19
Share
@DrBud420
Follow
13.06. Cherry Poppers 1# Day 49# Cherry Poppers 2# Day 46# The plants are making good progress, the deuce has overtaken the ace, the game has reversed. 5 nights ago there was a strong storm, the morning after the storm when I came to the site, I found some plants crooked, some normal, but there were no broken ones, thank God, but they were very stressed and what you can see in the pictures appeared on the leaves, some leaves were crispy at the edges, but still green, mostly shoots before the newest ones. I haven't had this problem before, I researched a bit on the internet and came to the conclusion that the wind burned them, and I also turned to GW for an opinion, two characters confirmed my opinion. Two days later I noticed that the matter was getting worse and that it was spreading, which worried me, so I contacted GW again for an opinion. Some told me that it was mold, some that it was an infection, disease and so on, mostly guesswork, but no one specifically told me what was certain, so I decided on nim oil, and whatever it is, I guess the problem should be solved. According to some leaves, I would say that insects might be the problem, but I really don't know, I haven't had similar problems before. I regulate the ph of the plants, I still don't feed them, there is food in the ground for another week, except for the fact that I added cal-mag after that storm when I watered them. I want to say that the plants are certainly not locked, and the heat is not yet so high that this would happen from the same, the more the temperatures have dropped and now it is perfect. Since transplanting, I have watered the plants only 2 times. Yesterday morning they were topped for the second time, only the main branches, I will do the next topping of the side branches. Last night I sprayed the plants with neem oil and already today the problem seems to be going away, if I tripped at least it doesn't spread further, that's for sure. I didn't mix the oil very well, I didn't add any soap or anything like that because I wouldn't really spray the plants with any chemicals, and on some of the leaves on one or two plants there is that thick, brownish liquid, so I hope it won't hurt them, I noticed that today during the day, I couldn't see it at night. I still don't know what the problem is, but my guess is still that the wind burned them or some insects. Speaking of insects, I think I noticed thrips on one plant on the underside of the leaf, so in addition to the neem oil I already gave, I also ordered SMC, so I will spray that at least once a week while they are still young. Happy Growing and Stay High!!!
Processing
Likes
142
Share
Hey everyone :-) This week a lot has happened 🤗🍀. The 5 that are already in the 12/12 cycle explode day after day 😍😅. All others have been repotted, and will remain in the vegi phase for 1-2 weeks. Otherwise there is not much to say 😃. I wish you all a good start into the week, let it grow and stay healthy 🙏🏻🍀🌱
Likes
16
Share
Been doing a lots of defoliation in this week(Especially on ETHOS-Lilac Diesel) and all the plant are looking great. Still waiting for the bloom fertilizer and then we will start flowering stage as soon as we received the fertilizers.
Processing
Likes
20
Share
Grow Specs: Breeder: Mephisto Genetics Strain: Cosmic Queen F4 Nicknames: Timantha - CQ1 Genetic heritage: Spacedawg From TGA Seeds x Chemdogging F4 Indica/Sativa: 30/70 Est. cycle time: 65-75 days from sprout Medium: CQ1 = Soil, Mephisto Genetics Super Soil, Worm Castings. CQ2 = Soil, home made Subcool Super Soil variant, worm castings Lights: 132W actual LED Update schedule: I will try to send out the updates every Saturday or Sunday. For more frequent updates, add me on Instagram @grimbolthedruid Grow Schedule to Date: Sprout: 3/1/17 (Full moon) Age: Day 25 as of 3/25/18 Updates/Observations: - Water only for this last week and next. Soil is very hot so I don't need to cycle any of those nutrients down right now. - Plants showing light burns on lower foliage but nothing serious yet. - Trying to keep the soil always slightly moist and never let it dry completely to keep microbes (and by extension the soil) at optimum health. - CQ1 is still miniaturized and has shown sex so I think she is going to finish very small, if she makes it at all. I am worried the hot soil will burn her down because she wont ever get big. - CQ2s leaves show a very strong Sativa expression and I love it. - CQ2 is growing very vigorously. - All plant showing sex (F). Worm Feeding: - This week I fed my worms about a pound or so total of: Banana, mango, dill, tomatoes, carrots, strawberries, aloe filet, green beans, covered in a dash of oyster shell and alfalfa meal. - I layer down some canna leaves, layer diced up worm food, sprinkle dry amendments (kelp, oyster shell, neem, etc.), layer canna leaves, then replace bedding and they are happy! - Creating the food layer protected by the green manure gives the worms a nice buffer zone to move freely through eating as much as they want. - This method is inspired by HerbinFarmer on Youtube. I really enjoy his videos so if you have time, check him out! Cheers! G
Processing
Likes
18
Share
11/30: I harvested the first 6 today, flushed 5 more for the second time, and fed everybody else for the last time. I washed all the branches using the 4-step method ascribed by Doc Bud at High Times/420magazine and many other notable cannabis connoisseurs, with slight modifications: 4 x big plastic totes/bins 8 x ounces of 12% hydrogen peroxide (or 32 ounces of 3%) 2 x cups of concentrated lemon juice 2 x cups of baking soda 10 x gallons of water in each bin Unless your tap water stinks, you're safe to use tap water for the procedure, but I used an inline carbon hose filter to fill my buckets. Bin #1 - 10 gallons of water mixed with the hydrogen peroxide Bin #2 - 10 gallons of water mixed with the lemon juice and baking soda Bin #3 - 10 gallons of water as hot tap water Bin #4 - 10 gallons of cold tap water I was mainly concerned about removing as much lint and cat/dog hair as possible, but also rinsing off any residue left from all the various foliar applications of humic/fulvic acid, kelp, axiom, big bloom, and tiger bloom I did. First, I put my leaf blower on low speed and blasted my plants thoroughly, one at a time, replicating 50-60mph winds for about 10 seconds and watched as a whirlwind of debris and hair flew out the back door. Bud-washing: Pluck any necrotic plant material and any old fan leaves off while they're still on the plant. Then, take a handful of branches and submerge them in Bin #1 for about 30 seconds, agitating it, removing from water, submerging again, agitating, etc...then remove it and let it drip out for a few seconds...then repeat the process with Bins #2-4. Let it drip dry overnight with a little bit of airflow, then dry as you normally would...baskets, boxes, etc.. I hadn't watered these plants in a few days, so they were almost in draught, but after doing this procedure, they were fully hydrated(turgid) and seemed to have brighter colors than before. Nice!😍 12/1: The bottom part of the closet seems empty with only 9 plants in there.. 😟 I cut the harvested plants up and put them into drying baskets in the top of my closet with a small oscillating fan on. I've got the temperature fluctuating between 68f and 75f and the RH is staying between 48% and 52%. To do that, I had to take down the small light in the top of the closet to fit the drying baskets up there. So, I moved the 3 shorter plants still up there down to the bottom and put them on top of buckets. Now the bottom of the closet looks full again!😃 I'm anxious to finish up this grow so I can get busy growing the Fastbuds Fast Flowering Photo Testers!!! When I harvest the next 5, I'll flush the remaining plants really well and that will be all the flushing they'll get..I'll let them dry back out for a few days and harvest them. I've got to make some minor improvements to the garden (adding UV, blue and red/far red booster panels and intake fans) That should put me on track to start germinating them by mid-December if all goes well. 12/3: ...early a.m... The harvested plants are already dry!?!?? And have excellent texture??? Wow..bud washing is for real..roughly 48 hours after I hung them to drip dry, and 40 hours after I put them in baskets in 50% RH/70f conditions with moderate airflow...usually takes 4 or 5 days to get a good slow-dry in the same conditions, so I'm convinced that this must be attributed to the bud-washing procedure. I'm sold! Here's the talley so far: plant #1 - 115g (plus 13g larf) - Candy Cane [F2] plant #2 - 108g (plus 18g larf) - Candy Cane [F2] plant #3 - 119g (plus 15g larf) - C4ndycaine [Candy Cane x C4] plant #4 -  92g (plus 6g larf) - Candy Cane [F2] - the smallest plant in the main area plant #5 - 112g (plus 22g larf) - Candesia [Candy Cane x Amnesia] plant #6 -  75g (no larf) - Candesia [Candy Cane x Amnesia] - grown in upper area under 200w ...afternoon: I flushed 6 of the last 7 plants for the first time today and harvested 4 more of them. I washed them and hung them to dry.....my dripping wet bathing beauties!😍
Likes
86
Share
@Ageddd
Follow
------------------------- | BLUEBERRY HARVEST | ------------------------- After two sunny days it is harvest time !! - Finally, 16 days of flush - At first thought, the trimming would be easier compared to my previous plants, but when removing more leaves, more buds appearing too hahaha so it took like 4 hours or more..It is not the most accuurate trimming but i had not much time that day, i removed all the leaves and branches after weighting it all.. Like i said on the last post, im harvesting having in mind my bud preferences (the later the better), weather, humidity and sunlight, so the first of the cloudy/rainy days she was chopped in the moring, attending the principle of thc regeneration at night.. Got to say that, i wasnt expecting such production (8 days until it was well dried), this plant started as the season saver because the Cheese started to flower in march, revegged etc.. and i have been rewarded with this BB, a true genetic portent !! If i could, i would keep her as mother forever ^^ The quality is awesome, she looks more like a WW talking about that coat of thc.. Flavour without proper cure, is deep earthy at first, transitioning to a fruity, sweet one, it is a pleasure to smoke, delicious sweet aftertaste.. Maybe, this is the last year with this awesome climate, because im planning to leave Spain.. Thank you for follow and check !!! I hope you liked the diary :) Song of the week : Radiohead - Codex Good Vibes GrowDiaries !! ---------------------------------------------------------------------------------------------------------------------------------------------- 000000000000
Likes
9
Share
Week 2 of flower. Blue dream stopped stretching but the holy communion has continued stretching throughout the whole week into the 3rd.
Likes
4
Share
Likes
9
Share
Very nice smell coming from this buds guys! Very good strain to grow, let's see how those buds keep developing, they still have a long way to go! I just cannot wait to see this flowers in a couple of weeks more, I'm only watering using pure water, the FLO Living soil blend provides everything the plant needs and you only have to apply h2o and that's it!. Hope you guys enjoy my work! 🤗👨‍🌾🙏💚💛🧡
Likes
6
Share
Likes
4
Share
Welcome to week 5! Things are progressing along as some plants have started to display sex. I've removed some of the males that have shown themselves so far as we aren't looking to breed this run. Going to let them veg for this week and then I will be flipping the lights to get the flowering cycle started. Huge shout outs go to @MarsHydroLED for allowing me to grow with their kick ass gear! Huge huge shout outs go to all my followers and to the people who stop into the diary alike! Keep on inspiring. -The Projexx Day#29 Ladies are growing along and recovering nicely from the topping , Watered 1.5L from the bottom. Day#30 Plants seem to be doing ok from the water increase. Things moving along nicely Day#31 Pictures N/A. Plants are growing along remove 2 males Day#32 Watered 1.5L from the bottom , Plants arent very happy. I think the issues is i'm not waiting long enough between waterings. I will have to practice the technique more for now I may go back to top watering. Day#33 Pictures. N/A.Top fed 3.5 L each at 550PPM I knew I wasnt giving them enough water. Things are about to change heavy duty now Day#34 Pictures. N/A Plants are ridiculously happy now. Im going to cut away all the dying leaves and flip the lights. Day#35 Pictures N/A Last day of veg for this project. Im excited to see what these plants do in flower! Recap: Things where ruff at the start of the week but by the end we were rocking and rolling again and ready for flower! Wont be long now till we see some real action!
Likes
2
Share
Mon: Day 71: Chopped small plant. Day 73: Watered big plant Day 76: Watered with just phd water.
Likes
37
Share
@m0use
Follow
Plants are chilling, added in some bokashi and dry amendments, not expecting much more from this plant, just needs to finish growing and we can be done.