
Processing
Likes
Comments
Share


Likes
39
Share


@SamDo
Follow
Hello, 1ère semaine, on démarre en douceur, les plantes ont 1 jour, une graine de critical+ 2.0 n’a pas germé, mais cela arrive, je l’ai remplacée aujourd’hui.
J’ai mit vidéos du set up de la box et une qui reprend rapidement les conditions de cultures. C’est mon 1er journal, j’attend vos conseils et vos suggestions bienveillantes.. je ferais un update en fin de semaine...
Update fin de semaine fait. Toutes les graines sont cette fois bien sorties!!👍Il y a donc un léger décalage entre elles, mais aucuns soucis. happy grow!!😎

Likes
46
Share


@Roberts
Follow
Drunken Bitch Slap has been growing great bbn under the Hortibloom Solux 350. I just changed her solution today. She is in the midst of bulking now. Super frosty and sticky buds. It looks like vg it is gonna be a excellent smoke. She probably has about 3 weeks left till harvest. Everything is going great. Thank you Hortibloom, and Aeque Genetics. 🤜🏻🤛🏻💪🏻❄️🌱
Thank you grow diaries community for the 👇likes👇, follows, comments, and subscriptions on my YouTube channel👇. ❄️🌱🍻
Happy Growing 🌱🌱🌱
https://youtube.com/channel/UCAhN7yRzWLpcaRHhMIQ7X4g


Likes
29
Share


@Ultraviolet
Follow
Hope you are well. Thanks for taking the time.
Little main line defoliation to focus growth.
ATP (adenosine triphosphate) is the primary energy carrier in cells, including plant cells. It powers various cellular activities like nutrient uptake, protein synthesis, and cell division. Without ATP, the plant's metabolic machinery would grind to a halt, regardless of the presence of nutrients, oxygen, or carbon. Nutrients, like nitrogen, phosphorus, and potassium, are essential for building plant tissues and various molecules. They are incorporated into proteins, nucleic acids, and other vital compounds. While crucial, their uptake and utilization rely on ATP-driven processes. Oxygen is vital for cellular respiration, a process that generates ATP. While plants can produce ATP through photosynthesis, oxygen is essential for maximizing ATP production in mitochondria through oxidative phosphorylation. Carbon is the backbone of all organic molecules, including carbohydrates synthesized during photosynthesis. It's the fundamental building block of plant structures and fuels. However, its incorporation into organic molecules is also ATP-dependent.
We don't grow we facilitate energy conversion.
Likes
28
Share


@Southofheaven
Follow
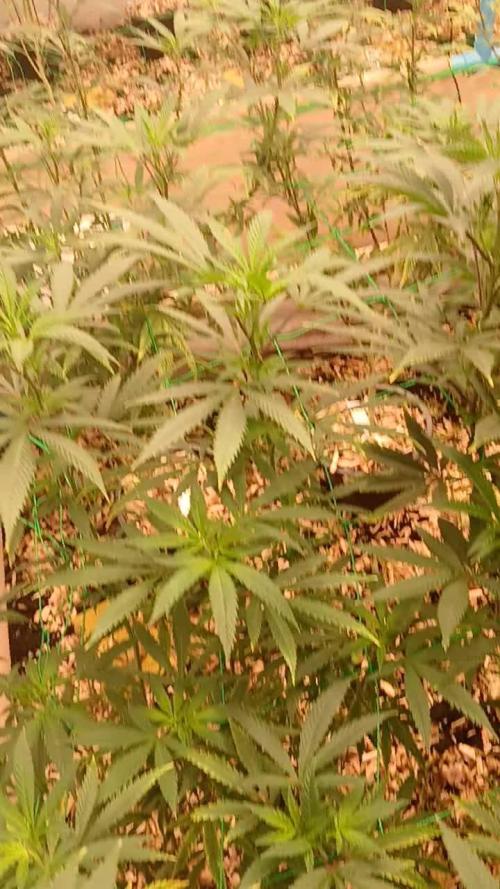
Another week of slowly reaching the harvest date.
Early sugar leaves on tops are showing average 10% amber trics.
Calyxes are swelling with each day, generating dense new trics to still ripen.
Pistils are browning, about 50% now with slight new growth/foxtailing on the tops.
Its getting real smelly.. maybe time for a filter, with a space this confined its gonna be a mission fitting one on.
Fan leaves withering off, no stress.
Buds are becoming dense and are weighing the stems down
probably looking at harvesting in 2 weeks to allow new trics to go cloudy. Hoping to click over 2 oz with this plant but aslong as the smoke is smooth and potent im not worried about yeild.
Cheers boys and girls for checking in, let me know what you think, have a good day 👍

Processing
Likes
17
Share


@Gordy
Follow
Beginning of week 9(Flower):
Plant still isn’t doing much, but she does look damn good. I love this plant.
The entire apartment seems to smell when walking in. I realized I may have had my carbon filter setup wrong. I was pulling air from the grow tent without the filter inside, it would push the air out of the fan and through another duct and then finally into the carbon filter. I feel a lot of the smelly air was escaping this way. Hopefully this makes a difference.
I took a clipping of a sugar leaf today and put it under my 60x microscope. This is my first time really checking on the trichomes, so I could be completely off, but it seems that 10% of the trichomes turned amber. I should be waiting for 30% amber before I harvest this? 2 more weeks I think? I’ll continue to check each week. Maybe I’ll try to get a check mid-week sometime.
It has been 1 week now since I’ve given her nutrients, still looking really healthy.


Likes
Comments
Share

@mawintinner60
Follow
Sprinkle with Kraft to add nutrients and spray the leaves with Epsom salt. The second bed of leaves is starting to recover from the magnesium deficiency.
Likes
17
Share


@Basementganja
Follow
Compared to her sister, this Pineapple Express auto flowered very early!
I LST'd her while I could, and defoliated what was necessary.
She turned out great! Although the yield for this phenotype is at my lower limit for acceptable.
I'm happy that I'm growing a second one, that vegged out longer, making for a much larger Pineapple Express!


Likes
10
Share


@eldruida_lamota
Follow
Que pasa familia, vamos con la cosecha de estas FBA-2506 de FastBuds.
Por dónde empezar, es una autofloreciente que es normalita de cultivar, tiene un periodo corto de crecimiento y de floración igual no es largo.
En cuanto a la alimentación , pues la aplique una vez por semana y a sido suficiente, se a comportado bien en interior, la flor pues no es muy prieta porque no deja de ser una autofloreciente, pero es una flor que va repleta de tricomas, y tienes unos colores morado intensos.
El periodo de luz pues de principio a fin a 18 horas, fue suficiente para completar el ciclo de vida como esperaba.
Hasta aquí todo, Buenos humos 💨💨💨
Likes
13
Share


@Canadian
Follow
The plant continue to grow incredibly strong and fast from now on I well slow down on grow nutrientes cuz the leaves are very dark green and we are well into flowering meaning they don't need that much not nitrogen anymore.
Thank you for reading
I will continue to update have a happy grow.
Likes
3
Share


@ROY4L_GU4RD
Follow
Branches couldn't manage the weight so everything caved in like dominoes smh. I decided to chop on rainbow cake to help with air flow. Humidity is at 45 degrees steadily but im not risking mold or mildew this late in the grow. I added Ripen to the nutrient regimen at 5ml per gallon.


Likes
12
Share
@BettyFlores
Follow
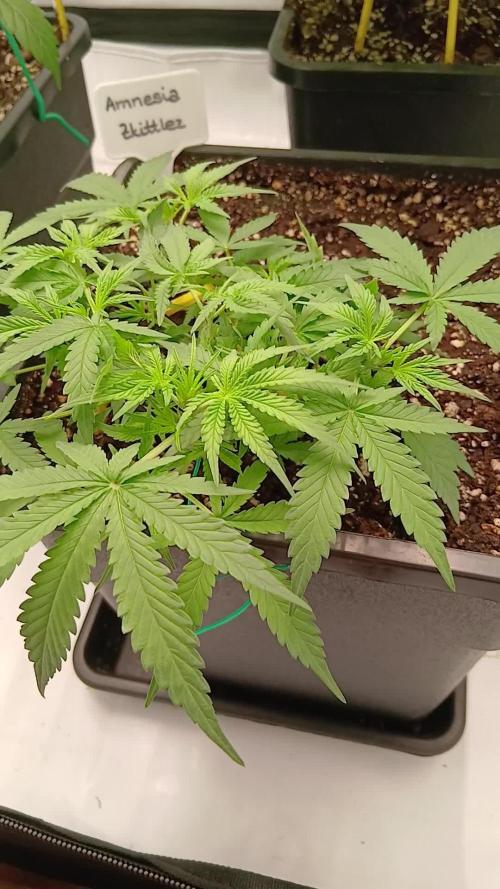
15.08.2025 They started flowering some days ago. They are splendid 🌸
Super-Cropped the Original Afghan Kush for achieving an even canopé, not mentioning the tiny version of Amnesia Zkittlez, which will never reach the canopé of the others.
16.08.2025 Yesterday evening I cropped the main cola of the O. A. K. and this morning 5 am she totally recovered the stem and is standing as before the cropping. Oh, Lord 😅

Likes
88
Share


@Wastent91
Follow
Diciamo che le ragazze dovevano tutte e due arrivare a maturazione, invece io magari stupidamente (anzi sicuramente) ho raccolto due settimane prima la ragazza alimentata con RQS organico fertilizzante,, solo che era in una posizione scomoda, bloccata dalla mia rete per fare scrog, che l ha molto penalizzata e soprattutto l aria da quale parti rimaneva sempre spesso umida e la ragazza ne ha sempre risentito da quando ha iniziato a fiorire, mentre l altra aha continuato il suo sviluppo diventando uno "scherzo della natura *🤣 per grossezza e densità delle cime e delle foglie ritorte accanto piene di resina e sode come fossero cime loro stesse!! 😺 Anche se cmq mi rendo conto che avrei potuto avere risultati migliori con le potenzialità che ho acquisto nel tempo, e spero nella prossima edizione indoor di dare il meglio di me stesso e dimostrare che posso essere all altezza in un paese contrario alla legalizzazione riesco a produrre un prodotto di qualità che ormai sono 3/4 anni mi permette di non dover entrate in contatto con criminalità organizzata per avere due canne da fumare... È questo per me è già un lusso spettacolare che mi posso permettere ma per cui ho sudato, lavorato per anni prima di averlo... Vabbe buon 420 a tutti!

Likes
14
Share

@TrickzGrowz
Follow
Hätte gedacht das die Gorilla Melon mehr stretchen will, aber Sie wächst eher sehr Kompakt. Bin trotzdem schon auf die Knospen gespannt.
Likes
19
Share

@DogDoctorOfficial
Follow
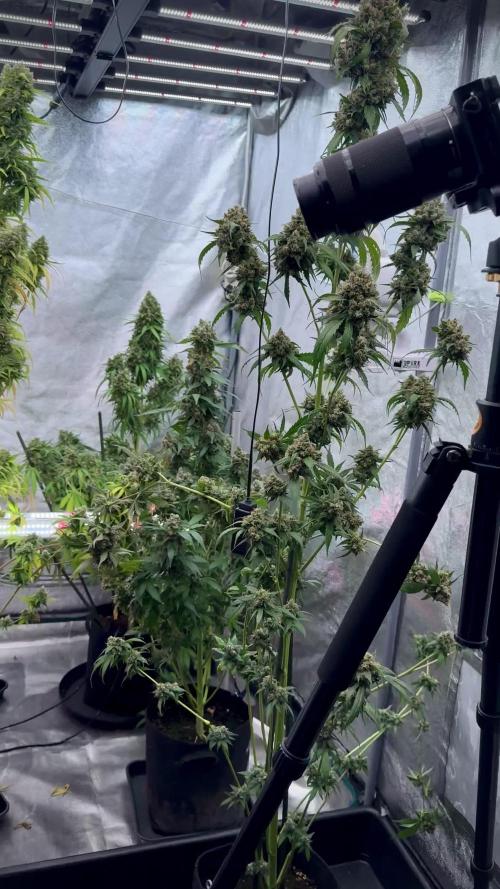
🌸 White Widow — Week 7 Flower (Week 11 from seed)
Status: Full flower, bulking rapidly.
Vibe: Dark foliage, compact form, heavy frost, 90s aroma profile.
Feeding: Aptus + Plagron lineup (Power Buds, Sugar Royal, Green Sensation, Regulator, CalMag, All-in-One)
Photos: Sony a6000 — loyal workhorse for studio shots. 📷
⸻
🧠 Deep dive — Why 12/12-from-seed makes a plant “go hard”
Plants evolved to reproduce. Their primary biological drive is to make seeds. Photoperiod (day length) is one of the most reliable seasonal cues plants use to decide: is it time to flower?
Mechanisms at play (simple → nerdy):
• Photoperiod sensing: Leaves detect day length via phytochrome systems (Pr Pfr). Short days (or the 11/13 rhythm) flip the hormonal cascade toward flowering.
• Florigen & flowering hormones: When the plant senses “short days,” it produces mobile signals (florigen) that travel to the shoot apex and shift gene expression from vegetative growth to reproductive development.
• Carbohydrate reallocation: Energy stops making more leaves/branches and is directed into calyxes, resin synthesis, terpene pathways, and seed/flower tissues.
• Result: A plant that thinks “the season’s ending — reproduce now!” goes all-in: denser flowers, rapid calyx swelling, intense trichome production.
Important point: they don’t know about pollination. The plant can’t tell you whether pollinators exist or whether pollen will land — it simply invests in attractive, resinous flowers to maximize reproductive success. As growers, we exploit that drive to produce potent sensimilla (unpollinated) flowers.
⸻
🔬 Why your White Widow is exploding in quality right now
• Immediate reproductive programming: Starting floral signals early (12/12 from seed) forces the plant to prioritize flower formation rather than vegetative mass. That yields compact, dense colas.
• High PPFD + short day = strong DLI in less time: With fewer hours of light, your lamp intensity is higher in those hours → powerful photosynthesis during the window the plant has chosen.
• Nutrition tuned to flower: the Aptus + Plagron stack feeds the metabolic surge — PK + biostimulators for bulking, sugar stimulators for terpene pathways, Ca/Mg for structural health.
• Genetics: White Widow is resin-happy; give it the right cues and it will frost up like a sugar cookie.
⸻
🌈 Why her colors are going dark (and why that’s beautiful)
Leaf & bud color comes from a balance of chlorophyll + accessory pigments (anthocyanins, carotenoids) and is influenced by:
• Genetic propensity (some phenos are naturally darker)
• Temperature swings (cooler nights often increase anthocyanin expression)
• pH / nutrient balance (some deficits/ratios nudge color pathways)
• Light spectrum intensity (strong red/far-red influence can shift pigment expression)
Dark phenos often correlate with high terpene and anthocyanin expression — visually stunning and often highly aromatic.
⸻
🔁 Quick timeline recap (for newcomers)
• Germination & early mistakes: initial heat-mat loss → restarted, one strong survivor.
• Veg: compact, short internodes under the 11/13/12-12 shuttle → stacked nodes.
• Early flower: slow to show, but once she flipped she committed.
• Now – Week 7 flower (Week 11 from seed): heavy bulking, thick trichomes, deepening color, classic White Widow aroma emerging.
⸻
🔭 What to expect next (this week → next week)
Expect:
• Continued bulking of calyxes and cola weight.
• Explosion of trichome coverage — white, cloudy glands multiply.
• Stronger terpene smell (earthy, spicy, resinous 90s profile).
• Possible color intensification — deeper greens, potential purples depending on phenotype & nights.
Do not expect:
• Major new stretch — she’s committed to flower and will remain compact.
• Immediate harvest — typical White Widow still wants its weeks; plan for patience (mid-late flower bulking happens over several more weeks).
⸻
⚖️ Should you run all seeds 12/12 next cycle? (pros & cons)
You asked if you might run every seed 12/12 — here’s the honest rabbit-hole:
Pros
• Much faster cycle → less time to harvest.
• Compact plants → ideal for small spaces or stealth grows.
• Often denser single-plant yields; less training needed.
• Great for experimentation, multi-strain rapid rotation.
Cons
• Generally lower total biomass per plant vs. long veg runs.
• Some genetics need veg time to express full canopy & branching; yields may be lower for those strains.
• Root systems can remain smaller → may stress under high PPFD if not supported.
• Less flexible for heavy-topping/lst/manipulation strategies.
Bottom line: for strains with good genetics for flowers (like White Widow), 12/12-from-seed can be very rewarding. For sativa-dominant, tall strains you might lose yield without long veg.
⸻
📷 Gear love — Sony a6000 shoutout
I’ve got to echo it: that camera is a workhorse for growers. Compact, responsive, great color fidelity, and perfect for low-light studio shots when paired with proper exposure. The a6000 captures the leaf texture, color depth, and bud gloss in a way phones struggle to match. Long live the loyal shooter. 📸✨
⸻
🙏 Gratitude — the usual and the real
Thank you to:
• Zamnesia — for the genetics & the nostalgia.
• Aptus & Plagron — the chemical & biological push that lets the plant sing.
• ThinkGrow / Future of Grow / TrolMaster — lighting, control, and environment orchestration.
• You — the makers, lovers, critics, curious readers — your energy fuels this diary.
And to our White Widow — for showing up, forgiving mistakes, and giving back in beauty. 💚
⸻
Week 7 flower — Week 11 from seed. Darker colors, heavy frost, the classic 90s scent, and a compact structure that proves 12/12-from-seed can produce absolute fire. We went full-in on Aptus + Plagron, kept the Emerson red-lead sunrise/sunset, and trusted the genetics. Watching her build is pure joy. Come see the series in 4K on YouTube — every detail, every shimmer. 🌿🔥📷 #WhiteWidow #Zamnesia #GrowDiaries #12fromSeed #EmersonEffect #Aptus #Plagron
📲 Don’t forget to Subscribe and follow me on Instagram and YouTube @DogDoctorOfficial for exclusive content, real-time updates, and behind-the-scenes magic. We’ve got so much more coming. You won’t want to miss it.
• GrowDiaries Journal: https://growdiaries.com/grower/dogdoctorofficial
• Instagram: https://www.instagram.com/dogdoctorofficial/
• YouTube: https://www.youtube.com/@dogdoctorofficial
⸻
Explore the Gear that Powers My Grow
If you’re curious about the tech I’m using, check out these links:
• Genetics, gear, nutrients, and more – Zamnesia: https://www.zamnesia.com/
• Environmental control & automation – TrolMaster: https://www.trolmaster.eu/
• Advanced LED lighting – Future of Grow: https://www.futureofgrow.com/
• Root and growth nutrition – Aptus Holland: https://aptus-holland.com/
• Nutrient systems & boosters – Plagron: https://plagron.com/en/
• Soil & substrate excellence – PRO-MIX BX: https://www.pthorticulture.com/en-us/products/pro-mix-bx-mycorrhizae
• Curing and storage – Grove Bags: https://grovebags.com/
⸻
We’ve got much more coming as we move through the grow cycles. Trust me, you won’t want to miss the next steps, let’s push the boundaries of indoor horticulture together!
As always, this is shared for educational purposes, aiming to spread understanding and appreciation for this plant. Let’s celebrate it responsibly and continue to learn and grow together.
Friendly reminder all you see here is pure research and for educational purposes only,
With true love comes happiness. Always believe in yourself, and always do things expecting nothing and with an open heart. Be a giver, and the universe will give back in ways you could never imagine.
💚 Growers love to all
P.S. — Deep dive on DLI (Daily Light Integral) — short, clear, and a little nerdy (in the best way). 🌞🌿
1) What is DLI, simply?
DLI = the total amount of photosynthetic light (photons) a plant receives over one day.
It’s expressed in moles of photons per square metre per day (mol·m⁻²·day⁻¹).
While PPFD (μmol·m⁻²·s⁻¹) tells you instantaneous light intensity, DLI tells you how much light the plant actually used that day.
⸻
2) The formula (how to calculate it)
Use this exact formula:
text{DLI (mol·m}^{-2}text{·day}^{-1}) = frac{text{PPFD (μmol·m}^{-2}text{·s}^{-1}) times text{seconds of light per day}}{1{,}000{,}000}
Where seconds of light per day = hours of light × 3600.
I’ll show worked examples so it’s easy to follow.
⸻
3) Worked examples (digit-by-digit so it’s crystal clear)
Example A — your reported PPFD ≈ 766 μmol·m⁻²·s⁻¹ and 11 hours light
• seconds of light = 11 × 3600 = 39,600 s
• photons per day = 766 × 39,600 = 30,333,600 μmol·m⁻²·day⁻¹
• convert to moles: 30,333,600 ÷ 1,000,000 = 30.3336 mol·m⁻²·day⁻¹
So: 766 μmol·m⁻²·s⁻¹ × 11 h → DLI ≈ 30.3 mol·m⁻²·day⁻¹
Example B — same PPFD but 12 hours
• seconds = 12 × 3600 = 43,200
• photons = 766 × 43,200 = 33,091,200
• DLI = 33,091,200 ÷ 1,000,000 = 33.0912 mol·m⁻²·day⁻¹
Example C — other quick refs
• 700 μmol × 11 h → DLI ≈ 27.72
• 800 μmol × 11 h → DLI ≈ 31.68
• 400 μmol × 11 h → DLI ≈ 15.84
• 1000 μmol × 12 h → DLI ≈ 43.2
(You can plug any PPFD and hours into the formula — those are ready-made reference points.)
⸻
4) What DLI targets are useful for cannabis?
• Vegetative (gentle): ~12–25 mol·m⁻²·day⁻¹
• Flower (typical good range): ~25–40 mol·m⁻²·day⁻¹ — most home/pro growers aim here
• High-intensity/CO₂-enriched commercial: 40–60+ mol·m⁻²·day⁻¹ (needs CO₂, stronger conditioning)
So your example (≈30 mol·m⁻²·day⁻¹ at ~766 PPFD × 11h) sits very nicely in the flower range. That explains the dense bulking + heavy resin you’re seeing — our DLI is right where White Widow loves to convert energy into flowers.
⸻
5) Practical implications — what DLI affects and what to watch
• Higher DLI → higher photosynthesis → more carbohydrate to drive bud bulking and terpene/trichome production.
• Higher DLI requires more water and nutrients. Plants transpire more and pull more minerals; be ready to feed and irrigate appropriately.
• Leaf temperature / heat stress: pushing PPFD up increases canopy energy/heat — keep airflow, VPD, and room temps under control.
• CO₂ matters: if aiming beyond ~40 mol/day, elevated CO₂ (e.g., 800–1200 ppm) becomes productive; otherwise additional light won’t be used efficiently.
• Distribution matters: DLI is an average over the canopy. Hotspots or shaded pockets mean some flowers get too much or too little — even light spread (and PAR mapping) matters.
⸻
6) Actionable tips for your run (based on your 11/13 / 12/12 experiment)
• We’re hitting excellent flower DLI (≈30 mol/day at 766 μmol × 11 h). That’s why buds are dense/frosty — keep the rhythm.
• If you shorten hours (e.g., 11 h) keep PPFD high to maintain target DLI. If you lengthen hours (12 h) you can reduce peak PPFD slightly and still hit the same DLI.
• If you raise PPFD to chase more DLI, ramp slowly (a few μmol/sec per day) to let stomata and roots acclimate — avoid sudden bleaching.
• Watch watering & EC — higher DLI → faster uptake → more frequent but measured feeding.
• If you ever push DLI 40 mol/day consider CO₂ enrichment and perfect VPD control to have that extra light used efficiently.
⸻
7) Quick rules of thumb
• Want to hit ~30 mol/day with 11 hours on the clock → aim for roughly 700–800 μmol·m⁻²·s⁻¹.
• Want ~33 mol/day at 12 hours → ~766 μmol·m⁻²·s⁻¹ matches that nicely.
• If you see leaf cupping/bleaching, you’ve likely exceeded safe PPFD for that canopy or temps are too high — back off, check VPD.
