
Likes
Comments
Share


@EhCndGrower
Follow
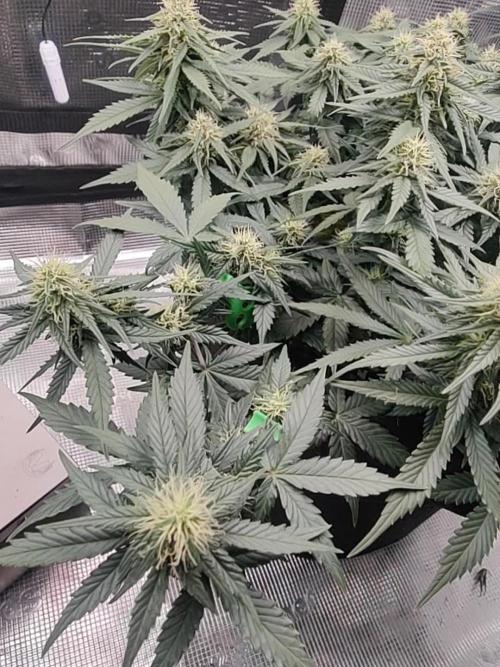
Day 17 and she is growing still a little slower compare to everyone else, but hope the side branching will pick up a bit for training. Keep freaking out thinking I have mites again but I don’t see them on my leaves. Plus I think I have grasshoppers nibbling on all my gals leaves. As of Saturday Fozzy Bear (we wanted it Fozzie but official paper work says otherwise) joined the family and his new big brother Buddy. He has already grown a few inches since we got him but god is he ever cute, and god bless Buddy for taking his playful shit since

Likes
26
Share


@Mrs_Larimar
Follow
2022-10-09
Plant grows lovely!
strong with huge Leaves, shes going to be topped.....
very soon
website for for my Fertilisers:
https://greenbuzzliquids.com/en/shop/
Code: mrs_larimar
Breeder Info:
👉Black Sugar is an indica dominant hybrid of Black Domina, L. A. OG and Critical.
It has kept the medicinal properties of L. A OG, a good flowering rate on the Black Domina lineage,
and the compact size of the classic Critical strain. With its small growth, the strain produces large yields
of up to 600gr/m2 on bushy branches. The buds are very dense and stinky.
Black Sugar has a high THC level. The variety has a fruity citrus aroma. Dense smoke gives the effect of relaxation and body buzz.
Good for Smoking before going to bed. It can become one of your favorite Seedsman strain
Genetics Black Domina x L.A OG x Critical
Harvest 450 - 500 g/m²
Flowering 50 - 55 days
THC 20.0%
CBD 1.0%

Likes
14
Share


@grower1212
Follow
Hoy transplante las 4 RHC a macetero de 3 litros, aproveche de enmendar el sustrato y aplicar QUILLAJA para prevenir plagas.
También les aplique microorganismos estilo drench, si perder una gota de agua.
13-10 han sido regadas sólo con agua desde que fueron transplantadas.


Likes
8
Share


@Pifferson
Follow
This week was fun, had nutrient lockout on the one plant some signs on others.
Decided to flush from the top with two plants which is a terrible idea with autopots; the minerals build up in the soil and all I did was wash them down.
The plant that was looking the worse had some lower branches die after this so I cut them out.
Reached out to autopot and they were a huge help, flushed from the Rez and then brought my nutrients way down. I only just got an ec meter but I was at 3200 ppm when I started the flush and 150 by the time I added nutrients back in.
The two plants that I flushed from the top aren’t in great shape but they’re still alive, only 2 more weeks to go so hopefully this didn’t have too much of an impact on quality!


Likes
22
Share


@bypado_farm
Follow
Day 49:
Watered each plant with 1L with nuts
1568 ppm, 3345 us/cm, 3.3 EC (purple punch, strawberry banana, wedding Cheesecake)
1573 ppm, 3346 us/cm, 3.3 EC
It wasn't me who did the feeding
(gorilla cookies)
2 different feedings for the 10 plants
Day 51:
Watered each plant with 1L with nuts
1562 ppm, 3325 us/cm, 3.3 EC (purple punch, strawberry banana, wedding Cheesecake)
1514 ppm, 3293 us/cm, 3.2 EC
It wasn't me who did the feeding
(gorilla cookies)
2 different feedings for the 10 plants
Day 53:
Watered each plant with 1L with nuts
1632 ppm, 3472 us/cm, 3.4 EC (purple punch, strawberry banana, wedding Cheesecake)
??? ppm, ??? us/cm, ??? EC
It wasn't me who did the feeding
(gorilla cookies)
2 different feedings for the 10 plants
Day 55:
Watered each plant with 1L with nuts
1655 ppm, 3521 us/cm, 3.5 EC (purple punch, strawberry banana, wedding Cheesecake)
2142 ppm, 4557 us/cm, 4.5 EC ?
It wasn't me who did the feeding
(gorilla cookies)
2 different feedings for the 10 plants

Likes
1
Share


@WeedSherpa_420
Follow
Blacked out all windows in the shed and moved Moby Dick plants here from greenhouse to ensure flowering as they are now in darkness for 13 hours uninterrupted. Growing very well for 7 week old. Ran into some nitrogen deficiency problems as these Phenos are very nutrient demanding but still no problems. Will keep in flower for 4 weeks and bobs your uncle

Likes
24
Share


@Kountryboi90
Follow
And here we are! CHOP DAY! This strain has been impressive and smells like a bag of oranges! Oh so lovely! This girl packed on the weight. Several branches are hanging and has caused some side branching to separate from the main stalk(my fault for cutting the scrog net). Will definitely be growing this strain again!

Likes
18
Share


@Hawkbo
Follow
On cruise control now, done some defoliation here and there but that's it, feeding every 2-3 days and they are swelling up very nicely. I took a nice slow video instead of photos of each plant individually below is the order they appear in the video.
1st is 32
2nd is #29
3rd is #35
4th is Orange Sherbert
5th is #31
6th is Wedding Cheesecake
7th is Wedding Cheesecake #2
8th is #37
REMEMBER , IF YOUR SHOPPING FOR GEAR YOU CAN USE THE CODE “BANGDANG” FOR 10% OFF YOUR ENTIRE PURCHASE FROM ANY OF THE FOLLOWING COMPANIES.
@greenbuzzliquids
@rainscience_growbags
@gorilla_grow_tent
@growlightscience.led
NEW* @Rocbudinc Seeds on his website *
*****Gorilla grow tent discounts extend to all companies affiliated with grow strong industries which include..*****
@super.closet
Lotus Nutrients
Kind LED grow lights
Likes
2
Share


@dwotTV
Follow
Transplanted in the afternoon of 10/23 because they were rooting out of the pucks. Got some humidity dome cups coming tomorrow and another inline fan to handle intake to try to dial in things a bit more. Fugue State #2, in the black pot is still a bit shell shocked, hopefully it opens up soon.
Well both #2 and #3 damped off / shell shocked to death, so there's just one left, c'est la vie. #1 is trucking along well and ready for week 2.
Sprayed with Neem Oil on 10/24
Fed Light Fox Farms Blend on 10/25
Treated with NemAttack on 10/26

Likes
26
Share


@MadeInGermany
Follow
Flowering day 37
since time change
to 12/12 h.
Hey guys :-)
The buds have developed incredibly nicely this week.
The smell is getting more and more extreme :-) .
The whole plant itself looks perfect 👍.
The growth has slowly stopped as the full energy goes into the production of the buds.
This week it was watered 3 times with 1.2 l each (nutrients see table above)
They were individually inspected and checked for their health.
Osmosis water for the coming week was refilled in a 100 l tank 👍.
Have fun reading the diary and stay healthy 💚🙏🏻
👇🏼👇🏼👇🏼👇🏼👇🏼👇🏼👇🏼👇🏼👇🏼👇🏼👇🏼👇🏼
You can buy this Nutrients at :
https://greenbuzzliquids.com/en/shop/
With the discount code: Made_in_Germany you get a discount of 15% on all products from an order value of 100 euros.
👇🏼👇🏼👇🏼👇🏼👇🏼👇🏼👇🏼👇🏼👇🏼👇🏼👇🏼👇🏼
You can buy this strain at :
https://www.exoticseed.eu/de/hanfsamen/lemon-candy
Water 💧 💧💧
Osmosis water mixed with normal water (24 hours stale that the chlorine evaporates) to 0.2 EC. Add Cal / Mag to 0.4 Ec Ph with Organic Ph - to 5.8 - 6.5
MadeInGermany

Likes
29
Share


@Grow420pice
Follow
21.01.2022
Läuft sehr gut.
Was ein Dungel!!!
Futter erhöht.
Hier mal ein dickes fettes Lob an Biobizz.
Ich liebe die Produkte!!!
Ich werd nichts anderes mehr verwenden. Geschmacklich sowieso immer top, es kitzelt alle Terpene aus den Pflanzen heraus. Und man hat selten Probleme, die Pflanzen sehen immer sehr gesund aus...
BioHeaven 👍👍👍
Was denkt ihr, kann ich Ende Februar ernten???
22.01.2022
Einige haben kleine leichte rost braune Flecken auf den tops bekommen. Ich werd Phosphor und Kalium nochmal ein wenig erhöhen. Werd auch topmax erhöhen und etwas Alg a mic.
Bis dann growmies
🌱💪😎

Likes
4
Share


@Growstopher
Follow
Fastbuds seeds
LSD-25 auto #2
Only using spring water for first week and spraying with foop mist every night.
Going to be using foop nutrients with Humboldts secret cal/mag and nectar for the gods ph up and down.
Here we go!
Likes
16
Share


@GRow_M8s
Follow
* MephHeads for 1st time, really excited about that.😁
* we're gonna try the LST technique.
~ Grow tent : 1m×1m×2m.
~ Soil : allmix biobizz 65% + Bioterra plus 25% + perite extra 10%.
~ Seedling soil : Bioterra plus
~ 6 plants { 3 Sstomper, 2 GWK n 1 SODK (5 days later) }.
* Only tap water, co2 tablets, microorganisms and snake poison(foliar spray) until week 4.
* No chemicals ✋🛑 only tap water.
● One stomper has issues and its already stressed ( we had to put more soil over it ).


Likes
67
Share


@AsNoriu
Follow
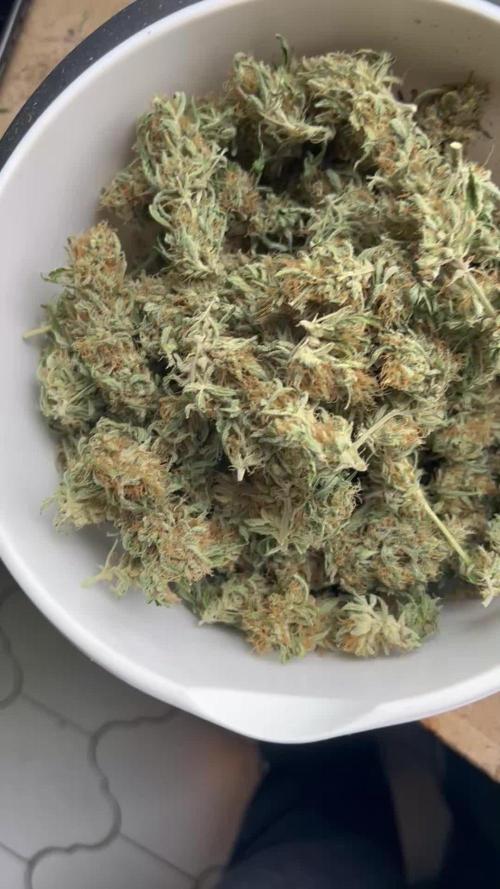
Day 63. She is going down, my fastest ever big healthy plant. Looking at first waves 3 numbers, I think it's not even 2 ounces plant, it's f@cking THREE !!! ;))))))))))))
Day 71. One to jars another for trim jail. Busy day ...
Day 72. After small delay, she went down ;)
Day 82. Straight to vacuum sacs, but she was really great !
Happy Growing !!!
Likes
50
Share

@AsNoriu
Follow
Day 73 since seed touched soil.
Sparkles as THC BOMB should be by name ;)))
See few foxtails starting. Girl started to gain weight, but buds will be small, VERY small ;))) hopefully dense !!!
Tried to wave biggest top to feel how heavy it is - air ;))) BUT , OMG OMG OMG , how lovely she smells , gassy stinks and have few more aromas, mix of Kalini Asia and some good Girl Scout Cookie maybe ... anyways, even if she will be in 50g area - i will still LOVE HER, can guarantee it NOW !!!
Would love to push her at least 14 days more,but looks like she has less in her ...
Mars TSL2000 blasting them really nice, i liked that light, if good air movement and temp control is in , she will deliver LOADS ;)))
Happy Growing !!!


Likes
101
Share


@Grey_Wolf
Follow
Dinafem Cheese
1st week of flowering
10th june 2020
Well after 5 days since switching to a 12/12 lighting regime this lovely girl is starting to bloom. 👌 😃
I gave her a feed of some Blackstrap molasses @ 1 teaspoon / Gallon (mixed with water)
also added in
Ozi Magic Monstabud @5mls/L
She hasn't stretched too much which is a relief to me and I'm now looking forward to watching her buds develop over the coming weeks 😎
the Marigold I planted as a companion has flowered now also and is a brilliant yellow colour
Thanks for stoppinng by 👍

Likes
29
Share


@nonick123
Follow
Día 6 (29/04) Spray solo agua el top del sustrato. DLI 13
Día 7 (30/04) Spray solo agua el top del sustrato. DLI 13
Día 8 (01/05) Spray solo agua el top del sustrato. Subo a DLI 17
Día 9 (02/05) Elimino la cúpula casera de humedad y empiezo a regar con 300 ml solo agua
Día 10 (03/05) Empiezo a luchar con una ola de calor inesperada para esta época, que me trae temperaturas exteriores de 30 ºC y humedad relativa del 30%...
Mantengo la cúpula casera de humedad
Día 11 (04/05) Hace muchísimo calor.. 30 °C. A ver como lo llevan
Hago un invento casero para aumentar la humedad
Día 12 (05/05) Primera alimentación con Aptus! 300 ml H2O + Regulator 0,15 ml/l + CaMg-Boost 0,25 ml/l + Startbooster 0,25 ml/l - pH 6.2
Creo que las plantas se ven un poco pequeñas para tener 12 días... esperando por explosión de crecimiento en los próximos días....
💦Nutrients by Aptus Holland - www.aptus-holland.com
🌱Substrate PRO-MIX HP BACILLUS + MYCORRHIZAE - www.pthorticulture.com/en/products/pro-mix-hp-biostimulant-plus-mycorrhizae