Processing
Likes
Comments
Share
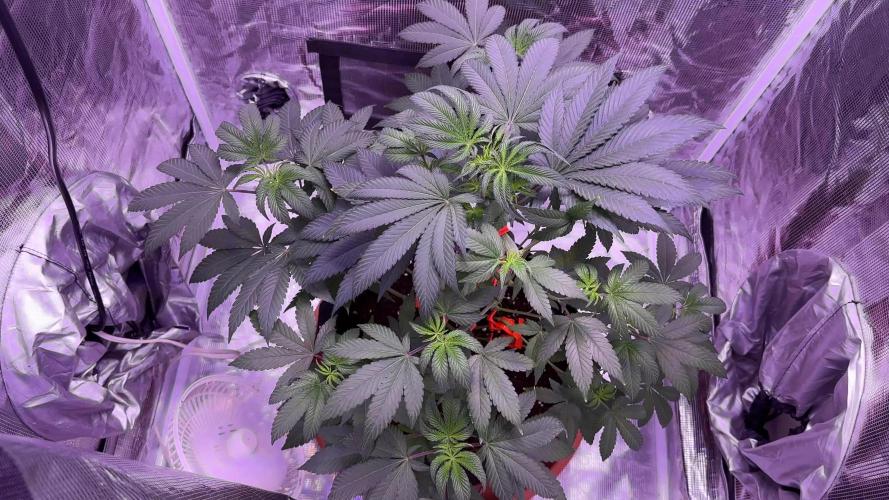
These guys seem to have some stunted growth from being in that shitty rock wool dish setup I had but they are making up for it now that they are in the air pots. I transplanted them into sunshine #4 because my other plants have had problems with N tox in coco loco, the only other soil mix I have...probably won’t ever be using fox farm soil again. Too expensive for what it is and it’s a pain in the ass dealing with nute probs. Day 8: into the new grow tent tomorrow

Likes
55
Share
@Max1973
Follow
Day 79 - Another week passes, not much to post, normal feeding, 1000 ppm 6.2 PH, normal lights, the girls are fattening up nicely...... 😎 Day 84 - some pics/vids.... pics of a Test Bud (ready for curing)......doing some experimentation..... read up about drying and curing, but i don't have a set method, so test abit..... never grown bud before..... 👍 my tent is really small, i think 50x120x160 or something... and it's tight in there, i have no other source of herb, so i'm going to start getting into the smaller one, and focus the light on the larger one..... i've been trimming and drying all during the grow.... there's really only enough room for the big one, and it's really squishy in the tent........ 😎
Likes
5
Share
Did a partial harvest on my 1 frostbanger to let her get abit more light to the bottom. And also im prob gone wash the rest thats still on the plant.
Likes
23
Share
@Northfork
Follow
The harvest of this plant was very well. I harvested it the plant the second week of October the buds were very top-heavy, with minimal, fluffy buds almost the entire plant was useful. I was very happy with the harvest of this blue gelato. also, it is a very stony plant very very strong Indica.
Likes
65
Share
Monday, March1st All Seedlings show up... thats fine I spray them daily with Fast Plants spray and they get a little Water too March 5th Today all showing properly up..... one is older than the others but yeah next friday week 2
Likes
13
Share
@Rene1968
Follow
20-2 a New week. Day 55 Starting week 4 flowering. I feed them now with Plagron 'Green sensation'. The distance light at 62 cm from the plants. PPFD at the middle is 981 umol/s 21-2 Flowering looking well for so far 22-2 I changed power of lamp. PPFD is 1002 umol/s. Past night all the Girls grows 3 cm.
Likes
Comments
Share
@Batista
Follow
We are a couple who decided to plant cannabis for the first time during the covid-19 quarantine, and it helped us get through it, during and after grow =] Before deciding to plant, we studied a lot and saw many diaries here, so we didn't have many surprises during the cycle, also because we were able to see, compare and know what to expect from our plant. It was really cool to see the result of what we had studied happening in practice, we learned a lot from Grow Diaries. Definitely we will do a lot of different things next time, but overall we were satisfied to be able to smoke our own weed. Grow diaries helped and motivated us a lot, both to learn new things and to organize and register our grow. Our intention is to continue growing and sharing our experience here. Weed love you to leave comments and tips in our diary, it helps us to learn and improve more and more. Thanks and see you all next grow! 👽😜👌
Likes
92
Share
Week 10 - Second Week of Flowering 🌸 As week two of flowering begins, the garden’s growth is unstoppable! These ladies are thriving, stretching up while staying beautifully vibrant and green. Every inch of this tent is optimized—each plant is soaking up light, nutrients, and water precisely as they need, filling the room with energy. Room Conditions 🌡️ • Temperature: 27.3°C • Humidity: 62.6% • CO₂ Levels: 800 ppm • VPD: 1.36 kPa (excellent range for robust flowering) • Lighting Intensity: 818 PPFD Solution & Medium 💧 • Solution Temp: 21.5°C | TDS: 470 ppm | pH: 6.02 • Medium: Moisture 100% (recently dried to 67%), TDS 510 ppm, Temp 22.5°C The “dry-out” to 67% was a strategic move, helping boost nutrient uptake and root strength. Meanwhile, our slight increase in reds seems to be having the desired effect, nudging these ladies further along in the flowering process. Eye Safety & LED Lighting 🌞🕶️ With powerful LED systems like the ThinkGrow and ICL-300, eye protection is critical. LED grow lights emit high-intensity light across the full spectrum, including intense UV and infrared components that are not easily detected by the human eye. Long-term exposure without adequate protection can lead to eye strain, and in extreme cases, damage to vision. • Blue Light Hazard: LEDs often have elevated levels of blue light, which can harm the retina over time if proper precautions aren’t taken. • UV Protection: Even low doses of UV can accumulate and harm eyes, so grow glasses with UV protection are essential for any indoor gardener. Investing in quality grow room glasses can help protect from glare, UV, and infrared rays, making plant care safer and more comfortable. Lighting Enhancements: ICL-300 In-Depth 🔆 The ICL-300 is our newest addition, specifically designed for inner canopy illumination. This LED offers a targeted light boost under the canopy, enhancing flower growth in lower and shaded areas—ideal for maximizing yield and light efficiency. • Dual Spectrum Technology: The ICL-300 provides a custom spectrum designed to penetrate deeper into the plant canopy, promoting robust bud formation throughout. • Enhanced Light Distribution: With strategically positioned diodes, the ICL-300 reduces shadowing and balances light distribution to all parts of the plant. • Energy Efficiency & Heat Management: This light is designed to be energy-efficient, running cooler and reducing the risk of heat stress within the grow space. The inner canopy light gives the plants exactly what they need, particularly during the flower stage when bud sites deep in the canopy can benefit from more direct exposure. However, after noticing slight leaf burn on some plants, I’ll hold off a bit longer before fully integrating this light to ensure optimal adjustment. Looking Forward 🌟 As we continue dialing in conditions, it’s all about balance, precision, and taking proactive steps to optimize every aspect of the grow environment. We’ll keep a close watch on the canopy height, and next week, I’ll aim to fine-tune the light integration even further with the ICL-300. P.S. - ICL-300 and CO₂ Sensor 🌱 The TrolMaster CO₂ Sensor (MBS-S8) has been crucial for real-time CO₂ adjustments, ensuring the plants get exactly what they need without constant monitoring. Combined with the ICL-300’s spectrum flexibility, these tools make an unbeatable setup, allowing for nuanced control over plant growth and development. As always, a huge thanks to the Grow Fam for the tips, support, and enthusiasm! I’m excited to see what these next weeks will bring as these plants reach their full flowering potential. Stay tuned for more updates, and don’t forget: eye safety first, growers! 🌞🌿 Discount Codes so you can save big on your next check out 💚💚💚 Kannabia - DOGDOCTOR 30% off SeedsmanSeeds - DOGDOCTOR 10% off CannaKan- DOGDOCTOR 15% off terpyz.eu - DOCTOR 15% off The Neutralizer - PORKIT5-DOG 15% off As always thank you all for stopping by, for the love and for it all , this journey of mine wold just not be the same without you guys, the love and support is very much appreciated and i fell honored and so joyful with you all in my life 🙏
 With true love comes happiness 💚🙏 Always believe in your self and always do things expecting nothing and with an open heart , be a giver and the universe will give back to you in ways you could not even imagine so 💚 Friendly reminder all you see here is pure research and for educational purposes only Growers Love to you all 💚💚💚
Processing
Likes
68
Share
Hi guys, I have a power outage in my village for 2 hours on the V+4 😒 but it's ok don't have problem. 👍 just a little trick I see she needs more ratio of air humidity, I put a plate with water in it to see with the heat if it evaporates. 😀 i have cut the head on the day 11. switch to 18/6 on the day 12
Likes
43
Share
🍼Greenhouse Feeding BioGrow & Bio Enhancer ⛺️MARSHYDRO The ⛺️ has a small door 🚪 on the sides which is useful for mid section groom room work. 🤩 ☀️ MARSHYDRO FC 3000 LED 300W ☀️Also special thanks to VIPERSPECTRA P2000 (200W) & XS2000(240w) LED growlights 🌱 FASTBUDS 420
Likes
5
Share
Finally bud sights day 38 from seed 👌🏾🤞🏾
Likes
2
Share
Likes
23
Share
Week 14 marks a special chapter for Nectar Drip. What started as a straight 12/12 from seed run has turned into one of the clearest side-by-side lessons in plant behavior this room has given us so far. Same room, same feed, same light cycle, same genetics—but two very different approaches, and now two very different outcomes. From seed, this run was split in philosophy. One Nectar Drip was trained early and shaped by hand. The others were left almost entirely untouched—no topping, no real intervention, just leaf tucking and enough space to do their thing. That contrast became the real experiment. By now, the result is hard to ignore: in this format, under 12/12 from seed, the less we interfere, the more the plant seems willing to give back. The trained plant stayed smaller, stacked tighter, and never fully matched the natural size or output of the untouched sisters. Still beautiful, still resin-heavy, still absolutely worth growing—but clearly the most reduced expression of the group. And that made the decision easy. This week, the trained Nectar Drip became the chosen plant for fresh frozen. Not because it underperformed—but because it offered the perfect candidate for something different. Smaller structure, dense flower, extreme resin coverage, and a terp profile too loud to ignore made it the obvious pick to sacrifice to the wash. Rather than drying it traditionally, the whole plant was harvested and frozen immediately to preserve the volatile compounds exactly as they were on the stem. That means this one is no longer headed for jars—it is headed for ice, agitation, and eventually bubble hash. For anyone unfamiliar with the process: “fresh frozen” means harvesting the plant and freezing it immediately after chop instead of drying and curing first. This preserves more of the volatile terpenes and allows the resin to be processed later into solventless extracts—most commonly ice water hash. In simple terms: instead of smoking this plant as flower, we freeze it now so we can wash it later and separate the trichome heads into hash. Same resin, different destination. And if any plant in this run deserved that treatment, it was this one. Even as the smallest of the group, it was dripping in frost from top to bottom. Thick trichome coverage, greasy heads, sticky stalks, and that unmistakable oily feel when touched—the kind of resin that tells you immediately this cultivar has extraction potential. The aroma made the decision even easier: fruit up front, skunk underneath, something creamy in the middle, and a strange almond-like edge that keeps showing up every time the flower is handled. Loud, weird, greasy, and complex—exactly the kind of profile worth preserving in fresh frozen form. The remaining plants are still standing, and this is where the room shifts into its final phase. At this point, the living Nectar Drips are no longer being fed in the traditional sense. This week is water only, using collected rainwater and reclaimed dehumidifier water, with a small amount of enzymes to help break down remaining organics in the root zone. No more push. No more force. Just clean hydration, natural fade, and enough biological support to keep the substrate active while the plants finish at their own pace. It is the final reduction phase now—less input, more observation. And the plants are responding exactly the way they should. Fade is accelerating across the room now, and this is the kind of late-flower senescence we want to see. Fans are pulling color, chlorophyll is retreating, and the plants are beginning to cannibalize what remains in reserve. This is not deficiency panic—it is end-of-life behavior. The engine is shutting down naturally. Energy is no longer going into leaf production or structural growth. Everything is being redirected toward resin, ripening, and final flower maturation. Morphologically, that means the stretch is long over and the architecture is locked. What we are seeing now is finish work. Calyxes will continue to swell. Bracts should tighten. Resin heads will continue shifting from clear to cloudy. Aromatics will intensify. Leaf mass will continue fading back. Water uptake will begin slowing. The flowers are no longer building size the way they did two weeks ago—they are building finish. And that finish is already obvious. Buds across all remaining plants are dense, compact, and far heavier than their frame suggests. The untouched plants especially proved the point this run has been hinting at from the start: in this style of cultivation, less handling allowed for stronger vertical development, better natural structure, and ultimately more productive flowering sites. No topping, no recovery, no unnecessary stress—just uninterrupted forward motion. The difference is visible now in both size and final output. What happens next is simple: patience. There is no hard harvest date yet, and there does not need to be. From here forward, timing belongs to the trichomes. Right now, heads are mostly cloudy with very little amber present, which means we are entering the harvest window—but not fully inside it yet. Clear means early. Cloudy means peak THC. Amber means degradation begins shifting the effect. Until those heads begin showing the level of amber we want, these plants stay standing. So now we wait, watch, and let them decide. The room is loud. The flowers are greasy. Frost is everywhere. The fade is beautiful. The smell is ridiculous. Fruit, skunk, cream, funk, and something strangely nutty underneath. Sticky, oily, loud, and getting louder by the day. Nectar Drip has been a special one. Big respect to TICAL and Zamnesia for this collaboration—this cultivar has been loud, unique, and unforgettable from start to finish. Huge thanks as always to everyone following along, whether you have been here since day one or just landed in the diary this week. To the regulars, the silent watchers, the growers, the learners, the curious ones, the supporters, the skeptics, the OGs, the new faces, the lovers and the haters—thank you for being part of the ride. Big love to GrowDiaries for giving growers a place to document the process, and respect to every sponsor and supporter helping keep this garden moving. One plant went to the freezer. The rest are headed for the finish line. 📡 DELETED @ 1K Please stay tuned.we never quit https://www.youtube.com/@TheDogDoctorOfficial NEW 🙏 Thank you for your patience and continued support. FOR DISCOUNT CODES AND MORE JUST FOLLOW THE LINK https://website.beacons.ai/dogdoctorofficial 📲 Don’t forget to Subscribe and follow me on Instagram and YouTube @DogDoctorOfficial for exclusive content, real-time updates, and behind-the-scenes magic. We’ve got so much more coming, including transplanting and all the amazing techniques that go along with it. You won’t want to miss it. GrowDiaries Journal: https://growdiaries.com/grower/dogdoctorofficial Instagram: https://www.instagram.com/dogdoctorofficial/ YouTube: https://www.youtube.com/@dogdoctorofficial Deleted by Youtube - https://www.youtube.com/@TheDogDoctorOfficial NEW Vimeo : https://vimeo.com/dogdoctorofficial Under construction stay tuned ⸻ Explore the Gear that Powers My Grow If you’re curious about the tech I’m using, check out these links: 🔆 Lighting & Environmental Control • Future of Grow — Advanced LED lighting technology https://www.futureofgrow.com/ DISCOUNT CODE: DOG20 • Lumiflora — Under-canopy LED lighting https://lumiflorade.com/ • TrollMaster — Environmental controllers and automation gear (past collaboration) ⸻ Genetics • Zamnesia Seeds — Genetics used in this project https://www.zamnesia.com/ ⸻ 🌱 Soil, Substrates, Boosters & Root Support • Plagron — Substrates, bio mixes, and supportive products https://plagron.com/en/ ⸻ 🎒 Storage, Curing & Preservation • Grove Bags — Curing and storage solutions https://grovebags.com/ ⸻ 📸 Photography Equipment & Tools (Not sponsors, but part of my creative toolkit) • Sony A6700 • Sony full-frame macro lens + few more • Stacking photography workflow - learning • iPhone (for behind-the-scenes shots) We’ve got much more coming as we move through the grow cycles. Trust me, you won’t want to miss the next steps, let’s push the boundaries of indoor horticulture together! As always, this is shared for educational purposes, aiming to spread understanding and appreciation for this plant. Let’s celebrate it responsibly and continue to learn and grow together. With true love comes happiness. Always believe in yourself, and always do things expecting nothing and with an open heart. Be a giver, and the universe will give back in ways you could never imagine. 💚 Growers love to all 💚 📸 P.S. – The Eye Behind the Lens All photos in this diary (for now — except for the ones showing the camera, which I took with an iPhone) are taken with a Sony A6700 paired with a Sony full-frame macro lens and a few more. Photography is part of the story — it’s how we share the fine textures, the glow, and the quiet details that words can’t always capture. I’ve also started experimenting with photo stacking — a technique where multiple images, each taken at a slightly different focus point, are layered together to create one perfectly sharp image from front to back. It’s not digital enhancement or AI; it’s pure photography — a way to reveal the plant’s beauty in microscopic depth, from trichome to petal. You’ll even see a few shots of "ghost me" capturing the shots — camera, lens, setup — because every grow deserves not just to be cultivated, but documented like art. FOR DISCOUNT CODES AND MORE JUST FOLLOW THE LINK https://website.beacons.ai/dogdoctorofficial NEW DISCORD - Official Server Invite Link : https://discord.gg/ksjAkA5T74
Processing
Likes
4
Share
Likes
90
Share
Aug 6th - Jack gets fed today; 3 gallons first meal w/all bloom nutes. Aug 7th - Whats happened is I have taken 2 of the smaller Colas from the back of the plant, and brought them Forward and out the front, low. They are official branches but they were really limited in that location. So down in front they, or it may even look a little lollipopped - Foliar feed tonight @ sundown - Kelp Meal worked into the Compost at the surface - Pistils are present on all branches, its Flower 🌸 time Aug 8 - 4 branches took off the last couple days, and they were levelled for the last time Aug 9 - plant looks great today, pic attached - Foliar spray tomorrow if possible. Then only 2 more next week finishes the fulvic acid / epsom salt addition through the leaves before proper flowering begins week 3 - next meal posted above; w/ Molasses (tomorrow) BUT, rain is forecast for the next 2 days, so the meal can wait. I have put some fresh compost on the base of the plant… 10th - massaging a few of the branches, and what a smell of Lemon - evening, heading right into Flower, I defoliated lower Nodes up to 29” and any obvious shadow makers - super-cropped a couple smaller branches at the half-way mark on the cage. Front & Center. Now they will participate 11th - looks strong - last 2 cups of liquid phish poop added to the compost 12th - solid rain overnite, more predicted. Looking at Sun/Mon feeding (15th/16th) - last Foliar Spray this morning b4 the heat or rain kicks in… and b4 too far into flower. Foliar spray is now done.
Likes
1
Share
Likes
11
Share
Was really worried the whole time through out my grow as I am a Newbie and this was my first grow. Thanks for all the help provided by users on growndiaries. Much appreciated. Had great result from my solo cup. 12.6 grams of dried bud. Time for curing and let that smell build up. Fingers crossed will taste better but smells amazing. Zesty smell when crushed. More confident for my next grow. Hopefully will be more fun and relaxing growing.
Likes
Comments
Share
Englischversion below Deutsch: Tag 16 Veg: LST und Topping sind die Schritte die jetzt anstehen. LST muss täglich wenn nicht sogar mehrfach täglich ausgeführt und kontrolliert werden, um zu gewährleisten, dass die gewünschte Pflanzenstruktur erstellt wird. Wie auf den Bildern zu sehen ist, hat die Dame vorne links weniger Triebe. Beim Training hat sich einer bereits verabschiedet (Durch Unachtsamkeit) und ein Trieb entwickelte sich einfach nicht und wurde entfernt. Beim LST versuche in jeden Trieb in eine eigene Richtung zu biegen und dann senkrecht zum Boden auszurichten. Ich warte noch 2 Tage bis zum nächsten Topping - zum einen, damit der Stress auf die Pflanze verteilt wird, zum anderen weil der Wachstum einiger Triebe der schwächeren Pflanzen noch nicht so weit sind. der VPD liegt zwischen 0.44 und 0.68 - für die frühe Wachstumsphase ideal - das ist auch am Wachstum der Pflanzen zu erkennen. Tag 17 Veg: Heute früh wurde zum 2ten Mal, diesmal an der ersten entstandenen Nodie, getoppt. Nur bei den Obeneren Trieben wurde gewartet, da diese noch zu jung waren. Warum habe ich trotzdem die unteren Triebe getoppt? - Erstmal macht es sinn den hohen Stress auf ein paar Tage zu verteilen, außerdem möchte ich eine Gewisse Struktur erreichen. Vor und nach der überliebenden Nodie sind Erdanker gesetzt um die Triebe in Position zu halten. Tag 19 Veg: Heute gibt es wieder ca. 1-1,2L Flüssigkeit mit 6,3 PH und 1ml Cal-Mag für jede Dame. Dabei wird das Wasser in 125ml Schüben nach und nach verabreicht, bis ein leichter Drain von ca. 100ml zu erkennen ist. Tag 20 Veg: Dem Wachstum der Pflanzen ist zu entnehmen, dass sie das letze Topping verarbeitet haben. Die neuen Seitentriebe legen nach und nach zu. Hier ist es wichtig, für eine Gute Struktur, regelmäßig mit LST zu intervenieren. Auf den Bildern von Heute sind die Pflanzten vor und nach dem LST zu sehen. Auch einige Blätter, die die Triebe bedecken, wurden entfernt. Die ganze Energie soll in den Wachstum der Triebe geleitete werden. ---------------------------------------------------------------------------------------------------------------------------------------------- Day 16 – Vegetative Phase: LST and topping are the next steps to be carried out. LST needs to be performed and monitored daily, if not several times a day, to ensure that the desired plant structure is achieved. As can be seen in the images, the plant at the front left has fewer shoots. During training, one shoot was lost due to inattention, and another shoot failed to develop properly and was therefore removed. During LST, the goal is to bend each shoot into its own direction and then orient it horizontally to the ground. I am waiting another two days before the next topping. This is done partly to distribute stress more evenly across the plants, and partly because the growth of some shoots on the weaker plants is not yet sufficiently advanced. VPD is currently between 0.44 and 0.68, which is ideal for the early growth phase. This is also reflected in the visible growth of the plants. Day 17 – Vegetative Phase: Early this morning, topping was performed for the second time, this time at the first newly formed node. Only the upper shoots were left untouched, as they were still too young. Why were the lower shoots topped anyway? First, it makes sense to distribute the high level of stress over several days. In addition, a specific plant structure is intended to be achieved. Before and after the remaining node, ground anchors were placed to keep the shoots in position. Day 19 – Vegetative Phase: Today, approximately 1–1.2 L of liquid was applied to each plant, adjusted to a pH of 6.3 and supplemented with 1 ml/L Cal-Mag. The water was administered gradually in 125 ml increments until a slight runoff of about 100 ml was observed. Day 20 – Vegetative Phase: Based on the plants’ growth, it is evident that they have recovered from the last topping. The new side shoots are progressively gaining vigor. At this stage, regular intervention with LST is essential to establish and maintain a well-structured plant architecture. In today’s images, the plants are shown before and after LST. In addition, several leaves covering the shoots were removed so that energy is directed entirely toward shoot growth.