
Likes
Comments
Share


@Lordviper28
Follow
These lady's have real good except error on my part with one that ended up herming out but got it out tent before it could do anything but rest have since to gotten way better and are filling out nicely and my mania she still the best looking ggxww I got initially got about a week left before the ready to be chopped down have been flushing for almost two weeks ph has been at 6.5

Likes
53
Share


@Mastr
Follow
Week 11 come along and she finished nicely I already flush her now i just feed her with water and bloombastic
and take off all fan leaves to bud recive more energy I will chop her down at day 75 so not long left
Today day 72 and guys she is ready but I don't wanna rush so let her 3 more days to get best results

Likes
20
Share


@the_curious_grower
Follow
the stretch has begun. in just 9 days the flowers are gonna start to form. i've been trying to give the plants more support. i placed a bunch of Bamboo through the cages to support the branches and placed a net on the smallest plant. ( the net's holes were too small, so i cut it up. only problem, since i can't reach the other plants that well i can't do the same for them. yet.) i'm working on it, i haven't had that much of time lately to work on the plants and the weather isn't helping either.
most of the plants reached the height of 180 centimeters and maybe 190 before flowering. curious how big they will become when it all starts.

Likes
6
Share


@TheSurfBud
Follow
Flowers are shaping up nice and phat.
Very sweet smells, leaves are fading out.
Always following High Powered Organics Gro-dirt Gro-Guide
@highpoweredorganics or
www.highpoweredorganics.com for more info


Likes
2
Share

@Aleks555
Follow
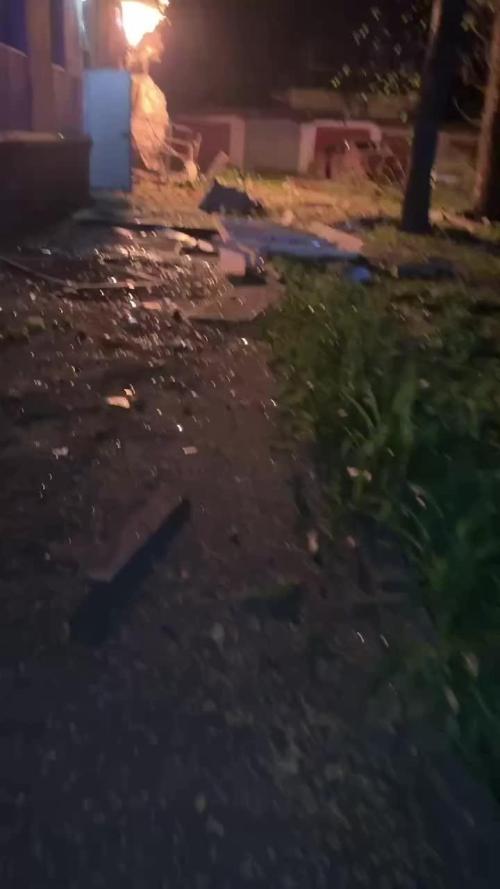
⚠️ MOMENT OF IMPACT — RUSSIAN SHAHEED DRONE HIT OUR APARTMENT ⚠️
Hello everyone. Please watch the video until the end. The footage captures the exact moment of the explosion and the aftermath inside and outside of our apartment.
We survived by pure miracle.
🔊 Watch with sound on.
⚠️ Warning: the video contains strong language and distressing scenes.

Likes
14
Share


@MrGrowthSpurt
Follow
Today is the last day for these babies. Week 9 flowering day 2. It is a 10 week flowering strain. So I am early by about 1 week. The trichromes are right where I want them to be, mostly cloudy with a bit of amber. It has been a smooth grow. No issues at all, it is my 3rd time growing this magnificent strain, and will not be my last.
Based on my previous 5 grows, each plant yeilded roughly 1 oz give or take. I'm expecting to double that. I will be pleasantly satisfied if I yeild 8oz or more.
Stay tuned for pictures of the harvest and the update on yeild amount.

Likes
90
Share


@AsNoriu
Follow
Day 50. Had big plans, but postponed them to monday/tuesday. Will strip and heavy bend/lst girls, give them 5 days and i think they will be ready for flower.
Increased light power output from 50% to 70%. Girls got water with 0.5 ml/l Fish Mix.
Overtimes and all weekend at work stops me a bit, but work is work ...
Day 54. Girls got heavy training, started it even too late, leaves were too droopy. All went good, while last one was done, first were somewhere "happy" ;)))
Pure water.
Think to send them to flower this weekend.
Day 55. And like nothing happend ;))) All girls are happy and bushy, one or two days, darkness and FLOWER TIME ! ;)
Happy Growing !


Processing
Likes
2
Share


@Valedor
Follow
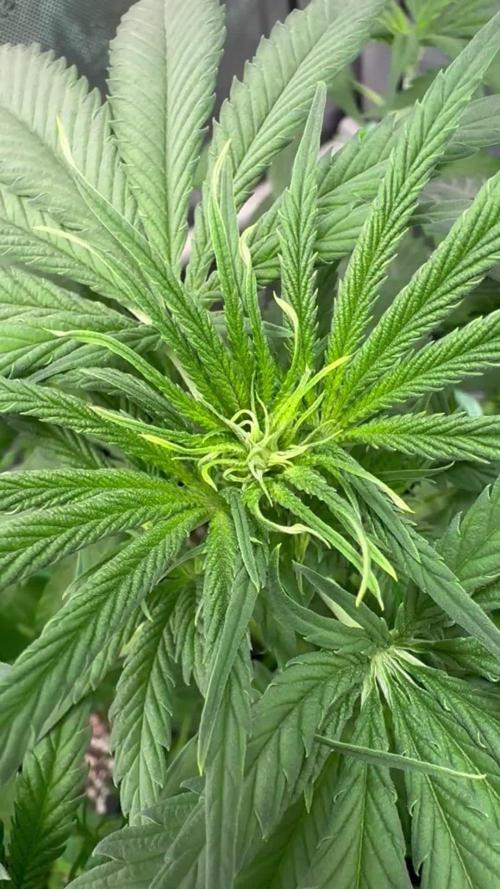
semana de crecimiento de tricomas, ademas las flores presentan un crecimiento muy bueno, ya están madurando de verdad, el próximo cultivo lo documentaré con fotos mas claras, he aprendido mucho de tenerlas en hidroponia, me gusta y lo voy a seguir usando y explotando


Processing
Likes
42
Share


@Gabarram
Follow
03/12/2019 Day 81 The Dr seems to be concentrating in forming buds but I think she's grown some half centimeter, is she going to touch the ceiling? She has to know that is is confined and the sky is not the limit, at least in her condition.
Day 82 (04-12-2019) The shoot at the rear left is almost touching the celiling of the grow tent😨 and i keep on tying other shoots and keeping them the farthest from the burning lights (many leaves' tips are scorched, but fortunately it's just the tip and the bud is still far from that hot point. Other leaves that are close to the lights, well, I took scissors and there's no need to speak further. Look the hard work I'm having with this plant height's issue. Goddammit why can't I have a normal grow like everyone?
Day 83 just looking the video and the pics is self explanatory. No further comments 😒
Day 84 Ithe tallest shoot has reached the ceiling and seems to try to keep on growing so she needed to start bending at the very top because she wouldn't get past the tent fabric.
Regarding EC, I am using a fertigation solution about 1,3 mS/cm and the runoff EC at 1.5 mS/cm. EC has been kept controlled since I raised fertigation volume to 6 L per fertigation event (1/day), unfortunately this solution containing nutrients goes to waste :(
Day 85 07/12 I'lllst the tops that get to touch the ceiling and keep observing and acting as needed. I fear she'll stilll keep going up for a while. Fertigations as usual, got runoff EC 650 ppm today (1.3 ms/cm) which I think it's very good of a value.
Day 86 (08/12/2019) Following advice I defoliated and even cut some thin and improductive shoots. Removed a lot of foliage and even supercropped a long tall shoot, I want to see how this high stress technique affects her. Because I plan to keep it doing if other shoots decided to continue growing.
I wonder why do shoots continue growing vertical after having passed the light's level. Is it the glow coming from the reflective walls perhaps? Many questions.
I decided to take down some tall shoots by suspending little weights near the tip, it seems to work more or less fine.
Day 87 luckily the HST seems to have worked fine, the shoots are recovering and point upwards again. The main tip is quite unruly, today I supercropped that tip. Runoff EC is 650 ppm, perfect.
Day 92 /14-12-2019) I think that despite her exaggerate growth she's managing to thrive fine with some limitations, buds seems going well. Shoots are still growing vertical but supercropping and resistance seems to have hampered her a while, but now I see she engaged on growing some centimeters more :/
Day 93 two days from starting the 14th week, despite the lights and the heat of this season (added to the lights I had to keep the tent door open for there was 32 ºC inside) the Dr is taking it well, I see the buds foxtailing as I expected, and I'm positive this grow will get to a good end. I'll work day by day to achieve that. Regarding fertigation, I gave her a solution half concentrated (relative to the solutions that I had given her the preceding days) because I noticed salt build-up by the EC measurements. I left run off EC at 800 ppm which is still a bit high for my liking but not excessively. For the amount of runoff I collected today, I see she seems to be drinking a little more.


Likes
29
Share


@Grow420pice
Follow
21.01.2022
Läuft sehr gut.
Was ein Dungel!!!
Futter erhöht.
Hier mal ein dickes fettes Lob an Biobizz.
Ich liebe die Produkte!!!
Ich werd nichts anderes mehr verwenden. Geschmacklich sowieso immer top, es kitzelt alle Terpene aus den Pflanzen heraus. Und man hat selten Probleme, die Pflanzen sehen immer sehr gesund aus...
BioHeaven 👍👍👍
Was denkt ihr, kann ich Ende Februar ernten???
22.01.2022
Einige haben kleine leichte rost braune Flecken auf den tops bekommen. Ich werd Phosphor und Kalium nochmal ein wenig erhöhen. Werd auch topmax erhöhen und etwas Alg a mic.
Bis dann growmies
🌱💪😎

Likes
25
Share


@ImLegitMn
Follow
Day 21 of flower week 3 everything is smelling really great can’t wait for the end here! Update at day 24 and a short video.


Processing
Likes
16
Share


@Max1973
Follow
Day 63 - haha.... mazar are lookin pretty good... one of the ssh was male, so
one of the mazar got moved into a big 19lt, IWS DWC Oxipot .......... lol
just kept it in the same established plastic top/basket, and just put it straight into the top of dwc pot....
fits ok, so there's no disruption to the roots..... 👍
fans arrived, 20w :)
just slowly moving along nicely.... not in any rush ... so just let em keep veggin...
might top em, or something... try to get their stalks alot stronger....
Day 66 - 2 vids... topped em, lookin good ...
👍😎


Likes
8
Share


@R1pp3r
Follow
Sigue manteniendo su misma altura, pero se ah estirado bastante a los lados.
Ah llegado a expandirse unos 8cm aproximadamente a los lados ya lleva unos 53x53 cm aprox

Likes
119
Share


@Roberts
Follow
I just dropped Divine Indica. I scuffed the seed, and dropped it in water. I will place in the rockwool in 24 to 48 hours. Thank you Divine Seeds, and Spider Farmer. 🤜🏻🤛🏻🌱🌱🌱
Update: the first seed failed. Starting a second.
Thank you grow diaries community for the 👇likes👇, follows, comments, and subscriptions on my YouTube channel👇. ❄️🌱🍻
Happy Growing 🌱🌱🌱
https://youtube.com/channel/UCAhN7yRzWLpcaRHhMIQ7X4g

Likes
2
Share

@Aleks555
Follow
We are starting the cultivation of a new, fast-growing strain Creamy Beast Turbo Feminized from Seeds Mafia. The seed was germinated in a paper towel and sprouted within 24 hours. Afterward, we carefully planted it in a 1.6-liter pot filled with a specially prepared soil mix: 50% soil, 10% perlite, and 35% coco substrate.
The daytime temperature is 28°C, nighttime temperature is 21°C, and the humidity is maintained at 65%. The light schedule is set to 18/8.
A big thank you to Seeds Mafia for providing the seeds, we're excited to see how it develops!
Likes
51
Share


@Chumpkilla
Follow
12/30/23 - Day 54 - Hello All! I started this week a day early. I wanted to update everyone on something I have been thinking about a lot. Curing. I feel if there was a hole in my growing skills it would be curing. Last grow there was more than I had anticipated. I was not set up for curing 1 lb. I threw in an audible at the last minute. It worked out but I know I can improve with some trial and error and hands-on experience. So after reading a ton, and going off of some of my prior builds for drying, I came up with this design.
I have a controller that will turn the air on and will run when the contents inside the box hit whatever RH% I want to set it at. I think the first week I will set it for 78%RH, then every couple of days go down a % until I hit 62%.
The thought is that if the bucket gets above the set RH% then the air will kick on and distribute air across the buds until the RH% is back down to where you want it. It will force the humidity out. I won't need to worry about burping. It will happen on its own.... in theory.
Ill update tomorrow with some pictures after the water change.
12/31/23 - Day 55 - Everything is looking good. The water change completed this morning while I was in the shower. Its adding nutes now and will do so over the next hour or so. She is starting to get stinky. I had to add the extra carbon filter to the room. I've got some pics up top of that.
Happy New Year! Next time I post it will be in 2024! Have a great night and be safe! Dont drink and drive, your life and anyone else involved in an accident is too important! C' YA!
1/4/24 - Day 58 - I have been thinking of trimming her for a while.... I got a comment on the bushy-ness and I got self-conscious and gave her a trim. Lol I have been going bath and forth for a while and that gave me the push to give her a little trim.
She looks great and is growing really quickly. Ill update with more pics as it goes along.