
Likes
Comments
Share


@ngenius
Follow
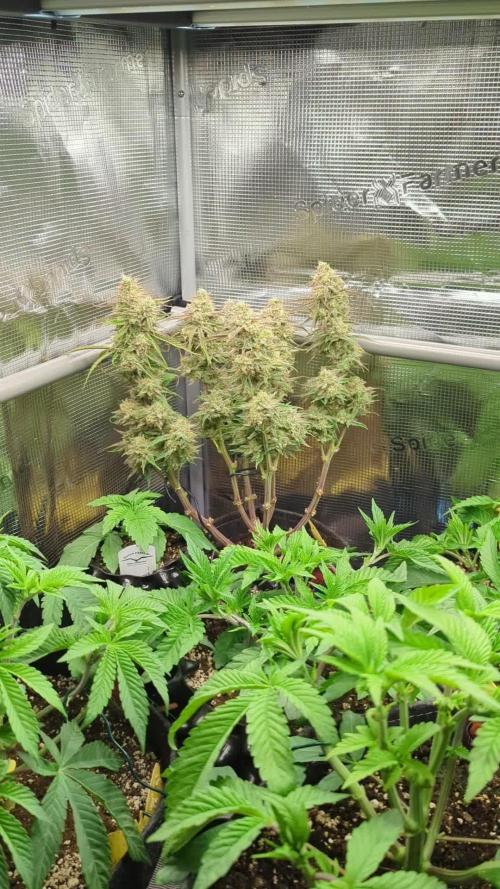
Day 26 and things are still looking really good , been giving the girls LST as much as i can , I also got rid of a couple of leaves that were really blocking the budsites.
But overal the girls are reacting well , the mega power plant auto is already showing some signs of flowering since she is starting to produce her first pistols on her nodes.
Make sure to drop a like or leave a comment guys !!
I would love it if i could win newbie of the month with this BUDGET BUDGET grow ! 😁
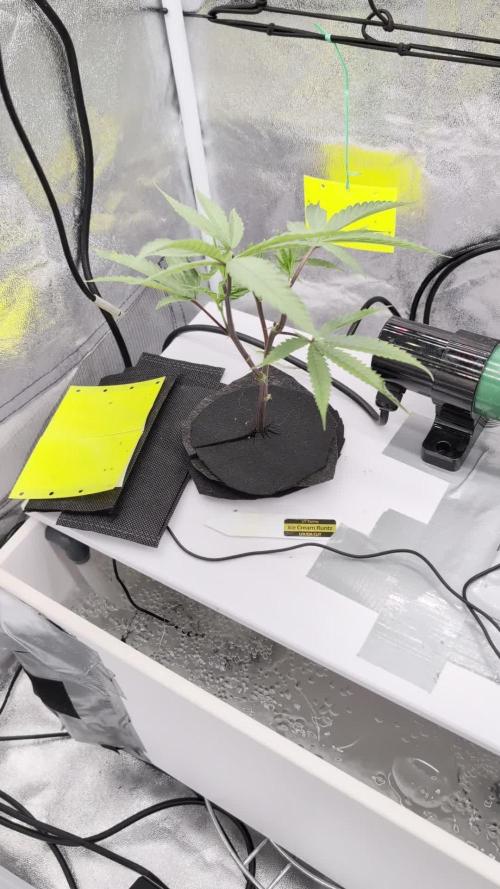
Day 16 from germination.
A spaceship landed in front of my house today.
Some weird green creature comes out of the craft ,hands me a box and takes back of on the spaceship.
So ofcourse im wondering what it is ...
I open it and there it was , the mars hydro ts600.
A gift from the gods !
Hung it up in my tent straight away.
So in total i have the mars hydro ts600 hanging and the mastergrow 600w wich pulls about 130wats.
With both hung up i total 230 wats maybe a bit more.
Still think i have to wait 1 more day before i can give them some water and top dressing.
Make sure to follow me or this diary, leave a like or a comment.
you may also part some of your wisdom to me if you wish to.
Happy growing guys !😁✊


Likes
8
Share


@Grow_for_Happiness
Follow
End of week 6 and the girls are looking great! Gave them a good defoliation first day of the week (day 41 from seed) because I couldn't get the humidity below 65%. Glad I did, they were so bushy and lots of little branches in the middle, now so much cleaner and much much more airflow. Not sure if because of trimming but they barely grew this week. Blueberry is typically a bit shorter though so may just be the strain. Three plants look very similar with one plant looking 5-7 days behind. Starting to see colour starting already might be some beauties coming!
Watering 3 liters a day per plant, just chugging along as the buds come in.
Light up to 90% at 18" hitting 700umol/s.
UV running 1 hour per day mid cycle
4" intake running around 60%
6" exhaust running 40%
Upper oscillating fan 40%
Lower oscillating fan on Low


Likes
75
Share


@Secretflower
Follow
Bonjour mes amis,
💨 Le 18 Mai..Jour N°98 💨
🌻 Flowering Day 33 🌻
5ème semaine de floraison pour mes trois Original Glue Feminisées..
Franchement en une semaine c'est abusé comment les buds ont grandi.
Cette génétique c'est de la balle..
Ça commence à sentir très bon..😘
💉 : je ne change rien..👍
🔦 : Quantum Board 480 watts à 100% de puissance et à 40 cm de la canopé.
www.weedseedsexpress.com
Voilà c'est tout pour l'instant mes amis, merci beaucoup d'être passé voir mes chéries, hésitez pas à Sub et je vous suivrai en retour.
Prenez soin de vous et de vos proches.
Je vous souhaite que du bonheur avec vos plantes..😘
À bientôt..💨💨

Likes
5
Share

@PapaTerps
Follow
AlienZ Automatic - Greenhouse Seed Co.
Day 89 - watered with 3L of RO tap water, mixed with the defined nutrients in order and then pH'd to 6.3.🚿 She's in week 8 of flower now and I think this will be her last diary entry before harvest! I gave her a good defoliation today to remove most of her remaining fan/larger leaves as she doesn't need them anymore, I've also completely removed all nutrients from her feed, anything defined is from her very last feed - she is now just on plain RO water 👍🏻 she will be watered maybe twice more this week, before I leave her to completely dry back, at which point she will be harvested🌸✂️. She was really enjoyable to grow and smells lovely and floral, with hints of candy and earth, lots of vibrant colours too!


Likes
8
Share


@Listening2thestatic
Follow
Welcome to week 3 of my tiny pot grow....
Herbies just been chillin' taking in the sites and smells of the grow tent. Livin' his best life.
Plant is coming along fantastic! A few nodes have started to appear. Will probably be able to start training by the end of the week. Still just watering every other day when dry with 1-1/4 Oz.
Day 26,
Start of the LST! She bent.....
White pistol hairs shooting out of the top new growth. We are either are in flower, or very close to it.
Day 28,
She's in flower and recovered well from the LST.

Processing
Likes
7
Share


@Bills1995
Follow
Everything going as planned. Will take more pictures soon.day 85(getting phatter)


Likes
5
Share


@Capzinator
Follow
Week 6 is starting well, and the bloom seems to hit heavy on all of them, but espacially my Strawberry-Gorilla. i still have issues with big differences by temperatures, but i found now the possibility to keep it at least above 15 degrees at night. dont want to see the electric bill, but this grow is worth it.
im giving all 2-3 days water, rotatory clean water and with nutritions.


Likes
41
Share


@ClubRiot
Follow
Start week 5 , Bio Grow 2 ml/L + Sensi Cal-Mag Xtra 2 ml/L + Alg-A-Mic 2 ml/L + CarboLoad 2 ml/L + Bio-Heaven 2 ml/L + Bio-Bloom 1 ml/L ( Ph 6.5).
Likes
1
Share

@Highsenberg82
Follow
I thought the plants would grow a bit faster, but I also pruned a lot of shoots. The root mass is now increasing rapidly on both plants, and this time they're staying white and healthy. I think the light penetration into the reservoir is lower, the oxygen supply is better thanks to the new air pump, and the Athena Cleanse from the start is also helping. Now I need to figure out the best power setting for the new lamp and the exact setting for the sweet spot. The temperatures should finally rise, so I can soon do without the radiators. It's still much too cold in the basement.
I am always grateful for advice and tips from experienced growers. 😉
Especially growers with experience using Athena: is IPW worth it ?
04/26/2026
Damn. Another stupid accident caused trouble. 😡😡 One of the green radiators rolled over to the Sour Fraise and burned the stem of the plant. All the bark is gone all the way around.
I cut the plant above the burned area, treated the stem with Clonex gel, and placed it in a rockwool cube soaked in a cloning mixture according to the Athena scheme.
Let's hope it works.
Likes
4
Share

@sunshinegroww
Follow
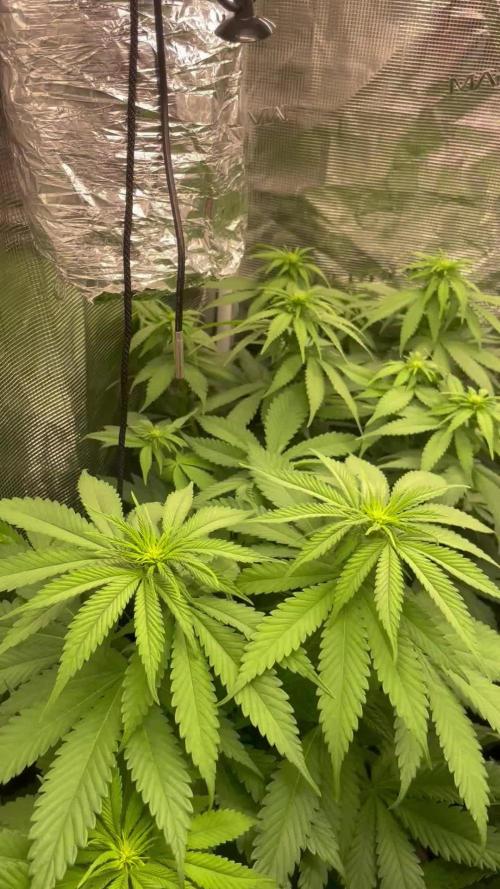
Very good and healthy looking i think stretch is kinda over and i can clean her up in few days ao she is ready to start pump those flowers lets gooooo

Likes
11
Share

@MrGrowDiarie
Follow
Day 42 – Vegetation
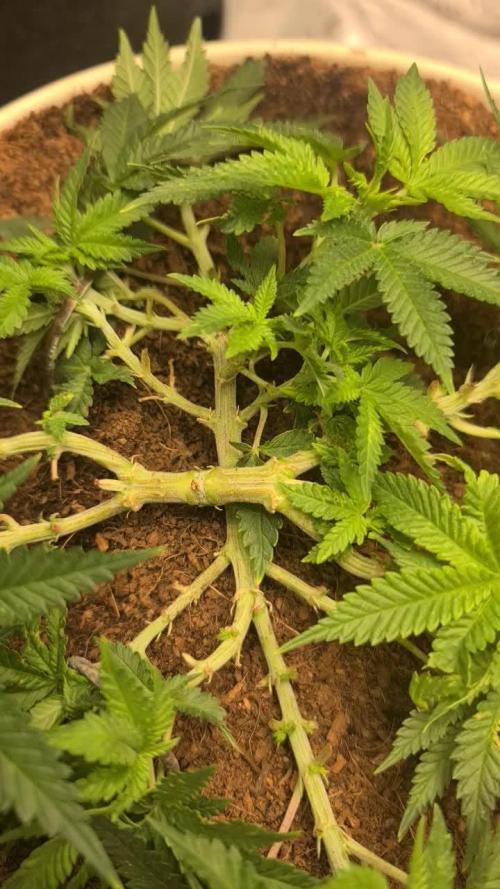
This plant is looking well-trained and spreading out beautifully! The main stem has been opened up with some strong LST, allowing light to hit every single top. New growth is healthy and vibrant green, with multiple bud sites forming along the branches.
The structure is flat and even, creating an ideal base for a wide, productive canopy. No signs of stress from the training – she handled it like a champ. Over the next few days, she’ll keep focusing on filling in those gaps and building strength before the flip to flower in 6
Likes
19
Share


@MrGrowMan
Follow
week 20-21
1 nutrient water
1 non nutrient water
LsT and Scrog
Diesel and Mimosa Harvest
day 62 start 12/12 light period (genetically damaged plants)
2 break up cake day 67 start flowering
17.03 day 130 Left flush.
21.03 day 134 Right Flush.


Processing
Likes
17
Share


@MoneyGrowup
Follow
Growing slowly, growing organic. Lights are still on 12/12 due to my first grow that's still finishing up can't wait to switch the light schedule to 18/6 to see the growth

Likes
38
Share


Likes
2
Share


@Mr_nugs_lover_David
Follow
Very sticky snd dense nuggets,tons of resin in this autoflowering strains, they are high quality, as you guys can see both wedding cakes auto by original sensible seeds have the exact same resin production, very frosty both, very sticky and big fat main colas with all the buds from the lower plant are also fat, dense and sticky, just a dream come true 💎 very good automatic strain, doesn't even looks like an auto, super sticky and a very pure and strong aroma, she's been fed with only organic dry amendments by guanokalong complete organics and seaweed powder and florganics that's how I prepared her soil. Thank you so much everybody hope you like another diary of frosty cookies 🍪🤤🍭🌸✌️💚❤️

Likes
28
Share


@TheHighentist
Follow
Welcome to week 7! Maybe the last week before harvest, i will keep an eye out for the trichomes in the end of the week
👽👉 21/11 Water day*
They got the same dose as last week, and flush might come soon.
👽👉 22/11 Lower humidity 40-45
👽👉 23/11 I got a cheap Scrog net to support the heavy tops and correct the canopy spread.
👽👉 24/11 Water day* Start of flush
Moved the light a little bit closer
👽👉 25/11 The Frost, The Smell and The Trichomes are telling me, we are getting close to harvest
👽👉 26/11 Changed the humidity to be extra low the last days of their cycle.
👽👉 27/11 Water day* Flushing
Likes
17
Share


@OrganicBuds030
Follow
Mir gefällt Melonade Runtz bis jetzt sehr gut. Sie hat einen schnellen Wachstum und macht den Anschein als würde sie dicke fette Buds produzieren. Ich bin sehr gespannt wie dieser Run wird. Bis jetzt hatte keine Pflanze irgendwelche Mangelerscheinungen. Stabile Genetik von Dutch Passion 💚