
Likes
Comments
Share


@Bub1972
Follow
Just starting the 3rd week, I’m at 1/2 strength on the nutrients, will be changing water and nutrients every Saturday. Looking good. Roots coming thru. So far so good coming into second weekend of clean water and more food on Saturday. Really starting to get full. 8/18 Fresh water and nutrients today and both topped. Finishing out the 3rd week all topped and ready to bush out.

Likes
5
Share


@Creatorknbsland
Follow
Última semana magica de cores ! Temperatura baixa = flores roxas! Logo mais colheita dessas flores roxas e cheirosas!ate breve

Processing
Likes
2
Share


@BigHorn
Follow
This week had some growth but it has definitely slowed but the smell has gotten more potent. At the end of this week I will be harvesting this beauty. I will post weight and pics when I do. I will be flushing the plant the night before than harvesting the flower.


Likes
4
Share


@dfgh95
Follow
I watered them with 250ml and 400uS/cm each. I use the photone app to meassure the luminosity and they are receiving 7000lux aprox.
They are all doing well. Although Juana has grown more than de others, they all look pretty happy so far.
I plan to increase the light intensity at the end of this week since they won´t be babies anymore sooner than later.
Today 22 is second week last day and they are starting to grow noticeably each day.
This week I raised the EC to 400uS/cm and watered the plants with 250ml, so I just had to water them again with plain ph balanced water one more time during the week and that was practically it with watering.
I also raised luminosity by switching 2 more LED bulbs and getting them all closer to the canopi, about 50cm. that is about 10000 lux in the meter
I still spray them all day with ph balanced water, maybe next week I'll spray them with a little bit of Algafort, that can be used in foliar spraying.
Humidity stayed at +-58% the last 2 days even with the little humidifier and me spraying them all day. I'm trying to raise RHs so next week I'm planning to lower de temp to 22-23 °C hoping humidity raises more naturally.
Next week we also will start with a little of CO2 that is always well recieved.

Likes
25
Share


@BigDaddyK
Follow
Starting to flower 🌹
Friday video fir you
Added another vid
Sunday added full power Fir 10 hrs

Likes
16
Share


@MadeInGermany
Follow
Flowering day 57
since time change
to 12/12 h.
Hey guys :-)
The lady is slowly coming to an end 😍.
The buds start to swell extremely .
The trichomes mature day by day.
This week she was given a very light flush with Clean Fruits so that she can use up her remaining nutrients in the coming days 👍.
It will be harvested in the next 10-14 days 😍.
I can't wait to try them all :-) .
Otherwise everything was cleaned and checked.
Have fun and stay healthy 💚🙏🏻
👇🏼👇🏼👇🏼👇🏼👇🏼👇🏼👇🏼👇🏼👇🏼👇🏼👇🏼👇🏼
You can buy this Nutrients at :
https://greenbuzzliquids.com/en/shop/
With the discount code: Made_in_Germany you get a discount of 15% on all products from an order value of 100 euros.
👇🏼👇🏼👇🏼👇🏼👇🏼👇🏼👇🏼👇🏼👇🏼👇🏼👇🏼👇🏼
You can buy this strain at :
https://www.ripperseeds.com/en/feminized/kmintz-feminized-cannabis-seeds
Water 💧 💧💧
Osmosis water mixed with normal water (24 hours stale that the chlorine evaporates) to 0.2 EC. Add Cal / Mag to 0.4 Ec Ph with Organic Ph - to 5.8 - 6.5
MadeInGermany

Likes
33
Share


@FreshCoastOrganics
Follow
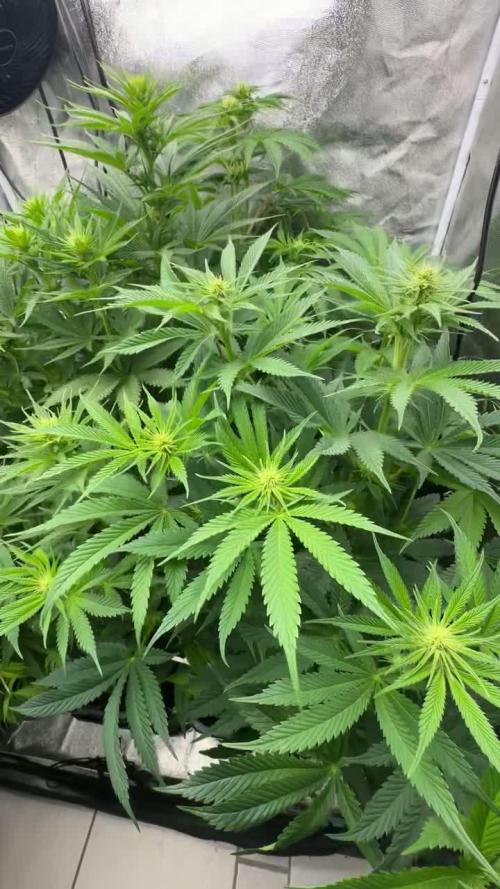
The girls are doing great! They are getting bushier by the day, I don’t want to stress her much by defoliation so I’m doing a good amount of leaf tucking and only removing lower yellowing leaves that were ready to fall off on their own.
The medium from Miller’s Soils has been extremely well balanced throughout the grow. I only dealt with a small amount of nute burn in the beginning but they quickly used those preloaded nutrients to their advantage.
They responded well to their Bloom feeding so I will continue to up the dosage as time goes on. So far she isn’t showing any signs of deficiencies or excesses in nutes so I’m treading lightly with the feed schedule.

Likes
25
Share


@AsNoriu
Follow
First week indoors done !!! And they BULK ;) Love it !!! Trichs stacking well, they don't look so leafy anymore and overall it will be nice result with wild forest strawberry flavour ...
Finishing indoors - works !!!
Middle of the week. Girls drink like crazy, bulks up and looking really nice, just watered and thinking its the one before last one .... Loads of dead leaves, they eat themself nicely and will award me with clean smoke at the end ..
Wild forest strawberry smell faded away tho, a bit sad, maybe he is still in the bud .
5th day of week. They are ready !!! Checked all plants, first ambers, even fresh pistils here and there, loads of fan leaves where eaten, plants just finished perfect. Purple colours here and there and full maturity in my eyes.
Still one more light watering, 48 hours of darkness and chop hopefully on sunday, next wednesday - latest.
Happy growing !


Likes
1
Share


@Ogchemst
Follow
First day in Flower! It's been... very interesting 2 weeks.. now that I survived tha, im having some lockout due to being unable to take care of my plants for the past 5 days and someone having no idea had to do the job, I'm not afraid of showing these mistakes I'm always looking forward to the outcome so I'm still having some hopes for this og kush, not everything here went as planned and that's why I want to focus on finishing up the grow and starting new ones, better ones as soon as possible, I will definitely never grow autos again as I'm just not a fan of them having to be on 18/6 schedule and I like having co trolley over my plants as sometimes things can go wrong.
Og kush had a lockout after flush it grew beautiful but still ate up some of the upper leaves.
Runtz.. yeah I like him he is a beautiful little bonsai he didn't get lockout too much but also did I'm looking forward to seeting the stretch on him if it so happens.
Cherry gusher, a tiny pheno I got this time I'm looking forward to growing 4 next time and hunt down a pheno.
They say outdoors you have to play with God and indoor you try to play God.. we are not perfect and that's why I'm looking forward to the finish line.
Will i scrog? I have the net setup but I'm not sure if I will get enough stretch.
Day 3 I noticed some light white spots on bottom leaves of the plant after a flush I did recently, I diagnose this as magnese or magnesium deficiency, I'm going to up the cal mag to 8 ml and a+b to 10ml per 5 L of water along with additives extra 0.5 ml just as a touch up. Also I noticed we are at 47cm at the tallest branch after topping and lst and this thing is an absolute bush.. I could probably hide behind it if I was a kid playing hide and seek!.

Likes
25
Share


@GangbudsGenesgdl
Follow
04/01/21. inicio de semana creo que me pase con el fertilizante note algunas quemaduras que creeo son ecxesos de nutrientes😕
07/01/21.hoy la pase a fotoperiodo12/12 con 120 cm de altura
10/01/21. cierre de semana con 125cm de altura fotoperiodo de 12 12 ya lista para la floracion
Likes
40
Share


@Master_weeda
Follow
Bonjour à tous les padawans et maîtres jedis
La sénescence a commencé au jour 72 j'ai était surpris et de suite inspecté ses trichomes qui étaient bien laiteux et 5% ambrés, j'ai donc commencé le rinçage au jour 73 je procéderai à la récolte au jour 80
Je précise ma surprise du fait que ses pistils étaient encore bien blanc
Likes
15
Share


@Dunk_Junk
Follow
Looking absolutely gorgeous this week.
Incredibly stinky!
Incredibly sticky!
Really fat buds.
And she's done. Will be chopped in 24h.
Likes
24
Share


@el_cultivito
Follow
Set up Scrog in the start of the week.
Foliar fed with CalMag + Iron 3 times this week.
Defoliated lower shoots and fan leaves mid week.
Raised ph in reservoir to 6.1 because the runoff was coming out at 5.2 ph. Now the runoff is at a steady 5.6 ph.

Likes
54
Share


@BudXs
Follow
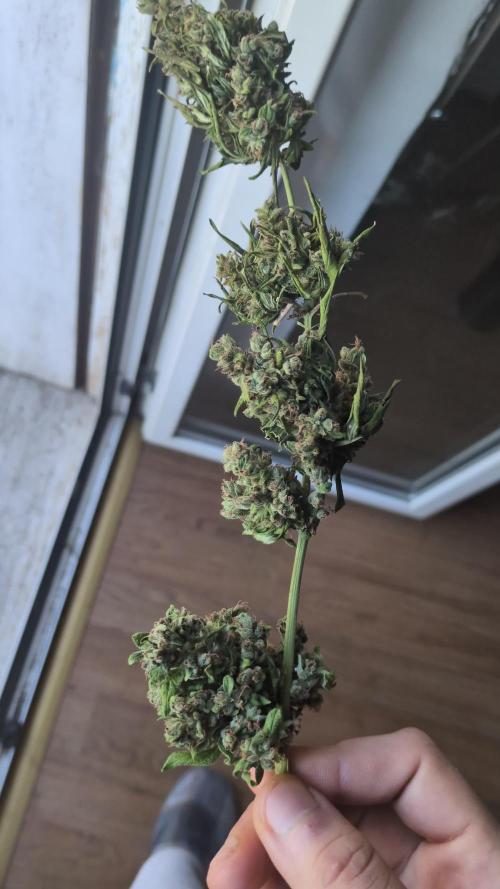
Taken down today. Chop,dry,burp,cure to follow. Good season, no mold, no bugs, frosty nugs.
Will smoke the entire yield in one video take on harvest week. Stay tuned


Likes
57
Share


@Roberts
Follow
Pablo Escobar is growing really well. She is in the mist of bulking now. She has a really nice layer of frost going. I can't smell due to a cold, so I can't really describe that at the moment. Everything is looking really well. Thank you Spider Farmer, and Divine Seeds. 🤜🏻🤛🏻🌱❄️🌱
Thank you grow diaries community for the 👇likes👇, follows, comments, and subscriptions on my YouTube channel👇.
Thank you Happy Growing 🌱🌱🌱
https://youtube.com/channel/UCAhN7yRzWLpcaRHhMIQ7X4g

Likes
4
Share
@Guerrilla_grower777
Follow
Strange hot week in the very end of Summer
I had to write something here to post this😄😄

Likes
21
Share


@Budhunter
Follow
As I did the flushing in day 70 I was watching the trichomes and on day 87 I could see 25-35% amber so I decided to cut it. I cut the whole plant on the base and hang the whole plant to dry. For this reason I will update my findings later when it gets dry and trimmed about yield and numbers. So far really happy with the results. It will probably be the champs of this run yielding nicely 👍🏼.
Likes
23
Share


@DeepRootsGrowTrees
Follow
MATARO BLUE by KANNABIA
Week #16 Overall
Week #2 Flower
This week she's doing good👍 she's dealing the heat and elements fairly well hopefully that will continue as she flowers!! Stay Growing!!
Kannabia.com. MATARO BLUE
