
Likes
Comments
Share


@w33dhawk
Follow
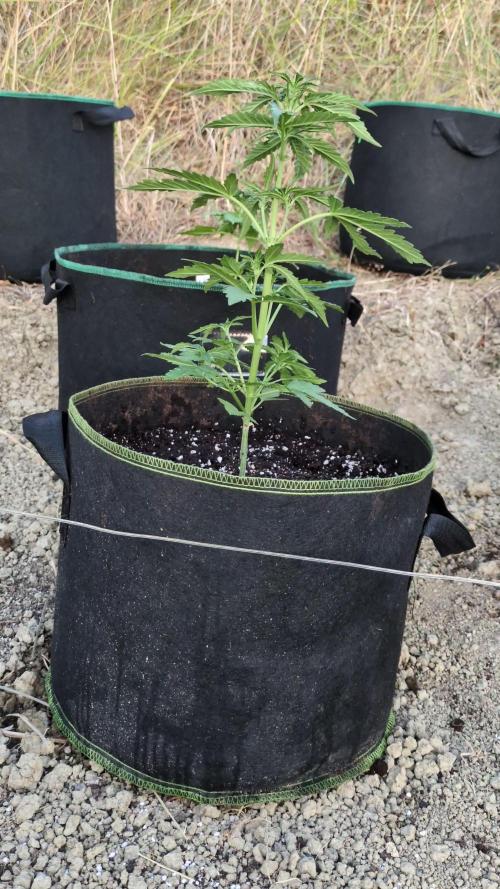
03.08.21 Moin Growmies hab mir in der letzten Woche Gedanken gemacht zu meinem Vorhaben mit den Tomatenringen und mir ist aufgefallen das die Ladys nicht Grad gleichmäßig wachsen ,das liegt sicherlich daran das ich Depp wieder schlauer sein wollte und ein paar Seitenäste dran gelassen habe sprich beim ersten topping hätte ich alles entfernen sollen bis auf die 2 Triebe von der 3. Nodie und ich hab die 2 nodie mit stehen lassen weil ich dachte ich bin schlauer 🤬🤬🤬🤬🤬🤬🤬🤬🤬🤬🤬🤬🤬🤬🤬🤬🤬🤬🤬🤬ich könnte mich selber schlagen für die Dummheit naja Ergebniss des ganzen ist ungleichmäßiges Wachstum somit kann ich die Sache mit den Tomaten Ringen vergessen.......... Hab jetzt aber mein System noch einmal überarbeitet andere Topferhöhung ( 2x alte Bilderrahmen aus Holz auf Paletten Balken geschraubt und mit Hühner Draht bespannt das ganze auf Steine gestellt damit ich ne Wanne darunter stellen kann für abtropfwasser) den Rahmen vom scrogg netzt wieder raus gesammelt und neu bespannt ( Rahmen
90x90 cm aus nem alten Pavillon Gestell zurecht gesägt und mit Zaun bespannt die Abstände zwischen den einzelnen Rauten beträgt 6 cm sollte ausreichend Platz für die Triebe sein) habe das ganze gestern auf einer Höhe von 16 cm über dem Topfrand eingebaut mit Kabelbindern an den Zeltstangen befestigt somit hängt es an seiner Position fest und kann nicht von den Pflanzen hoch gedrückt werden wenn sie in die Blüte geht. Also is nun doch wieder ein sqrogg draus geworden aber den Ladys geht es insgesamt gut sie wachsen und gedeihen und wirken insgesamt gesund in den nächsten Wochen werde ich nun die Ladys in das netzt weben und Mal sehen was sie von scrogging Alla Milchschnitte halten.
Ach ja die purps aus dem Garten sind anscheinend direkt nach dem umtopfen in den Stretch zur Blüte gegangen war ein bisschen spät dran fürs raus setzten
aber lässt sich jetzt nicht ändern Mal sehen was draus wird,vll ja ein Gummibärchen Baum 😏😉 hab den outdoor Ladys gestern nen kleinen Regenschutz gebaut, is nicht der schönste aber er sollte seinen Zweck erfüllen damit der Topf Mal abtrocknen kann das Wetter ist seit fast 14 Tagen hart wechselhaft und der Topf noch nicht 1x richtig trocken gewesen das war's eigendlich was bis heut passiert ist cu Growmies und euch noch viel Erfolg........

Likes
Comments
Share


@DRgreeen
Follow
Crescono molto rapidamente nutro con i prodotti biobizz sempre in vasi da 1 litro in spazio di coltivazione 60 x 60 con lampada fog 200w


Likes
19
Share


@GoldenWeedGrower
Follow
Legend
Timestamp: 📅
EC - pH: ⚗️
Temp - Hum: 🌡️
Water: 🌊
Food: 🍗
pH Correction: 💧
Actions: 💼
Thoughts: 🧠
Events: 🚀
Media: 🎬
D: DAY, G: GERMINATION, V: VEGETATIVE, B: BLOOMING, R: RIPENING, D: DRYING, C: CURING
________________________________
📅 D84/B22 - 07/02/24
⚗️ EC: 1 pH: 5.0
🌡️ T: 19-26 °C H: 55-65 %
🌊 8L
🍗 CalMag - Bloom A-B - B52 - Bud Candy - Big Bud
💧
💼
🧠 The VPD rate was stable on the right value for all the day ! Great, and many thanks to TrolMaster Tent-X !
🚀
🎬 Added Timelapse video and screenshots
________________________________
📅 D85/B23 - 08/02/24
⚗️ EC: 0.8 pH: 5.2
🌡️ T: 19- 24 °C H: 45-80 %
🌊 2L
🍗
💧
💼
🧠 I'm lowering down the EC as I see signs of burns on tips
🚀 Humidity went out of control for about 2h
🎬 I made a photoset with "Garlic Puppy" enjoy the pictures 😋. Added Timelapse video and screenshots
________________________________
📅 D86/B24 - 09/02/24
⚗️ EC: 0.8 pH: 5.2
🌡️ T: 20-26 °C H: 50-70 %
🌊
🍗
💧
💼 Little defolation
🧠
🚀
🎬 Added Timelapse video and screenshots
________________________________
📅 D87/B25 - 10/02/24
⚗️ EC: 0.8 pH: 5.2
🌡️ T: 22-24 °C H: 55-65 %
🌊
🍗
💧
💼 Little Defolation
🧠 The buds are forming
🚀 Today VPD was very stable
🎬 Added Timelapse video
________________________________
📅 D88/B26 - 11/02/24
⚗️ EC: 0.7 pH: 5.2
🌡️ T: 20-25 °C H: 50-77 %
🌊
🍗
💧
💼 Little Defolation
🧠
🚀 Humidity went out of control for about 2h
🎬 Added 8 pics of Nicole, the timelapse video and the screenshots
________________________________
📅 D89/B27 - 12/02/24
⚗️ EC: 0.7 pH: 5.5
🌡️ T: 19-25 °C H: 50-70 %
🌊 4L
🍗 CalMag - Bloom A-B - B52 - Bud Candy - Big Bud
💧
💼
🧠
🚀
🎬 Added timelapse video and screenshots
________________________________
📅 D90/B28 - 13/02/24
⚗️ EC: 0.9 pH: 5.8
🌡️ T: 19-25 °C H: 50-70 %
🌊 4L
🍗 CalMag - Bloom A-B - B52 - Bud Candy - Big Bud
💧
💼
🧠
🚀
🎬 Added timelapse video and screenshots

Likes
16
Share


@DaddyPrime2
Follow
6/24 this may be the last week. The screen recordings are of both plants (purple octane and rs11) they're both close. I also went back and did some math and the last week of veg, should've been first week of flower. I may let her go for 10 weeks. We will see how she looks throughout this week(trichs)
6/25 looking super close. All cloudy besides maybe 10%
6/29 will get in there with a microscope again. just waiting on her to ripen. can't tell if she's done, or at rhat point where she looks so good that she's done but then that last week the plant explodes. well see and yall will definitely hear about it.

Likes
5
Share


@Krissci
Follow
This week I have topped for a 2nd time with auto's it is a very tight window to train correctly.
Now have 4 main nodes..mostly LST and light defoliation going forward
Likes
Comments
Share

@Guerrilla_grower777
Follow
23/07/2025 20:20
Gorilla Z Is officially in the preflower stage this One stayed pretty small so i don't expect a lot of g when It comes to harvest time
First days of the frostbanger in the spot,transplanted Easy and i think Is gonna be great weed from her,showing signs that it's going to flower soon on her 15th day WTF???
EC Is higher than usual because i added honey and Epson salt on It,i want to give a kick to the bioactivity of the soil

Likes
57
Share


@MadeInGermany
Follow
Hey everyone 🤗.
Today they were planted in their 11 L pots 😀.
Now the root growth can really accelerate.
When repotting, a total of 3 g per liter of Green House Powder Feeding Bio Grow was added to the Canna Coco 😊.
That's enough for 8-10 weeks :-).
I'm curious what they are doing this week and I wish you all a lot of fun with the update :-).
Stay healthy and let it grow 🌱🍀
You can buy this Strain at :
https://sweetseeds.es/de/red-mandarine-f1-fast-version/
Type:
Red Mandarine F1 Fast Version
☝️🏼
Genetics:
Red Poison Auto®️ (SWS39)
X
Tangie (California Orange x Hybrid Skunk)
👍
Vega lamp:
2 x Todogrow Led
Quantum Board 100 W
💡
Bloom Lamp :
2 x Todogrow Led
Cxb 3590 COB 3500 K 205W
💡💡☝️🏼
Soil :
Canna Coco Professional +
☝️🏼
Fertilizer:
Green House Powder Feeding
☝️🏼🌱
Water:
Osmosis water mixed with normal water (24 hours stale that the chlorine evaporates) to 0.2 EC. Add Cal / Mag to 0.4 Ec Ph with Organic Ph - to 5.5 - 5.8 .

Processing
Likes
16
Share


@HisHope
Follow
3/4 Day 16 Flower
Changing PK to KoolBloom as the Peak has run out.
Will work up the CT nuets to @10ml/gal or so as the burnt tips have proven kind of a red herring.
Loving the dual light sources, makes things so much easier.
3/5 Day 17
Nuets to 925ppm unadjusted added Fish Sh!T and the terps just explode 😄
Last defoliation of loofy branches
New pics
3/6 Day 18
Pics last of the week most likely
Nice little present the girls gave me in the pics 😍
Little touch up today, last of the grow
Nuets as is for the week
She is doing well see what the next weeks bring
3/9 Day 21 Flower - Halfway home
New Video and nuets

Likes
17
Share


@The_Projexx
Follow
Welcome to week 7 of flower! Our new camera should be in this week so I'll be able to capture better photos! Things are just grooving along at a nice pace, I will be looking to check the trichomes this week to see where everythings at but I know for sure we still got some time left especially for Fuel D.og. Over all really excited to see what this week will bring and hopefully we will be starting flushing the plants by weeks end!
Huge Shout outs to the following for all their outstanding work with everything from equipment to genetics: @MarsHydroLED , @Seedsman , @PyramidSeeds , @GreenHouseSeedCo
HUGE HUGE shout outs to all my followers and people who stop into the diary alike! Keep inspiring to grow!
-The Projexx
Day#43F Plants reacting well to water increase! Fade continues to get more pronounced and the flowers still putting on mass but starting to slow down.
Day#44F Pictures N/A. Ladies continue to grow. Fuel D.og#2 is really starting to smell like my old shop now, a mix of gas and grease!
Day#45F Checked trichomes, Black Cherry Punch and Kings Juice will begin their flush at the end of this week, I will sneak in 1 final feeding with nutrients before flush.
Day#46F Ladies are grooving along, Fuel D.og is still putting on mass daily! New camera came in and I think it does the plants justice now!


Likes
24
Share


@Greensoul920
Follow
Buds are getting fat and full of resin, not much to say let’s wait 2 more weeks happy growing to all!!!


Likes
16
Share


@MrWolfe
Follow
What an awesome thing to walk in on starting off week three all the girls were praying and just getting so fat, I really need to strip some fan leaves off the mom.
They look great, the smaller cuts definitely aren't as good as the 4-6" cuts are, they were MAYBE 3-4" cuts and pretty small, but they are extras anyways so it doesn't matter, just seeing what they do. I'm excited for them to have all this space to stretch out when I pick up another light.
Last day of week three and I couldn't be happier, I absolutely have to cut thicker clones , these smaller ones all got a bulbous base? Not sure what that's about but we will see how they develop. They are extras anyways but still nice to figure it all out.
Likes
9
Share


@bigolebuds
Follow
Week 4: We are officially one month into our grow! things have been going pretty smooth so far and that’s exciting!! Yesterday we picked up our Gaia Green 4-4-4. With that and the topping done, we plan to give them the week to recover and then start LST and feeding. You’ll notice a large number of plants were moved outside… those were all auto seeds that we got for free from Seedsman and Perry’s Magic Beans (Northern Lights, Critical + 2.0, M+M, and High C) shout out to them!!


Likes
10
Share


@AvocadosFromMexico
Follow
Keeping an eye on her for any signs of stress. Transplanted to a 3 gallon pot on 4/18. Dirt settled more than I anticipated therefore had some extra space on top of he pot, hence the crease. I have been using 25% of the light intensity up to today which I increased now to 50%. No nutrients have been added so far. Will be looking into LST by next week since at the moment when I bend the plant some leaves touch the dirt. Also got a new sensor for temperature a humidity that allows you to see trends thru the day.

Likes
44
Share


@Buffynuffy
Follow
The lemon pie has sum stuff going on not sure if I under-watered her a little bit I did wait 4 days to water that one but I thought the soil was still good until I picked it up and it was light as a feather so I gave a cup of Ayer maybe a littler more and had I slight VPD problem I think it was 84 with like 50% humidity I added a second fan today it bounced up to 65% at 82 degrees! Please help am I over thinking or is this something bigger
Likes
Comments
Share


@eldruida_lamota
Follow
Vamos familia, actualizamos la sexta semana de floración de esta Amaretto Tarmac de Seedstockers.
Empezamos abonando ya con varios productos de la gama Agrobeta para la floración.
Temperatura y humedad dentro de los rangos correctos, 12 horas luz, 12 oscuridad.
Una lástima que de todas solo aguanto una, y en concreto tiene un color espectacular aún así seguiremos con el diario hasta el final.
Agrobeta:
https://www.agrobeta.com/agrobetatiendaonline/36-abonos-canamo
Hasta aquí todo, Buenos humos 💨💨💨

Likes
4
Share


@Exicuter
Follow
Sie entwickelt sich immer weiter, null Probleme außer Hitze……. So langsam läutet sie den Endspurt ein. Geht in die Breite und wird auch noch dichter, so wie wir!


Likes
17
Share


@Mroizo
Follow
Beginning of the third week.
I started to do lst, maybe it was too soon, but it seemed to me that there were some bud sites that needed more light.
I'm not very experienced, but this isn't my first grow, so far they look good to me.
I don't use nutrients, at least for now.
Likes
76
Share


@DogDoctorOfficial
Follow
🌸 Week 9 – Letting Go to Shine Brighter 🌸
Welcome to Week 9 of flower in the Eternity Grow Cup, a milestone moment where we shift gears and let the plants begin their final expression. This is the week we cut all nutrients — a bold move made with care and trust — leaving only System Clean to keep our lines pristine in the Autopot system. No harsh flushes, no dry backs, just gentle guidance toward the finish line.
We didn’t wait for the reservoir to hit empty. Instead, we added pure water early, letting the system blend into a soft EC of 0.45, with a reservoir temperature of 21.9°C and a pH tuned to 6.3 — perfect for this phase. In the soil, EC sits at 0.95, giving the plants enough to sip on while encouraging them to cannibalize their stored energy, pushing out their richest colors, aromas, and trichome production.
And what a show they’re putting on.
The colors in the room are breathtaking: purples, oranges, yellows, deep greens — a painter’s palette. But above all, there’s this serene dark fade taking over, a sign of maturity and final expression. Trichome production is off the charts, with Runtz #1 still dominating the aroma game — sweet, powerful, unforgettable — while Runtz #4 emerges as the frost queen, covered head to toe in shimmering resin.
The environment is dialed in:
• Humidity at 52%
• Temperature holding at 28°C
• PPFD reduced to 683 to ease the plants into ripening
• CO₂ around 1000 ppm for that final metabolic push
We’re focusing now on presence and precision — ensuring airflow, temperatures, and humidity are in harmony. Every decision from here is about preservation, encouragement, and letting nature take the lead.
This week’s update includes a special series of photos taken through the mask lens — showing the garden from my eyes, from tops to bottoms, sides to centers, trichomes to fade tones. It’s a personal view I’m grateful to share.
The structure of the grow has become something of a symbol: four phenos in each corner, one in the center — creating an X from above, a cosmic mark that feels intentional, aligned, and just… right. They’ve bushed out so beautifully that this symmetry, almost a message from the plants themselves, is impossible to ignore.
And from the top down to the lowest buds, there’s no weak link. No “B-buds” here — they’ve become A-tier expressions, worthy of jars and not just extracts. The synergy between Plagron, Aptus Holland, and the TrolMaster & ThinkGrow lighting ecosystem is performing at an elite level — tuning spectrum, dialing environment, and nurturing these compact queens into full form.
This is a week of wonder, of silence before the final bloom. A week of gratitude.
⸻
🌟 With Grower’s Love, I want to thank:
• Our incredible community — lovers, haters, dreamers, doers
• The sponsors who make this possible
• And every grower competing in this cup — you are the fire that keeps this space glowing. I’m humbled to grow alongside you.
🎥 Full 4K episodes now on YouTube — come join us there for the full experience
📸 Daily beauty and behind-the-scenes on Instagram
Let’s celebrate the craft. Let’s finish strong.
Good luck to all. Eternity is in bloom.
Genetics - Runtz https://www.zamnesia.com/6000-zamnesia-seeds-runtz-feminized.html
Nutrients - Plagron https://plagron.com/en/hobby
- Aptus Holland https://aptus-holland.com/
Controls - Trol Master https://www.trolmaster.eu/
LED - https://www.futureofgrow.com/en
LED - https://www.thinkgrowled.com
Soil - https://www.promixgardening.com/en
Germination - Cannakan https://cannakan.com/?srsltid=AfmBOopXr-inLXajXu3QFgKXCXXos4F1oEvScjMKIB5MR5dk8-GJ-F49
DOGDOCTOR 15% off
Smoking Papers - https://ziggioriginal.com/
Terpene saver - https://grovebags.com/
As always thank you all for stopping by, for the love and for it all , this journey of mine wold just not be the same without you guys, the love and support is very much appreciloved and i fell honored with you all in my life
With true love comes happiness Always believe in your self and always do things expecting nothing and with an open heart , be a giver and the universe will give back to you in ways you could not even imagine so
As always, this is shared for educational purposes, aiming to spread understanding and appreciation for this plant. The journey with nature is one of discovery, creativity, and respect. Let’s celebrate it responsibly and continue to learn and grow together!
Growers Love To you All 💚
#EternityGrowCup #RuntzHunt #GrowersLove #CannabisCommunity #AptusHolland #ProMixSoil #TrolMaster #Zamnesia #Plagron #ZiggiPapers #Grovebags
