
Likes
Comments
Share


@DBoogie
Follow
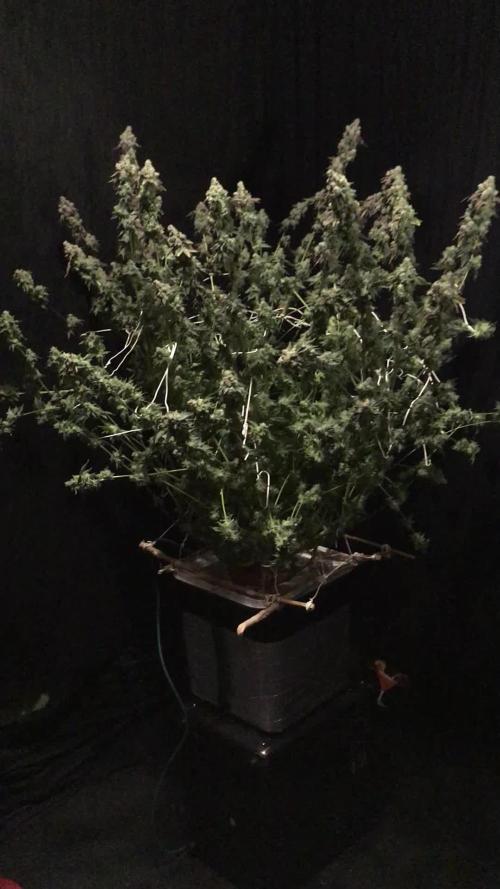
Hey Team!
What can I say, my first time grow is coming along smooth. 🍃🍃 🍃 D-Boogie coming along smooth y’all. I think My tangerine dream is getting ready to flower soon. Going to carry out the veg-state as long as I can.
I’m not sure how much water to give them but I’m sticking my gallon a week to keep it safe. Looking forward to next week!


Likes
33
Share


@Lou_Grows
Follow
Very happy with this girl here. She is stretching at good pace and putting pre-flower all over. I can't wait for this one to be ready.

Likes
10
Share

@Black_Widow
Follow
Привет садоводы !!!
Вот и закончилась эта история Strawberry Chemdawg OG
И закончилась она просто великолепно
Сорт просто супер
Красавица опять выросла
шишки тяжелые и твердые как камень
все покрыты обильно смолой
судя по предыдущим опытам ,получилось не мало
сорт отличный
Создателям SSSC заслуженный поклон !
Всем спасибо кто следил за этой историей !


Likes
14
Share


@Whiteybulger1814
Follow
Day 31 of flower
Basically the girls are on autopilot, with the autopots and Gaia green there really isn't much to do, both methods are super user friendly and the basic needs that need to be meet are just ph water in the reservoir every couple days and then watch them stack buds on top of buds...Occasionally I move a branch over to another square in the net to make room but Basically after the last top feeding it's just watch and weight, pun intended....


Likes
33
Share


@Hawkbo
Follow
These are also doing very good one of them stretched alot 2 stayed shorter.
Growth has been steady and everything is thriving right now. Might need to get a new dehumidifier soon mine is starting to shit the bed so RH levels are a little high with lights out but the heater keeps them low enough to get by at this point. Still feeding the veg nutes for the most part, I dropped the calmag and grow dose a little and added in a little bloom. I will slowly increase the bloom and decrease the grow over the next few feeds. The green buzz bloom doesnt have much N in it so I find it best to add atleast some grow all the way up to around week 5 of flower. Hope everyone is practicing their social distancing skills. Use the code bangdang at any of my sponsors for 10% off.
@greenbuzzliquids
@growlightscience.led
@rainscience_growbags
@gorilla_grow_tent


Likes
15
Share


@the_big_pink_place
Follow
01/17/22 Everything's starting to grow again from the LST and defoliation at the end of this week flipping to flower. Tested run off last watering it was 2250ppm, did straight water this watering. *Note plant 4 has had hiccups from the start when it popped out of its seed it's tap root was curled I fixed it with tweezers by pulling the skin off and then placed it into the Coco, it shows the most stress out of the 4 plants and does not respond well to anything I do to it, even with 2250 ppm runoff it's still showing signs of a nitrogen dificiency PH in run off at 6.0 so not sure why it's so finicky . It did get the worse light burn out of the 4 , me being a novice at this I'm not sure if early stress ruins the rest of the grow but I'm starting to think it does from past grows and this one. 01/23/22 Just watered plants , the lockout has been fixed that one plants not eating as much as the other three and due to future harvests suggested mixing was way to high 1200-1300 ppm I had to mix by there measurements then weaken it with water till I reached 800ppm. Thank you everyone who post info for me.

Likes
4
Share


@PhinolaGreen
Follow
5. Woche
Sie hat sich gut vom letzten Topping erholt, ich werde sie diese Woche noch ein bisschen zurecht Formen, wie ich sie haben will 😊

Likes
25
Share


@PrairieFrostGrow
Follow
***** Week 11 growth - February 13 to 19, 2021 - Week 2 Flower *****
CL1 is staying more temperamental and will start to focus a little more on her separately trying to correct. She hasn’t been giving the most run off of the group so possibly a pH issue forming, could be a little too much water for her?? CL2 has been awesome! She was slower in Veg but her tips are up and she is stretching💪 Looking like she should stack a couple of those colas👊 Also, CL1 has more branching on her just due to limited access to her in the tent compared to CL2.
2nd SCROG layer in now....finally😞 Lots of work to do in cleaning up the lower leaves next week. Will do larger leaf strip and lolipoping when they start focusing more on bud development.
Light is at 24” only pulling 310 watt, and the meter at the tops of the girls is roughly 28,500LUX. It is feeling like it’s a little strong for them but it’s close......the curling leaves is slowly increasing on the tops.
Nutrients switched over to flower schedule and following week 2.....but so-called back a couple of items. Adding some other items beyond IPP line so backing off some of the ppm to compensate. Still only one “feeding” per week. Early flower so hitting the microbes a little harder this week and next and then slowly start backing off. I like Remo’s Natures Candy for sweetener because it has humic, sweetener and old school molasses, amongst other things to feed the microbes as they are in coco. Bud Fusion being used now for pk boost.........no more “red kool-aid”😂 Still adding Rezin from Green Planet becuase it seems to boost my trichome quantity.....Terpinator likely this week as well......increase some of the sulfer to increase aromas.
Little more detail.......
Feb 13/21 - Day 8
- 3.5L watering with CalMag @ 1ml, Nature’s Candy @ 1ml, Resin @ 1.5ml
Feb 14/21 - Day 9
- 2nd SCROG added today.....finally. Plucked a bunch more leaves in the process
- watering with microbes only today. Recharge has some molasses in it so just adding that.
- 4L water for these girls with Recharge @ 1/2 tsp/gal
- 320ppm and 6.0pH
Feb 15/21 - Day 10
- today is big feed day....its been 7 days.
- 3L each girl with all the IPP line as listed plus silica @ 1ml, Nature’s Candy @ 1ml. (Bud Fusion was 0.2gr/L)
- 1325ppm and 6.0pH
- Girls gave run off at 3L today so didn’t push past that.
Feb 16/21 - Day 11
- some feed left from yesterday so added 6L of plain water to dilute it and watered into the girls tonight.
- 3L full feed of nutrients for each girl
- 800ppm and 6.1pH
- CL1 is coming out of her funk.......or she has just been Hungary the last couple of days😃👍
- CL2 is looking like she is in flower with her thicker stalks, leaf growth in bud sites, bigger buds themselves....she is well into flower now.
Feb 17/21 - Day 12
- 3L each girl with Terpinator and CalMag @ 2ml, Nature’s Candy @ 1ml, Recharge @ 1/2 tsp/gal
- 775ppm and 6.1pH
- increased light power to 350 watts. Now at 32,500LUX.......take it slow over the next week and keep creeping up. Leaves have a bit of a taco shape coming out and looking fairly serrated at the edges.....pushing the light intensity on the tops👍
- leaf colour on the girls is very good......tips are not burnt either.
- CL1, cut two lowest branches from the main stem......they are not reaching high enough on the canopy........energy suckers😀
Feb 18/21 - Day 13
-3L each girl of plain water today
- added beneficial bacteria and enzymes @ 1.5ml
- 330ppm and 5.9pH
- was looking for a little lower pH as I have not been checking runoff.
- CL1 - cut off two lower main branches from her......they weren’t going anywhere......she has too many side branches anyway.
- have to do a leaf strip this weekend......start of week 3.
- light power increased again, 400 watts now.
Feb 19/21 - Day 14
- day out day.......they have not had one in a bit.
- humidity was higher today as door to grow room closed today to assist clones with more humidity.
- CL2 is looking really nice. Bud sites getting larger and not thinking there is much stretch left in them to go.
- CL1 has been slightly happier the last two days......added more air movement around her to help,
So that takes us through two weeks of flower now. Not knowing these girls enough yet, I suspect feeding will stop at the end of week 6. That leaves four more weeks. I will treat the next two weeks like mid flower for nutes, and the following two weeks as late flower. Feed supplements accordingly. Mimosa girls will be taller but these two are holding their own. They are rocking ETS.......looking forward to seeing the bud swelling next couple of weeks💪👍👊🙏

Likes
26
Share


@KingSalomonsWeed
Follow
Nur noch 2 und ne eckenphoto.
Na ja lassen wir das.
Die Sensi Seeds (mich wundert es nicht) sieht gut aus. Die Blätter sind dicker. Phylaxien everywhere.... Nein ich lüge erst obere Drittel...
Die SeedStockers... 😛 💪
Das ist heftig.
Sooo Fett
Wenig Phylaxien
Ahm habe ich erwähnt, das sie Riesig ist? Ich messe morgen mal n Blatt, dann zum Vergleich die Sensi.
Boah.
11
Elf
Eleven
How can i explain that.
First, it's da SeedStocker.
Crazy
Genius
Fingers
Sry sweat .
Ganja little 🎄 tree
The Leaves
The most
they become
Some re yet
11
Oh holy lady
ELEVEN
F.
F.
FINGERS
THE MOST LEAVES
THE FINGERS
11
I only got 10 fingers.
On 2 Hands
She got 11 Finger on one Leave.
Im Scared. (Humor is something that i dont want)
I call the cops
(Now i grin)
OK SensiSeeds, fast and stable as SensiSeeds ever was. (TITAN)
Seedstockers, 2 weeks behind the Banana, but normal. Its the strain.
I knew it. Stable. (not normal). 👍
UND
ICH
BIN
EIN
I D I O T.
GELATO 41 FAST.
SUPERPFLANZE
BESTIMMT...
BESTIMMT KEINE...
JETZT KOMMT ES
KEINE auto..
Habe ich gedacht,
Wäre ne Auto...
Is nicht... Toll.
Chaos Grow lässt grüßen.
Steht ja auch auf der Originalseite.
Wers lesen kann...
Ok, *ab morgen oder so 12-12....
Seufz
Ok, ich gebe es zu. Hätte tatsächlich etwas sanfter mir ihr umgehen können.
BUT REMIND
SIX LITTLE GANJA SEEDS
COMIN INTO DIRT,
4 WAS GROING TO THE SUN,
ONE WAS BURNING THERE.
4 Kleine ne...
Egal
Only the best survive.
The fast buds lives at another (secret outdoor place). Looking good.
I will bring, you photos.. 😛 💪


Likes
15
Share


@Meewin
Follow
Planted the Blue Dream from Seedsman outside yesterday. This ends her days under the led lights from Mars Hydro and starts her journey in the great outdoors!!

Likes
31
Share


@Sider79
Follow
Didn't get the potential. Very happy with the look of the finished product , so far I'll give this particular strain 9.3. In it's best stability this would be my go to phenotype cause of the overall potential and ratio. Very happy for it being my first auto grow experience now I'm hooked. Definitely would suggest this bad girl for a first time auto enthusiast and for the connoisseur . I've been looking into that Purple Lemonade by Fast Buds and very excited to purchase also that Black Berry cause they remind me of the Blue Dreams large flower to plant ratio. For now and my next auto grow will beee......🥁
FB.Six Shooter,
VS.Super Xtra Skunk,
Seedsman's Northern Lights
Seedsman's Limited Edition
Strawberry Cheesecake.
I decided to do multiples this time because of finish times I feel will never be the extact either way
I'll try to get a rotation going .😃


Likes
4
Share

@RooftopFarmer
Follow
Guava Runtz – Week 9 (Fast Buds Outdoor 2026)
Weather was okay. Guava Runtz is receiving stronger nutrients following the schedule and continues to look good.
She is now around 52 cm tall with plenty of leaves and is fully in the flowering stage. A light sunflower like scent is noticeable and getting stronger. The trichomes are still mainly glassy with a few starting to turn milky. Steady progress.
Likes
11
Share


@VividGreen
Follow
Lowered bloom nutrient to 16 mL per gallon and hydroplex to 4 mL per gallon.
EC now 2.3

Likes
29
Share


@Prilyfe13
Follow
February 15, 2024
Welcome back to another season of Insane Autoflowers. I have 11 weeks to finish these ladies up before 4/20. Then I have a competition to join. That being said, let's go over the setup.
This setup is an AC Infinity 3x3 automated grow system. I'm running a 4" exhaust fan with carbon filter.
2 fans. Both are 6" with one being oscillating.
The germination kit is also AC Infinity. With the new AC Infinity supplemental lighting, a small computer fan for air exchange and a nice shot glass to germinate these little babies.
I'll be using root riot plugs and 3 gallon AC Infinity fabric pots with the AC Infinity bottomed feed watering basins.
There will be a total of 4 plants in the tent. These ladies will be sharing the space with a pair of Banana Purple Punch Autos.
For the seedling stage, I have the light around 250 PPFD and will bump it up to 350 PPFD in the last couple days in the germination center.
I'll be reusing Sohum Living Soil. This is the second time using it, but it should be fine. I reused the same soil brand with my last grow and the Gorilla Cookies in that grow gave me 21.25 oz dried and trimmed. So, it should be fine. I also have advanced nutrients just in case. I may give a weekly dose of recharge and the base nutrients just to keep everything from getting drained completely.
This strain is 8 to 9 weeks to harvest. Let's hope it doesn't go any further than that.
I'll be using a couple training techniques. LST to start. If need be, I'll use a SCroG net as well. I may end up topping. So far I have noticed every single plant I've grown does better when topped. However, I have a feeling that slows the plants down and goes beyond the suggested life span. So hopefully I won't need to top them and they do just a well as my last grow. Let's hope for 10 oz per plant.
One last thing, I have the new little square hydrometer from AC Infinity in the germination center. I plan to keep the temp between 75° and 80° and RH at 75% to 80%.
That should be everything for today.
February 16, 2024
Day 1:
Both ladies popped last night and had taproots this morning. Just peeking out. Perfect time to plant them in the plugs. They will be in the Germination Center for just a couple of days.
I like to ant in the final containers just before the roots break out of the plug. That way there is no stress whatsoever. I may add a bit of my seed starter soil in the top part of the pot. Just to keep the seedling from burning. However, I haven't had a burn issue yet, so there may be no point. Honestly, the seed starter soil is really for the Photoperiod plants. The ones that last about a week or two in the Germination Center.
That should be all for the day. Ladies are planted.
Germination Center Environment:
Temp: 77.6°
RH: 82.9%
VPD: 0.55 kPa
February 17, 2024
Both ladies are showing some green coming out of the plugs. I feel like they will pop the surface later today. I'm having a bit of an issue keeping the temp above 75°. I'm sure it will adjust once the lights go on, but for now it's just below 75°. The humidity is a bit bouncy as I can't find the correct spot for the "exhaust fan" yet. It won't really matter until the lights go on and both ladies have popped.
I didn't end up filling the pots up yet. I have to wash the basins out first. I'll do that today and prep the pots tomorrow.
Quick Update: I turned the light on now that I'm seeing green but not quite popped yet. It should help with keeping the heat up.
Germination Center Environment:
Temp: 76.5°
RH: 82.1%
VPD: 0.56 kPa
February 18, 2024
We have some little green babies! They're perfect and it's only been 2 days.
I expect these 2 to be super vigorous with how that look now. As long as I don't screw anything up.
For starters, the light is 18/6 as of today. The Germination Center Lights are set to 60% power with an intensity level of 250 PPFD. Hopefully that will keep the stalks thick and short. I don't like lanky seedlings. Much harder to work with.
Today, I decided to fill the 3 gallon AC Infinity Fabric Containers with reused Sohum Living Soil. This is the first time being reused so everything will be perfectly fine. My last grow had a monster plant grown in the same used soil. So it's all good. The goal is to plant the babies in the pots before the roots start to show too much. Normally I'd use a couple of nursery bags, but this time around I don't need to. I pan to use the tent environment this time. No domes, no extra bags. Just plug to soil.
I plan on having the light around 18" with a humidifier. It should do the trick. I'll also be keeping the light around 300 PPFD for the first couple of days. Power should be around 20% after they establish a root system, I'll move the light up to 24" and increase the intensity to around 450 PPFD. Normally I'd work with DLI, but I don't need to yet. I will once the light is raised. So that should be an excellent transition from dome to tent life. If all goes as planned, these 2 should live up to their full potential.
Quick Update: I decided to drop the light power down to 30% and gradually turn it up over the next couple of days until they need to come out of the dome. So 2 days max. Then I can turn the big light on and work from there.
Germination Center Environment:
Temp: 76.5°
RH: 76.4%
VPD: 0.74 kPa
February 19, 2024
Today is a new day and a new stage.
Both ladies were planted in their final containers. I watered them in with 250 ml of plain water PHed to 6.2. I didn't concentrate all of the water at the base. I made sure to start with 100 ml around the base and the rest covering the whole top soil.
Their tap roots were poking out from the plugs already. I was kind of hoping for one more day in the Germination Center, but then I would have had to set up the nursery bags and that wasn't the plan for this run. Hopefully my calculations are correct with the 250 ml.
I'm using the 3.4 gallon fabric pots from AC Infinity I already mentioned. They are also used from 2 runs ago and washed thoroughly.
Domes were added and the main grow light is now on at 20% power. The light height is around 30" and the intensity is at 290 PPFD. It's a bit high, but the domes block out a bit of the light, dropping the intensity down to 200 PPFD.
The tent isn't all that warm currently due to cold weather, but I'm hoping the heat of the main grow light will increase the temp in the domes. Currently the tent temp is 72° and the temp under the domes is around 68°. I'm hoping over the next few hours, the temp will raise up and the environment will stabilize.
I can't keep the domes off either as the RH is hovering at 43% in the tent itself. I have a humidifier, but that dropped the temp down even more, hence the domes. Kind of a pickle I'm in. I'll keep trying different things until I get it right. I hope it won't take me more than a day or 2. If not the next few hours.
Grow System Environment:
Temp: 68°
RH: 79%
VPD: 0.49 kPa
February 20, 2024
It's day 4 since seeds and these ladies are doing perfectly fine. Right on cue as well. I expect them both to hit the Veg stage in just a few days. Should be by the end of this first week. Maybe a day or 2 after.
The domes are doing their job perfectly. Just a little bit of dew and the temps are finally leveling out at a reasonable number. 75° by the end of the morning, the environment should be spot on.
That's all for the day. No watering. I'll water tomorrow another 250 ml for each baby.
Grow System Environment:
Temp: 75°
RH: 75%
VPD: ? (I'm taking readings from 2 different hydrometers. One of the main tent for temp and the one for the Germination Center for RH)
February 21, 2024
Both ladies got another 250 ml of filtered water PHed to 5.8, spread around the entire pot surface. I was thinking about doing another 250 ml around the outside of the pot. It may be a good idea to start moistening the rest of the soil. So when they start the veg stage, they can take off immediately. I'll probably wait until this afternoon and then decide. I did notice that A had drier soil than B. B is in the front and A is in the rear. I wonder why that is.
They look absolutely wonderful. Slightly praying and they both have really nice steady growth. The leaves are a beautiful dark green. So healthy and ready to go. The baby fan leaves have some really pronounced, serrated edges.
As for lighting, I've been paying attention over the past day and I think the domes will come off tomorrow or the next day. The light may also need to be lowered when the domes come off. Currently the intensity is 200 PPFD. I think 300 PPFD should be a good starting point starting week 2. I've also been researching and I think I have a good light schedule for the whole grow.
At 18/6
Week 1: 200 PPFD DLI: 13
Week 2: 250 PPFD DLI: 16.2
Week 3: 350 PPFD DLI: 22.7
Week 4: 640 PPFD DLI: 41.5
Week 5: 700 PPFD DLI: 45.4
Week 6: 725 PPFD DLI: 46.7
Week 7: 725 PPFD DLI: 46.7
Week 8: 600 PPFD DLI: 38.9
Week 9: 550 PPFD DLI: 32.4
This is based on a 3 week veg time and 5 week flower time.
Update: Domes Removed. I was researching as to when to remove a humidity dome from a seedling and everything I've read is to remove them a day or 2 after sprouting. So I removed them. The tent has been sitting nicely around 68% and 77°. So everything should be fine. I'll have to keep an eye on the light. Without the domes, they are getting the full intensity. However, I'm not all that worried. They are both praying, so a bit more light won't hurt.
Grow System Environment:
Temp: 73.6° too low
RH: 77.5% spot on
VPD: 0.95 kPa estimate
February 22, 2024
Not much to do today. I filled the humidifier, cranked the heat and spritzed the babies with a mist of PHed water. Took some photos and that's all. No adjustments needed. Both plants look absolutely perfect. Their leaves are flat, so I know the light is right where it needs to be.
Grow System Environment:
Temp: 75.9°
RH: 80.9%
VPD: 0.93 kPa


Likes
3
Share


@curious_budsie
Follow
day 22: Feeding time again, ran veg schedule and a little calmag and root juice. 750ml
day 23: raised the light and upped the ppfd a little.
day 25: feed week one flowering nutes. 750ml
day 27: feed week one flowering nutes plus calmag. 750ml
looks like we are going into flowering now.
