


Processing
Likes
6
Share


@Weedganja420
Follow
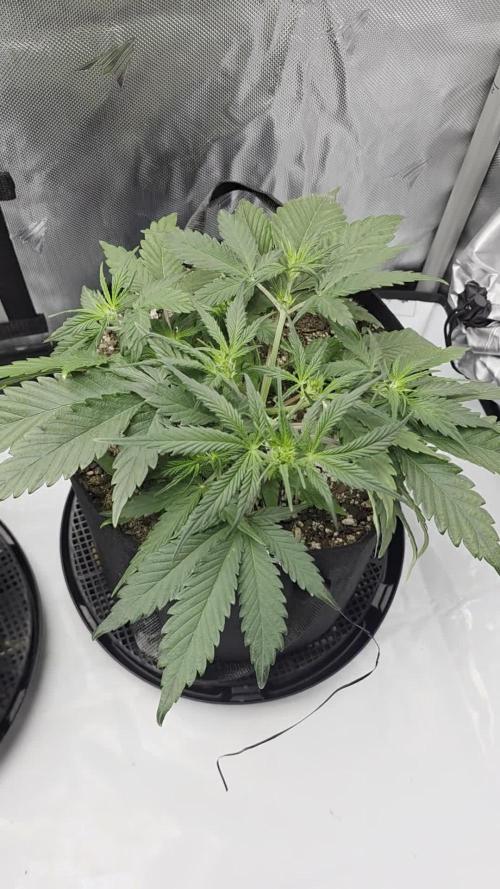
Muy buenas!
Les he rellenado la maceta con un poco de sustrato, van estirando muy bien.
Mañana aplicare el segundo riego con fertilizantes en la etapa de floracion
Lleva 15 dias a 12/12 horas

Likes
5
Share


@GrowerBaal
Follow
Have harvested her on November 3rd and now she is drying. Will later add the result of the dry weight. When smoked i will give the final resukt of stars.
Have weighted her after it dried and the result was 78g. So i will add 300 as wet weight (80 x 4=320)(I think 300 to 400 is a good range).
A final smoke test will be made in 2 weeks or so, but she has a lot oft potence.


Likes
41
Share


@PrairieFrostGrow
Follow
Sweet Seeds Cream 47 grow 2020.
Sweet Seeds Cream 47 was finally run and she was a great experience…….as always there was something to be learnt here but in the end these girls were super frosty and finished super fast! Done in 8 weeks Veg and you keep ALL the trim for further processing😊 Stayed under 30” for height and can fight off many issues including pests and temps……as well as cracked stems and broken branches😊
I believe I ordered these in 2018 after my first experience with Sweet Seeds and Gorilla Girl photo. I was so impressed I had wanted to try something else from them. Then I don’t know what happens…..something else newer or possibly more interesting at the time comes along and you push this seed pack to the back. For some reason AK47 has been the strain I have played with a couple variants of and these girls finally had their chance. The seed pack I have has a date stamp of 2016…….not a worry Growmies, seen lots of other growers popping 10 year old genetics from seed and thy will still work out fine. Just sharing a little reminder that its about storage…….I keep mine in a sealed container in a different fridge in a dark spot😊 As an example, these were 4 years old and I got two girls from my three seeds…..works for me😊
Beginning the diary……during germination everything is rosy and you are going to set things on fire!!!!!!
Germination started on July 11/20 with two seeds. First one came up from coco 7 days later on July 18 and C472 was actually the third seed and was put into a rapid rooter on July 19 and came up from coco on July 23…….that left us with C472 actually being 5 days behind C471. Quick note….C472 was a bigger girl at the finish line even though she was 5 days younger and being grown in the 3 gal pot vs the 5 gal pot.
Typical photoperiod process and went to solo cups and then to 1 gal and then a final upsize to either a 3gal or 5gal. I put one in each. At the start of this diary I wanted to focus on seeing the difference in yield between a 12L and 20L pot and is it worth the extra media and nutes? Well things change and you have to go with the punches😊
Early veg and building root mass……..come one girls, lets see some snow white roots!!!!
The girls were grown in 90 – 80% coco and 10 - 20% Perlite……..COVID made many things hard to get here and there this past year and I believe and I even had to use some Vermiculite as I couldn’t get perlite. As in the previous couple of grows I battled pH drift in this run as well. Quick note…….I am now mixing my media with 65% coco, 25% peat, 10% perlite and the current run is doing very well for both autos and photos……pH is holding at 6.1 in media rather than damn 7.2 a couple of weeks later, may consider dropping peat a little next run to 20% or 15% and increase the coco by the same percentage to see the impact😊😊😊
By the end of 7 days they had a whopping 1 set of single blade fan leaves out and the thought of a second set of leaves. Then by the end of 14 days they really rocked and we had a set of 3 blade leaves out and a sliver of green forming the first set of 5 blade fan leaves……..on fire they were😊😊😊😊 With the girls facing an 8 week veg, I was in no rush.
At the end 21 days they were roughly 7” tall and it was time for their first upsize to a 1gal pot. They were finally transplanted on day 23. C471 had a better root development that C472 and she was slightly bigger so was eyed as the pheno to get the 5 gal pot in the future. Usual Mycorrhizae added to the holes and in the pots and further microbes to supplement the girls. Need the roots to more plentiful than what they currently are. The girls loved the extra room and week 5 saw good growth as side branching developed and the leaves became bigger……on course!
Late veg and forming a canopy for flower……SCROG or not?????:
Weeks 4 and 5, plus the start of 6, the girls continued to flourish and grow in 1 gal pots. Being feed a couple of times a week they continued to progress. The girls had reached a little of 10” tall and it was time to top them. Not sure about LST or SCROG at this point, I knew they had to fill half the tent, so I went a head and topped the girls on day 37 between the fourth and fifth nodes. The girls grew a little different shaped fan leaves and they were more “pointy” and long in growth……and long lateral growth fan leaves. She wanted to grow laterally on her own…..bonus!
The girls reacted will to the toping over the next days and kept a solid growth. This strain has tight node spacing and will not grow into 5’ monsters like the Gorilla Girl strain they were grown beside. Finally at day 50, Sept 6/20, the girls were given their final home and transplanted a last time. C471 with more vigorous growth was given the 5 gal pot to fill with roots while C472 was designated the 3 gal pot.
I finally decided that a SCROG was going to be the answer because the other girls in the tent will need to be kept tied down. Problem was that these girls won’t stretch much but the other girls will……how the hell to SCROG that situation otherwise you have nodes 12” taller than others and creates a tough canopy to give the correct amount of light??? Solution was to put C47 girls on boxes and rise them up. Took a guess at the potential height difference in the strains and figured I should plant at least a 12” riser of some type. It actually worked out not to bad……they were coming through the top of the SCROG first but as they grew things balanced out between the strains😊
In week 9 the girls took off and we finally had a good canopy to start flower with……all the girls were down low and touching all sides of the tent and each other. Getting them ready to SCROG I decided to perform LST for a couple of weeks and ensure the branching grows to the side and not straight up. They formed 4 main tops on each girl and the side branches were thick. Bud Ignitor added to the feed in week 9 and we are ready…….lets change the light and watch the explosion Baby 😊😊😊 Still only positive thing happening in the grow to this point!!
Flower time and filling up the tent with sticky buds………my F@#%ing tent is too small for the girls:
Okay Growmies……we are on fire, all 4 girls are growing with pistols popping, branches bent everywhere and put in the first layer of the SCROG……..right on!! Soon reality sets in and the fictitious Gremlins arrive to F my grow and actions☹️ Getting ready for putting the net and decided to cut to low branches from C471 as they just don’t have any thickness to them. Concern was that she was now down to 6 main branches on her…..don’t break any!! Mid week I check the tent in the morning and there is a damn fan laying on top of C471!!! That’s no good but shit happens, no visible damage to the plant…..or the fan😊
So we get through week 1, IPM spray done and net is in, and moving into week 2 of flower my heart stopped when I noticed a huge crack in the main stem of C471……WTF??????? So on day 12 of flower I am looking at two girls with cracked main stems…..one C47 and one Gorilla Girl……WTF everything is the same, why did this happen for no apparent reason? Answer - - - - usual “grower F-up”…….I topped the girls to close to the lower node when done and I should have the scissors up against the node above and left a larger “nub” on top……I had them against the node below when I cut and little to no nub left on top!!!! Once they were trained a bit and started growing harder, the stem didn’t have any more strength and cracked right in the middle of the main stem! Learning point……remember to always leave a good piece of stem at the top when using scissors……hasn’t been an issue for me in the past when “pinching” tops as they develop, this was though☹️
So what to do now they are doing awesome????? Well, that is why I support Grow Diairies and continue to use the site outlining my grows……I asked for help and other opinions about what happened😊 Sure enough within hours, I had some input from fellow growers, thanks again @Mr_Motalovah who pointed out quickly what I had done because they had shared about what has happened to them in the past……thanks a bunch for the input Growmie….you rock!! Now that I know what I screwed up, we vaped a bunch of bud and put on the MacGyver Hat and fashioned some supports and ties out of a pool noodle, zip ties, tape, and more weed😊 Tied the girls up and kept the area moist for a week! She never did weld right back together at the crack because it was too major and at a high stress point for the branches. I feel this certainly contributed to C471 not being as big a yielder as I am sure she should have been.
So now we are getting back on track, forget all the other shit of the last two weeks, stay positive and lets rock this grow😊 There was lots to be positive about as the second lay of SCROG is in, the girls are 20” tall and looking happy with leaves up. She has some huge fan leaves and starting to really show some trichomes already! Right on Sweet Seeds……they are pulling through and doing awesome now! Problem I am now having is keeping the air movement in the tent as these four girls are killing it and I am out of room. If I don’t help with more room or air movement, the yield and quality of the bud will suffer……they will finish and all is good but there will be lost opportunity. I really struggle to grow 4 plants in a 3’ x 3’ tent. I am always out of room and can’t get the light down as low as I want. This grow is a perfect example of that. Not to mention how to cool them off and reduce light intensity when ripening in the last two to three weeks?? I need a bigger freaking tent….finally bit the bullet and ordered a 4’ x 4’ tent for flower. Will then have a 4’ x 4’ for photos and keep one of the 3’ x 3’ for autos. Through week 3 of flower and going now Baby, just waiting on a new tent😊
Late flower and watching them buds swell……no worries now, let the deficiencies fly!!!:
Now in week 4 of flower and the girls are getting very big. The trichome production has kicked in and they are looking happy everyday at this point. Tips up everyday and they are loving the light and feed at this point. Chugging along and feeling like we will feed them though week 6 and flush for weeks 7, 8, and 9 and take down about day 62 or so. Feed moved into Big Bud and silica going to keep the stems strong so they support the bud weight. Her nodes have stacked very well and for week 4 she is chunking out nicely! The girls are pretty dark green now at this point and looking healthy. Again, buds are big and they are frosty…..the grow is going very well.
New tent finally arrives in week 5 and we move the girls to a new home with more room for air and light penetration lower on the branches. Had to cut the girls out of the SCROG and added bamboo to the other strain being run with these girls. Since C47 was not very tall, they were not supported. So feeling that everything is good and we are moving forward. Like I say, feeling good, but I think the girls had their issues in weeks 5 and 6 and I didn’t really pick up on it. They had battled high pH through the grow, again why the media change this run, and it seemed to stall the girls. I think I was so focussed on the success of the Gorilla Girls that I didn’t really pick on the fact these girls were slowing down. At any rate, they looked very good and frosty and still eating so we kept going, there were even resin rails beginning to form on fan leaves and they are 24” tall😊 LST helped to keep them short, along with topping. She is showing that she will make hash people happy!!! Awesome trichomes for this stage of growth…..excited as hell!
We move into week 6 and start working on some flushing. She is dark now and concerning. Her hairs are starting to red here and there and I am seeing some colour in the buds. She smells of a strong floral or something that almost “stings” your sinuses…..sorry for description but it was good strong smell. Flush should have begun at the start of this week, six. Instead, it was not given until week 7, almost too late at this point. She had slowed down her drinking and was not uptalking much anymore. Her buds looked beautiful but her leaves were dark. Yup…..F#$% I missed her and she will not finish with the colours that she should. Not much you can do at this point. She was given Flawless Finish twice and roughly 7 days of plain watering before darkness. Then on November 8, Day 51 the girls went into darkness……..the trichomes had matured and it was time. This strain should have stopped her feeding at the end of week 5 and keep the water only for up for 2.5 weeks idea and colours should pop on her…….not one week like I did☹️
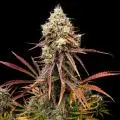
After two days of darkness the girls looked gorgeous and faded a little more than when they went in……right on. The buds are beautiful with the light colour of purple on some calyxes and red hairs in there. Frosty as all heck and sticky like crazy😊😊😊
Harvest, dry, cure and smoking Cream 47 from Sweet Seeds……..is she Sweet Smoke??
Remembrance Day was harvest for the girls. They ran their 53 days and its time to cut them down. It was a little surprising to see that C472 had better bud production that C471 since she was the slower grower. At the same time, it was not surprising as C471 had her stem split and this impacted her yield because of a challenge getting the amount of nutrients she wanted up the stem. She made it to the finish line though and was still making me smile at the end😊 can’t ask for much more than that really! Again, I wanted to compare 3 gal vs 5 gal but this diary simply didn’t work out that way. (one should also use clones for a better test of this and not seeds but its all good because I was just having fun😊)
I hope that my pictures show her level of trichome production as very good to excellent. She has a lot of crystal in her buds and they are sticky. They hung for 10 to 12 days, took a couple of days to finish his time, and went it jars. I kept ALL fan leaves and of course sugar leaves…….in the freezer right now waiting for the next edible or hash run……grower bonus😊 not to mention the crazy good kief in the tray from trimmings you can enjoy as the grower😊 Full Melt Hash!!!
The yield was not the largest for this girl and you can see that in the pictures by the amount of leaf in the buds. They didn’t swell right up……again going back to weeks 5 and 6 in flower I suspect☹️ This is my smoke and I am not worried about yield to be honest. Therefore, even though I only pulled a couple of ounces from each girl…….its primo smoke! The lung expansion is huge and takes my breath away for a couple of seconds as well😊 One dab the size of a rice grain for light weight friend and he was sleeping on the couch 15 minutes later😊 Anyone have insomnia issues?? She is a strong one but with my crazy tolerance she is a nice day to evening smoke for me.
That will wrap it up for this grow and Cream 47 for 2020. Have a few ounces to enjoy plus still have another seed to keep the dream alive😀👍 Should have cloned her........there are so many options though👊 Still, would love to have ran her again knowing that she is done at the start of week 8 and hit the flush properly. On to the next one though.
She was indeed Sweet Smoke!!! Cheers @Sweet_Seeds another one you should be proud of😍😎👊

Likes
2
Share
@EchoEcho77
Follow
Day 28 and these girls are in full stretch. I see a difference in them almost daily now. I top dressed them with 3 Tbs of Gaia Green 4-4-4 All Purpose and 2-8-4 Power Bloom each. Then watered them in real good after that. I split 1 gallon of PH adjusted, declorinated tap water between them.

Likes
3
Share


@RumplePuffskins
Follow
Buds are still stretching and trichromes are still a little transparent so I’m picking this one late. New England heat and humidity I think has it finishing a little bit later than an indoor grow
Likes
19
Share

@Naujas
Follow
Day 140!!! I'm back from vacation:) when I saw her live after a 3-week break, I really didn't expect such a good result:) she looks just great:) Biotabs nutrients helped her a lot :) it's a pity that summer is already ending:( and she gets little sunlight :( fog appears in the mornings, which is very unfavorable for me, I'm afraid that rot will appear, but so far everything is going smoothly:) good luck to everyone:).
Likes
3
Share

@CaveGanja
Follow
Removed a lot of leaves to get better airflow still kind of scared doing it 👉👈
so far the gelato cookies is closest to finish followed from the green gelato.
the isla mirage is maybe 2 weeks behind dosent even have a lot brown hairs.
I check trichome all 3 days and wait for the green gelato to be on peak harvest and cut all 3 down.
This is at least the paln.
Next time i grow autos again.
If im in controll it gets out of controll 😝

Likes
1
Share


@fabialien
Follow
Lunes 19 Agosto 2024
Primera semana de plangulas, desafortunadamente solo dos de 4 blueberrys se dieron, de orange Blossom 3 de 3, una va muy débil pero las demás van muy muy bien, a ver que tal se van desarrollando.

Likes
4
Share


@MoneyMorris
Follow
Looking like 3 more weeks until harvest. I’m going to start flushing in about 10-12 days

Likes
5
Share


@Strangelet
Follow
Day 60
No sun from Monday to Thursday. Almost finished. Will stop feeding her and flush next week or so.


Likes
13
Share

@tuzeus
Follow
So this is the Start of week 9, today is day 57 of flower. Strain is supposed to have 8-9 weeks of flower. Before I started I was thinking of 10 weeks of flower. Let’s see how the week is going. I took some trichome shots but they are not ready yet. I’m thinking of 2-3 weeks left. I will use Athena fade for the last 2 weeks. Maybe I will change to that in the next week. I keep my humidifier running so I have a constant 40-45% of humidity, max 50. Cheers.

Likes
3
Share

@GREENPHOENIX6262
Follow
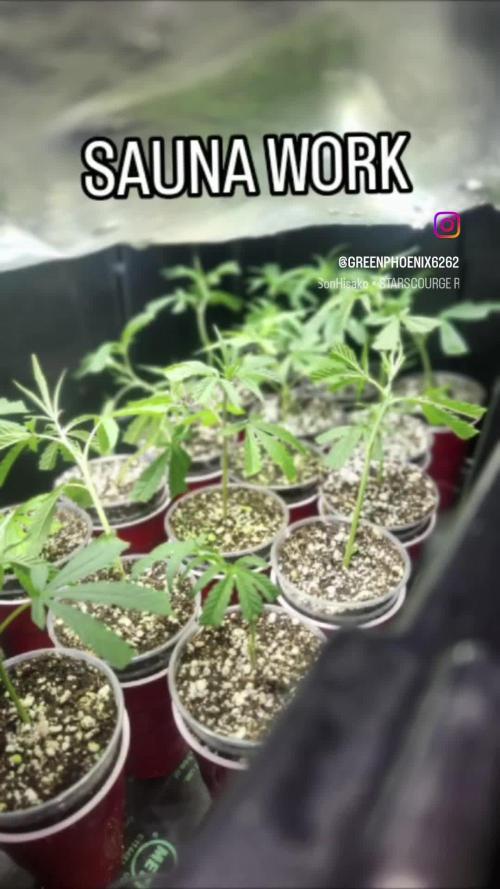
09/03 - Clone cuttings running strong - Chopped the mother - Pulled approximately 17 viable clones - currently in solo cups rooting - Heavy on the humidity prop 80% - Temps 79 (F)


Processing
Likes
9
Share


@TheWeedPimp
Follow
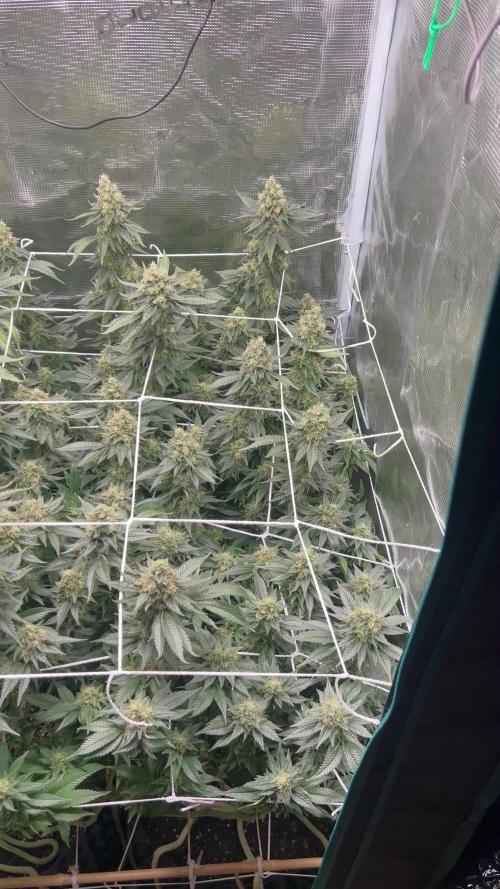
Really like all the training 😍👍🏻
Gurillas just growing up in the Air

Likes
8
Share


@Nutrient_gro
Follow
Really wish she got huge like my gorilla cookies. Buds are so nice. 🔥
Likes
2
Share

@BushDoctor740
Follow
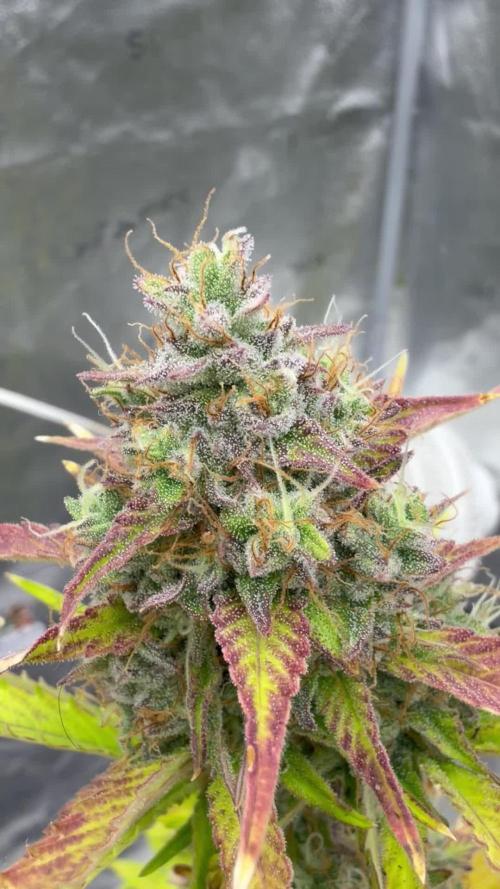
I have the light cranking at 80 percent intensity at this point and the buds are developing into some very nice frosty nugs.The tallest plant seems to be the most advanced and fan leaves have a heavy fade going.I’ll harvest these ladies at different dates.Also I added a combo of bud candy and Plagron green sensation for this weeks feeding to try and pack on some more weight.When I open the tent it smells absolutely amazing in there at this point.