Likes
Comments
Share


@King_Green21
Follow
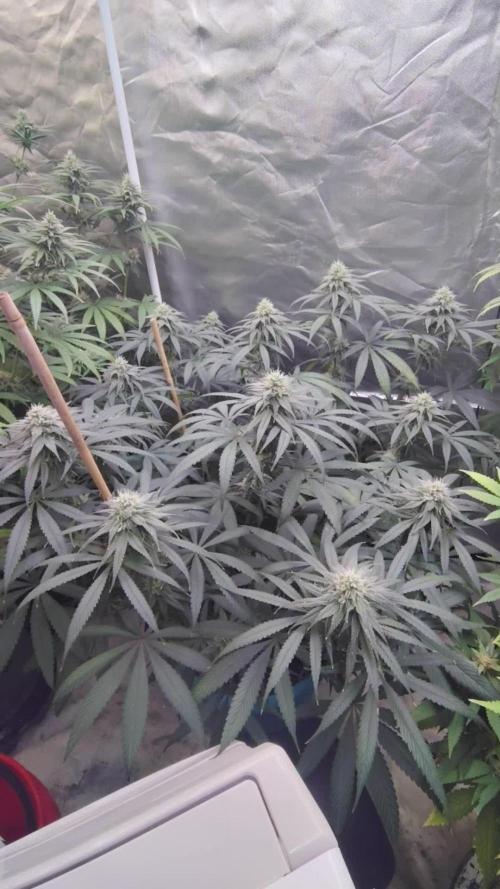
Everything going nicely so far not much stretch after the first week and bud sites popping up everywhere.
Day 66 - they were really bushy so decided to give them a lil hair cut, cutting away all the big fan leaves leaving all the bud sites.
Day 68 - I fed them until run of today as going on holiday next week and have a pal sorting them out from Monday
So far so good :)
Will wait till end of the 3rd week and give them a little defoliation to improve air flow and light spread untill then there fed either everyday or every other day depending on when they need it.

Likes
7
Share


@herbalistssword
Follow
Weather is really bad. I've moved her inside to avoid mold :s taking her out whenever rain stops to get some light. Hope she pulls through.
Some leaves are getting grey, not sure if it is because of environment changes or what. Grow question asked said mg deficiency, but after looking at symptoms it is quite different. I'm leaving her and assuming it is ok

Likes
16
Share


@w33d_zm00k3r
Follow
Day 37: The girls are growing fast and strong! They also seems to have turned into flowering state now. Everything seems good. Ive been recommended to just let the girls do their job from now, and I won't touch them for awhile, but I think I soon will give them some more nutrients as they are now in flowering state.

Likes
12
Share


@Siriuz
Follow
She is loaded right now very heavy and potent yielding plant oh yeah thanks 420 fastbuds I will be getting more of your seeds you rock
Guys im so happy I boughy fastbuds seeds
It was great to see this second seed pop an amazing grapefruit we did fiming and she eneded up with many colas and many flowers plus super frosty and smelly
Also turned purple all buds which to us was a surprise and did not expect that
Since last grapefruit was different than this
Thanks a lot for all your support
Imagine if we had a full spectrum light
I think we would be growing trees
Honestly we have more than we expected
COMING from an Indoor thats nearly located in a tropical climate of 30/33 degrees most of the year and with that said raising temps very hot sometimes very humid thats close to the equator
So we have to use A/C all times and maintain humidity levels by spraying all walls to keep it around 45/60% while ac is on remember droping temps so we have to make it as comfortable as possible and that its not easy in this side of the world
OR either you need a lot of money which I dont have yet to build a super setup and a separate ROOM with all of that temp and great humidity lvls so yeah we do what we can with our budget
We live somwhere where things are pretty much fckd up but it is what it is
Hey at least we are safe because it is illegal lol so yeah brothers we have hard times
And still with all risk we here doing our best
Showing all support
Showing im greatful
TO find a space like this where
We all can share like and Comment
And help each other grow better everyday
Blessings to you all
Keep EM buds coming
Happy growing


Likes
21
Share


@PeterSage
Follow
last week was a stormy like one... it even occurred some hail at one point, as you can see the damages in the pics.
since it was frequently and heavy raining I have not watered, and haven't give any nutrients, except a little bloom disc by royal queen seeds at the start of the week, but one day later it started changing the weather, so I don't know how much of effect it gave...
Likes
43
Share


@TheCannaProphet
Follow
~ FastBuds PAPAYA SHERBET Photoperiod~
Well here we go on another journey together through 'Canna-land' and this one's kinda special... forget that, it's VERY special because this is FastBuds newest surprise for the community, a FEMINIZED PHOTOPERIOD STRAIN!🤯
I was fortunate enough to score these seeds, of which only 1000 were available and can't wait to see what this strain can do! This Papaya Sherbet, according to FastBuds, is a hybrid with a 9-10 weeks flowering period. For a more detailed and accurate description of this strain the following from FastBuds says it best:
"Combining the massive stature of Papaya (Oni Selection) with the strength and resilience of one of our best keeper cuts (Sunset Sherbet), this strain develops into a big, expansive bush adorned with numerous bud sites that later transform into a generous harvest of medium-sized buds. Papaya Sherbet flowers deliver a signature flavor of premium cannabis with subtle citrus undertones that emerge upon inhaling. During growth, her aroma makes for a sweet yet pleasantly bitter fragrance, giving you an idea of what the smoke will taste like. Notably stress-resistant, Papaya Sherbet is a great choice for growers working in challenging environments. She is very forgiving and rebounds quickly from any adversity, allowing growers the freedom to experiment with confidence that she will take everything like a champion she is. This strain embodies resilience, flavor, and abundant yields in every grow cycle."
Sounds like an epic strain and I personally cannot wait for this lady to strut her stuff!😍
________________________________________________________________________________________________________________________________________________________________________________________________________________________________________________________________________________________________________________________
The Setup:
This is going to be an outdoor grow, but I have started the Papaya Sherbet photoperiod indoors as our weather is still a bit too chilly to put a newly sprouted seedling outside (nighttime temp's dipping regularly into the 40's℉).
The plan is simple... let her grow inside under a 19/5 light schedule until the nighttime temperatures are in the mid 50's℉, which shouldn't be long. After which, she'll be moved outside and transplanted into the soil which I have already setup and inoculated with beneficial microbes from BioTabs and slow release dry amendments from Gaia Green. Once she's established herself outside she'll be given periodic top dressings of Gaia Green 4-4-4 and 2-8-4 along with worm castings and Compost Tea's. Her grow area is approx. 5'x5' and I have posts and a trellis net set up already for when she gets bigger to aid in training her. Let the fun begin!🤪💚
________________________________________________________________________________________________________________________________________________________________________________________________________________________________________________________________________________________________________________________
Weekly Updates:
5/31- Week 4 from seed and the FastBuds Papaya Sherbet photoperiod is doing a lot better now that she's going through a growth spurt!
The leaf chewing has mostly subsided now since I have been spraying Neem Oil on her every 2-3 days. She's also beginning to increase in height about an inch per day now and has great color and vigor.
6/2- Yesterday I top dressed the Papaya Sherbet with 2 cups of Gaia Green 4-4-4, 1 cup of Down to Earth Bio Fish along with 1/2 gallon of worm castings. After top dressing and working the amendments into the soil by hand, I watered it in via garden hose with straight well water.
6/4- It rained hard yesterday, so I skipped watering the FastBuds Papaya Sherbet photo today as the ground was still pretty wet.
6/6- The last two days have been sunny and warm so I watered the Papaya Sherbet photo with straight well water from the garden hose today.
Another week gone by for the FastBuds Papaya Sherbet photoperiod and I'm looking forward to next week, as well as the weeks that will follow to see how this lady progresses!
Thank you for checking out my diary, your positive comments and support make it all worthwhile! 💚Growers Love!💚😎🙏
Likes
93
Share


@MadeInGermany
Follow
Welcome to the Zamnesia Spring Cup 🏆
Day 13 since the time change to 12/12 h.
Day 3 since the right bloom started.
Hi everyone 🤗.
This week she continued to do a very nice stretch 😀.
It looks beautiful, and you can see that the Monster Bud Mix does a very good job 👍.
I am very enthusiastic about Monster Bud Mix, and so far I have not found any defects 😀.
Today she got another 25 g Monater Bud Mix because of the slightly longer vegi phase, which should last until the end 🙏🏻.
I am very excited to see how it will develop in the coming week.
I wish you a lot of fun with the diary, stay healthy 🙏🏻 and let it grow 🌱😀
You can buy this Strain at :
www.Zamnesia.com
Typ:
Sour Diesel (Zamnesia)
Zamnesia Spring Cup 🏆🏆🏆
Type:
Runtz
☝️🏼
Genetics:
Zkittlez x Gelato
👍
Vega lamp: 2 x Todogrow Led
Quantum Board 100 W
💡
Bloom Lamp : 2 x Todogrow Led
Cxb 3590 COB 3500 K 205 W
💡💡☝️🏼
Soil : Canna Bio
☝️🏼
Nutrients : Monster Bud Mix
☝️🏼🌱
Water: Osmosis water mixed with normal water (24 hours stale that the chlorine evaporates) to 0.2 EC. Add Cal / Mag to 0.4 Ec Ph with Organic Ph - to 6.0 - 6.3
💦💧


Processing
Likes
36
Share

@MadeInGermany
Follow
Hey everyone :-).
This week they have grown super, but unfortunately they are getting lighter.
3 days ago I added another 1 g per liter of GHSC Powder Feeding Bio Grow substrate, as they still remain a bit in the veggie.
Hopefully it doesn't take too long to release the nutrients.
Whatever the reason, that still not all trips are elemened 🤬.
I've only seen some before, and treated directly with neem oil so that it finally has a rest ☺️.
I wish you lots of fun with the update, stay healthy and let it grow 🍀
You can buy this Strain at :
https://sweetseeds.es/de/sweet-skunk-f1-fast-version/
Type:
Sweet Skunk F1 Fast Version
☝️🏼
Genetics:
Sweet Skunk Auto (SWS34)
X
Early Skunk
👍
Vega lamp:
2 x Todogrow Led
Quantum Board 100 W
💡
Bloom Lamp :
2 x Todogrow Led
Cxb 3590 COB 3500 K 205W
💡💡☝️🏼
Soil :
Canna Coco Professional +
☝️🏼
Fertilizer:
Green House Powder Feeding
☝️🏼🌱
Water:
Osmosis water mixed with normal water (24 hours stale that the chlorine evaporates) to 0.2 EC. Add Cal / Mag to 0.4 Ec Ph with Organic Ph - to 5.5 - 5.8 .

Likes
4
Share


@TheObserver
Follow
Switch to flowering stage
Day #38 12/12 with red LED light from tonight on. ScrOG net Is on. Pots are still wet, no need to water. I defoliated a little bit, then I'll let the alone for a while.
I need to find a environment for the clones. It stresses me a bit but I don't want to kill those 4 little clones, not voluntarily.
Day #40 I still tend to water too much but I'm slowly learning. Watered until saturated with Biogrow and Atami B Cuzz a +b (for coco, whatever),a swell I added a bit of magnesium nutrient by Cifo, a garden store brand. Trying to understand how to ScrOG.
I built a small growbox with leftovers from my garage. Not a penny was spendt in this operation. Clones are still alive. Starting a new diary.
Last night reading blogs I discovered 💡🌟🔆 Photone App 💡🌟🔆, a free grow light meter https://growlightmeter.com/download/
They also have a web guide to establish how much light your canopy needs in the moment https://growlightmeter.com/calculator/ . In pre flower it figured out I need 1100 umol of red LED light (calculation DLI). I adjusted my light height accordingly, It was too close.
Very, very useful. Those guys in switzerland deserves a huge kudo.
Day #42 Growth Is fast. I snapped a branch trying to ScrOG so I repaired It with wire, as I done with tomato before.
Watered with some broth and my own nutrient I use in my garden. I defoliated a Bloom that was facing down.
Humidity at 60%, I'm struggling with It a bit. Dehumidifier in the room Is now set at higher setting.
Happy growing. Any advice is apreciated.

Likes
Comments
Share

@jeffbudger
Follow
week 8 i harvested yesterday on Week 8 Day 4, they are now drying so i will update in around two weeks after the first puff for each, thanks for following guys and ill see you next grow👉

Likes
15
Share


@Elektrolurch
Follow
They survived the nutrient burn pretty well that they got from early transplanting. All have been connected to the autopot tank.
The Mango Sherbet has been topped, the Apple Blossom and one OCP have been mainlined. Especially the Apple Blossom is growing like hell. Never had better genetics so far. Even though I topped/mainlined them there hasn't been any slow down or still stand in growth at all.
Also I've connected the pump to the airdomes on the first 3 in the lower row as the leaves already reached the edges of the pots.

Likes
53
Share


@Mz876
Follow
Looking like she might go into flower soon . Excited. No deficiencies so far


Likes
16
Share


@Andres
Follow
I would believe this variety again ... I think it could be better ... and do not make some mistakes in it ... I recommend it to all growers ...

Likes
2
Share


@Seldom_Seen
Follow
Day 43: (Mon)Small plant is in week 2 of flowering. Fade already stated before buds have matured. Think I should have given more nutrients. Clipped a few leaves off big plant near the tops.
Watered both plants with nutrients 1ml B, 1ml SR and the small plant also got 0.5ml GS
Day 45: Watered small plant with same nutrients
Day 46:(Thursday) Watered big plant with 2ml B and 1ml SR
Day 47: Watered small plant with just ph’d water
Day 49: Watered big plant with 2ml B, 1ml SR and 1ml GS. Watered small plant with half dose.
Likes
34
Share


@CanadianFillmore
Follow
Let the flushing begin! Super pumped to finally be at the end of this first grow of this strain. 4 liters water for the flush. The last week she put on a little bit of size, but probably more density in the buds as well as terpenes and smell was gained.

Likes
2
Share