


Likes
4
Share


@UnitedStrainsGermany
Follow
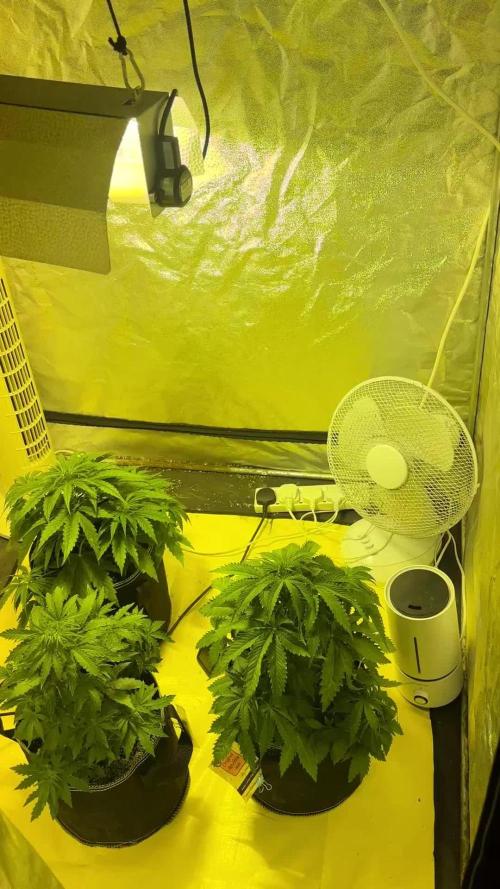
Dieses Mal wurden beide defoliert zum letzten Mal vor der Blüte ich werde beide voraussichtlich in einer Woche in die Blüte schicken beide sind sehr potent und sehr gesund !


Likes
15
Share


@Kayotic
Follow
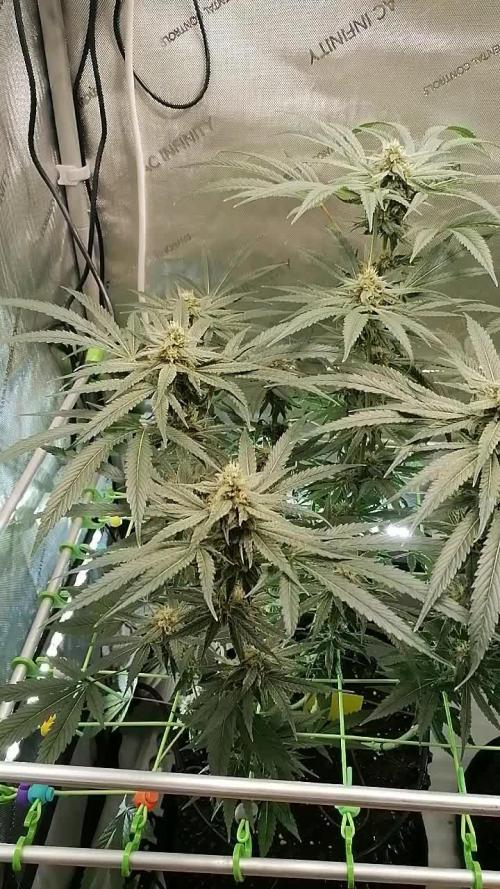
NOT the best week....
-Day 47 since sprouting
- Day 12, week 2 of flower ? ??
Possibly?? Honestly, no idea
Inside
- Last time watered was Sunday
- Tiger Bloom
- Grew tall QUICK , got too close to the light- Broke off the top few inches of the main cola while raising the light and taking fan and filter down on Tuesday
- Very high humidity in tent, started too many at once, didn't expect them to be so big! Got it under control , but too crowded. Now sharing with Zkittles Auto, I believe.
Outside
- Watered Tuesday ( didn't ph water)
- Weather has been very inconsistent- tornado, high winds, rainy, humid, cool, hot
- Seems happy, been having to move her around a lot, hoping today is the LAST time.
They both smell amazing! Not going to lie. I will be disappointed if I mess them both up. One of my favorite strains to use and grow. Next time will be topping and keeping inside, lesson learned. No bugs!
-


Likes
51
Share


@nonick123
Follow
Día 92 (20/01) CBD Auto 20:1 #1 - Reviso los tricomas, y a pesar de tener muchos pistilos blancos, detecto un 50% de tricomas nublados / 50% tricomas transparentes
La cosecha se acerca para este monstruo!
Día 93 (21/01) CBD Auto 20:1 #1 - Los cogollos siguen engordando! Never ending lady!
Día 94 (22/01) CBD Auto 20:1 #1 - Los cogollos siguen y siguen engordando. Increible!
Día 95 (23/01) CBD Auto 20:1 #1 - Cada día pistilos nuevos y mayor densidad! 😍💥
Día 96 (24/01) CBD Auto 20:1 #1 - Se acerca la cosecha
Día 97 (25/01) CBD Auto 20:1 #1 - Reviso los tricomas: 49% transparentes, 50% nublados y 1% ambar.
La senescencia general de la planta con muchas hojas amarillas y el estado de los tricomas me llevan a la cosecha!
Día 98 (26/01) CBD Auto 20:1 #1 - Cosecha! 😍💥💨😁
Un viaje apasionante con esta monstruosa planta que ha crecido hasta 1,60 metros tras Supercropping en dos ocasiones, LST en incontables veces, Lollypopping en 2 ocasiones, varias defoliaciones...
Hubiera sido increible tener en tierra madre (suelo) o en una maceta de 21 litros en exterior...
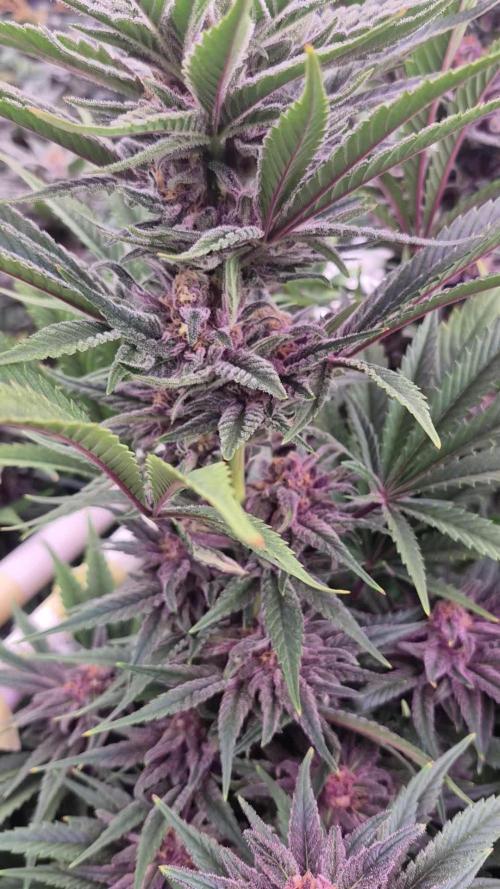
Cogollos estilo sativa, no muy gruesos pero si densos y con forma de bate de beisbol, que en ningún momento paran de formar más y más pistilos nuevos! 💥
El color de los tricomas y la senescencia general de planta nos indica que ya está lista después de 98 días desde germinación
Desprende un olor muy tropical, dulce, como una mezcla de papaya y mango, con un toque picante de fondo
Esperemos a ver con que perfil terpenico nos sorprende después del secado y curado!
Unos colores verde lima durante toda la fase de floración que ha ido mutando a morado en las puntas de los cogollos conforme se produce la senescencia
Esperando a probarla para el efecto 😁


Likes
Comments
Share

@GrahamTheGrower
Follow
Grow is done, extremely happy with the results. 5 day rinse is next.

Likes
7
Share


@Kitties_and_Colas
Follow
We only pulled about 20 grams off this one, we had to cut her down with only 7 weeks of flower, she didn't look too far from done but we needed to clear everything out and it was easier to start them drying than to transport around town.. sorry for the anticlimactic ending if you were following this grow, the stuff dried thus far is decent, about a 6 for buzz but an easy 10 for smell/taste :) ..happy growing friends
Likes
3
Share


@Flako1985
Follow
Transplanting on 05/30/2019. That when I'll turn on the 600w MH. Germinated on May 12,2019. Popped and Planted with 24 hrs.


Likes
98
Share


@DogDoctorOfficial
Follow
And my army as arrived lol its IPM time with in this case is not preventive but its attacking a situation !!!!
In my humble opinion wen growing in organics one fight life with more life and in this case i broth the big guns, i am talking about applying nematodes (steinernema faltiae) with you cant see at naked eye but will do they’re job on the soil and take on a microscopical way, i also am introducing some beneficial bugs to be more exact the stratiolaelaps scimitus they are machines killing trips, soil flies and a bunch of other plages we dont want around our girls and i also invited some Noseilus Californicus as a preventive for Any kind of non beneficial mites. With this i recipe i have faith my girl will be in control until the end of the run were i can clean it all up good !!!
Appart from the bugs situation and that this girl is always starving dont ask me how but just in case i start adding NPK in liquid mineral way lol she is doing amazing to my eyes, i mean the bud formation its amazing , i can already see a canopy full of golf balls , she is not an easy one to grow but i believe she will compensate me with amazing fruits, lets see … <3 <3 <3
As always thank you all for stoping by, for checking my journey , for the love support and for it all, i am blessed and humble with you all.
Just a reminder , all i grow is medicine for myself, for me and for my best friend with is me nothing to sell, so don’t even ask.
All info and full product details can be find in can find @
https://ganjafarmer.com
https://aptus-holland.com/
https://marshydro.eu/
#aptus #aptusplanttech #aptusgang #aptusfamily #aptustrueplantscience #inbalancewithnature #trueplantscience #Ganjafarmer #growerslove
With true love comes happiness 💚🙏 Always believe in your self and always do things expecting
nothing and with an open heart , be a giver and the universe will give back to you in ways you could not even imagine so 💚💚💚
More info and updates @
https://growdiaries.com/grower/dogdoctor
https://instagram.com/dogdoctorofficial
https://youtube.com/channel/UCR7ta4DKLFMg2xxTMr2cpIg
💚💚💚Growers love to you all 💚💚💚

Likes
5
Share


@Do_it_Dan
Follow
She's starting to fatten up now and she's getting rather greedy for water, fed 3 litres yesterday and today she's feeling a little light so probably feed in another 2 days, I'm happy she's happy were all happy 😊 l, happy growing and stay green ✌️ 💚 👌


Likes
17
Share

@Brujha77
Follow
Beginn Woche 12
Außer abwarten ist gerade nix zu tun😇😇
Buds legen gut an Masse zu, und so langsam riecht es wirklich lecker nach Zitrus mit Papaya/Mango😍
Denke bis Ende Oktober/erste Novemberwoche dauert es noch mindestens.
Tag 44 Blüte
Leider gerade etwas Probleme mit Trauermücken🤬 Geht zwar noch, aber bevor die Biester Überhand nehmen heute nochmal SF Nematoden.


Likes
11
Share


@BlaKX
Follow
Ajoooooo das ist bzw war mal ne lange check Liste..Gefällt mir definitiv:)
Die WW muss noch trocken habe sie Komplett Manikürt da vielen 30g Zucker Blätter nass ab und zu Butter verarbeitet
Schätze werden so 75g trocken.


Likes
1
Share

@Bones_1986
Follow
Day 21. Fed just over 1.5L only yesterday and they appear to be really thirsty girls with the pot already feeling light however with the slight curling of Leafs maybe suggests slight overwatering.
Im also thinking a very slight mg deficiency so will add a little cal-mag on the next feed.
Gonna wait at least another 24 hours then Introduce bloom and top max. Would like these to stretch a lot over the next week. Already starting to smell. With this tent being in my garage and the outside temps dropping from 10 degrees now down to 0 the temp inside the tent has gone from 27 to 22. Turned extraction fan down to help hold the heat but with the night 600w HPS on 24-0 as well as plenty of inside airflow, absolute no issues.
Day 23
Just shy of 2L per plant. Responding well. Very early signs of flowering, still stretching about 1” daily really wanna see these shoot up over the next 5 days
Day 25 currently 12-14” height.
Plants are thirsty so another 1.7L fed today.
Day 27.
Cotton berry.
Lacking a little N, so upped the grow. Growing nicely
