


Likes
Comments
Share


@Yuriboyka9
Follow
this week we topped the 5th knot, lst and gave a dose of delta 1 root. See you lateeeerrrr💪


Likes
27
Share


@DeepRootsGrowTrees
Follow
Week # 15 Gelato-K By Kannabia
Week #15 Feb 15th-22nd
Week #4 Flower this week she is starting to stack and the trichome coverage looks amazing along with her aroma!! Check Kannabia for some great genetics!!

Likes
11
Share


@w00tGrow
Follow
Here comes the week 12.
West Coast OG looks huge, what i can't say about Californian Snow, in some moment it buds stopped growing and im not sure about the harverst. what do you think should i give it extra week ?

Likes
32
Share


@GODSGIFT_2005_JM
Follow
🍼Greenhouse Feeding BioGrow & BioBloom
⛺️MARSHYDRO
The ⛺️ has a small door 🚪 on the sides which is useful for mid section groom room work. 🤩
☀️ by VIPARSPECTRA (models: P2000 & XS 2000)
🌱 DUTCH HEADSHOP SEEDS:
www.dutch-headshop.eu
www.dutch-headshop.nl
ONE STOP SHOP
. 100% germination success on first try!
. Very friendly customer service
. Best bio-seed packaging
. Sells other products @ best prices:
. Nutrients
. Vaporizers
. Smoking accessories (grinders, cones)
. CBD Tinctures
. Resin Extracts
. Boveda humidity packs
. Ziplock bags
. Other health supplements such as:
. Lion’s Mane Organic Capsules
. Hemp Seed coffee

Likes
11
Share


@growerflowerweed
Follow
bueno hemos iniciado el dia de hoy con un transplante final de cada de estas niñas las he transplantado a un sustrato propio hecho por mi con los suficientes minerales y propiedades para qeu este cultivo sea una locura , solamente estoy con pulverixador

Likes
57
Share


@Regenwurm
Follow
Diese Woche war ein Berg ab und Berg auf! Nachdem die Ladies nach dem entlauben ohne Befeuchter stellenweise auf eine RLF von unter 30 % gefallen sind habe ich den Befeuchter wieder im Zelt installiert! Nun sind es in Tag und Nachtphase 40-45 % also perfekt. Am Tag 41 die Leistung der HID Lampe auf 600 Watt erhöht. In dieser Woche die Pflanzen mit einem pH von 5,8 und ec von 1,1 gespült. Die Temperatur ist konstant gut. Die Pflanzen wurden ebenfalls zum denke ich letzten Mal stark entlaubt um Licht an die Buds zu lassen. Von der Größe der buds stehen sie der x haze etwas nach,, Ich bin aber zufrieden. Es fängt an gut zu riechen 😁 bis nächste Woche ✌️🏾


Likes
12
Share


Likes
23
Share


@Chubbs
Follow
420 Fastbuds week 2
Gorilla Zkittlez Auto
What up grow fam. Been another awesome week of growth. Keeping everything the same as Keeping it simple is working great so far. They both have very great color of green and new growth it almost seems daily.
All in all Happy Growing
Likes
10
Share


@Gutismoke102
Follow
She has grown to be a beast. She’s been very easy to grow medium feeder ever other day I keep ppm 400-600 so I’m able to feed more frequently. She loves it stay tuned she just warming up

Likes
11
Share


Likes
Comments
Share

@RooftopFarmer
Follow
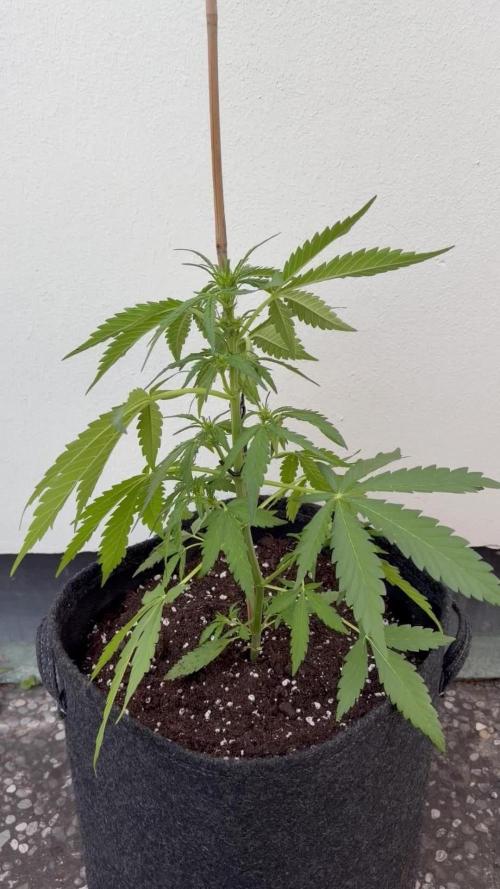
Guava Sundae – Week 5 (Fast Buds Outdoor 2026)
Another week of fantastic weather! Guava Sundae is getting tons of direct sunshine every day and is being fed regularly. She’s really soaking it all up.
As you can see in the pictures, she’s still growing a bit crooked and it hasn’t straightened out yet. The good news is she seems to be doing really well regardless.
I upgraded her support with better sticks this week to keep her stable. She’s now over 15 cm tall with a beautiful, vibrant green color.
Likes
32
Share


@Compassionate_Gardener
Follow
The pistils on all plants are getting more and more brown, its time to check the trichomes now. I check with a handheld microscope and they are getting milky, but not yet amber, which means they are ALMOST READY TO HARVEST, but not yet. The amount of crystals produced under the Q6W-Gen.2 LED-lamps from SANlight is astounding, the plants are coated in trichomes! This week I stopped giving any nutrients in order to FLUSH the plants, this is VERY IMPORTANT in order to get a smooth smoke of the dried end-product. The aroma of the plants is VERY STRONG NOW, they smell mouth-watering. The Shiva Skunk has a sweet, musky smell with a fresh citrus note to it, its a delight to smell those plants. The Serious Kush smells EXTREMELY fuely and gassy, like the OG-Kush, but with an amount of buds like the White Russian, its FLABBERGASTING. I cant wait to try those two strains...😎


Likes
28
Share


@TheHighentist
Follow
Start of week 4 of flower!
Off to a troubling start, as the light switched on over 1 hour ealiere than scheduled.
I took a spare timer, and set it up to continue it's 12/12 schedule, but now moved one hour back.
I cross my fingers they forgive me for this error.🙏
👽👉31/10 The day after watering and the day my timer messed up my 12/12 schedule. But hope it brings no problems.
I defoliated lightly and only removed most under the SCROG line.
Even a couple of underdevoloped branches that stretched below SCROG-net got cut.
👽👉 1/11 Been having a battle with humidity after watering, but upped my air circulation to help.
👽👉 2/11 Waterday*
Upped my nutes on BioHeaven, BioGrow and BioBloom.
👽👉 3/11 They seem to be responding good to the upped nutrients.
👽👉 4/11 Humidity under control.
👽👉 5/11 The VPD on point, has really speed up the trichome production.
👽👉 6/11 Waterday*
Stayed on the same schedule, as last watering. They seem very satisfied and no signs of mistreatment.
Likes
38
Share


@Drgreen13
Follow
Both girls are healthy and going strong, a little cal/mag deficiency on auto#1 but other than that all is good. Auto #2 has turned out bigger than auto#1 but auto #1 is definitely more purple. This is the 10th time I've grown purple lemonade and not been disappointed, definitely my favourite strain atm. Thanks for reading, feel free to check out my other diaries and leave me a like. Stay high, stay fly. #420everyday.
Likes
55
Share


@Bread_n_Buds
Follow
And here we are at the end of this magnificent journey on the spaceship Black Orchid Automatic, a phenomenal strain from Zamnesia, it is the last beauty harvested more or less at the same time as the others but shown separately for the amount of important photos that I am taking.
Please take a look at the macros (micro) and let me know what you think.
This week I'm talking about the harvest of the third and last lady, the purple one, very purple to be clear.
She grew a lot, she matured quite quickly and produced a lot of resin. The flowers are quite hard and of a wonderfully wonderful color.
The smell is very particular probably from the purple / cookies / cake area but the strong point of this beauty are the trichomes. The girl offers a park of trichomes of a disarming beauty, the more I shot the more I wanted to shoot, I was left speechless for real. We have purple stuff in the stem, purple noba in the gland, totally purple stuff in the stem with amber gland, glands in various shades of purple. Wonder for real. There is still something transparent but it had to come venia, like animals feel earthquakes I start to feel the mold in advance, or maybe I'm paranoid, anyway we are mostly cloudy, something amber and a thousand shades of purple and something even transparent.
For me it's fine like this baby. Harvest time, in the drying room.
I strongly recommend you to try this strain both in the feminized version and this one in the photoperiod version, if this plant doesn't convince you wait to see the next two that I will publish in the next two weeks but they have already been harvested.
The taste is still CALI in sense of purple part of cookies family. We feel like we're teleporting to Los Angeles with Snoop making a blunt, incredible California flavor, to be clear in a coffee shop in Amsterdam you would pay 25 to 30 euros per gram.
Everything has always been grown with Plagron Pro Mix soil which I found exceptional, I was used to using Light Mix but I had probably underestimated the power and cleanliness of going 100% organic. It has an absorption coefficient that I find very pleasant, it dries with less aggressiveness than the light mix so you will not have that phenomenon that when the plant is too dry the water goes down. With this soil it is more difficult as it is more difficult to have midges. In my MODEST opinion pre-fertilized are fertile ground for ground midges with this soil I have had ZERO GNATS, before ever.
Information and personalized cards on the Plagron website
---- at the link --- https://plagron.com/en
The plant has eaten the 100% Organic feeding of Plagron: Alga Grow and Alga Bloom as basic nutrients, the rooting Power Roots, the amino acids of Sugar Royal, the Enzymes of Pure Zym that eat the dead parts in the soil, Power Buds that always gives us immense satisfaction with rapidity of start of flowering and composition of the buds, the legendary Green Sensation that now needs no introduction, a name a guarantee. Also the foliar Vita Race used for the first time with success.
The fertilizer kits that you can find on the Zamnesia website are perfect for this purpose, there is everything. Choose them based on their mineral/organic composition and the soil you have chosen.
at the link --- https://www.zamnesia.io/it/11457-plagron-easy-pack-natural.html
The growbox is the DS120w by Secret Jardin as well as the DF16 ventilation system and all the fans
at the link --- https://www.secretjardin.com
The light was supplied in the past by Viparspectra and it went crazy but it came back to me to produce very well too...
at the link --- https://www.viparspectra.com
A fantastic selection of seeds, a headshop and a selection of exceptional accessories on the world of cannabis, many other things about mushrooms, health, well-being and all the beautiful things that nature offers only on the Zamnesia website
at the link --- www.zamnesia.com
Instagram ----
@zam.nesia - @zamnesiawebshop - @zamnesia_usa - @bread_n_buds

Likes
13
Share


@GodZilla_Owner
Follow
The grow began with great anticipation for these two legendary strains: 420FastBuds Blue Dream and 420FastBuds Moby Dick. Both strains demonstrated strong initial vigor, living up to their reputations.
After planting, the seeds of both Blue Dream and Moby Dick sprouted quickly, with healthy roots emerging after just 32 hours. This rapid germination was a promising sign of the robust growth potential these strains are known for.
At the 44-hour mark, the seedlings were introduced to their first light. Both Blue Dream and Moby Dick responded well, showing strong early development. The stems appeared sturdy, and the initial leaves were vibrant and healthy.
With such a solid start, the grow journey for Blue Dream and Moby Dick is off to an excellent beginning. The fast germination and quick adaptation to light suggest these plants are well on their way to becoming the potent, resilient specimens they are famed for.
Likes
51
Share


@nonick123
Follow
Día 8 (28/10) Subo a DLI 20
Spray solo H2O RO en el top del sustrato
Retiro la cúpula de humedad, porque una de las CBD Auto 20:1 tenia el tallo ligeramente doblado por falta de resistencia
Sin la cúpula y con el ventilador a la potencia mínima (1/10), van a tener una suave brisa que va a hacer que se fortalezca el tallo!
Día 9 (29/10) Las plantas se han estirado mucho y se tambalean un poco
Creo que deberían haber tenido un DLI más alto desde el principio!
Día 10 (30/10) CBD Auto 20:1 y LSD-25 Auto se encuentran "tumbadas" porque el tallo se ha estirado mucho!
Hago un soporte casero con una brocheta de madera + alambre + clip de enrejado para mantener los tallos verticales!
Spray solo H2O RO en el top del sustrato
Día 11 (31/10) Las plántulas se muestran verticales y felices! Una de las CBD Auto 20:1 está mostrando un desarrollo muy rápido!
Spray solo H2O RO en el top del sustrato
Día 12 (01/11) Spray solo H2O RO en el top del sustrato
Día 13 (02/11) Las plántulas se están estirando mucho! Creo que las falta DLI
Subo el DLI a 30
Spray solo H2O RO en el top del sustrato
Día 14 (03/11) Introduzco la 1ª BioTab a 5 cm de profundidad, lado derecho
1er Riego! 750 ml de H2O RO + ORGATREX 5 ml/L + BACTREX 1 g/L
💦Nutrients by Bio Tabs - www.biotabs.nl/en/
🌱Substrate PRO-MIX HP BACILLUS + MYCORRHIZAE - www.pthorticulture.com/en-us/products/pro-mix-hp-biofungicide-plus-mycorrhizae
"GDBT420" 15% DISCOUNT code for the BIOTABS Webshop https://biotabs.nl/en/shop/
Likes
86
Share


@Tropicannibis_Todd
Follow
Alright Then
REMINDER I DO 2 UPDATES PER WEEK 👉WEEKLYROUNDUP👈👉MIDWEEKLY UPDATE👈
We just hit week 5 and all is well , for the most part , having a little magnesium issue but hopfully with some adjustments I got under control 😃 .......
Middle of last week I have decided to start with her little sister and started a little training by pulling her over to the side 👌 And will continue to LST this week👈 And she's looking fantastic and she's already begun next faze by preflowering 😲
Pheno #2 is about 10 to 12 days behind
rain water to be used entire growth👍
Lights being readjusted and chart updated .........👍
I GOT MULTIPLE DIARIES ON THE GO 😱 please check them out 😎
Likes
3
Share

@Growmigos
Follow
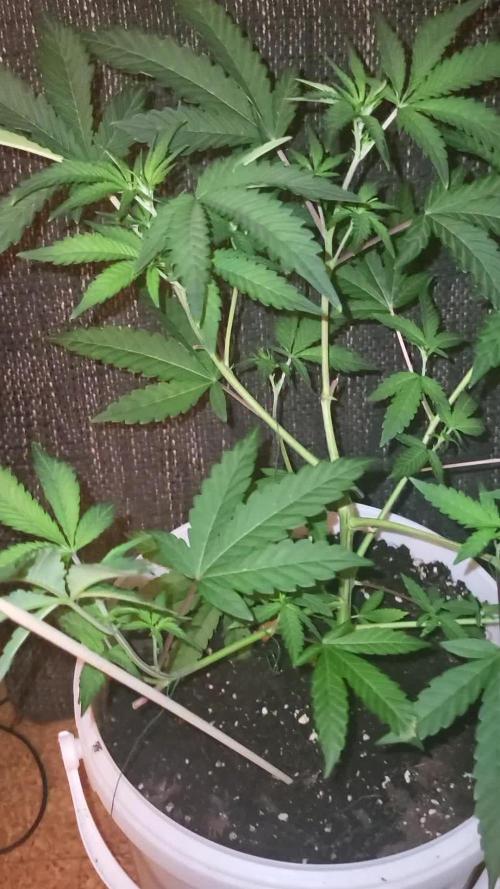
Se wirkt in meinen 👀ein wenig mager aber gut ich mach was draus!! Werde sie nochmal toppen und schauen was geht🌱🌱🌱
