
Likes
Comments
Share


@KingSalomonsWeed
Follow
Duftet. DUFTET hervorragend. Total irre. Caramel Schokolade, vanille süß.
KLEBRIG. ALLES!
GRINS
BUD MACHINE!
Day 51 laut breeder fertig. Ok noch 5 tage.
Aber fertig, ja. Defenitiv. Lasse sie trotzdem noch im Reaktor, denn sie dürfen gerne noch ein wenig reifen. Heute nochmal mit dünger. Den Rest ihrer Zeit dann nur noch Wasser.
19.09.16 16? Ok 17? Egal.
TRICHOME CHECK was successfull..
Har har ok mostly milky. A lot of trychomes not ready.. Buds re not rock hard. Like you touch a dog. Not the fat ones i mean.
And they grow up. Everyday. The buds. I mean theyre not the biggest. But i saw gelato buds spend in dispenserys
(www). Who re smaller than mine.
They grow up in height, tall and weight. Trichomes re the same as always... 😛
Har har.. GANJA THERE EVERYWHERE.
STEAM.
SOME LEAVES(heavy you can see there where she eats aphids. NO JOKE.(@sugarleaves)
First trichomes surrounded it. Than one day later you see them stuck in some trichoms. Than Abracadabra NO JOKE after a few days and nights only some darker trichomes left there. By the time they go brighter again as the others, but bigger).
Sticky smell girl. Mjam
HALLEJUULIA 13 FINGERS A LEAF!
Ganjaloveriamtobringsomedelicious GELATO41FASTfromSEEDSTOCKERStomyworld.
Im satisfied :)
Day 54 of flower. Anything going well.
Did a little pre chop. 3 buds like( with milky trichoms) because of room problems.
They hang dark inside the tent.
And switched my blue light off.
Now only white and red. For faster ripening
20.09.,growing growing growing.
21.09 trichomes re ready. Milky most but ready. 8 weeks of flower, and they're ready. GOOD WORK SEEDSTOCKERS
But i will give her1or 2 more weeks.
Because this strain is so
OUTSTANDING..
She DESERVES a little more time because of some inaccuracies from me......................
And i really want this indica Punch.
For this is better to become some amber trichoms... And weight.. 😛 💪
DAY 58 OF FLOWER.
She is ok. Ripening.
But the aphids.
NOW ITS TIME TO GO TO WAR
☣️ ☣️ BIO LOGICAL WEAPON ☣️ ☣️
BASIL WATER
B weapon for aphids.
Day 59 of flowwring: in progres.
And found the first trichoms going amber.!!!!!!! YES.!!!!!
Day 61. Nuggets or Buds? BUDS!
Day 63. Waiting.
Day 65 Chop of Buds the Rest needs more time. Where re my buds? Fallen, washed, now about to dry.


Likes
60
Share


@BudBoutique
Follow
Welcome to Bud Boutique Grow Diary - really appreciate all your love and support :)
Dont forget to check out my other current grows!
🗓️ This Week:
- Day 20: doing good and getting bigger and fasten up a little bit
- Day 24: developing faster and faster, roots as well
- next week finally ready to transplant - still focus a bit little stronger rootball before I wanna do repot
- both still inside AC Infinity Germination Kit
- keep up high humidity with about 80% and open the little air vents of the humidity dome to start with a minimum of air circulation
Thank you for still staying with me 💚
___________________________________________
--- 🌱 Strain (Sponsor) 🌱 ---
🏷️ Cookie Haze by Kannabia Seed Company
https://www.kannabia.com/en/feminized-cannabis-seeds/cookies-haze
--- 🥗 Nutrients and Feeding (Sponsor) 🥗 ---
* 🍸 XPERT NUTRIENTS: Master Grow A+B, Master Root, Enzymes
* 📅💪 baseline + additives: 2ml/l
https://xpertnutrients.com/
---💡 Lighting ---
💡AC INFINITY - Germination Kit
https://acinfinity.com/grow-accessories/propagation/humidity-domes/humidity-dome-germination-kit-with-seedling-mat-and-led-grow-light-bars-5x8-cell-tray/#product-warranty
--- 🏭 Grow Setup ---
* 🏠🌿 Indoor: Homebox 120x120x200cm (4x4)
* 📐🌀 PrimaKlima exhausting Fan 1180m3/h (running on 60-80%) & Can Light Filter 800m3/h & 1x Fanbox 1x Dyson fan for Air circulation
https://primaklima.com/de/shop/ventilatoren-de/ec-ventilatoren/pk160ec-tc/
https://canfilters.com/products/filters/
All Likes and comments are highly appreciated!!!
don't forget to check out my Instagram: budboutiquee
- Bud Boutique


Likes
12
Share

@ZhulenejJohny
Follow
Zdar hombres, máme tu 27. Den květu holky v cajku, zvýšil jsem hnojky a zvládají to úplně ok. Snad pořádně nakyneme. Zdar zas za týden.

Likes
8
Share


@Ikalimkury
Follow
Craaazyyyy weeks
Craaazyyyy growth
Loving it AAALLLL
Ok, so, this is the 5th week.
Plants started flowering during 4th. They've had massive growth (from my perspective and experience 😅😅) and started to smellll
I think I was consistent on that LST. Always trying to give all the heads as much light as possible. It was a lot of work, but I still loved it. Having 2 plants makes it more fun because I need to have a diferent point of view for each one.
S has been toped, and with LST I was able to have lots of heads very well positioned
B is responding marvelously to bending, wich makes it hard to bend because THERE IS NO MORE ROOM TO RUN TO 😂 she is growing a lot, and there's just to much leaves to tuck...
As I was saying they're different, wich I am loving
I decided to defoliate them as my last stress move towards the plants.
Cutted the leaves that were on the bottom and covering the top heads, and the very small, tiny, thiny side branches.
I am lowering the LST to minimum.
Since the heads I chose, now have space and LIGHT to grow at will, I want to not disturb them as much as I can.
You can see that when I defoliated them, there was light on the soil. And just in 1 day difference, even at this point, you almost can feel them grow! I was amased, because of the stress I had caused them.
Yet, look with attention, you can spot the differece.
(I hope you can see it too through the screen, because it's real 😅)
Look at the S. She is doing just greaaaaat. Think it was a good decision to top her. Hope it keeps growing as it is!
Smell is increasing
Day 30 changed the light to 24h ON.
Day 31
- Heads bigger
- !QUESTION!
-I always water the plants simultaneously. B's vase is noticeble heavier. Cant understand why... I'm going to start checking if they need to be watered at different times. I can only imagine that the root system is different, due to its "differences outside". But really! They have suffered different stress at different times... different root system = different drainage?
Food for thought
Day 32
Defoliated them because I thought they were too bushy. Felt like it maybe was a mystake, later, due to some recommendations i read...
Day 34
Plants seem to have reacted ok to defoliation, lets see how the next days go by
Day 36
Starting to get frosty and smelly
Plants seem healthy ❄️
TEMPERATURE: 22-27°C
RH: 40-60%
WATER PH: 6.2-6.5

Likes
18
Share


@Bunterbiber
Follow
I flushed the 3 girls with approx. 30l each and of course stopped feeding them about 1 week ago. Therefore, as you can see in the pictures, the older leaves turn yellow. Most of trichomes are milky. We'll see when the girls are ready for the harvest.
GG#4 No.1: 100 cm
GG#4 No.2: 100 cm
Runtz F1 Auto: 45 cm

Likes
14
Share


@Mr_Dior21
Follow
Another slow week. I increased light schedule to 13/11. I’m going to slowly lower the time of light until by the time harvest day comes it’ll have a longer dark period. I’m also going to stop feeding the bottle nutrients my soil is moist still so I gotta wait. I’m predicting a couple ounces this grow.

Likes
12
Share


Likes
37
Share


@Dr_Doobie
Follow
Solid week of growth and development. Temperature, humidity were solid and dialed all week.
Both plants were defoliated and trained towards the beginning of the week. They bounced back quickly and started to pack on weight which led me to look into trellis.
I don’t like that you can’t move the plants once the trellis is set and that it’s stupid pieces of plastic. We’ll see how many times I can re-use the trellis before it’s trashed 🙄.
That said, I can already see the benefits. It really helped me even out the canopy and lower a few stubborn colas as well as open the lower levels to more light. Nice. I’ll be investing in some biodegradable trellis in the future if I like the results.
I started using Fish Shit! between feedings to condition the soil. So far, so good.
As for the clones, I used hardware store rooting hormone instead of a high quality gel or powder rooting hormone. You get what you pay for . . . I also think I’ve kept my growing medium too moist. I’ve had one clone root and transferred. I’ve been trying to dry the medium out a touch. Hopefully I get at least two more rooted within the next few days.
This upcoming week I’ll continue the nutrient regiment and begin the pk boost for weeks 4, 5, and 6.
Likes
17
Share


@World_Breeders
Follow
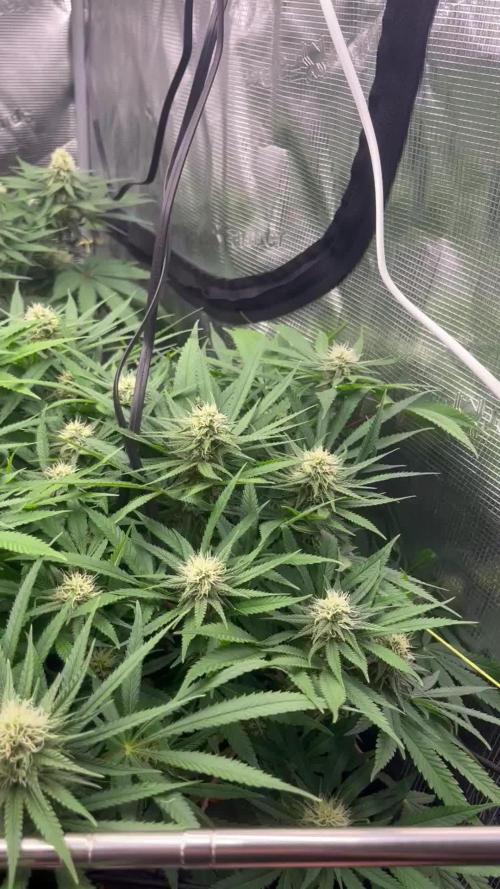
Pilot reaches week 6 with noticeably denser flowers and a strong increase in resin coverage. The buds are stacking well along the branches, developing solid structure while maintaining the plant's characteristic open architecture. Trichome production is now evident across both flowers and sugar leaves, and the terpene profile continues to intensify. This cultivar is showing excellent flower set and is entering the final fattening phase with great potential for quality and resin production.
Seeds by World Breeders
Cultivated by Piperoots 🇲🇦 🌱🔥
Likes
9
Share


@DESERT_DANK_FLAVER
Follow
ENDING WEEK 4, THEY SEEM TO BE HAPPY. QUESTION? WHEN SHOULD I TOP THESE GIRLS. ?
Likes
11
Share


@Glizzy420
Follow
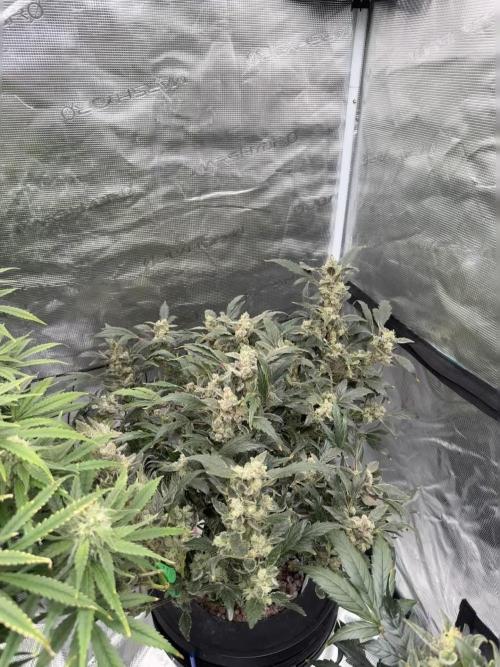
This plant just amazes me how many thricomes it has , i would definitely recommend this strain. I'm curious how it will smoke when it dries up! 😁
It smells very fruity and piney and you can see the crystals shining on it.
Very happy with the results 🙂
Likes
10
Share


@Staffedition
Follow
Привет друзья!
Как смог спас растние, уж очень я их люблю и рука не поднимается выкинуть.
Первый раз покормил на стадии начала цветении. Вчера ещё раз покормил.
Шишки ещё набирают массу.
Растение маленькое и явно с нарушением генетик, но я полюбил эту малышку.
Как и обещал покажу в конце еще одно растние этого сорта.
Тоже маленькое но очень красивое!
Всем мира, добра и хорошей генетики!
Likes
1
Share

@Antarctic
Follow
Week 14 (Apr 1 – Apr 7)
April 1–3 → buds heavy, pistils turning darker.
April 6–7 → macro shots of trichomes: mostly cloudy, still some clear.
Aroma increasing strongly.
Processing
Likes
9
Share


@MG2009
Follow
04/28/2020
Week #8 of flowering begins will post more pics latter.
04/29/2020
Did some leaf removal had some powdery mildew on some leaves took infected leaves off, plus some for good measure. Drying out every day or two today she took one liter before run off. You can see in the video the colors? And sparkling buds?
04/30/2020
Day 50
I decided to take the top buds in pics , 47 grams wet.
It is a 9-12 week strain but I think she need a week or two? But we will see.


Likes
6
Share


@eldruida_lamota
Follow
Que hay familia, volvemos por aquí y actualizamos la quinta semana de floración de las Original de GrowBarato.
Jodo, que aroma más rico que desprenden, cómo están progresando y cómo se están poniendo repletas de polen.
Estoy bastante contento aún siendo los ejemplares de granel, orgulloso del resultado hasta ahora.
Agrobeta:
https://www.agrobeta.com/agrobetatiendaonline/36-abonos-canamo
Mars hydro:
Code discount: EL420
https://www.mars-hydro.com/
Las maximas de temperatura no superan los 26 grados y las mínimas no bajan 20, así que no me puedo quejar.
Los niveles de humedad también son los correctos van entre 45%/55% de humedad relativa.
Por supuesto el Ph lo estamos dejando alrededor de 6.
Hasta aquí es todo, buenos humos 💨💨💨.

Likes
Comments
Share


@Slap22
Follow
Starting to really stack up not going to be a giant harvest but those buds are dense af
Likes
29
Share


@Prilyfe13
Follow
March 1, 2024 Day 15
A new week and a lot of changes. We are talking watering, nutrients, lighting and RH.
First, let's discuss the look of these girls.
They have extremely broad leaves and the yellowing was definitely a nutrient deficiency. The tops started turning a very light yellow. A sure sign of a deficiency. I'm not sure what it is though. Nitrogen or Cal/Mag? On of those. I think. They are both 3" tall now and are starting to really stretch.
This leads me into the next topic. Nutrient regimen. Today started the Advanced Nutrients 3 part base at 2 ml/gal each and Advanced Nutrients Sensi Cal/Mag extra 2 ml/gal. They also got another dose of Recharge.
That being said, out next topic is watering.
I have changed up the watering to 500 ml every other day starting today. I'll keep a close eye throughout the day for any over watering issues, but I don't think there will be any. I have the moisture spread well throughout the entire container. No runoff so that's good as well. It means I haven't over watered for such young plants.
Now for lighting. The light was dropped last week from 29" to 27.5" but this morning I made some changes. I increased the light intensity up from 30% to 40%. I also raised the light to 28" from the little baby plants. This all increased the light intensity to a happy level.
DLI: 22.7 mol/m²/d
PAR: 350 ppfd
Distance: 28"
Finally we are looking at RH. The goal for this week is 60%. With the higher light power level the temp will increase. In turn, the humidity should hover around 60% to 62% with the temp closer to 78°. However, I would like to keep it at 77° for the whole veg stage.
That's all for today.
Grow System Environment:
Temp: 73°
RH: 60.3%
VPD: 1.09 kPa
March 2, 2024
Kind of running into an issue with feeding and watering. The containers aren't as moist as I would have hoped and I'm starting to think the nitrogen levels are still low. I think I'll increase the whole regimen by 50% and double the Cal/Mag. I'm also considering feeding 250 ml on off days. For this week, I'll use nutrient water and no plain water. I'll switch to every other watering, next week. Just until I can get them to catch up. They are both still very yellow.
As for lighting, it's perfect. They are both reaching just right. Perfect praying. I will most likely increase the power level to 60% next week to match the middle/ late veg stage. I'd really like to be at 100% power by the middle of flowering.
Other than the yellow leaves they look healthy as can be. Super broad leaves and strong stalks. I have fans running in the tent for circulation but nothing is directly hitting the plants. That will hopefully keep the stalk malleable for training which will start when they can reach the edge of the containers without folding the plant in half. I would like to see maybe 5" of standing stalk from the base. Much easier to water when the soil is free of too low hanging branches.
This time around, I will do my best to keep these well defoliated. However, I don't want to go overboard. According to FastBuds, the buds are super dense and the branches need to be supported and spread out for air flow. They didn't say anything about leaf coverage. I'm guessing they will be super busy as it goes with most indicas. We shall see though. I may ask for help from the community for defoliation. I'm no good at it. At least not with autoflowers. I feel I'll have a lot more control with photoperiod, but I like the autoflowers. I have plenty of photoperiod seeds, just haven't had the space to grow them. Some day, I'll grow some. Probably a better idea to grow them sooner rather than later. Maybe I'll run them after my Sour Diesel/Blue Dream run. That will be after the competition I'm joining around 4/20. Those will be autos as well, so it should go pretty quickly.
Update: I decided to water in 250 ml after all. I didn't water at the base though. I feel that is crucial in not overwatering the young plants. When I water the 500 ml tomorrow, I'll water the base. It seems to be working. Also, I am wondering if I should do a foliar spray with the nutrients just to help speed up the nitrogen intake. I'll have to research if I should or not.
Grow System Environment:
Temp: 74.1°
RH: 60.9%
VPD: 1.10 kPa
March 3, 2024
So I realized that I need to compensate for the complete lack of nutrients in the soil and bumped the feed from 2 ml to 3 ml for all the nutrients except for Recharge. They got their 500 ml watering today. The bases were watered as well. A tiny bit of drooping, but they were just fed and the water needs to seep in. Plus the lower half of the containers are still fairly dry. So that should certainly spread down and even the soil out.
They also haven't recovered from the nitrogen deficiency completely, but I'm sure that will come with time. They aren't slow, at least not that I can tell. They seem to be growing at a decent rate. They are both the same size and nearly identical. Even down to the nitrogen deficiency. What's interesting is the 2 Banana Purple Punch's don't seem to be as hungry as these two and they didn't show signs of it until just yesterday. But I'm pretty sure I caught it in time. Nothing to worry about... I hope. Lol...
Anyway, I had to raise the light and inch. They are starting to stretch and I'd like to keep the DLI at 22.7 mol/m²/d for the rest of the week. But I may also mess with the light mid week and increase the power up to 50%. I'll probably have to raise the light, but then next week I can move right into 60% and increase the DLI. I'll decide over night. Might be a good idea. Getting the extra power down to the plants so they can grow like mad.
The environment has been nearly perfect for the last couple days. The RH is spot on and hasn't really moved much at all. The temps have been comfortable at 77° during the day and 70° for lights out. I plan to keep it that way for the rest of this week. Next week, I'll decrease the temp a bit and drop the RH to 58%.
Grow System Environment:
Temp: 75.5°
RH: 62.1%
VPD: 1.11 kPa
March 4, 2024
Lots to do today.
Let's start with watering. Both plants got their 250 ml where I don't water the base of the plants. They are still pretty yellow, so I may increase the Grow base nutrient a bit. I really need the nitrogen deficiency to catch up now. This time is absolutely crucial for growth and I know they aren't growing at their fullest potential. Hopefully the boost from tomorrow's feeding will show improvement overnight. I may even do a light foliar mist as well. Something to get more nitrogen in the leaves. Maybe I'll do it with just the base grow nutrient.
Reservoir instillation is coming next week. So I really need the containers to have a bit of runoff when I install them. I may have to do another 500 ml after tomorrow as well. The containers just aren't moist enough yet. Hopefully it will be fine by the end of the week.
As I mentioned yesterday, I messed with the light today. I increased the power level up to 50% and dropped the light about an inch for a new intensity.
DLI: 27.2 mol/m²/d
PAR: 420 ppfd ( totally on purpose 🤣)
Power: 50%
Distance: 27"
This is prep for next week as the light power will be increased to 60% and DLI increased. The goal is to get the light down to between 24" and 26" from the canopy.
Grow System Environment:
Temp: 76.0°
RH: 62.0%
VPD: 1.14 kPa
March 5, 2024
Both plants are looking really nice. They are both still a bit light green though. I'm sure in time, they will both be growing like mad in no time.
They are getting close to the edge of their containers. Right on que. In 2 days, they should be big enough to install the basins. Hopefully the roots will be close to the bottom where the wicks can work their magic.
I watered in 500 ml today. I decided that I needed to increase the nutrients as we are coming to the end of week 2. So now I have all nutrients at 4 ml/gal except the Recharge of course. I may increase that for next week.
I'm not sure that I've caught up to the nitrogen issue though. That's still a concern. I really want to do a foliar spray, but I don't know if Advanced Nutrients are foliar compatible.
I had to move the light up a half inch today. It's not much, but I'm keeping the PAR at 420 ppfd until next week.
The environment is spot on for the week so far. 78° and 60.5% humidity for the day so far. As for last night, temp at 70.7° and 62.5% humidity.
Grow System Environment:
Temp: 76.1°
RH: 61.9%
VPD: 1.14 kPa
March 6, 2024
Both plants got watered 450 ml today. That's what was left in the jug, so that's what they got. I did end up watering the bases as well. I need moisture throughout the soil ASAP.
The light green is still there. So I'm not sure they have enough nitrogen yet. I'll definitely be increasing the nutrition dose again at the start of next week.
I didn't mess with the lighting today. I'll check it tomorrow and adjust as necessary.
The environment is looking great as well. It's a bit warm out today, so the tent is hovering at 78°, but the RH is still at 61% wonderful!
Grow System Environment:
Temp: 75.9°
RH: 61.7%
VPD: 1.15 kPa
March 7, 2024
Boh ladies got their watering today. I started with 250 ml and waited an hour to add the other 250 ml. I also increased the base grow nutrient to 8 ml from 4 ml as well as Recharge. That was increased from a quarter teaspoon to a half teaspoon.
Both plants are still showing signs of nitrogen deficiency. So the increase in grow nutes should do it. I'll also be able to water in a liter pretty soon. It won't be tomorrow, but maybe the next watering after that. We shall see how things go.
Lighting is fine still. I didn't move anything. The plants aren't tall enough for the intensity to increase. Either way, tomorrow I'll be increasing the power and intensity. They should love the change. Especially at this age.
The environment is also spot on still. I'll be decreasing the humidity down to 58% tomorrow and will keep the temp the same around 77°. It should be perfect for week 3 of veg. I expect the flowering stage to start in a couple of weeks. Maybe a week and a half. At least that's what I should be expecting according to FastBuds.
I'd also like to note that both plants have been rotating all on their own. It's intriguing how they are doing that. I'll have to start rotating in a couple weeks when they get bigger. Unless I have to run a net, then no rotation obviously. Still super interesting.
Grow System Environment:
Temp: 75.5°
RH: 61.6°
VPD: 1.13 kPa
Likes
15
Share


@DeepRootsGrowTrees
Follow
AUTO MOON ROCK / DIVINE SEEDS
HARVEST WEEK
This lady was easy to grow she didn't have any issues during her grow. She produced quality stinky buds just covered in trichomes!! She's a heavy
smoke nice and relaxing for both your mind and body. She's a special lady!! Stay Growing!!
Thank you for stopping by and taking a look it's much appreciated!!
THANK YOU DIVINE SEEDS!!! Appreciate you hosting the grow contest!!
DIVINE SEEDS / AUTO MOON ROCK
