


Likes
12
Share


@cheetah844
Follow
Looking healthy, hoping it'll be a girl. I'm ready to get my hands on some Blueberry OG again, I haven't had it in over 2 years. I remember it being a relaxing but still alert & dissipating my daytime migraine.
Likes
15
Share


@URUGUAY_BOY
Follow
Estupendas, estoy muy contento con los resultados que voy observando, me tienen enamorado con el olor a frutas variadas, la resina que tiene es impresionante brillan como una cucharada de azúcar,
y tiene 67 dias. El proveedor dice que con 70 dias pero alguna le queda un poquito mas de de lo recomendado si que otras están muy bien echas pero otras no.
llevo toda la semana lavando la raíz con agua.

Likes
98
Share


@Tropicannibis_Todd
Follow
💩Holy Crap We Are Back At It And Loving It💩
Growmies we are at DAY 28 and she's just killing💀it👌
👉We are in the Preflower stretch 👈
So Shit , I gave them just a tad to much nutes on the last feeding 👈 But I have since fixed it
So I'm starting to pull her over and do some low stress training 🙃 and some defolation 😳
Lights being readjusted and chart updated .........👍rain water to be used entire growth👈 Changed To Bloom 8-20-30
👉I used NutriNPK for nutrients for my grows and welcome anyone to give them a try .👈
👉 www.nutrinpk.com 👈
NutriNPK Cal MAG 14-0-14
NutriNPK Grow 28-14-14
NutriNPK Bloom 8-20-30
NutriNPK Bloom Booster 0-52-34
I GOT MULTIPLE DIARIES ON THE GO 😱 please check them out 😎
👉THANKS FOR TAKING THE TIME TO GO OVER MY DIARIES 👈

Likes
253
Share


@Ju_Bps
Follow
Hello growmies 👩🌾👨🌾🌲🌲,
👋 The babies growing well, and healthy, not yet in pot, I prefer wait harvest of other girls, to down the light and avoid burning.
We'll start grow nutes next week in in pot.
💧 Give water 2x per day, keep soil wet with vaporisator.
Water + Rhizo
PH @6
💡Mars Hydro - FC 3000
50% Not yet under
Mars Hydro Fan kit
Setting 7
Have a good week and see you next week 👋
Thanks community for follow, likes, comments, always a pleasure 👩🌾👨🌾❤️🌲
Mars Hydro - Smart FC3000 300W Samsung LM301B LED Grow Light💡💡
https://www.mars-hydro.com/fc-3000-samsung-lm301b-led-grow-light
Mars Hydro - 6 Inch Inline Fan And Carbon Filter Combo With Thermostat Controller 💨💨
https://www.mars-hydro.com/6-inch-inline-duct-fan-and-carbon-filter-combo-with-thermostat-controller
Fast Buds - GG4 Sherbet FF🌲🌲
https://2fast4buds.com/us/seeds/gg4-sherbet-fast-flowering
Likes
13
Share


@AutoCrazy
Follow
This plant is coming along nicely. Starting to bud up a little bit now. Haven’t had any issues crop up this week. She will be getting a top dress soon to keep her happy.
😎🍿


Likes
8
Share


@Changman
Follow
Shout outs to MiyaguiOkPolilla for the lateral training tip, as you guys can see, we have bent them and hopefully this will double our flower power, lets see what happens growers!
Likes
92
Share


@DogDoctorOfficial
Follow
Week 16 Flower: Embracing the Flush & Celebrating the Shine 🌟
It’s week 16 of flower, and a pivotal moment in the grow journey! This week, we’re diving deep into the flush phase, a critical step in achieving those clean, flavorful harvests. 🌿 Switching over to just water with 0.5 ml/L of System Clean marks the start of what I like to call the “So Cal Flush.” We’ll break down the whys behind this practice, the benefits of flushing, and how it sets the stage for smooth, aromatic results. Let’s demystify this important phase together and make sure everyone feels confident implementing it in their own grows.
The Room is Glowing ✨
Every plant in the garden is unique, shining bright under the ThinkGrow LEDs! 🌈 Here’s the lineup of what’s happening:
• Green Papaya: The frost queen herself, dripping with trichomes, setting the frostiest example.
• Punch Pie: Claiming the crown for the fattest buds in the room—absolute monsters in size and density!
• Gorilla Melon: A beauty with mesmerizing red reflections dancing across her leaves.
• Papaya Zoap: Still stealing the show with snowy whites and pristine structure.
This week was a photographer’s dream—I pulled out my Sony and Nikon cameras to capture some jaw-dropping close-ups and unique angles. I’m sharing these shots to highlight the sheer diversity and beauty of these genetics.
Tech in Action: TM+ Pro App 📱
Let’s talk tech for a moment. The TrolMaster ecosystem paired with the TM+ Pro App has been an absolute game-changer. Capturing and sharing real-time data and alerts, it provides peace of mind and full control from anywhere. Whether you’re a seasoned grower or just starting out, this tool simplifies and elevates the entire experience. I’ll share some videos from the app this week to show exactly how it’s helping me stay on top of the grow like never before.
P.S. — A Word on the Ecosystem 🌐
The TrolMaster system is proving to be a standout solution for growers of all levels. Its intuitive design and easy configuration make it perfect for beginners, while offering the advanced customization and precision that experienced growers crave. Whether it’s managing lights, fans, or sensors, this ecosystem has you covered with simplicity and reliability.
A Big Thank You ❤️
None of this would be possible without the incredible support from this community, my sponsors, and Grow Diaries itself. Massive thanks to TrolMaster, ThinkGrow LED, Aptus Holland, ProMix Soil, Cannakan, and the incredible seed banks for making this journey so rewarding. And, of course, a heartfelt shoutout to YOU—the followers, lovers, and haters alike. Your energy keeps this mission alive. 🌟
Let’s keep growing, learning, and sharing the love. 💚 See you next week when we explore even more as we inch closer to harvest day! 🌱 #GrowWithMe #ControlledEnvironment #PositiveVibesOnly
Discount Codes so you can save big on your next check out 💚💚💚
Kannabia - DOGDOCTOR 30% off
SeedsmanSeeds - DOGDOCTOR 10% off
CannaKan- DOGDOCTOR 15% off
terpyz.eu - DOCTOR 15% off
The Neutralizer - PORKIT5-DOG 15% off
Fast Buds - DOGDOCT 15% off
As always thank you all for stopping by, for the love and for it all , this journey of mine wold just not be the same without you guys, the love and support is very much appreciated and i fell honored and so joyful with you all in my life 🙏
With true love comes happiness 💚🙏 Always believe in your self and always do things expecting nothing and with an open heart , be a giver and the universe will give back to you in ways you could not even imagine so 💚
Friendly reminder all you see here is pure research and for educational purposes only
Growers Love to you all 💚💚💚


Processing
Likes
16
Share


@GreenMunchkin
Follow
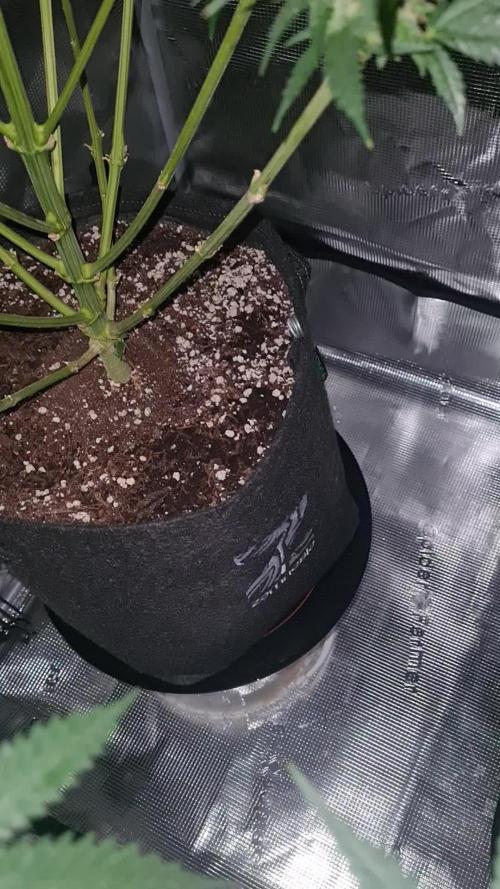
Day 16: Some branches were tied down already. trying to get her to expand as much as possible. The previous training I did with a Dance World, ended up with a very bushy plant which did not allow a lot of light penetration.
Day 18 : They were transplanted in a hempy bucket, I would like to play with it once more. I did not use layers only spike in the super soil.
it follows the same recipes as the first transplant in week 2.
Day 19 : They were both topped in order to keep 5 branches on each plant, I would like them to spread out as much as possible as they get so bushy. Trying to adjust from the first grow.
Day 21 : They were tied down in order to start growing outwards instead of up.
Likes
13
Share


@GodZilla_Owner
Follow
The Blue Dream has recovered somewhat this week. The Moby Dick became more and more yellowish over the week, probably due to magnesium.
I have uploaded some pictures of the leaves, perhaps someone might like to comment on their suspicions, without wanting to influence my guess.
I don't know to what effect this will have on the harvest, but the buds continue to grow.
Likes
8
Share

@bkickstand
Follow
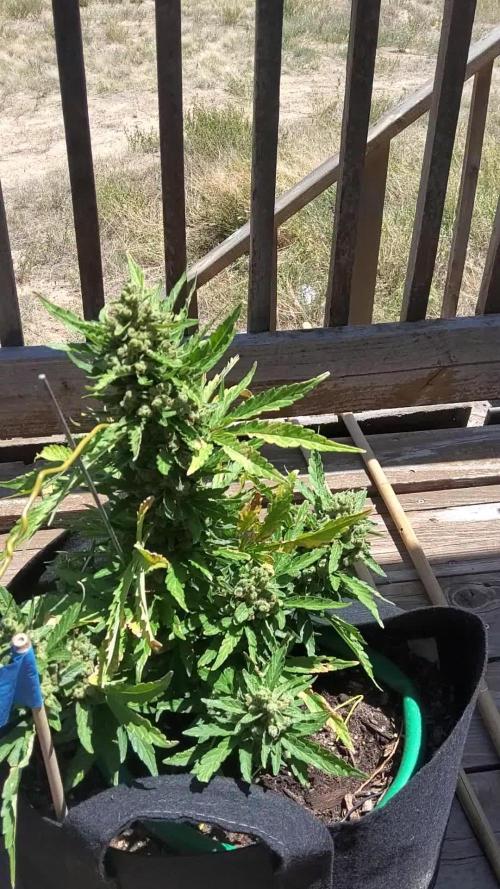
Grow Diary Entry: July 17, 2026
We have entered the flush phase of flowering. Plain well water at a PPM of about 550 and a pH of 7.2.
Charlotte (Week 8 of Flower):
She is looking fantastic and has developed a beautiful, dense structure.
The buds are maturing well, and it is rewarding to see the results of the consistent care and trainingrovided throughout the season.
Makayla (Week 6 of Flower):
She is filling out nicely, showing healthy, vibrant growth across her canopy.
Her low-profile shape is working perfectly, allowing for good light penetration and steady bud development.
General Observations:
The use of PVC risers continues to be an effective setup, keeping the bags elevated and well-drained.
Both plants are benefiting from the natural, outdoor environment, and it is a pleasure to watch them move closer to harvest.
It’s been a rewarding season tracking these two, and they are clearly responding well to the cultivation techniques.
Update 07.19.26: Under the microscope, we've hit that cloudy/milky point on Charlotte's trichomes. I'm waiting for 5-10% amber trichomes

Likes
13
Share


@4F1M6
Follow
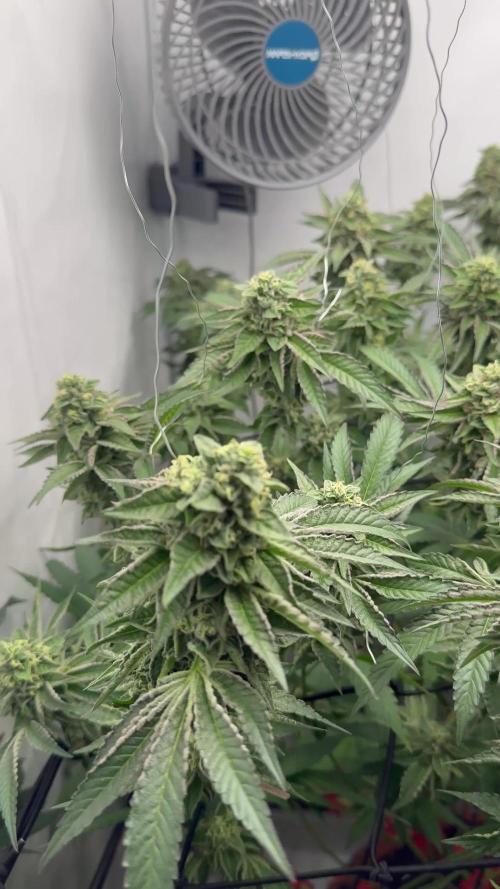
Stretch is finally done and flowers are piling on now! I treated with lost coast as a preventative. I kept the feed the same but it will be altered end of grow week. Canopy is getting hella full can't wait to watch these colas stack on. Did a clean up of the underskirt. Until next update. Happy growing and stay lit fam.

Likes
49
Share


@masterofsmeagol
Follow
5/10 Got up super early for wife's appointment at 7 came home and transplanted 4 of the purple punches. Transplants went good. Soil was too dry and a couple fell right in the hole but I was messing around showing my dad. It just got dropped in the hole a little harder lol. The other that happened to is fine though. Definitely make sure your soil is moist enough before transplanting. My transplanting technique for 3 gallon is to put soil on bottom. Set cup in at appropriate distance then replace cup with plant with soil filled cup and fill around it. Leaves the perfect hole. Then you just snip the cups twice on each side, peel it down and fold the cup down and cradle the bottom and in the hole it goes! Holes have mykoscand a little like water. I water a little after transplant. I misted soil whole mixing it up.
5/11 Dad left the windows open last night "because the soil smell was bothering Lynda." I couldn't ficking believe it. They were all fine when I got back but still. Everything is transplanted into 3 gallon containers bit that 1 purple punch that is a little bit dwarfed. I looked at the bottom of the cup and drainage wasn't as good. Must've been the last cup and the jail didn't go all the way through in a couple places. I increased the drainage on that little dwarf and I'll transplant it when I get time. We are going to have some good weather coming up. I need to get my cage moved, my bags sanitized and get on a good watering routine.
UPDATE: Went back over at four and everything's dry as fuck but the leaves are uo and every one of them looks happy so I'm holding off watering. I'll start with a quart probably tomorrow. Also cleaned out tge cage and secured the handles to move it. Only thing left is cleaning and sanitizing. These girls have a south facing window and they LOVE it. It was 80 today. I hope we have an early season.
5/12 Transplanted the last purple punch today. I could easily tell the problem was drainage. It was the last cup I had stacked when I drove the nail threw so it didn't pierce all the way the the other slips and tac holes apparently weren't enough. Used mykos and same soil mixture. Soil was extremely dry. I lifted a pot with dry soil and these were heavier. Commercial buddy said to start with a quart a pliant and see how it goes but I kind pussed out and only gave them 24fl 0z a plant. Half the quart. I asked if I should water more and he said to just wait and see how they like this water and up it to a quart next time maybe quart and a half. Im just leery of overwatering. When i watered SOME of them the water literally just sat there and took forever to absorb. Plants werent wilting though. Soon theyll be going outside during the day and in mdoors at night.
UPDATE: Went back over at two and everything looks AMAZING. Healthiest looking plants I've grown. Leaves all pointed up. I'm taking my commercial dudes advice and hoping the water next watering. For now, they're doing amazing.
5/13 Everything is doing greatcso far. Gotta figure out when to start nutes. Considering adding silica but don't want to raise ph to much. I'll consult with others but my the soil blend I'm using is full of nutes.
5/14 Rushed morning and I wanted to water bit the plants looked great still. Sticking my hands deeper I can feel a little moisture deeper down or in the drain holes so I decided to give the blueberry cheese and the 10th planet a "touch of kindness" which was a small circle of water from a small watering can around the outside edge of whete the rootball should lid be. I'm working on getting a watering g schedule down.
UPDATE: Went back over at five and everything was looking good with leaves praying. Maybe my half measure helped. Doubtful but still. Tomorrow I plan to water. Since the soil has tons of nites ill probably hold off a little while longer before starting the nutrient schedule. I want to make sure I've got the watering down first. One thing at a time.
5/15 The 10th planet and Blueberry Cheesecgot their first REAL watering since transplant. Still being cautious I watered 28fl Oz a plant. I phed the water with an indicator solution and ph down. I gave the purple punches a "cup of kindness" which was a circle of water around the transplant hole. Can't waif to get a watering schedule down. I wanted to start nutes but my soil is full of them and i believe it's too early. I didn't see ANY run off from this watering. I think that's good as I'm not looking to wash away the nutes in the expensive soil I use. I need to start HST as well but I'm doing things proper and "one at a time". That way if I run into a problem I'll know what I did and how to rectify it. At least I hope.
UPDATE: Went back over at 3 leary that I may have "overwatered" but the plants ALL looked AMAZING and had shot up like an inch! Looking into hst and will probable fim a few. Top a few and leave one to grow naturally. Can't wait to see how these girls do outside.
5/16 Wow. Just wow. Plants are doing phenomenal! Since the watering went really well I watered the purple punch bit I only used about 16fl Oz as the plants were a little smaller than the others. I'll up it to a quart next time like I did with the others. I want to USE the nutes in my soil so im not washing them all away by watering to run off. I topped 2 10th planet's and FIMed one of them. I want to see how the respond then I'll begin training the others. Off to a Great Start!
5/17 Glad I held off watering. It's raining today. Just showers. We haven't gotten any of that extreme wind we usually do. I have the plants supported but I still worry. Definitely more than I should. Plants are still doing good and acclikatimg to their new homes.

Likes
5
Share


@High_Road
Follow
All transplanted to new homes coco as the soil.
It’s about day 5 give or take and they are loving there new homes!🤟🏽🌱🔥
All plants look healthy 🌱🤟🏽💨


Processing
Likes
15
Share


Likes
13
Share


@MiyaguiOkPolilla
Follow
Esta semana ha ido muy bien. Su color es muy verde a pesar de la poca cantidad de nitrógeno aportado y lleva un crecimiento muy fuerte a sus flores que ya estan bañándose en tricomas con ese delicioso olor a goma de mascar rosa. Es muy visible el trabajo de Bud Booster sumado a Bud Candy que estan dando un increíble aporte de volumen a sus cogollos. Por suerte no tuve que usar agua de grifo para esta planta que aún está siendo alimentada con agua de lluvia.
Irie!
Likes
8
Share

@PrinceOfHerbs
Follow
The plant smells extremely strong, and above all it is super sticky. The flowers became so heavy that I had to fix them with wires, otherwise they would hang.
The first pistils are turning a brownish color, a few leaves were also removed
Flowering day: 42

Likes
41
Share


@Mrs_Larimar
Follow
2024-06-08
INDOOR:
After the training is complete, i placed her into the Floweringroom Yesterday.
She drinks alot around 2l every day, and i may have to fertilise soon, we will see, because i added athick
layer if INSECTFRASS on the surface.
OUDOOR
The weather turned to very hot and humid- perfect for the Plant, she had a super Progress.
Afghanistan / Brazil
Type:
Indica/Sativa
Flowering:
63 Days
THC:
29%
Harvest:
1000 g/m2
Height:
150-205 cm
Rating:
Divine Seeds developed Opium as a new champion strain, unprecedently powerful and loaded with unbelievable quantities of resin. Certainly, no average genetic base could be behind such brilliant parameters! Several Afghani Indica landraces, recognized as most potent and resinous, were bred together with a mighty Brazilian Sativa which Opium inherits its bright berry taste from. Then a great deal of work followed aiming for the highest THC level and endurability as well as a branchy structure that would provide maximal yields. Now we can proudly title Opium the best Indica you could dream of growing!
Indoors these plants mostly stay mid-height (1.5 m), reaching up to 2.0 m out of doors. Depending on your height limitations, Opium flourishes universally in grow boxes, balconies, green houses and terraces. Due to its Afghani parentage, this strain can stand hot weather if provided enough water and some shadow. Responds well to any training techniques: ScroG and SoG, LST, topping and FIM, supercropping. The start of blooming is marked with a rush of growth, when plants stretch almost 1.4x. Expect heavy colas that often require additional supports. Whilst ripening, Opium gives off a pungent earthy stench with fruity and berry undertones, also a bit of pine. Ready for outdoor harvesting in October.
The stoning psychedelic impact of Opium is like being hypnotized (unless you’ve had too much, then it feels more like a blackout). Stone-lovers will appreciate every minute with Opium: its spicy taste immerses your mind into daydreaming, while the body rests flat. Recreation with this psychedelic Indica means silent tripping from one insight to another. Mighty enough to kill chronical pains, Opium is also medically efficient against insomnia, nausea, appetite disorders, muscle spasms, headaches, irritation, fatigue, panic attacks, epilepsy. Best consumed at night time, the effects keep going for up to 4 hours.
