


Runtz X Baby Grogu - Bellota Seeds


Runtz X Baby Grogu - Bellota Seeds



VEG
Personalizada Light Emitting Diodes/75W
Personalizada
FLO
Personalizada Light Emitting Diodes/100W
Personalizada

Tent
50x40x120 wardrobe
50x40x120 wardrobe


Soil
Custom

Indoor
Room Type
Defoliation
weeks 10-12
ScrOG
weeks 7-17
LST
weeks 4-9, 11
Topping
weeks 3, 9
23 liters
Pot Size
1 liters
Watering
Start at Harvest
G
Germination4y ago


alvaroGraciaL Starting the grow of this Runtz X Baby Grogu, an S1 cross from Bellota Seeds based on an elite cut of Runtz and the winner of a selection of Baby Grogu from another Spanish breeder. With indica dominance, quick flowering, purple tones, and gas terpenes, it should tolerate the pruning I'll do in a few weeks. It's going to be on a 20/4 schedule since once they germinate, it will share the closet with the two Big Devil XL autos from Sweet Seeds and as many peyotes and San Pedro's as can fit in the closet. I have high hopes for this little one!
2 likes
1 comment
Share
Used method
Directly In Substrate
Germination Method
1
Week 1. Vegetation4y ago


3 cm
Height
20 hrs
Light Schedule
32 °C
Day Air Temp
80 %
Air Humidity
3 liters
Pot Size
50 cm
Lamp Distance
Nutrients 1

Deeper Underground
0.5 mll
alvaroGraciaL In 4 days, the little one has germinated perfectly. The dome is kept on to maintain air humidity. Homemade air pot designed by me and 3D printed.
2 likes
comments
Share
2
Week 2. Vegetation4y ago


5 cm
Height
20 hrs
Light Schedule
28 °C
Day Air Temp
80 %
Air Humidity
21 °C
Night Air Temp
3 liters
Pot Size
50 cm
Lamp Distance
alvaroGraciaL Nothing to say, just growing.
Today I has removed the "tupper greenhouse" as I think 45% natural air humidity is enough for now.
2 likes
comments
Share
3
Week 3. Vegetation4y ago


8 cm
Height
20 hrs
Light Schedule
28 °C
Day Air Temp
50 %
Air Humidity
20 °C
Night Air Temp
3 liters
Pot Size
40 cm
Lamp Distance
alvaroGraciaL The little one is growing perfectly. For now, it doesn't need any nutrients; with what’s in the soil and the mycorrhizae that were added in the first week, it should be fine for at least two or three more weeks. I'm interested in having it develop a well-branched root system with the Air pot so that when I transplant it before flowering, it has fully colonized the substrate and can comfortably expand into the new soil. An apical cut has been made, amputating only the apical bud. The leaves are large and have a very nice lobed shape.
2 likes
1 comment
Share
Used techniques
Topping
Technique
4
Week 4. Vegetation4y ago


10 cm
Height
20 hrs
Light Schedule
28 °C
Day Air Temp
50 %
Air Humidity
20 °C
Night Air Temp
3 liters
Pot Size
40 cm
Lamp Distance
Nutrients 1
Deeper Underground
1 mll
alvaroGraciaL Another week. The growth has been slower because I cut the apical tip and the plant has had to distribute energy among the rest of the buds. I did a little LST and removed the branches that were left on the back.
2 likes
comments
Share
Used techniques
LST
Technique
5
Week 5. Vegetation4y ago


10 cm
Height
20 hrs
Light Schedule
28 °C
Day Air Temp
65 %
Air Humidity
20 °C
Night Air Temp
3 liters
Pot Size
40 cm
Lamp Distance
Nutrients 2
Deeper Underground
0.8 mll

Top Veg
1.3 mll
alvaroGraciaL It seems to have reacted very well to the apical pruning.
I've tied the plant to encourage the growth of the side shoots. I want to have 6 or 7 tops.
Every day I tie the tops a little to distribute the branches and start forming the structure of the plant.
2 likes
comments
Share
Used techniques
LST
Technique
6
Week 6. Vegetation4y ago


15 cm
Height
20 hrs
Light Schedule
28 °C
Day Air Temp
65 %
Air Humidity
20 °C
Night Air Temp
3 liters
Pot Size
40 cm
Lamp Distance
Nutrients 1
Top Veg
1 mll
alvaroGraciaL Good growth, the plant is starting to fully develop after the apical pruning and the strong ties I've applied. By accident, one of the tips that was going to be apical broke off (things happen). So, in the end, the plant will have 6 main tips. I'm going to try to clone the tip that broke, but it's too small, it only has 1 node, so I don't have much hope that it will root.
1 like
comments
Share
Used techniques
LST
Technique
7
Week 7. Vegetation4y ago


15 cm
Height
18 hrs
Light Schedule
25 °C
Day Air Temp
50 %
Air Humidity
20 °C
Night Air Temp
23 liters
Pot Size
50 cm
Lamp Distance
Nutrients 1
Top Veg
1 mll
alvaroGraciaL Here comes the good part.
Transplanted to a final 25-liter fabric pot with a mix of substrate, perlite, homemade worm humus, and a little bit of Plagron bat guano.
I've set up a SCROG net and I estimate that in 2 more weeks I’ll be able to switch to flowering with the surface well covered.
1 like
comments
Share
Used techniques
LST
Technique
ScrOG
Technique
8
Week 8. Vegetation4y ago


15 cm
Height
18 hrs
Light Schedule
25 °C
Day Air Temp
45 %
Air Humidity
20 °C
Night Air Temp
23 liters
Pot Size
50 cm
Lamp Distance
Nutrients 3
Sprutniz insecticida
10 mll

Big One
1.5 mll

Barrier
0.25 mll
alvaroGraciaL I keep tying, bending, and grabbing.
Today I did foliar feeding with Big One and a bit of barrier (I'm not a big fan, but I have it and it should do something).
I added sprutniz because I see a few small traces of red spider on the leaves, and it's better to prevent now that there are almost none and I'm in the vegetative stage.
1 like
comments
Share
Used techniques
LST
Technique
ScrOG
Technique
9
Week 9. Vegetation4y ago


15 cm
Height
18 hrs
Light Schedule
25 °C
Day Air Temp
Weak
Smell
45 %
Air Humidity
18 °C
Solution Temp
20 °C
Night Air Temp
23 liters
Pot Size
50 cm
Lamp Distance
Nutrients 1
Big One
2 mll
alvaroGraciaL Finally, 2 days ago I changed the light schedule to 12 hours. I made the last apical cuts (the same day as the photoperiod change), taking the opportunity to take a couple of cuttings (the previous one died, I forgot the propagator open and it died at 45% outside humidity). The plant is slow, it has very slow vegetative growth, but it’s already branching out, I’ve filled almost the entire surface of the cabinet and it’s ready to stretch and go 20 cm above the net if everything goes as planned. The next two weeks will continue with defoliation and tying work. For now, I’m not fertilizing, just big one which is mainly a stimulator, it doesn’t have much nutritional load. In the substrate mix, I added a lot of hummus from my own worm composter and bat guano. Being a slow-growing plant, it doesn’t demand too many nutrients and the intense green color of the leaves indicates that it’s loaded with nitrogen. I probably won’t have to fertilize until the third week of flowering.
2 likes
comments
Share
Used techniques
LST
Technique
ScrOG
Technique
Topping
Technique
10
Week 10. Flowering4y ago


25 cm
Height
12 hrs
Light Schedule
25 °C
Day Air Temp
Weak
Smell
55 %
Air Humidity
18 °C
Solution Temp
20 °C
Night Air Temp
23 liters
Pot Size
1 liters
Watering Volume
45 cm
Lamp Distance
Nutrients 1
Big One
1 mll
alvaroGraciaL This week I did a good defoliation of the lower leaves during the first week on a 12-12 schedule. You can already see the first pistils scattered throughout the plant. I will continue defoliating progressively over the next few days to avoid leaf congestion that hinders ventilation. The work is done on the lower part; there are 4 or 5 large leaves left that are catching the light that sneaks through some gaps in the canopy. As the upper branches develop, I will completely defoliate the lower part. The pre-fertilized substrate included worm humus and a little guano and mycorrhizae. For this reason, the plant should still have food for a couple more weeks. Next week, I will add a small amount of base flowering fertilizer and molasses, depending on how things progress. The leaves have a very nice bluish-green tone, and the plant looks healthy and happy. I added a small handful of worm humus on the surface.
2 likes
comments
Share
Used techniques
ScrOG
Technique
Defoliation
Technique
11
Week 11. Flowering4y ago


35 cm
Height
12 hrs
Light Schedule
26 °C
Day Air Temp
Weak
Smell
55 %
Air Humidity
18 °C
Solution Temp
20 °C
Night Air Temp
23 liters
Pot Size
1 liters
Watering Volume
40 cm
Lamp Distance
Nutrients 2
Hummus de lombriz
15 mll

Bat Guano
10 mll
alvaroGraciaL Very good week. It's stretched out and looks beautiful. It's very, very healthy, and throughout this week I've been progressively defoliating up until today.
I'm going on vacation this week, and my entire garden is under the care of my girlfriend, which has forced me to pot the cuttings earlier than planned, fertilize earlier than planned, etc.
I hope everything stays just as good when I get back 🙏
The cuttings are in the 18-hour zone with cuttings from other plants and the Zombie Kush from Ripper Seeds, which will move to the flowering cabinet later 👌
The Zombie is growing faster than the Runtz x Baby Grogu did; it's going to get too big.
Here are some photos of some San Pedro's and Peyotes that I planted from seed this past year.
Merry Christmas to whoever reads this!
1 like
comments
Share
Used techniques
LST
Technique
ScrOG
Technique
Defoliation
Technique
12
Week 12. Flowering4y ago


45 cm
Height
12 hrs
Light Schedule
26 °C
Day Air Temp
Weak
Smell
55 %
Air Humidity
18 °C
Solution Temp
20 °C
Night Air Temp
23 liters
Pot Size
1 liters
Watering Volume
40 cm
Lamp Distance
Nutrients 3

CalMag Pro
0.3 mll

Top Candy
1 mll

Top Auto
1.2 mll
alvaroGraciaL The structure of the plant is finished, from here on I'll be doing small defoliations here and there and that's about it. This week I've been out of the house on vacation and it's been left with minimal care (a couple of waterings with the pH adjusted by eye). I'm glad to see that the stretching has finished very well. With the net, I've achieved a pretty uniform surface of buds all at the same height with a difference of 6-7 cm. My grow tent is very small and I've managed a really good distribution of buds. I'll have to see if for future grows it’s better to distribute fewer tops or if this style is fine.
2 likes
comments
Share
Used techniques
ScrOG
Technique
Defoliation
Technique
13
Week 13. Flowering4y ago


45 cm
Height
12 hrs
Light Schedule
26 °C
Day Air Temp
Weak
Smell
55 %
Air Humidity
18 °C
Solution Temp
20 °C
Night Air Temp
23 liters
Pot Size
1 liters
Watering Volume
40 cm
Lamp Distance
Nutrients 4
CalMag Pro
0.3 mll

PK 13-14
0.5 mll
Top Candy
1 mll
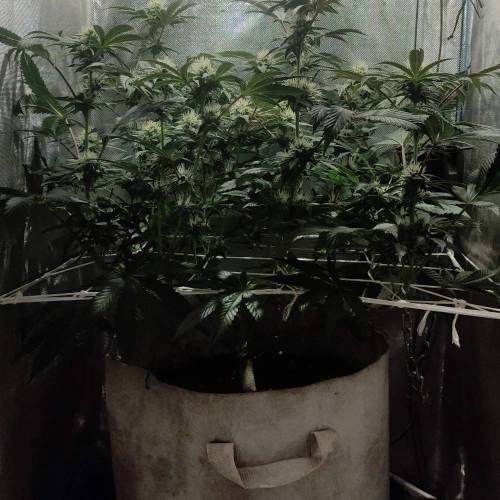
alvaroGraciaL The plant is beautiful, growing strong and healthy like a true champion. It has started to show purple tones on some of the upper leaves and pink on the underside of many others. Since I don't have a follow-up on the strain and it's my first time growing it, I can't tell if it's genetic or a slight potassium deficiency. It doesn't seem like potassium because the lower leaves look healthy. Today I fertilized, and if throughout the week I see that the tips don't burn from excess, I'll start to alternate a bit of pk13-14 in the watering.
2 likes
comments
Share
Used techniques
ScrOG
Technique
14
Week 14. Flowering4y ago


45 cm
Height
12 hrs
Light Schedule
26 °C
Day Air Temp
Weak
Smell
55 %
Air Humidity
18 °C
Solution Temp
20 °C
Night Air Temp
23 liters
Pot Size
1 liters
Watering Volume
40 cm
Lamp Distance
Nutrients 4
CalMag Pro
0.5 mll
PK 13-14
2 mll
Top Candy
1.5 mll
alvaroGraciaL This week I increased the nutrition quite a bit, I wanted to push the plant a little more to the limit of nutrition. I've calibrated it pretty well because only the tips of the leaves have burned a little and the buds have started to fatten up like crazy. It has a soft but spectacular sweet cake smell. It doesn't require much more work than watering and fertilizing. If the buds get too fat, I'll have to remove some leaves to improve ventilation, but for now, I'm very relaxed.
3 likes
comments
Share
Used techniques
ScrOG
Technique
15
Week 15. Flowering4y ago




45 cm
Height
11 hrs
Light Schedule
26 °C
Day Air Temp
Weak
Smell
55 %
Air Humidity
18 °C
Solution Temp
20 °C
Night Air Temp
23 liters
Pot Size
1 liters
Watering Volume
40 cm
Lamp Distance
Nutrients 4
CalMag Pro
0.5 mll
PK 13-14
1 mll
Top Candy
2 mll
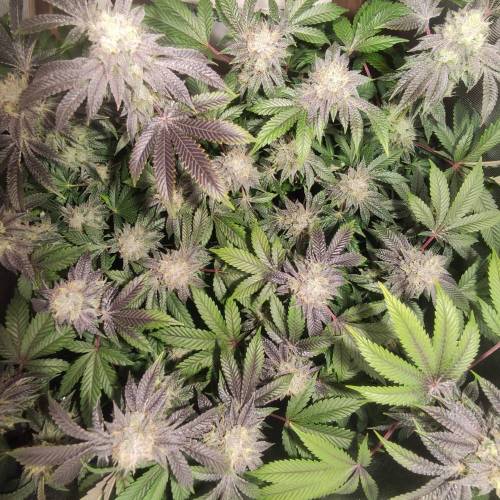
alvaroGraciaL The buds keep fattening up and the leaves are turning purple.
A lot of resin, very sweet soft smell.
The next watering will probably be the last one I fertilize with a bit of PK and then just water, as I estimate it has about 2 weeks left.
2 likes
comments
Share
Used techniques
ScrOG
Technique
16
Week 16. Flowering4y ago




45 cm
Height
11 hrs
Light Schedule
26 °C
Day Air Temp
Weak
Smell
55 %
Air Humidity
18 °C
Solution Temp
20 °C
Night Air Temp
23 liters
Pot Size
1 liters
Watering Volume
25 cm
Lamp Distance
Nutrients 2
PK 13-14
2 mll
PK 13-14
0.5 mll
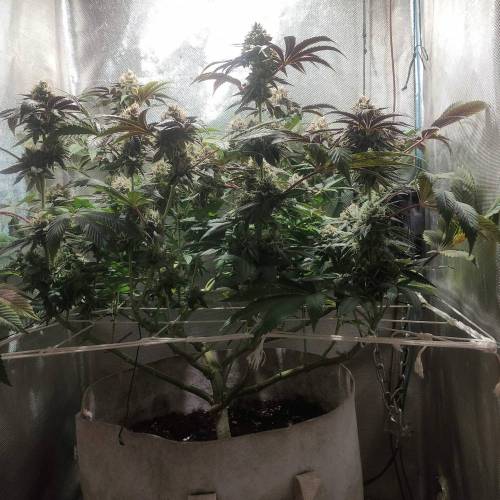
alvaroGraciaL The plant is already 1 week away from harvest, so nutrition has been removed except for a little CalMag and PK. The important work is already done, it has about 1 week left until cutting, with 8.5 weeks since the switch to 12-12. Healthy, trichomes still a bit transparent.
1 like
comments
Share
Used techniques
ScrOG
Technique
17
Week 17. Flowering4y ago


45 cm
Height
11 hrs
Light Schedule
26 °C
Day Air Temp
Normal
Smell
55 %
Air Humidity
18 °C
Solution Temp
20 °C
Night Air Temp
23 liters
Pot Size
1 liters
Watering Volume
25 cm
Lamp Distance
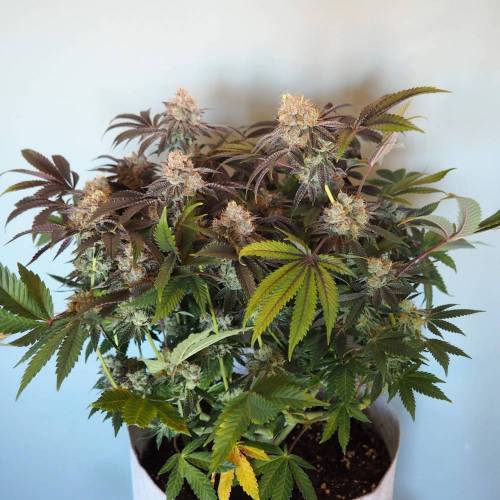
alvaroGraciaL Harvest week at 60 days, the last 3 on the terrace in the cold.
They have a spectacular smell and a lot of resin.
Some leaves have turned almost black.
Very happy with the result.
Smells like sweet lemon cake and a little bit like diesel.
8 likes
3 comments
Share
Used techniques
ScrOG
Technique
17
Week 17. Harvest4y ago
Happy Harvest Day!

9/10
Rated
Es sin duda la mejor marihuana que he cultivado. Los cogollos son muy muy aromáticos a pastel y cítricos suaves (la marihuana más olorosa que he tenido nunca). Los cogollos son muy duros y cubiertos de resina. Hasta ahora sólo he probado un poco la marihuana, ya que le falta un poco de curado, pero el sabor es delicioso. Lo que si he probado bastante son el dry hash hecho con los restos de manicura y también puedo decir que es de los hash más sabrosos y potentes que he probado (sin contar resinas).
En general estoy muy muy contento con el resultado, volveré a poner esta cepa sin duda.
Show more
Translate
Spent 121 days
Ger Veg Flo Har
340 g
Bud wet weight per plant
90 g
Bud dry weight per plant
1
Plants
0.2 m²
Grow Room size
Normal
Difficulty

Hungry, Relaxed
Positive effects

Dry mouth
Negative effects

Stress
Medical effects

Citrus, Cream, Mint
Taste
Height
Day air temperature
Air humidity
Light schedule
Solution temperature
Night air temperature
Pot size
Lamp distance


alvaroGraciaL Just as I said above, I'm very happy with the strain, the best weed I've ever tried. An amazing smell and taste, sweet with a tremendous strong indica high. Aesthetically very, very beautiful with those colors from red to black. The grow went really well, without any mishaps or problems. I noticed a couple of leaves with spider mites in the last two weeks, but I didn't even have to treat it. The strain isn't the easiest; it has quite slow vegetative growth and struggles to root (I've taken many cuttings to try to get S1 seeds). It has a moderate stretching of about X2 (more than I expected). I fertilized the plant well (not optimal, but still very well) and pushed it to the feeding limit until the tips started to slightly burn; it's not a very greedy plant. The final harvest was 82g of very uniform dry buds in size, completely covered in resin, rock-hard, and very aromatic. I also got 5-6 grams of delicious dry hash of very, very good quality with a tremendous high.
-
Average yield: 400g/m2
Light yield: 0.98 g/W
*The light is adjustable and was only at 100W for the last 10 days, the rest of the time at 75-80W. An average calculation has been made.
A completely recommendable strain. I still have 2 more seeds that I will plant. If they resemble their sister when I grow them, I will definitely buy more seeds from this breeder.
2 likes
comments
Share











5 comments
Sort by
popularity
popularity
newest
oldest

KingSalomonsWeed commentedweek 174y ago
Wow, looks super.
likes 2

Mr_Auto commentedweek 34y ago
Happy Growing, Buddy! 🌱🌱🌱
likes 2

love_2_grow commentedweek 04y ago
Happy Growing, Buddy! 🌱🌱🌱
likes 2

LegacyMarketFarm commentedweek 174y ago
Little bit of smaller buds, But they look super caked & super dense, I love the color contrast of them too. Keep up the great work!
like 1

alvaroGraciaL commented4y ago
@LegacyMarketFarm, thank you very much. Yes, I prefer having many small and uniform buds rather than some bigger and others very small. The buds are like rocks.
likes

the end.
Enjoying this diary? Follow for more updates!

Prefer the old Diary view?
Go back to the old Diary view