Vote Now 🏆 for the Grow Awards 2025!
Chat
Recommended

My very first Grow

12
84
53
2498
2 years ago
Follow
0
Germination
2 years ago
Nutrients 1
Mycorhizes 3 mll
You can read all the process under the pictures 🧐 But to add some details, I think for a 100 % germination, the heating mat is for the second day with the cotton, not too early and absolutely with a plate to not eat so much 🔥 One seed didn't come in the same time, so the erreur that I've made, it's to wait for planting the 3 others seeds, hers germs was enough longer to plant. But didn't do nothing. Next time I'll plant first when the germ come to 2-3 cm maximum 🌱 Now it's ok, but I've maid again a little mistake 🤣 to plant the 4 seeds under 4 CM in the substrate... So after thinking and talking with a friend, I've try to take away some soil. And here we are, they are coming here to show there face 😍 As you can see, in the seven day, one of my fourths seed coming wrong... But I've put a 5th seed on 1st of February in case. So germination ok. Let's see next week. For the substrate : - Perlite (11,6 %) - Compost (5,4 %) - Classic potting soil (37,8 %) - Coco fiber (42 %) - Small piece of coal (3,2 %) It's the end of my first week since starting this new project, but I'm so exciting to do that and to share with you ! So, see you later guys 👋🏼 "If my English, isn't that good, you've the right to laugh at me" 🙃
12 likes
5 comments
Share
Used method
Glass Of Water
Germination Method
1
Week 1. Vegetation
2 years ago
3 cm
24 hrs
25 °C
No Smell
95 %
3 cm
Nutrients 1
Mycorhizes 3 mll
First week after germination ! 🌳 Was not an intensive week, because of the very first leaves. As you can see along the different photos, one of my first, 4 seeds died... I don't know why and how actually... But I've put an other seed as I said and she come faster to comeback the 3 others ^^ 😅💪🏼 I'm still in 24 hours lightning in the little incubator, with a bit saturation of water almost 95 % Two little baby was bending to have more light, so I've create some kinds of things 😂 to keep them well right ! I didn't add anything, just watering 3-4 times a day with a sprayer, kindly 💦 The next step for the new week, will be a big foot for me. To prepare the all tent (first time for me, because that's my first grow), add all the elements (lights, fans, etc). Create the new pot with my mixture, and do the transfer from the incubator to there new place ! Big new place 😍 (this part, is very important for the plant, I hope do not shock them...) And maybe, if I'm ready for that, I will give them they're first boost at the end of the new week, next Monday PS : One of the fourths still alive, have a little leaves problem, like rolling himself the leaves. But she's gonna be alright soon)
10 likes
12 comments
Share
2
Week 2. Vegetation
2 years ago
3 cm
18 hrs
25 °C
No Smell
50 %
30 L
50 cm
Third week finish ! A lot of things happened ahah 😁 Let's start at the beginning this week was very complete, I had to transplant the baby plants to give them the space they needed to grow. So I first started by creating my substrate, the detail of the composition with the percentages is present in the comment section of my first week :) After making the mixture, I made the distribution in my pots. With first, a first layer of clay ball at the bottom of each pot. As you can see, I chose 30 L textile pots, I grant you, it's substantial but I wanted to have room for my plants and their companions, a mistake on my part, surely, but I think it's not too bad. I then filled with my delicious fresh mixture and voila, everything is ready. So I started transplanting, the worst is yet to come. The mistake of having made the plugs myself is that it was too airy and therefore to take them out, it was impossible, at the risk of breaking the roots... 😭 Thanks to the advice of a group of friends, I took all my utensils and carefully cut the plastic in order to extract the block of my mixture as well as possible. Before putting them in the ground, I made a small hole to make room for them and add a little mycorrhiza at the bottom and on the roots. After this trying ordeal, I watered my young seedlings a little bit and I placed my pots in my previously prepared box (2 fans, extractor and carbon filter, my led panel currently set to 250 W at 50 cm seedlings). At the beginning, I had placed a dehumidifier but in the end I will only use it towards flowering. In order to help my plants, I added some friends in the pots, for this first test, I put alfalfa which will create a good contribution of green manure once I have cut it, and their roots will have created an interesting network for the constant aeration of the substrate. I also sowed some white clover and buckwheat seeds. Small point on one of my plants, the one that had somewhat misshapen leaves, well at first I was afraid that it wouldn't go well, but as you can see the following leaves are totally normal and constant, I'm really happy, she's a survivor! Thank you for your support and your waiting, there was a bug on the site, all my text written last Monday was not on my page and I was quite disappointed, so I waited again before rewriting my text for you because inspiration for me is important. I'm going to get ready to write and publish the week that just ended today 😀 See you soon my dear friends 💪
8 likes
6 comments
Share
3
Week 3. Vegetation
2 years ago
7 cm
18 hrs
25 °C
No Smell
50 %
30 L
0 L
50 cm
New week over, I grant you, I have not been assiduous on my photo shoot this week, that's why, you will see in quotes a big gap. On my first photo, we can see that the clovers are coming out and that the alfalfa is also accelerating. I like to spray water once a day on the leaves, if ever later I notice that the reverberation is too strong I will stop but for the moment no problem. For lighting I increased to 400 W on Tuesday February 21 and most recently today February 27 to 600 W. For the moment, I always stay at the same 50 cm from the plants as last week, since they do not have very little stalk, I stay that way and I will raise according to the next week to avoid burns. Thursday was dedicated to the care of my babies, I first offered a nice hemp mulch cover (it's funny to tell the truth) on top of my substrate, some alfalfa will have to fight harder to get through haha 😂 And I also added an improved drip irrigation system, the black pipe having no hole, I made it with a needle all along in order to make a uniformly distributed watering and put the pipe in circle. A bucket of 15 liters is placed in the middle of the tent with the pump which splits into 4 black pipes, it lasts 3-4 days before being completely empty, it is an additional watering. At the end of the day, I had finally found the names of my dear babies. Alpha because it is the first that released its germ, I hope you guessed it, but Conan is the name for my pretty deformed, the fighter (conan the barbarian), Yoko with the meaning of child of the sun is since she is under 600 W for 18 hours haha ​​it suits her well, just like the others you would say to me, but we had to find a name ^^ And Eden, because I hope I will go to the Paradise while smoking its beautiful flowers (finally in paradise, I understand myself lol) 😅 I think the height of my led panel is at the right height because the plants do not stem. I think that since they are Hybrids, the F1 Epsilon, with 50-70 cm of final height, it is normal that it stays quite low and that suits me very well :) I find it really beautiful. 😍 The vegetation phase is accelerating strongly and we can see it on the last photos taken today. The estimated time was 8 weeks, with the last 4 weeks of flowering, but having finished the 4th week, I think I have a minimum of 1 to 2 weeks late. Surely due to the too long delay of germination and the beginning of growth. I will try to fix it for the next ones, I already know what points to change :) That's the end of my weekly monologue, see you next time! 👉
8 likes
3 comments
Share
4
Week 4. Vegetation
2 years ago
18 cm
18 hrs
25 °C
No Smell
70 %
30 L
0 L
50 cm
Hello Hello 👋 Week starting on a high because I started to boost my little babies with a homemade compost tea without chemistry :) (the base) 😎 I was inspired by Zouzou canna to understand the contributions and have a first impression, but I did not totally realize the same contributions 100% It must be said that it is very expensive to bring a lot of different elements, even if in small quantities. As you can see, I first had to put a double bubbler in my bucket of water (room temp, 20-25 degrees), so I could evaporate the chlorine from the tap water. You would have to leave a good 24h, but I left 12h for this one. You can leave more depending on your water, it's up to you to check if you wish (Ph, acidity). I have rather good water, a little hard (limestone) from time to time. Then come the contributions that you will leave infused for 24 hours with the bubblers still active. For 12 liters of water (for my recipe): 👇 Part 1: In a canvas bag - 25 gr of BioGrow (a very complete mix) - 15 g Bat Guano - 15 g of dried blood - 500 ml of fresh compost if possible (or a rich potting soil) Part 2: Directly in the water - 60 ml of black molasses (sugar to help fermentation and the activation of beneficial bacteria). - 30ml seaweed - 30 ml of fish mix (hydrolysed fish) - 10 g of mycorrhizae Keep 48 hours maximum, so do not do too much in advance. What remains in the infusion bag, do not throw it away and keep it for the top of your compost (redo a cycle) or use it for the creation of a future substrate. Knowing that it will be reduced in nutrients because of the infusion. Now let's move on to the rest of my week, I let a lot of things happen, that's why next week I'm going to completely cut the alfalfa which is too overgrown (I'll change the way I do the next shoot). My drip system doesn't fit with my compost tea which makes for double watering which is why I'm going to be removing it next week too Well you have to admit it now, my 30 L pots are way too big... And my saucers too small, that's why you'll see on the wide shot, that my tent serves as a giant pot ^^ Change of course for the next one haha, 15 L pots and saucers of the right size so as not to create a pool in the tent ^^ And second thing, having created a well-ventilated substrate, I did not pack down at all during the start, which lets too much water pass through, something to correct also, pack the substrate a little bit when filling the pot. Otherwise everything follows its course, we can see the appearance of a pretty white tip, it is because my plants are surely going into pre-flowering. Really looking forward to seeing what this will bring. 💪 Besides, I tell you about it a little in advance, but I set up a second smaller tent in order to make a rotation. So I started new seeds, I will do a new journal next with a single foot of White Widow Auto, a classic I know, but I wanted to try :) So see you soon for next week which will be busy, a big refreshment of the tent and pots, and a new newspaper eheh 😏 Thank you for your support 😍
10 likes
7 comments
Share
5
Week 5. Flowering
2 years ago
18 hrs
26 °C
No Smell
55 %
30 L
0 L
40 cm
Well that's it, we're really starting the first week of flowering, it has already almost tripled in height in one week, it's really great. As promised I cut the alfalfa well which was very tall and invasive but now that it is cut, it will create small cavities in the ground so that my dear babies have more air and room to grow. I missed a lot of photo days because I was away and I think I also made a mistake, which I hope won't be irreversible or too big... I haven't made compost tea all week, and I only watered twice, about 1 liter each pot... That is in one week 2 liters of water without nutrients for 30 L pots, and as you can see, within a few days the leaves have thinned out tremendously. I will ask the question via the form so that you give me your opinion. A little low morale following this... but hey what do you want... Don't hesitate to check out my new plantation, the newspaper will be online in a few minutes! Thank you for your support
8 likes
3 comments
Share
Grow Questions
Deckerno
Deckernostarted grow question 2 years ago
I watered only 2L of water without nutrients this week (pot 30 L) You can see it on the diary photos, the plans have lost their colors (yellow). I wanted to know what exactly it was due to, because I read on the net a lack of nitrogen but I would like the expert opinion Thanks !
Solved
Leaves. Color - Yellow
Leaves. Color - Pale
1 like
Organoman
Organomananswered grow question 2 years ago
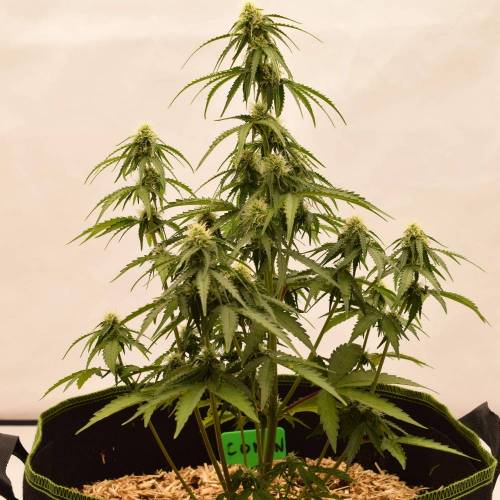
Early flower is when to increase phosphorous and potassium signifigantly and maintain adequate nitrogen levels, before reducing nitrogen mid flower. 
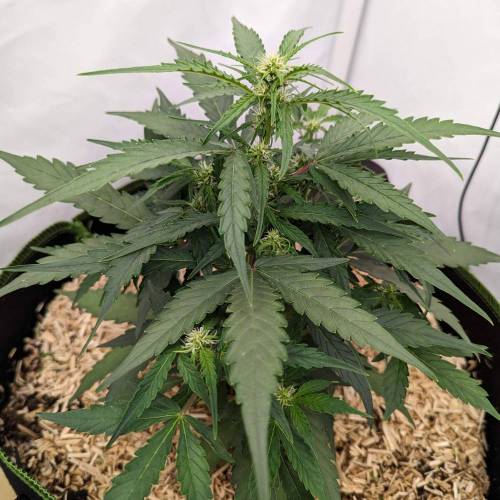
Often the lowest/oldest leaves going yellow at this stage can be atributed to a lack of light penetration down low. 
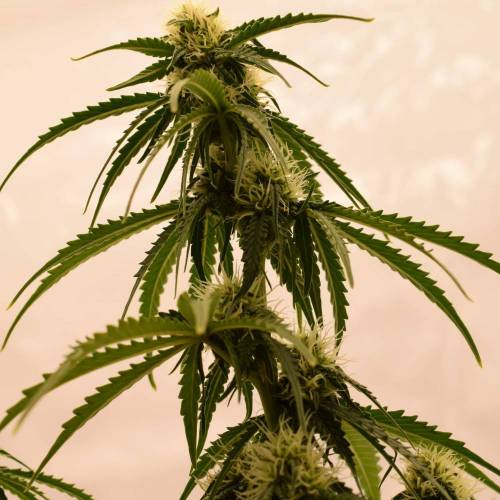
After looking at you diary, I would suggest your previous "cover crop/companion plants" have stripped a lot of the nutrients from the soil, so yes, a general lack of N/P/K would be a valid reason for the yellowing.
6
Week 6. Flowering
2 years ago
18 hrs
26 °C
No Smell
55 %
30 L
0 L
40 cm
Nutrients 1
Compost tea 300 mll
A big week of stress on my side I admit ^^ 😬 Since my questioning at the end of last week, thank you for your enlightenment, indeed, the lack of nutrients in my pot and especially nitrogen (N) has caused the lower leaves to turn yellow and die. 😞 It was mainly due to the lack of input on my side, but it would not have happened if my companions had not drawn from my soil, so the first mistake would have been to have let the alfalfa grow too long and pump my nutrients from floor. And my lack of watering and underdosing of my compost tea didn't help. With the advice of elders :) ^^ I urgently provided a compost tea boosted with nitrogen as well as a foliar treatment with boom boom spray from Bio Tabs (by the way don't hesitate to go see my new diary on Natacha, the white widow ahah, who she will only be fed with the complete pack from Bio Tabs) 😃 After a few days, the leaves turn yellow and dry up so I cut them and return them to nature in my compost eheh. Now they look better and a little greener than before. 💪 Well all his adventures from my beginnings obviously impacted the future harvest, with less vegetation, and less full heads, but it's to do better later that we make mistakes haha ​​:) Another very crucial information that I learned and you will take me for an idiot ^^ but I was watering too quickly and with too much quantity, which had the problem of bringing all the water down directly. I learned that the substrate therefore did not have time to capture the water and gorge itself... This problem is quite uhh how to say, serious, since my substrate since the beginning (6 weeks), had not not enough humidity then the water was in the box, and as I had put 5 centimeters of clay balls in the bottom, the substrate had no way to pump enough water... 😭 Finally you understood, it was the swimming pool LOL, and with the swimming pool I had the right to a lot of seaweed... After having had the information, I hastened to clean everything and now I water little by little and over the entire surface! One more thing learned ! Check ^^ On the penultimate photo, you can see, I have the impression that it's a burn on the leaf, only on this one, I think that with the Boom Boom I must have insisted too much on this place, but nothing serious a priori ! 😊 Thank you for reading me, I talked a lot, I apologize, and above all you can tell me in the comments what you think of this new MACRO lens which normally will provide better photos 😎
5 likes
5 comments
Share
7
Week 7. Flowering
2 years ago
40 cm
18 hrs
26 °C
Weak
45 %
30 L
0 L
50 cm
Nutrients 1
Compost tea 300 mll
Same as on Natacha's post, unfortunately I was away for 4 days, so the photos have a micro gap but it shows less than with her ^^ 😁 I also have on the first photos, still too much light exposure, it's time for me to take the new lens in hand, but it's not a big deal My babies are holding up well, the new progressive watering is much better and it doesn't overflow from the saucers anymore haha 😝 I also brought a probe per plant, which lets me know that from 15-20% humidity, I water them again, because not being diligent enough on this point, I needed help ! I love watching the buds, they are turning brown and the smell is starting to get to the 4 plants, and I find them really too pretty, can't wait to get to the next step 😍 So I'm telling you next week, hoping to get closer to the harvest, I'm going to find out about the subject because for the moment, I don't know when the right time will be... 😕 See you soon friends
10 likes
7 comments
Share
8
Week 8. Flowering
2 years ago
50 cm
18 hrs
26 °C
Normal
45 %
30 L
0 L
50 cm
Nutrients 1
Compost tea 300 mll
Hello Hello, Me who thought that I would have published the week with a harvest, but in the end no, it was still too early eheh ^^ 😍 But my patience will only be better rewarded! 😋 The change is not noticeable a lot, but I think at the microscopic level, the glands and trichomes should mature as they should. After the advice of a friend, I bought a microscope to take with my phone, so you know that next week you will have beautiful photos ready and for future newspapers too (we train every day ahaha) You can also see the senescence on the leaves because we are approaching the end if I am not mistaken ;) Really in a hurry! 😜 For 2 days, I see more and more midges on my substrate and therefore in the air, it dies quickly because of the light but reproduces quickly too, so you never know, do you have any BIO tips? and which does not damage the seedlings? Thanks again for your support and see you next week 💪
13 likes
5 comments
Share
Enjoying this diary? Follow for more updates!
DeckernoDeckerno
Follow Author
OR
Prefer the old Diary view?
Go back to the old Diary view