
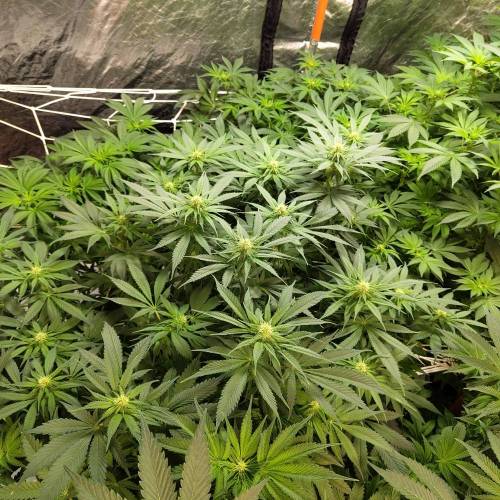
Barneys Farm indica grow with NFT


Mineral Wool
Custom

Soil
Custom
ScrOG
weeks 5-16
LST
weeks 4-13
Topping
weeks 3
HST
weeks 3, 5-6, 8-9
Defoliation
weeks 3-11
4 l
Pot Size
Start at Harvest
G
Germination3y ago


Finniegrow NOTES:
I'm watering only by spraying a few times with pH-balanced water (pH5,8) for the first week.
Hoping to get 12-13 healthy female's to grow further. I think that's the max. amount I can fit in my grow room.
DAY 1 (18.10.)
I germinated the seeds by using the paper towel-method and left the seeds to sprout in the dark on my bathroom floor with floor heating on. I covered them up with a plastic cups to keep the moisture up.
DAY 2 (19.10.)
After 24h: 4/5 Cookies Kush, 4/5 Kush Mintz and 2/5 Ayahuasca Purple had started to open and show their tails. After 32h, 14 of the 15 seeds were showing the same signs so I transferred all seeds to these propagation soil pellets.
DAY3 (20.10.)
Prepared the tent and set the timer on 18/6 -cycle and turned one of my LED's on and set to low power 40%/125w. Then I moved all germinated seeds in plastic cups to their new environment.
DAY 4 (21.10.)
I soaked all needed rock-wool blocks in pH-balanced water for 24h, shook most of the water out and left them to dry a bit.
DAY 5 (22.10.)
DAY 6 (23.10.)
As shown in the picture, 13 out of 15 seeds have started to grow and stretch out of soil. Ayahuasca Purples seem to be starting their growth the slowest.
One Led is now set to 50%/165w at 90cm height.
DAY 7 (24.10.)
1 like
comments
Share
Used method
Paper Towel
Germination Method
1
Week 1. Vegetation3y ago


5 cm
Height
18 hrs
Light Schedule
24 °C
Day Air Temp
5.8
pH
No Smell
Smell
200 PPM
TDS
80 %
Air Humidity
18 °C
Solution Temp
20 °C
Night Air Temp
3.5 l
Pot Size
0.03 l
Watering Volume
80 cm
Lamp Distance
Nutrients 6

Calcium Magnesium Supplement
0.25 mll

Dutch Formula Grow
0.5 mll

Dutch Formula Bloom
0.25 mll
Finniegrow Early Vegetation
To keep moisture and temperature on optimal levels at around 27°C / 80% I'm using two mechanical timers.
- 24/7 on: Fans
- Timer 1: Lights and Humidifier
18h on / 6h off
- Timer 2: Ventilation set on low
18h (15min on every 1h) / 6h off
NOTES:
All germinated seeds are going to be transferred to rock-wool cubes early this week. I'm moving them when the roots are starting to appear under and on the sides of each soil pellet.
I'm going to try some different grow techniques in the upcoming months, like LST, ScrOG, Defoliation and Topping for example.
I have one Led on 90cm distance and on 50% / 165w power. I'll add the second Led next to it, both set to 40%/at 80cm after I have transferred my seedlings to rock-wool. I'm also adding a humidifier and a small fan to my tent to make conditions more optimal. Also starting to give my plants their first nutrients this week.
DAY 8 (25.10.)
I transferred all my seedlings to rock-wool cubes just before the night, at same time giving them access to more light. I left all of my Ayahuasca Purple's in my propagation box for one more day since they are growing the slowest. Only 3 out of 5 have grown up from soil.
DAY 9 (26.10.)
I gave my Ayahuasca Purple's a closer look and it seemed like only three got through first phase. One seed didn't eventually germinate at all, and now one was still in its seed, had a white tip of 3mm but had stopped growing so I got them both disposed. I moved the three healthy looking one's next to my other plants.
DAY 10 (27.10.)
Started to add small amounts of nutrients. My nutrient solution's strength is EC 0,4 / pH 5,9.
DAY 11 (28.10.)
Set both of the Led's to 40% and covered the rock-wool cubes with plastic sheets to prevent algae from growing on them.
DAY 12 (29.10.)
DAY 13 (30.10.)
I think the plants are doing just fine. Some of them have leaves that are slightly bent, but I don't see any other signs of deficiences on them so I don't worry about it too much.
DAY 14 (31.10.)
First roots are starting to appear from the bottom of the rock-wool cubes. I'm going to slowly increase the amount of nutrients during next week to around EC 0,8 / pH 5,8.
2 likes
comments
Share
2
Week 2. Vegetation3y ago


7 cm
Height
18 hrs
Light Schedule
23 °C
Day Air Temp
5.8
pH
No Smell
Smell
400 PPM
TDS
65 %
Air Humidity
18 °C
Solution Temp
20 °C
Night Air Temp
3.5 l
Pot Size
78 cm
Lamp Distance
Nutrients 6
Calcium Magnesium Supplement
0.75 mll
Dutch Formula Grow
1 mll
Dutch Formula Bloom
0.5 mll
Finniegrow Vegetation: To keep temperature and moisture on optimal levels at around 23°C / 65% I'm using two mechanical timers.
- 24/7 on: Fans and water pumps (+Ventilation after 3.11.)
- Timer 1: Lights and Humidifier
18h on / 6h off
- Timer 2 (BROKEN 3.11.): Ventilation
18h (15min on / 15min off) / 6h off
NOTES:
Everything looks good and the roots have appeared from almost every (11/13) rock-wool cube.
From now on I'll mostly water the plants from bottom by adding the wanted amount of nutrient solution on a plate, and then placing the plant on top of for ~15seconds
This week I'm also starting to prepare the hydroponic systems (2x NFT-GT90, and 1x EBB-flow I think) and stronger nutrient solution since my plants are becoming ready to be transferred. Spreader-mat is the base of my plants when I have transferred them in to the hydroponic systems. DO NOT place more than one layer of the spreader-mat as it is not meant to be used like that! As you're cutting the mat for NFT's, be aware to have some extra for your peace to reach nutrient solution below the tray. That way you won't get noise from water dropping when systems are turned on.
Day 15 (1.11.)
Day 16 (2.11.)
First watering with a bit stronger nutrient-solution (~ EC 0,6 / pH 5,9) than before, starting with 50ml/plant and watering once from above. Slowly increasing EC to 0,8.
I cleaned and assembled 2 out of 3 hydroponic-systems which I'm going to use. I'll do the same also to the last system, but it currently has my plants on top of it so I'm going to do it later.
I want to make sure that my plants have built healthy and big enough root system before transplanting to hydroponics. I'm waiting for the rock-wool cubes to be bursting of roots so they won't drown on their first day in hydro. Also, as the plants are bigger before the transplant, I'm able to fill my nutrient-solution tanks full with correct strength nutrient-solution for Mid-Vegetation from the start, therefore no need for that much adjusting later on.
Day 17 (3.11.)
I noticed my other timer which controls the lights had stopped working... The lights were on when they shouldn't have been, I noticed it an hour after they were supposed to turn off. I think I caught up to it early, but it may have been on for maximum of 2 days straight. No worries there since on vegetation-phase the plants don't necessarily need any sleep (Even though you should avoid quick changes like that!).
Roots have appeared from the bottom of every cube and plants are looking pretty healthy. I think they are almost ready for hydroponics.
Day 18 (4.11.)
Few plants are showing symptoms of nutrient deficiences or some sort of sickness, not certain what exactly. I'll be keeping an eye on it. I'll be transferring in to hydroponic systems in maybe a week, so I don't want to stress my plants more than what's necessary.
Increased my solution strength to 0,9 EC with a bit more Cal-Mag than before, and watered the plants for 50-150ml each plant depending on weight and size. I'll be slowly increasing the strength by around 50% during upcoming week. Thanks for tips!
Day 19 (5.11.)
Day 20 (6.11.)
Plants are recovering well from deficiences and I just transferred all of them to hydroponics. I don't have the water pumps on for 24/7 just yet, at this point I water them a couple times a day by keeping the pumps on for somewhere around 15min at a time. Lights are now set to 60% and I also added a tower fan to circulate the air and shake the plants.
Day 21 (7.11.)
Lights are now set to 70% since the Led's and plants are spreaded wider in the tent than before. Distance to plants stays the same at 75cm.
3 likes
1 comment
Share
Grow Questions

Finniegrowstarted grow question 3y ago
I added some pictures of my problems (Veg. Week 2). Should I increase the solution strength or keep it as it is? Or could ot be something else than deficiency? All help and advice welcome.


Solved
Leaves. Curl down
Leaves. Color - Yellow
Leaves. Color - Dark-brown
1 like

GMSgrowsanswered grow question 3y ago
When growing hydroponics, you really need to have a ppm, ec reader to feed properly. Here is a feed schedule I use
VEG STAGE FEED SCHEDULE
This feed regiment is for hydroponics such as RDWC, DWC, Drip systems, coco, promix HP, etc. This is for photo plants. From the day your babies pop from the soil, feed at,
Day 1....400 ppm, 0.8 ec for photos, 250 ppm, 0.5 ec for autos
Day 7....500 ppm, 1.0 ec for photos, 350 ppm, 0.7 ec for autos
Day 14..600 ppm, 1.2 ec for photos, 450 ppm, 0.9 ec for autos
Day 21..700 ppm, 1.4 ec for photos, 550 ppm, 1.1 ec for autos
Day 28..800 ppm, 1.6 ec for photos, 650 ppm, 1.3 ec for autos
Stop there unless you see your girls really need more. This applies for any fertilizers made for hydroponics and soil less grows. Maintain your ph at 5.8 through the entire veg cycle, and and try to keep your water as cool as possible
3
Week 3. Vegetation3y ago


10 cm
Height
18 hrs
Light Schedule
24 °C
Day Air Temp
5.8
pH
No Smell
Smell
600 PPM
TDS
65 %
Air Humidity
22 °C
Solution Temp
20 °C
Night Air Temp
75 cm
Lamp Distance
Nutrients 6
Calcium Magnesium Supplement
1 mll
Dutch Formula Grow
2 mll
Dutch Formula Bloom
1 mll
Finniegrow NOTES:
Keeping pH at 5,8-5,9 through the entire Vegetation-phase. EC is now around 1,2 and i'm increasing it if needed. I'll be checking the levels regularly from this week since all of the hydroponic systems are now running. I'm going to add some ice cubes in to the nutrient tanks to cool nutrient solution a bit always when I remember to, even though temperatures haven't been an issue so far. Can't do any harm so why not I quess. I'm also adding a CO2-bag in to the tent above the plants.
Also I'll begin training my plants this week by topping them.
Day 22 (8.11.)
Lights are set to 70%, water pumps are now on for 24/7 (EBB's drain water is on lowest setting possible to avoid drowning the roots) and pH is 5,8-5,9 / EC 1,2-1,3 on every hydroponic system.
I topped all of my plants and cut off all of the lowest leafs with single tips and some of the small nodes starting from them.
Day 23 (9.11.)
pH-level keeps on raising so I'm gonna be measuring it pretty often. I'm correcting it by adding some pH- while filling up the nutrient tanks with small amounts of fresh nutrient solution at a time. Everything's going well and I can't wait to flower these!
Day 24 (10.11.)
Lights are now set to 80% power at 70-75cm height from the tops. I cut off the rest of the lowest nodes which I had left to some of the plants while topping them. I don't think they would get enough light when they are bigger.
Day 25 (11.11.)
Removed the lowest (three-pointed) leafs of each plant.
Day 26 (12.11.)
I moved the Led's a bit higher (now at ~90cm above plants) and set them up to full power. Plants are now around 11-14cm height and growing like crazy!
Day 27 (13.11.)
The growing has exploded and these plants are getting bigger and bigger. I'm going to defoliate them lightly and remove the lowest nodes so the plants have around 6 nodes each going forward, hopefully I'll get an even canopy.
Day 28 (14.11.)
I changed new nutrient solution in to the EBB-flood system which has the Ayahuasca's on it. I'm keeping the EC at around 1,3-1,4 and pH at 5,8-5,9 on every system. Also added small amount of Cal-Mag in to both NFTs.
4 likes
3 comments
Share
Used techniques
HST
Technique
Topping
Technique
Defoliation
Technique
4
Week 4. Vegetation3y ago


15 cm
Height
18 hrs
Light Schedule
26 °C
Day Air Temp
5.8
pH
No Smell
Smell
650 PPM
TDS
60 %
Air Humidity
23 °C
Solution Temp
20 °C
Night Air Temp
85 cm
Lamp Distance
Nutrients 6
Calcium Magnesium Supplement
1.5 mll
Dutch Formula Grow
2 mll
Dutch Formula Bloom
1 mll
Finniegrow NOTES:
Trying to keep the pH-level at 5,8-5,9 and EC at 1,3-1,4 on all systems. Lights are set to full power at 100cm from the "ground" (top of the rock-wool cubes).
Day 29 (15.11.)
Day 30 (16.11.)
The pH-levels keep on rising, but I've managed to keep it under control by measuring and correcting it daily. I think everything looks pretty good.
Day 31 (17.11.)
Day 32 (18.11.)
Removed just a couple of leaves max. per plant to improve ventilation and prevent water condensating between leaves.
Day 33 (19.11.)
I cut off the lowest nodes of the lowest branches on each plant, but didn't touch any fanleaves. Also adjusted some of the leaves and branches using soft garden ties to get better reach of light and to spread them a bit wider from each other.
Day 34 (20.11.)
I tied and gently bent more branches to open up the plants for more light coverage. I think they are soon ready for the trellis nets and SCRoG:ing (Screen of Grow -grow technique).
Day 35 (21.11.)
6 likes
4 comments
Share
Used techniques
LST
Technique
Defoliation
Technique
Grow Questions
Finniegrowstarted grow question 3y ago
I've topped all of my plants and they are very similar to each other so these pics are just an example. Should I cut off the lowest branches or even the 2nd lowest with big sunleafs? Or would it possibly stunt the growth?


Solved
Techniques. Topping
Techniques. Defoliation
1 like

Team_Ballsforanswered grow question 3y ago
i wouldn't remove any leaves at this point. that'll only slow you down -- not an opinion.
Do you intend to use any of the stuff you listed. if you know those lowest 2 branches won't be used in the canopy, cutting them off is fine. i never use the axial buds from lowest growth node with the 1 finger leaves. i cut those off as soon as i they are large enough to safely snip off, because i know 100% that is wasted resources on growth i don't use. Even when i train those fckers to be dominant branches and even with canopy they have sucky buds by comparison to other colas in my experience.
the leaves power growth, not getting light to hit axillary buds. how easily they branch out is more about genetics. When you see heavily shielded axillary growth and tucking/bending isnt' enough, sometimes removing a leaf is useful. Try to wait until whatever is filling that space is large enough that you don't create large holes in your canopy.. light completely missing the plant is not effective use of electricity and only slows growth with less potential photosynthesis per day.
Remove the leaves when other leaves are congesting an area and you are getting potential condensation and such... or the RH is spiking too high in those areas. Don't remove them just because you see others doing it. i made that mistake plenty when topping and training early on.
5
Week 5. Vegetation3y ago


20 cm
Height
18 hrs
Light Schedule
26 °C
Day Air Temp
5.8
pH
Weak
Smell
700 PPM
TDS
60 %
Air Humidity
23 °C
Solution Temp
20 °C
Night Air Temp
80 cm
Lamp Distance
Nutrients 6
Calcium Magnesium Supplement
1.5 mll
Dutch Formula Grow
2 mll
Dutch Formula Bloom
1 mll
Finniegrow NOTES:
Keeping pH at 5,8-6,0 and EC at 1,3-1,4 like before. Overall healthy looking plants and I don't think I have really messed up anything. Roots are white and healthy, and have even reached the nutrient solution tanks below. I'm adding trellis nets to have more control of my plants height and to be able to spread them wider. I'll propably do a heavier defoliation somewhere at the end of the week or at the beginning of next. I'm not exactly sure when I should start to flower these baddies but I'm quessing maybe somewhere after 6th or 7th Vegetation week. Propably needs a lot of defoliating before that since they all are pretty sturdy and bushy, hopefully they'll get bigger after I switch the light cycle.
Day36 (22.11.)
I added the trellis net and started to guide some branches that reach with it. Also defoliated overall just a couple of leaves, lowest branches and nodes which didn't seem to get any light even by adjusting them.
Day37 (23.11.)
Adjusted more branches and leaves wider under the net. I'll continue doing this basically every time I visit my tent during the vegetation phase and the beginning of flowering. Plants are growing fast as fu©️k, and without bending them some of the tops would be at around 30cm height.
Day38 (24.11.)
Cut off a few nodes/small branches and leaves that didn't get any light or didn't look so good. It's pretty time consuming to train these plants to fill the trellis nets, hope it's worth it. I Accidently cracked one plant from middle, think it's going to recover well though. Plants haven't gotten much height because of the training I've done. Branches are pretty thick for their size in my opinion.
Day39 (25.11.)
Removed the humidifier since I have no more need for more humidity.
Day40 (26.11.)
I did the heaviest defoliation this far, removed/pruned some small lower nodes, foliage and approximately half of the big lower fan leaves per plant. Some variation of course but not really mentionable. I also dimmed the lights from 100% to 70% for the rest of the week to decrease stress caused by defoliation.
Day41 (27.11.)
Basically the same as yesterday but for the rest of the plants.
Day42 (28.11.)
5 likes
2 comments
Share
Used techniques
LST
Technique
HST
Technique
ScrOG
Technique
Defoliation
Technique
Grow Questions
Finniegrowstarted grow question 3y ago
I'm trying to Scrog and Defoliate to improve yield and quality. When should I turn to 12/12 cycle and when to heavily defoliate? Indica strains so shouldn't grow that much height, right? Now I'm just spreadin them wider around the net since they are growing bushy/relatively short


Solved
Plant. Too short
Techniques. ScrOG
Techniques. Defoliation
1 like

Polyphemusanswered grow question 3y ago
What organomann said.
Though, there are some reasons to do it despite the negatives he lists that are all true. Risk reduction being one. You should have a specific reason to do it.
Leaves overlapping that cause standing water on leaves is a disease vector.
A shit ton of congested leaves raising local RH is a disease vector, too.
Standing water and excess moisture on leaves, bad! Unnngghhh!! https://youtu.be/Mawve_3NSj4?t=30
When i see a leaf controting or can easily predict it, that's another reason, also interelated to congestion above. Controrting means the leaf is putting a lot of effort into seeking light - reacting because is not getting enough. Rather have a few fully covering area without contortion. Vectors of light not hitting tops of leaves are severely attenuated, even if still causing some photosynthesis. Greater surface area of leaves lying properly is probably better.
Timing helps avoid any negatives too. Be pataient and let any growth that is expected to fill in gaps is actually be big enough to do so. No reason to take it off too soon.
I also remove axillary buds that I know will never be included in my canopy, but I don't clip off that node's leaves, if there is no reason to do so.
6
Week 6. Vegetation3y ago


30 cm
Height
18 hrs
Light Schedule
25 °C
Day Air Temp
5.9
pH
Weak
Smell
750 PPM
TDS
60 %
Air Humidity
23 °C
Solution Temp
20 °C
Night Air Temp
70 cm
Lamp Distance
Nutrients 7
Calcium Magnesium Supplement
1.5 mll
Dutch Formula Grow
1.5 mll
Dutch Formula Bloom
1.5 mll
Finniegrow NOTES:
EC 1,5-1,6
pH 5,8-6,0
Later this week I'm turning the lights to 12/12 flowering cycle and going to change the nutrient solution on every reservoir a couple days before. The new nutrient solution is the same that I've added to this week, so basically a bit less Grow and a bit more Bloom. Also started adding the growth&bloom escallator.
Day43 (29.11.)
Day44 (30.11.)
Defoliation and pruning of lower growth.
Day45 (1.12.)
Defoliation and pruning of lower growth. Also changed the nutrients in to beginning of flowering phase. The exact ratio is on this weeks nutrient plan.
Day46 (2.12.)
Day47 (3.12.)
Day48 (4.12.)
Day49 (5.12.)
Switching light-cycle to 12/12 and counting the next week as the first week of flowering. Next heavy defoliation/pruning on 2nd or 3rd week of flowering.
2 likes
1 comment
Share
Used techniques
LST
Technique
HST
Technique
ScrOG
Technique
Defoliation
Technique
7
Week 7. Flowering3y ago


35 cm
Height
12 hrs
Light Schedule
24 °C
Day Air Temp
5.9
pH
Weak
Smell
750 PPM
TDS
60 %
Air Humidity
22 °C
Solution Temp
19 °C
Night Air Temp
65 cm
Lamp Distance
Nutrients 7
Calcium Magnesium Supplement
1.5 mll
Dutch Formula Grow
1.5 mll
Dutch Formula Bloom
1.5 mll
Finniegrow NOTES:
First week of flowering: pH at around 5,8-6,0 and EC at 1,5.
Day50 (5.12.)
Day51 (6.12.)
Day52 (7.12.)
Just a light defoliation of lower leaves and I also pruned a few small nodes that didn't get any light.
Day53 (8.12.)
I filled the tanks to the top with fresh nutrient solution. I stopped using the root stimulator, otherwise same amounts of nutrients.
Day54 (9.12.)
Day55 (10.12.)
Light defoliation and pruning, mostly on lower parts of plants.
First time using pH+ on this grow, since it is mostly needed in flowering phase. On vegetation I've basically only needed the pH-.
Day56 (11.12.)
More light defoliating and pruning on bottom halves of the plants. Growth had basically exploded and I was therefore forced to defoliate under the canopy to improve airflow and to prevent moisture from condensating.
Overall everything looks great!
5 likes
comments
Share
Used techniques
LST
Technique
ScrOG
Technique
Defoliation
Technique
8
Week 8. Flowering3y ago


40 cm
Height
12 hrs
Light Schedule
23 °C
Day Air Temp
5.9
pH
Weak
Smell
750 PPM
TDS
60 %
Air Humidity
22 °C
Solution Temp
19 °C
Night Air Temp
60 cm
Lamp Distance
Nutrients 6
Calcium Magnesium Supplement
1.5 mll
Dutch Formula Grow
1.5 mll
Dutch Formula Bloom
1.5 mll
Finniegrow NOTES:
I stopped using the root stimulator as I fill the tanks, next full nutrient solution change to mid-bloom phase is at around 3rd to 4th week flowering. I'll I stop using the Grow nutrient and will increase Bloom the same amount.
A lot of training on upper parts with the net and some light defoliating on lower parts of the plants.
Day57 (12.12.)
Day58 (13.12.)
Defoliated and pruned my plants a bit more. Removed some big fan leaves covering large areas of becoming bud sites but mostly focused on lower leaves growing inwards, blocking growth, airflow etc.. Added a video afterwards.
Day59 (14.12.)
Day60 (15.12.)
I continued doing the same as before, light defoliation mostly under the canopy.
Day61 (16.12.)
Day62 (17.12.)
Everything looks good and my teenagers are finally beginning to flower, also no signs of any males or hermaphodites so that's good. Filling the net and keeping the tops and bud sites at the same level is a lot of work since they've stretched a lot. They've also needed some pruning and defoliating but I've tried to not remove too much before they've finished growing bigger. After that, propably on 4th week of flowering I can decide better on what to remove and what to keep for the rest of the grow.
Day63 (18.12.)
I started the last heavier defoliation process which includes removing around 50% of the upper leaves blocking airflow and light to the developing bud sites. I'll continue the process propably a couple days so I don't stress them too much. It's pretty time-consuming to dive in to each plant and remove anything that's unneccessary for the rest of the grow, keeping that in mind I don't even have the time to do everything at once. This includes the bottom nodes and branches that aren't going to reach even close to the net, the leaves that are blocking the light on top, and the leaves at the bottom of the canopy that aren't getting basically any light.
Thanks for the tips! 💪
3 likes
6 comments
Share
Used techniques
LST
Technique
HST
Technique
ScrOG
Technique
Defoliation
Technique
9
Week 9. Flowering3y ago


55 cm
Height
12 hrs
Light Schedule
23 °C
Day Air Temp
5.9
pH
Weak
Smell
750 PPM
TDS
50 %
Air Humidity
21 °C
Solution Temp
19 °C
Night Air Temp
40 cm
Lamp Distance
Nutrients 6
Calcium Magnesium Supplement
1.5 mll
Dutch Formula Grow
1 mll
Dutch Formula Bloom
2 mll
Finniegrow NOTES:
Keeping the pH between 5,8-6,0 and EC at around 1,4-1,6 depending on system. EC at 1,5 seems to be optimal and my measurements are staying pretty steady at that level. Humidity is lowered to around 50% if I can.
The tops are now at around 45-60cm height from the soil.
Continuing the last heavier defoliation/pruning process that I started yesterday at the end of 2nd flowering week. I saw no signs of mold or any other issues as I went through the plants.
After this week I'm going to change the nutrient solutions on the tanks and fill them with fresh nutrients with minor changes: Dropping the amount of Grow from 1,5ml to 0,5ml and increasing the amount of Bloom from 1,5ml to 2,5ml. After the change I'm only going to refill the tanks without adding any Grow and will instead increase the amount of Bloom to 3ml. Propably a one more change of fresh nutrients until flushing with Final Solution prior harvesting.
Day64 (19.12.)
Some more defoliation focusing on the upper growth revealing bud sites below them and keeping off the moisture. Already got a trash bag almost full of leaves since they've been pretty bushy plants on average.
Day65 (20.12.)
Continuing the last defoliation process.
Day66 (21.12.)
Continuing the last defoliation process, pretty satisfied with the results so far. Light penetration and airflow have increased greatly so I don't have to worry that much about humidity or possible mold any longer.
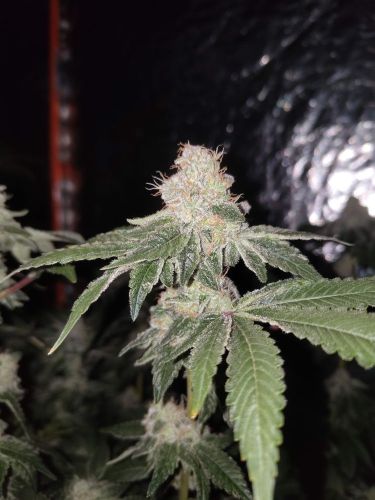
Each strain has started flowering, all plants are females and buds have started to develop. Defoliating didn't seem to stress the plants as much as I thought it would.
Day67 (22.12.)
Day68 (23.12.)
Refilled and added some nutrients with a stronger Bloom/Grow -ratio (~4:1) and left my girls to enjoy the Christmas Holidays as I did. I'll be gone for around three days, after that I'll change to new fresh nutrients as I mentioned before.
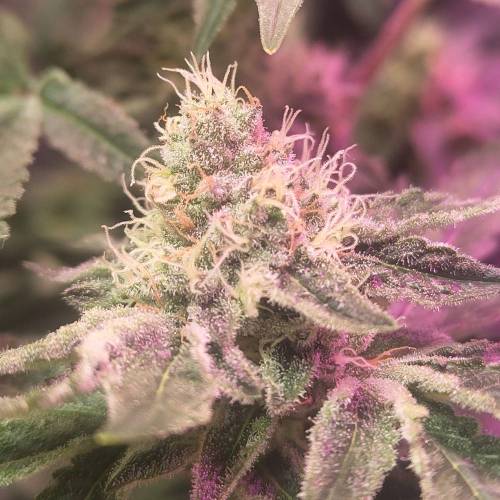
One Ayahuasca Purple seems to be ahead of others, and a few other ones have clearly started to develop some buds too, rest of the plants are following closely behind. Each strain has some truly astonishing individuals, and I think Ayahuasca's have shown most variety between different plants. Overall everything looks pretty good I think. Hopefully can say the same after a couple of days as I come back.
Happy holidays everyone!
Day69 (24.12.)
Day70 (25.12.)
I added another Led light to my tent just before the lights turned off. Everything looks amazing!
4 likes
comments
Share
Used techniques
LST
Technique
HST
Technique
ScrOG
Technique
Defoliation
Technique
10
Week 10. Flowering3y ago


65 cm
Height
12 hrs
Light Schedule
22 °C
Day Air Temp
6.0
pH
Normal
Smell
750 PPM
TDS
50 %
Air Humidity
19 °C
Night Air Temp
40 cm
Lamp Distance
Nutrients 6
Calcium Magnesium Supplement
1.5 mll
Dutch Formula Grow
0.5 mll
Dutch Formula Bloom
2.5 mll
Finniegrow NOTES:
Plants are around 50-75cm height with the net and I'm pretty amazed how they've stretched after flipping to 12/12 cycle.
First thing this week is changing the nutrients on all systems to the amounts listed on this week nutrient chart. After this switch I'll stop giving Grow completety as I refill, and increase Bloom to 3ml/l. I only fill the tanks to around half-full at first, adding more and correcting measurements next day.
I think my last defoliation is almost done, leaves have grown like hell so it has been a lot of work defoliating and training them.
Day71 (26.12.)
Changing the nutrients and continuing defoliating as mentioned before.
Day72 (27.12.)
Almost finished the last defoliating process. From now on I'll only remove a leaf or few when I see fit, so no heavy defoliating anymore before harvest.
Day73 (28.12.)
Day74 (29.12.)
Day75 (30.12.)
Leaves have grown so fast that I had to defoliate a bucket full of leaves again. Everything looks good overall!
Day76 (31.12.)
Tied and moved some branches for better light penetration and slightly moved the lights for better coverage.
Happy New Year!
Day77 (1.12.)
3 likes
comments
Share
Used techniques
LST
Technique
ScrOG
Technique
Defoliation
Technique
11
Week 11. Flowering3y ago


65 cm
Height
12 hrs
Light Schedule
22 °C
Day Air Temp
6.0
pH
Normal
Smell
750 PPM
TDS
50 %
Air Humidity
20 °C
Solution Temp
18 °C
Night Air Temp
35 cm
Lamp Distance
Nutrients 5
Calcium Magnesium Supplement
1.5 mll
Dutch Formula Bloom
3 mll

Dutch Formula Micro
1 mll
Finniegrow NOTES:
Keeping EC at around 1,5 and pH at 6,0-6,2.
Everything looks great and I'm hoping for amazing crop to start the year with!
One Ayahuasca Purple seems to be clearly ahead of others in flowering but that's fine. I'm going to harvest them all at the same time so I'll have a few different terpene profiles on the finished product, since they are all grown from seeds and not from clones.
Day78 (2.1.)
Day79 (3.1.)
Light defoliation to reveal more bud sites and to remove some lower growth that aren't getting any light.
Day80 (4.1.)
At last I've finished defoliating and pruning for all my plants. I think there is no need to remove anything before harvesting them. It took a hell lot of time to finish since I have 13 plants pretty close to each other that I can't move separetly.
Also using garden-ties to bend some plants a bit for better light coverage.
Day81 (5.1.)
Day82 (6.1.)
Tied some more branches for better light coverage.
Day83 (7.1.)
Day84 (8.1.)
I found a hermaphodite/bi-sexual plant! Strain was Kush Mintz and I haven't seen any signs on other plants. Keeping close eye on everything, hopefully I got it removed on time... I cut it off after analyzing the situation and hang it to dry in another room. It was clearly the smallest plant even though it seemed to flower just fine till this day when I found out those small banana-like pollen sacks. I'm praying this won't ruin my entire crop.🙏 Added a couple pics after removing it from the tent.
3 likes
comments
Share
Used techniques
LST
Technique
ScrOG
Technique
Defoliation
Technique
12
Week 12. Flowering3y ago


65 cm
Height
12 hrs
Light Schedule
22 °C
Day Air Temp
6.0
pH
Strong
Smell
750 PPM
TDS
50 %
Air Humidity
20 °C
Solution Temp
18 °C
Night Air Temp
35 cm
Lamp Distance
Nutrients 5
Calcium Magnesium Supplement
1.5 mll
Dutch Formula Bloom
3 mll
Dutch Formula Micro
1 mll
Finniegrow NOTES:
I found a herm as mentioned at the end of last week. It's removed from the growing environment and I'm keeping close eye on every plant for possble pollination. I truly hope my other plants are safe and I noticed the problem on time. I think it was propably just a weak pheno or something since everything looks great otherwise. They are starting to smell pretty strong and nice also!
Keeping pH between 6,0-6,2, and EC at around 1,5. Next week I'll lower the amount of nutrients I give, and propably the week after that I'll start flushing with the Final Solution for around 1-2 week period prior harvesting.
Day85 (9.1.)
Tied some branches with some soft garden-ties trying to cover the area where the herm was.
Day86 (10.1.)
Day87 (11.1.)
Day88 (12.1.)
I've been keeping a close eye on everything and overall things looks good! I think I'm starting to flush/switch to final solution after next week.
Day89 (13.1.)
Day90 (14.1.)
Day91 (15.1.)
2 likes
comments
Share
Used techniques
ScrOG
Technique
LST
Technique
13
Week 13. Flowering3y ago


65 cm
Height
12 hrs
Light Schedule
22 °C
Day Air Temp
6.0
pH
Strong
Smell
750 PPM
TDS
50 %
Air Humidity
20 °C
Solution Temp
18 °C
Night Air Temp
35 cm
Lamp Distance
Nutrients 5
Calcium Magnesium Supplement
1.5 mll
Dutch Formula Bloom
3 mll
Dutch Formula Micro
1 mll
Finniegrow NOTES:
I've flowered my babies for 42 days at the beginning of this week. Keeping EC at 1,4-1,5 / pH at 6,0-6,2 and nutrients as before. I'm propably starting to flush after this week.
Day92 (16.1.)
Took some pictures/videos for the diary and refilled the tanks with 40l of fresh nutrient solution.
Day93 (17.1.)
Day94 (18.1.)
Day95 (19.1.)
Day96 (20.1.)
Day97 (21.1.)
Day98 (22.1.)
1 like
comments
Share
Used techniques
LST
Technique
ScrOG
Technique
14
Week 14. Flowering3y ago


65 cm
Height
12 hrs
Light Schedule
22 °C
Day Air Temp
6.0
pH
Strong
Smell
700 PPM
TDS
50 %
Air Humidity
20 °C
Solution Temp
19 °C
Night Air Temp
35 cm
Lamp Distance
Nutrients 1

Natural Power Final Solution
1 mll
Finniegrow NOTES:
This week I'm starting to flush with only water and Final Solution -nutrient, so emptying the tanks and refilling them as doing so. I'll try to keep the pH at around 5,8-6,2. Overall everything looks pretty good and I can't wait to harvest. 🙏
Day99 (23.1.)
Took some pics and videos for the diary with my shitty camera.
Day100 (24.1.)
Emptying and refilling all nutrient tanks with fresh solution as mentioned above.
Day101 (25.1.)
Increased the dark-/night-time by 30min so now the lights are 11,5h On / 12,5 Off.
Day102 (26.1.)
Day103 (27.1.)
Reducing 30min of light again so now my timer is set to 11h On / 13h Off. I also moved the lights a bit higher for the rest of the grow, about 10-15cm higher than before.
Day104 (28.1.)
Day105 (29.1.)
1 like
comments
Share
Used techniques
ScrOG
Technique
15
Week 15. Flowering2y ago


65 cm
Height
11 hrs
Light Schedule
22 °C
Day Air Temp
6.0
pH
Strong
Smell
50 PPM
TDS
50 %
Air Humidity
20 °C
Solution Temp
19 °C
Night Air Temp
40 cm
Lamp Distance
Nutrients 1
Natural Power Final Solution
1 mll
Finniegrow NOTES:
Continuing the flushing phase, this will be the last week before harvesting. At the beginning of this week I've been flowering for 56 days. I've found a couple of seeds from couple of the flowers, propably due to that one hermie I cut off before. Hopefully I'm not going to find any more seeds because that could drastically affect the quality and yeld. Just a couple of them I can live with.
Day106 (30.1.)
Day107 (31.1.)
Day108 (1.2.)
Day109 (2.2.)
Everything looks good and I haven't found any problems this week. Just a week till I cut them down. I also lowered the power on the lamps a bit.
Day110 (3.2.)
Day111 (4.2.)
Day112 (5.2.)
Today is 62nd day after switching to flowering (12/12h-cycle). I've been flushing with Final Solution for around 12 days, so propably going to cut them all down after a few days. Propably going to leave them for an extra 12-24h of dark before cutting and hanging them to dry.
3 likes
4 comments
Share
Used techniques
ScrOG
Technique
16
Week 16. Flowering2y ago


65 cm
Height
11 hrs
Light Schedule
22 °C
Day Air Temp
6.0
pH
Strong
Smell
50 PPM
TDS
50 %
Air Humidity
20 °C
Solution Temp
19 °C
Night Air Temp
40 cm
Lamp Distance
Nutrients 1
Natural Power Final Solution
1 mll
Finniegrow NOTES:
This will be the last week of flowering. Just a couple more days of flushing with the Final Solution and I'll harvest all of them before the end of the week. Then I'll hang them to dry in the same growing tent and start the drying and defoliating process. Overall everything looks pretty good and no bigger problems have occurred.
Day113 (6.2.)
Today is 64th day of flowering and 13th day of flushing.
Day114 (7.2.)
After my lights turn off today at around midnight, I'll take the timer and lights off completely and leave the plants in total dark for a day or so before cutting them off.
Day115 (8.2.)
Day116 (9.2.)
Finally! Cutting the plants down this afternoon and hanging them to dry. So, the overall grow time from seed to harvest was 116days with 67days of flowering, with total darkness for the last 36hours before harvest.
8 likes
3 comments
Share
Used techniques
ScrOG
Technique
17
Week 17. Harvest2y ago
Happy Harvest Day!


9/10
Rated
The most stable strain of this harvest, total success. I got a great yeld of premium buds, and the plants reacted well to training and they didn't stress too much even to HighStressTraining.
Show more
Translate
Spent 116 days
Ger Veg Flo Har
5
Plants
4 m²
Grow Room size
Easy
Difficulty
Height
Day air temperature
Air humidity
PPM
PH
Light schedule
Solution temperature
Night air temperature
Pot size
Lamp distance

Finniegrow Overall 4,5/5 ⭐⭐⭐⭐✨
1 like
comments
Share
Equipment Reviews


17
Week 17. Harvest2y ago
Happy Harvest Day!
9/10
Rated
I had one hermie that I had to throw away, otherwise pretty stable strain with a bit more variety between individual plants than with the Cookies Kush's.
Show more
Translate
Spent 116 days
Ger Veg Flo Har
4
Plants
4 m²
Grow Room size
Normal
Difficulty
Height
Day air temperature
Air humidity
PPM
PH
Light schedule
Solution temperature
Night air temperature
Pot size
Lamp distance

Finniegrow Overall 4/5 ⭐⭐⭐⭐
likes
comments
Share
Equipment Reviews
17
Week 17. Harvest2y ago
Happy Harvest Day!
9/10
Rated
Most variety between individual plants. One was bigger than the other two combined. Pretty good smoke also, not my favourite out of the three thought.
Show more
Translate
Spent 116 days
Ger Veg Flo Har
3
Plants
4 m²
Grow Room size
Easy
Difficulty
Height
Day air temperature
Air humidity
PPM
PH
Light schedule
Solution temperature
Night air temperature
Pot size
Lamp distance

Finniegrow Overall 4/5 ⭐⭐⭐⭐
3 likes
comments
Share
Equipment Reviews
24 comments
Sort by
popularity
popularity
newest
oldest

AutoflowersSucK commentedweek 23y ago
I love Barney's Farm!
If you're not planning a sea of green, you're gonna be so over crowded!
likes 4
Finniegrow commented3y ago
@AutoflowersSucK, Me too, they've been awesome! You may be right, but I'm going to have three hydro-systems for them.
2x NFT-GT90 and one bit smaller EBB-flood system. I'm planning on putting 5 plants in to each NFT and 3 in the smaller system, so 13 plants total in my tent.
likes 4
AutoflowersSucK commented3y ago
@Finniegrow, Cool. Do a Diary so we can follow along!
likes 3
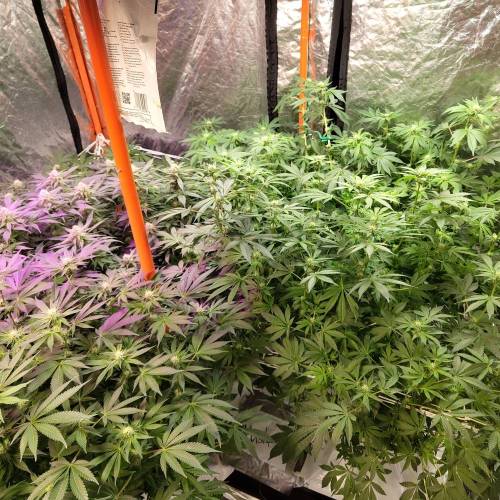
Finniegrow commented3y ago
@AutoflowersSucK, I just moved my babies in to their final systems and added a picture to demonstrate how my tent is set up for rest of the grow. Feel free to follow along with my crop, any comments and advice are more than welcome! 😎
likes 2
AutoflowersSucK commentedweek 83y ago
If your diary is accurate and you are in week 3 of flower, you are approaching the time to do your last defoliation. Remove some light blocking fan leaves off the tops of the canopy to let light get down to lower nodes. If you have 2 big fan leaves on a top, remove 1 of them kinda idea. They need some leaves but you can remove 50% of the foliage for better yield
You are in flower now, you are going to want to drop that humidity to 50% max, 40% minimum.
By the way, it's great to see your garden has bounced back. I remember seeing it in it's infancy and i thought they might not pull through. Good job man!
likes 3
Finniegrow commented3y ago
@AutoflowersSucK, I'm trying to lower the humidity a bit if I can, really appreciate the tips!
likes 2
AutoflowersSucK commented3y ago
@Finniegrow, Yeah, i've had bud rot before years and years ago when we grew plants that had coke can thick colas. It's brown slimy and mushy, and it will spread and kill the whole bud. It's worthless. You can't smoke it or make edibles with it, it's 100% ruined, so be aware brutha!
likes 3
Finniegrow commented3y ago
@AutoflowersSucK, Already started taking appropriate precautions: I started doing a bit heavier defoliation on the upper parts of the plants, and I'm continuing it throught next week. I'm also doing my best to decrease the relative humidity in the grow room. Ventilation and fans are now continuosly on max. power, that should do the trick or at least help a bit. Cheers mate! 🙏
like 1
Show More (2)

Golden commentedweek 43y ago
Coming along nicely, keep up the awesome work 🍀🔥
likes 3
Finniegrow commented3y ago
@Golden, Thanks mate, trying my best! Happy growing bro, those girls you have outside are looking good. 😎
like 1

majinglue commentedweek 162y ago
SHEESSSSHHH those are looking GREAT!
likes 3

IstrGrow commentedweek 152y ago
looks great ! Great setup brother!. 🏄♂️🏄♂️
likes 2
Finniegrow commented2y ago
@IstrGrow, Appreciate it, thanks! I've been thinking of some upgrades but been pretty good setup overall. 😎👌
likes 2

Lemonhazelover commentedweek 53y ago
Happy growing and good luck buddy ☘️
likes 2
Finniegrow commented3y ago
@Lemonhazelover, Thank you sir, you have a new follower.😎 Your plants are looking beautiful!👌
like 1

Herbie101 commentedweek 43y ago
Good luck for your first run and happy growing buddy! 🌱🌞🍀
likes 2
Finniegrow commented3y ago
@Herbie101, Thanks! Can't wait for these to flower 🍁🤩
like 1

BlueGrass commentedweek 152y ago
nice looking plants yoo
like 1
Finniegrow commented2y ago
@BlueGrass, Thanks, really appreaciate it! You've done some awesome job as well, nice diary mate.😎
like 1

the end.
Enjoying this diary? Follow for more updates!


Prefer the old Diary view?
Go back to the old Diary view