
Crystal White Kush on Coco 12/12 from seed Super Sativa Seed Club


VEG
Samsung led Light Emitting Diodes/240W
Custom
FLO
Samsung led Light Emitting Diodes/240W
Custom


Drip
blumat
Custom

Coco Coir
Custom
Indoor
Room Type
12-12
weeks 1-5, 7
30 l
Pot Size
Start at Harvest
G
Germination2y ago


Nutrients 4

Coco A
2.5 mll

Coco B
2.5 mll

Generator
0.15 mll
Appoldro420 So I am planning my next round.... This time my first single strain diary. I received 15 seeds from Super Sativa Seed Club to make this happen. Nice packaging, not my first SSSC strain (currently growing Lava Freeze). Since it is a single strain I am going to try to make it a low maintenance round. 12/12 from seed, single nutrient (allright and a bit of CalMag) and Blumat drip-system. Next Friday I will put them to germinate as soon as I have my newly ordered nutrient. Please give me some tips for the nutrient (locally available The Netherlands), not separate bottles for grow and bloom, must be able to keep fresh for 2/3 weeks in container (with circulation) and preferably no need for boosters or anything.
Today I am putting the seeds in the soil after a 24 hour soak in water (bit of peroxide). All seeds opened :) All of them are put in 5.6 litre containers for the first 3 weeks because of lack of space and I want to partially reuse the coco from my current run. Lighting scheme is 20.00 lights on, 08.00 lights off. Starting with 360W of power at 130cm height. As soon as the other round is harvested I will move them to this space and continu growth with 1500W for the rest of the run. Since it is a single strain grow and 12/12 from seedI don't expect any difficulties with nutrients as in my current round.
27/7: Small change in the plans... The pots don’t match the rest, so they’ll stay in a tent for the next three weeks. Hopefully, they won't grow too big.
I’ve sorted the seeds. I chose the ones with the longest root tips, although the difference is minimal. The remaining seeds are in the top right. 100% germination... thank you SSSC!
Now everything carefully goes into the coco. Nutrients consist of 5ml/L Cocos A+B, 0.8ml/L Calmag. 600ml nutrient solution per 5.6L pot. No idea how long that will last, so just to be safe, I prepared a total of 10L. Measured pH 5.9, EC 1.4.
Tonight, I'll just hang the lamp above and install a small fan. During the first three weeks, you won’t smell them, so it’s solely for circulation and heat dissipation.
30/7: 11 out of 12 are showing their heads. As mentioned I have 3 spare seeds, put one of them in the empty pot. So hopefully it comes up. Otherwise... 11 it will be.
31/7: A bit stretching but not sure if it is too much stretch. Will determine tomorrow, I like the current height so if they start developing some leaves without too much stretch I won't lower the fixture but when they do I will just have to. I will count next Saturday as day one (first week vegetation). Since I started on 12 hours I will just call them vegetation weeks as long as there are no signs of flower.
02/8: Totally unexpected the 12th seed came up.. So Monday will be day 1 veg..
2 likes
2 comments
Share
Used method
Glass Of Water
Germination Method
1
Week 1. Vegetation2y ago


8 cm
Height
12 hrs
Light Schedule
27 °C
Day Air Temp
5.9
pH
No Smell
Smell
700 PPM
TDS
55 %
Air Humidity
22 °C
Solution Temp
24 °C
Substrate Temp
23 °C
Night Air Temp
5.6 l
Pot Size
0.2 l
Watering Volume
80 cm
Lamp Distance
Nutrients 4
Generator
0.1 mll

Cocos A
3 mll

Cocos B
3 mll
Appoldro420 Well, today is day 1. All are up (one is still tiny) and they did stretch a bit because of lack of light but that is solved now with lowering the lights. Placed them in little pots because I want to run them simultaneously with my current grow in same room. All recycle the coco from them.
11-8: Littlebit on the bright side... can be a bit darker green. Just added 200ml per plant with Generator Hy-Pro 0.1ml/l, 3ml/L Cocos A - PLAGRON., 3ml/l Cocos B - PLAGRON.
Cocos B, 1ml/L CalMag Pro - PLAGRON. One or maybe two weeks before changing pots...
2 likes
comments
Share
Used techniques
12-12
Technique
2
Week 2. Vegetation2y ago


14 cm
Height
12 hrs
Light Schedule
28 °C
Day Air Temp
6.0
pH
No Smell
Smell
700 PPM
TDS
55 %
Air Humidity
22 °C
Solution Temp
24 °C
Substrate Temp
24 °C
Night Air Temp
5.6 l
Pot Size
0.2 l
Watering Volume
75 cm
Lamp Distance
Nutrients 4
Generator
0.1 mll
Cocos A
3 mll
Cocos B
3 mll
Appoldro420 Good morning everyone,
A new week has begun, and we can already start calling them small plants. At the moment, they are still in the 5.6-liter pots. I would have preferred to transplant them already, but my other batch isn't ready yet. I wanted to reuse some of the coco from that batch, so I need to be patient for a bit longer—a classic example of poor planning.
Fortunately, I still have a set of spare lights, but I don’t have a filter or a proper place to store twelve 50-liter pots. On the other hand, at the emergency location, I can more easily ventilate the air, which is definitely not a luxury during the summer. This also means I’ll have to cancel the CO2 supplementation or add it much later.
Anyway, it was meant to be a low-tech round, just to see what I can achieve with basic means.
2 likes
comments
Share
Used techniques
12-12
Technique
3
Week 3. Flowering2y ago


14 cm
Height
12 hrs
Light Schedule
28 °C
Day Air Temp
6.0
pH
No Smell
Smell
700 PPM
TDS
55 %
Air Humidity
22 °C
Solution Temp
24 °C
Substrate Temp
24 °C
Night Air Temp
5.6 l
Pot Size
0.2 l
Watering Volume
75 cm
Lamp Distance
Nutrients 4
Generator
0.1 mll
Cocos A
3 mll
Cocos B
3 mll
Appoldro420 Faster then I expected.. First signs of flowering... Anyone can tell me if I can still repot them now? Thanks in advance.
01/09: Ok... complete change of plans... I'm going to finish them off in this tent. I do want to give them a bit more light than they have now, so I'll check tonight what I have lying around. 120x60 is, of course, a very minimal space for 12 ladies, so that will mean a bit more training, although they look like they might not necessarily need it. I also let them get a bit too dry, which they didn’t take too well. It’s always a hassle with those online grow shops and their delivery times... Tip... if you order something from Eugardencenter... don’t start your round until you’ve received your stuff, apparently even delivering a few Blumats is advanced mathematics for them.
Really disappointed, I specifically bought a 120x240 tent, etc...
Well, at least I have enough for the coming year.
2 likes
comments
Share
Used techniques
12-12
Technique
4
Week 4. Flowering2y ago


40 cm
Height
12 hrs
Light Schedule
31 °C
Day Air Temp
6.0
pH
Normal
Smell
800 PPM
TDS
55 %
Air Humidity
27 °C
Solution Temp
24 °C
Substrate Temp
24 °C
Night Air Temp
30 l
Pot Size
0.2 l
Watering Volume
40 cm
Lamp Distance
900 PPM
CO₂ Level
Nutrients 4
Generator
0.17 mll
Cocos A
5 mll
Cocos B
5 mll
Appoldro420 Changed my plans a bit so they probably won't move to another location ( or they really have to outgrow their current pots... ) so added some additional lights and raised my EC a bit. Also added CO2 to 900PPM but not sure if continue with that. First time CO2 out of a bottle instead of a generator. If it is too pricey I will quit that.
07-09: YES!! I have an extra room available so I am moving these ladies to a bigger place.. will keep you up to date.... From 5.7 to 30 liter pot size (a bit late to switch but I do believe they can profit from it.)
A few hours later....
Well, that's not easy at all... taking a break for a moment...
Checklist for myself:
The tent is up and checked for leaks (ugly thing, but no complaints for fifty bucks)
Lighting is installed at the correct height
CO2 is in place, needs to be moved to the right spot
Exhaust is installed (still need to tape the transitions)
Still need to install Blumat (but first repot the plants due to positioning)
Install the water supply (yes, I should have done that first...)
Meh... another hour or two. Hopefully, they don't mind being without light for about 3 hours.
A few hours later.... Well, that was a lot of work... but thank goodness it all worked out (just need to install the Blumats, which I'll soak in water shortly). Besides that, I now have a water supply and drainage available, which makes certain tasks much easier. Hand-watering was pretty fun (the plants were doing well so far), but it was a lot of work for 12 pots. Having to use a syringe every day for dosing just isn't my thing.
The plants are suddenly looking very small again, though. But well, now they can literally grow in any direction. I'll quickly check how they did overnight, and then the lights will be going out again soon.
And then quickly took some photos just before the lights went out... The ladies seem to be doing just fine, with their leaves happily pointing upwards as if they're waving cheerfully. The CO2 has been used up quite quickly; the bottle is empty, which isn't surprising given the large tent. I'll refill the bottle shortly and see how long it lasts this time. I think trimming will be a bit easier this round. Tonight, I'll lower the lights a bit to around 30 cm and hope they can handle the doubling of the light intensity. They were doing well last night, at least. The temperature is on the high side (33˚C), but that's not surprising given the current outdoor temperatures. I expect that once we have normal temperatures again, the temperature will settle around 29˚C.
#SSSC_John Thank you very much for this outstanding strain so far...
1 like
1 comment
Share
Used techniques
12-12
Technique
5
Week 5. Flowering2y ago


60 cm
Height
12 hrs
Light Schedule
29 °C
Day Air Temp
6.0
pH
Normal
Smell
900 PPM
TDS
55 %
Air Humidity
27 °C
Solution Temp
24 °C
Substrate Temp
24 °C
Night Air Temp
30 l
Pot Size
0.2 l
Watering Volume
25 cm
Lamp Distance
600 PPM
CO₂ Level
Nutrients 4
Generator
0.17 mll
Cocos A
5 mll
Cocos B
5 mll
Appoldro420 Didn't check them out for 3 days and they have grown a lot.. Pretty satisfied... unfortunately the white widow seeds didn't germinate.. so this will probably continue to be a single strain diary.
Will raise the lights tonight a bit to give them some space..
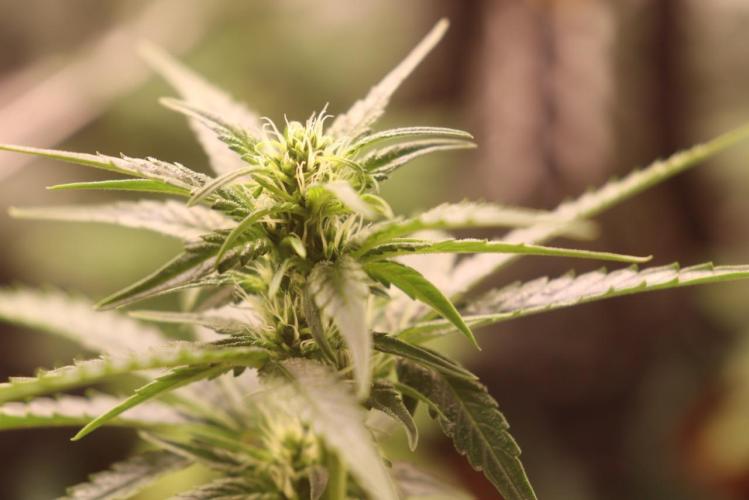
19/09: 49 days since germination.. according to my diary they are flowering for 2 weeks now... Not sure what to expect from this. Think they will continue growing but wil cut one top tonight because it is touching the lights and she is the only one doing that.. So I have two options... raising the lights (but removing it further from the other lights) or cut this lady so they are again all at same height.
19/09 Addon: Tomorrow I will receive my new iPhone so today I made some extra pictures, to be able to compare them. Off course they won't be exactly the same but I am still pretty excited to see the difference. First picture of this upload is a zoom of the second. All pictures from this upload are titled "2 weeks of true flowering"
22/09 The little girl is still little but developing some dense buds. We are at the eind of 3rd week flowering so tomorrow or tonight I will add first pictures week 4 of flowering stage. Last 4 pictures are from this morning.. No lights so a bit on the dark side. Needless to say I am very grateful to @SSSC_John for giving me this seeds tot test with...
2 likes
comments
Share
Used techniques
12-12
Technique
6
Week 6. Flowering2y ago


70 cm
Height
12 hrs
Light Schedule
29 °C
Day Air Temp
6.0
pH
Normal
Smell
800 PPM
TDS
55 %
Air Humidity
27 °C
Solution Temp
24 °C
Substrate Temp
24 °C
Night Air Temp
30 l
Pot Size
0.2 l
Watering Volume
25 cm
Lamp Distance
600 PPM
CO₂ Level
Nutrients 4
Generator
0.17 mll
Cocos A
5 mll
Cocos B
5 mll
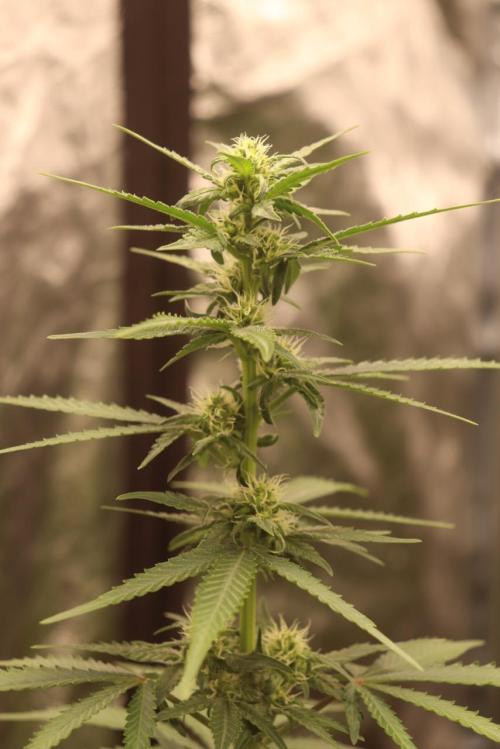
Appoldro420 Over the past week, I made several important adjustments to optimize the cannabis plants' growth. One of the key changes was lowering the nutrient concentration to 1.6 EC. This adjustment was made to provide a more balanced nutrient supply, ensuring that the plants aren’t overfed while still receiving the essential elements needed for healthy development, especially during the flowering phase.
To prevent light burn, I also raised the grow lights slightly, ensuring that the plants receive optimal light exposure without the risk of getting too close to the lamps, which could lead to heat stress or damage. This adjustment should help the plants grow steadily without any issues caused by excessive light.
I’ve also introduced Aptus P-Boost and K-Boost into the feeding routine. P-Boost supplies the plants with phosphorus, which is crucial for root and flower development, while K-Boost provides potassium to strengthen plant structures and support flowering. These additions are expected to improve the overall health and productivity of the plants.
In the coming weeks, I plan to manually add Aptus Topbooster through weekly water feedings. The Topbooster will provide an extra nutrient kick during the flowering stage, stimulating the growth of larger, denser buds. By carefully monitoring these changes, I aim to promote strong flower development and enhance the final yield.
28/09: Day 63 from seed... pretty satisfied so far.. off course not as big as intended but they made the start in very small pots. Well had to do that once so now I know for next rounds I will have to repot them before flowering stage.. Well, I would have if I could, but circumstances where just not right this round.
3 likes
comments
Share
7
Week 7. Flowering2y ago


80 cm
Height
12 hrs
Light Schedule
29 °C
Day Air Temp
5.5
pH
Normal
Smell
800 PPM
TDS
50 %
Air Humidity
27 °C
Solution Temp
24 °C
Substrate Temp
24 °C
Night Air Temp
30 l
Pot Size
0.4 l
Watering Volume
25 cm
Lamp Distance
800 PPM
CO₂ Level
Nutrients 4
Generator
0.17 mll
Cocos A
3 mll
Cocos B
3 mll
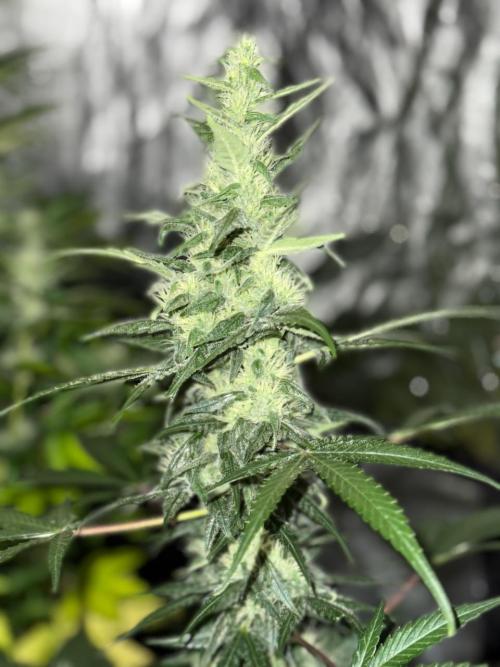
Appoldro420 Yo, what’s good everyone?
Last night, I accidentally let the plants dry out a bit (wasn’t on purpose this time, I swear) and realized I really should’ve raised my reservoir a bit higher. But you know what, this is probably my last run for a while, so I’m not even gonna bother with it. Only thing is, I’m gonna have to refill that reservoir a little sooner than expected (it had about 80 liters left in it).
Still gotta calibrate my pH meter though (gonna get on that in a sec), but other than that, the girls are lookin' tastier by the day. Now, the yield’s probably gonna be kinda light, but hey, I’m movin’ soon anyway, so it’s not really a big deal. We’re in week four of the real bloom now, and if things keep goin' the way they are, they can definitely go for another three or four weeks easy. I hate it when breeders don’t give a clear flowering time though. They’re talkin’ about 8-9 weeks, but if that’s counted from the flip to 12/12, it’s a bit tricky for me, ‘cause I always start on 12 hours straight away.
I’d low-key wanna run this strain again, but next time in the big tent and with bigger pots. I’m lovin' the consistent growth. Probably not the best choice for a SCROG setup, but a SOG? Man, that’d be dope (not gonna lie though, I never really repeat a run – too much fire out there to try). Might stick with the same breeder next round, but who knows what I’ll come across, right?
As for the girls, I’m seein' some discoloration on the leaves. Pretty sure it’s due to low pH (but yeah, gotta calibrate that meter first). The pH is sittin' at a solid 5.5 right now, but that’s just after mixin’ up the feed. In my experience with Plagron nutes, the pH drops down to like 4.9 after a week, which is way too low. That’s probably ‘cause of the super soft water we got here – no buffer at all. I’ve been using CalMag to help with that, and apparently, the girls are lovin' it.
Alright, time to sort out that pH meter and keep it movin’. Peace out and happy growin'!
01-10: Didn't expect that.. botrytis on one of the ladies... disposed it... too bad
02-10: Well fortunately it is not all bad news... The remaining ladies are looking gorgeous :)
2 likes
comments
Share
Used techniques
12-12
Technique
8
Week 8. Flowering2y ago


80 cm
Height
12 hrs
Light Schedule
29 °C
Day Air Temp
5.5
pH
Normal
Smell
800 PPM
TDS
50 %
Air Humidity
27 °C
Solution Temp
24 °C
Substrate Temp
24 °C
Night Air Temp
30 l
Pot Size
0.4 l
Watering Volume
25 cm
Lamp Distance
800 PPM
CO₂ Level
Nutrients 4
Generator
0.17 mll
Cocos A
3 mll
Cocos B
3 mll
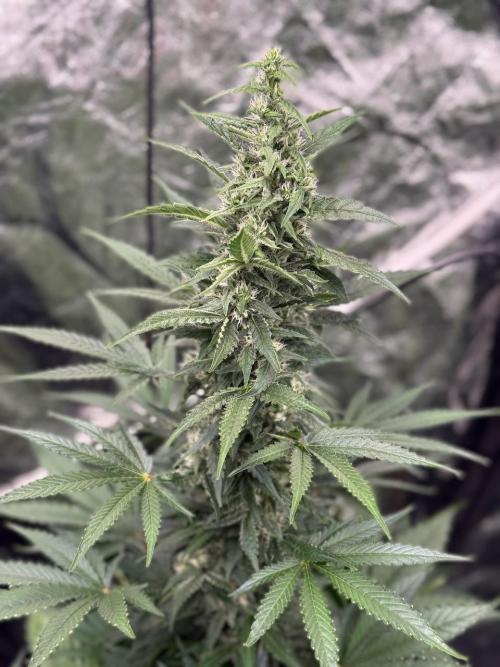
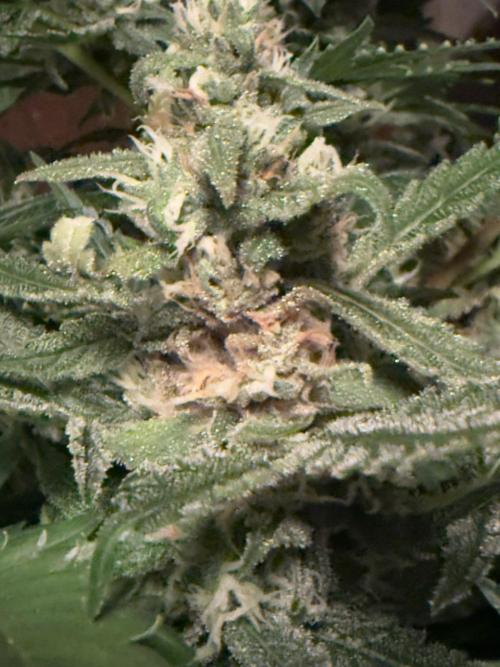
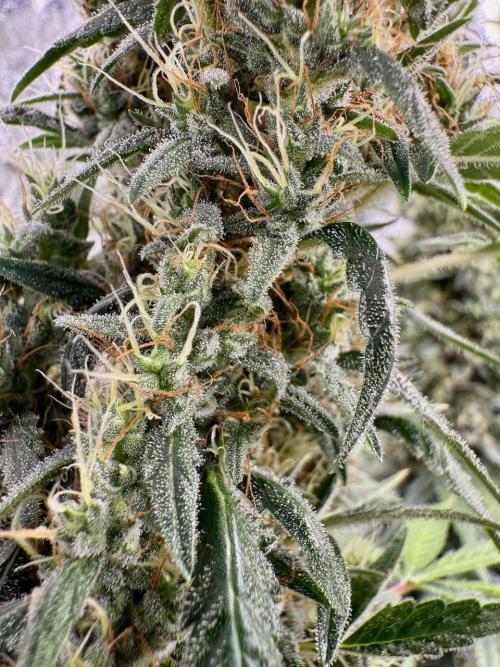
Appoldro420 Well that was a bad week. Removed three plants till now because of mold (botrytis). Inspected the rest very carefully but not for 100% sure it is safe now. Inspecting twice a day.. Buds are getting pretty dense and that is probably one of the root causes. Everything else is very stable (temp, rh, vpd etc.). What's left looks very tasty but a low yield is to be expected...
likes
comments
Share
9
Week 9. Harvest2y ago
Happy Harvest Day!


10/10
Rated
Very nice looking strain, very dense buds but because of that I had issues with mold, so only harvested 7 out of 12 plants..
Show more
Translate
Spent 58 days
Ger Veg Flo Har
300 g
Bud wet weight per plant
90.14 g
Bud dry weight per plant
7
Plants
2.4 m²
Grow Room size
Normal
Difficulty

Sleepy, Giggly
Positive effects

Dry mouth
Negative effects

Pain
Medical effects

Earthy, Woody, Caramel
Taste
Height
Day air temperature
Air humidity
PPM
PH
CO2
Light schedule
Solution temperature
Night air temperature
Substrate temperature
Pot size
Lamp distance


Appoldro420 Sadly I had some mold so I had to terminate some plants. But we did save 7 plants and we have a nice end weight of 631 gram. A lot less then hoped for but sure.. I will have enough for next year
1 like
comments
Share
Equipment Reviews


3 comments
Sort by
popularity
popularity
newest
oldest

KanOrganics commentedweek 02y ago
Good luck and happy growing! 😁
likes 2

Appoldro420 commented2y ago
@KanOrganics, thanks
like 1
Appoldro420 commentedweek 42y ago
@SSSC_Dave, Thank you!
likes

the end.
Enjoying this diary? Follow for more updates!

OR

Prefer the old Diary view?
Go back to the old Diary view