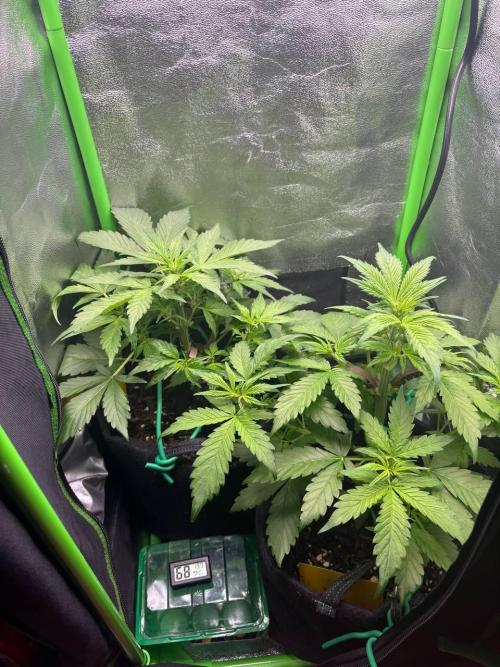
PumPkiiN All three seeds of the Black Runtz Auto have germinated, the three seeds of the other strain are either taking their time or are dead. I’ll still give them a few more days, maybe they’ll do something.
Currently, I have a humidity of about 50-60%, an average temperature of 20 degrees (without the lamp) and 23.2 degrees with the lamp. The distance from the lamp to the seedling is about 40 cm and the light output is 45%.
So far, everything is going well according to plan and I will transplant the seedlings into slightly larger pots this week before they go into my final pot.
3 likes
3 comments
Share
Used method
Peat Pellet
Germination Method
1
Week 1. Vegetation
1y ago
5 cm
Height
18 hrs
Light Schedule
25 °C
Day Air Temp
No Smell
Smell
60 %
Air Humidity
22 °C
Night Air Temp
1 liters
Pot Size
45 cm
Lamp Distance
PumPkiiN Hello Team! :-)
I have now repotted the little plants into the next pot size, as the roots were already peeking out of the starter plugs. I've decided to put the plants in a small 1L pot for now before they go into my final 12L fabric pot. This one is new, and I'm really curious to see what it can do. I packed the plants a bit deeper into the substrate, so they’ve become a little smaller and are stretching less.
I also started a small experiment since I can only grow two plants really big in the end. My little tent isn't set up for more. I planted 1 plant in regular soil, 1 plant with Lechuza Pon (a special substrate as a soil substitute), and 1 in a Lechuza pot with soil (with a water reservoir). Since I'm very happy with my green plants in Pon & Lechuza pots, I'm curious if I can also grow cannabis with them. I'll keep you updated.
So far, I've been watering with a spray bottle because I can estimate much better that way. At the beginning, they don't need much water anyway, and I spray the substrate a few times every evening.
I'm still a bit unsure if the distance and light intensity are good. They are growing, but quite slowly. Maybe I can increase the light intensity a bit..? Currently, I'm at about 40% light output from my Visparspectra P600 and a distance of about 45cm. But I don’t want to stress the little plants too much. Maybe I can add a little fertilizer for the first time next week. I've read that once the second leaf set has come out, you can really blast the plants with light. Until then, it's still a waiting game :-)
I'm also unsure about the humidity. I'm currently at about 60%, while I was always around 70-80% in the starter pots due to the cover. I can't maintain that level anymore. My little fan always provides enough fresh air and makes the plants sway a bit, so they form nice sturdy stems.
If you have any tips, feel free to share! :-)
2 likes
comments
Share
2
Week 2. Vegetation
1y ago
8 cm
Height
18 hrs
Light Schedule
24 °C
Day Air Temp
No Smell
Smell
50 %
Air Humidity
22 °C
Night Air Temp
1 liters
Pot Size
0.3 liters
Watering Volume
50 cm
Lamp Distance
Nutrients 1
0.5 mll
PumPkiiN A bit late, but still an update on week two of my plants.
Unfortunately, I lost some time because I initially provided the plants with too much light intensity and too little distance. I noticed this because, despite good watering habits, the leaves were pointing downwards. After I increased the distance (to 60 cm), there was an immediate effect, and the plants aligned themselves normally. Now that they have grown a bit, I'm at a distance of 50 cm and 70% light output. I should have read the supplier's recommendation earlier...
As for my watering habits, I switched from spraying to 100ml every two days with 0.5 ml of Bionova x-cel fertilizer. The plants apparently love the fertilizer; since then, they are noticeably growing faster.
The fan runs 1-2 times a day to thicken the stems. Unfortunately, I haven't noticed any difference yet; the stems are still quite thin..
Since the roots are already peeking out of the bottom, the plants are ready to go into the final pot. That will happen in week three.
My "project" with Lechuza Pon is also going well; it's a bit smaller, but it can still keep up just fine.
2 likes
comments
Share
3
Week 3. Vegetation
1y ago
1/3
14 cm
Height
18 hrs
Light Schedule
26 °C
Day Air Temp
Weak
Smell
50 %
Air Humidity
22 °C
Night Air Temp
11 liters
Pot Size
1 liters
Watering Volume
57 cm
Lamp Distance
Nutrients 1
0.5 mll
PumPkiiN In the last week, the plants have really grown strong. After adjusting the distance and intensity of the lamp, I think I've found the sweet spot. Right now, it's hanging 57cm away and at 75% light power. The plants are responding very well, and you can watch them grow daily.
I've also repotted them into the final 11L fabric pots. One plant handled it really well, while the other took 2-3 days longer to cope with the stress. I'm watering with 1L every 3-4 days, and that's working perfectly. I apply the nutrients every two watering sessions, so once a week.
I'm really excited about how the plants have developed. I almost think that the small tent might not provide enough space for the two plants if they keep growing at this speed. I'm still not sure if I want to top them since they are autos and that causes too much stress. This way, they could grow wider instead of taller. Let's see what happens :-)
Since the smell is starting to kick in, I bought ONA odor neutralizer. That stuff works wonders!! I can only recommend it.
2 likes
comments
Share
4
Week 4. Vegetation
1y ago
1/2
22 cm
Height
18 hrs
Light Schedule
26 °C
Day Air Temp
Weak
Smell
45 %
Air Humidity
22 °C
Night Air Temp
11 liters
Pot Size
1 liters
Watering Volume
50 cm
Lamp Distance
Nutrients 1
0.5 mll
PumPkiiN Here's a slightly delayed update from my last week. There's not much to report, the plants are just growing and growing. I was also away for 4 days, but they managed well with the liter. I think they could have gone another 1-2 days without major issues. Unfortunately, a few fungus gnats hatched during that time, but I'm well-equipped and immediately hung up a few new yellow sticky traps and added a pack of nematodes with the watering. So that problem should be resolved soon.
For next week, I plan to try my hand at LST. I'm not sure how to securely tie the wires to the fabric pots. If you have any tips, feel free to share them here! :-) Also, I'll be removing a few leaves since the upper ones are providing a lot of shade.
In short, everything is going great, they seem to be growing more every day!
1 like
comments
Share
5
Week 5. Flowering
1y ago
1/4
30 cm
Height
18 hrs
Light Schedule
24 °C
Day Air Temp
Weak
Smell
68 %
Air Humidity
19 °C
Night Air Temp
11 liters
Pot Size
1.2 liters
Watering Volume
41 cm
Lamp Distance
Nutrients 1
0.5 mll
PumPkiiN Week 5, the plants are in pre-flowering or almost in flowering stage.
As mentioned in the last post, I tried my hand at LST and tied down some branches so they can also get light and develop nice buds. I couldn't really tie down the main stem effectively since it was already too big. I need to do that earlier next time.
I've also already cut off several leaves to allow the lower parts to get more light and reduce the risk of mold. I'm a bit worried about that since I'm now at 68%. I'll try to cut off a few leaves in the coming days to keep the air circulation going. The fan will have to work even harder now. Unfortunately, I only bought a battery-operated fan back then... The light intensity remains unchanged at about 70-75%. The plants are also showing no signs of deficiency. Next week, I'll be using the next fertilizer for the first time, which is specifically for pre-flowering and flowering and is phosphorus-based.
Otherwise, they got a good boost last week and are developing a lot of flowers. I'm really curious to see how they develop this week.





 commentedweek 02y ago