
Royal Critical | Indoor | Wintergrow


VEG
XQP-500 (x4) Light Emitting Diodes/200W
NoName
FLO
XQP-500 (x4) Light Emitting Diodes/200W
NoName


Fan
4-speed Inline 4'' Fan
NoName
Fan
Oscillating Clipfan 20W
Cyclone

Filt
CanLite 150m3/h
CAN


Vermiculite
POKON
Indoor
Room Type
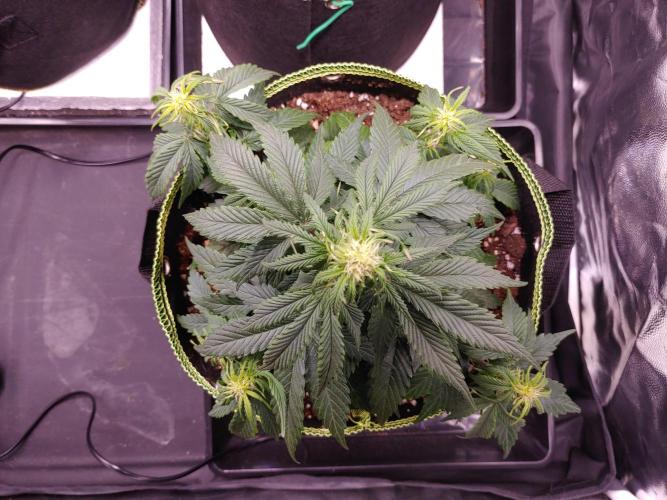
Defoliation
weeks 6, 10-12
LST
weeks 7-8
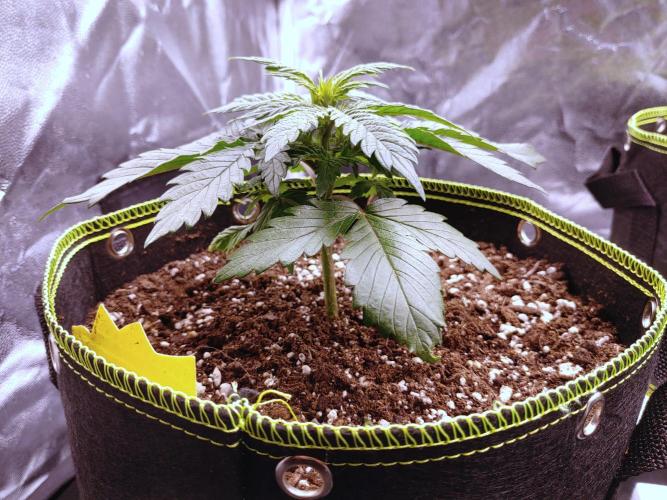
11 l
Pot Size
Start at Harvest
G
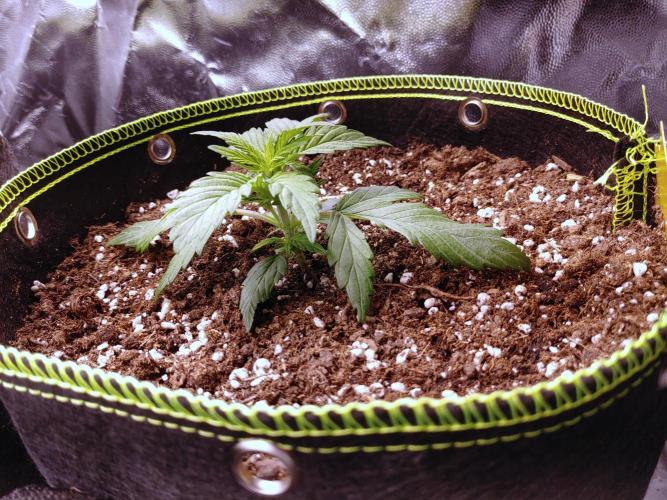
Germination7mo ago
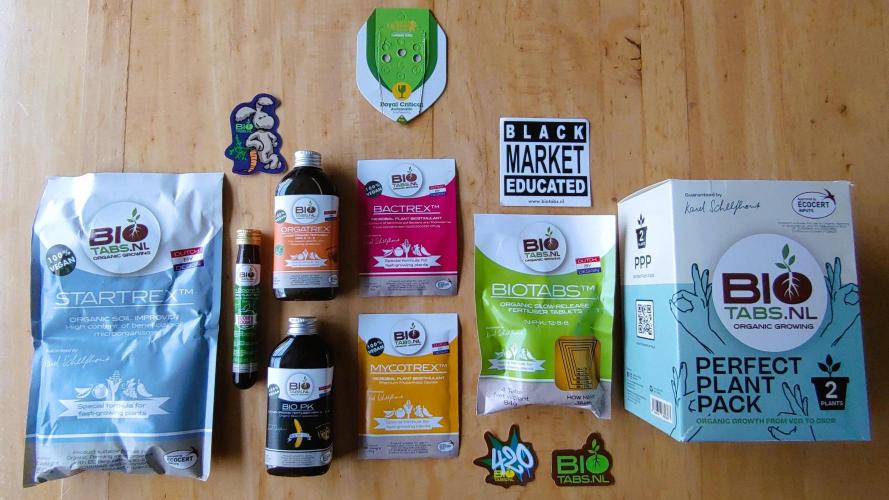

Nutrients 6

Startrex
5 mll

Bactrex
1 mll

Orgatrex
10 mll
CountDoobie .
07/12/2025
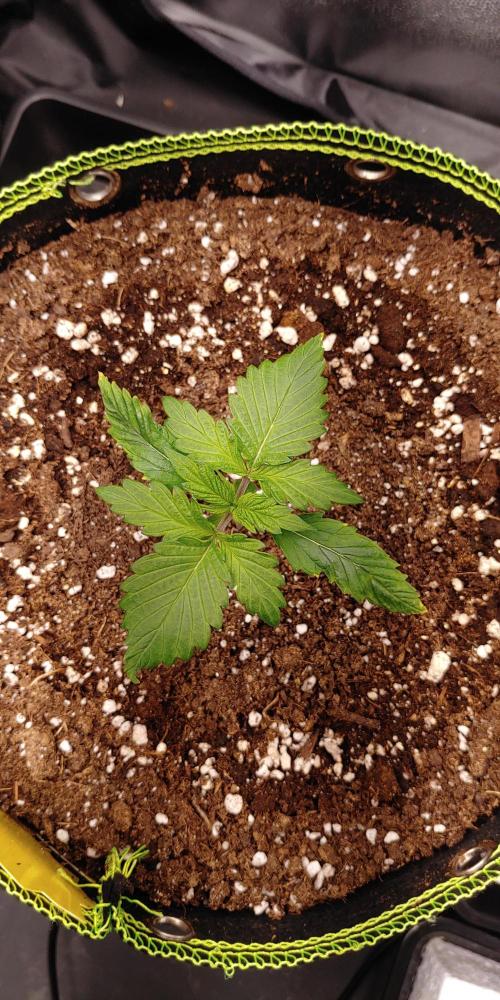
The seeds got planted today.
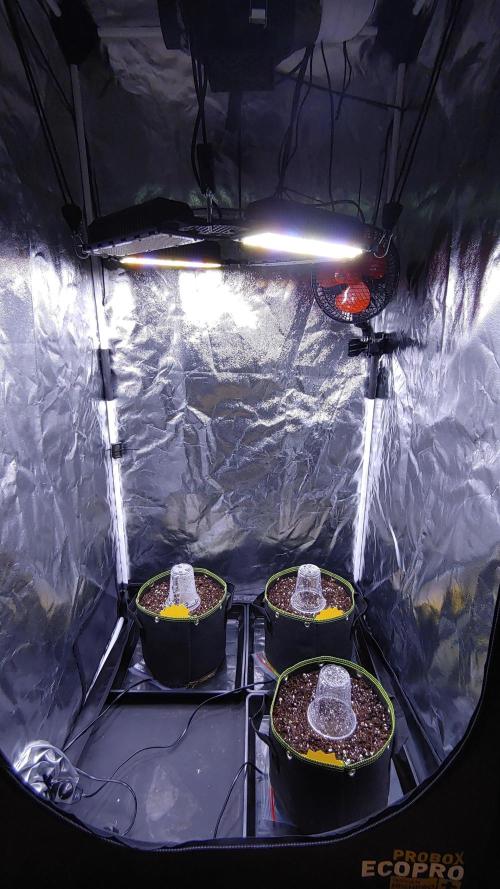
First, the 11L (3gal) fabric pots are filled with BioBizz Lightmix. Because of the lack of definitive information about this, I have estimated that this soil has approximately 10% perlite in it. Therefore, I have added an extra 5% perlite and 10% vermiculite. After adding all substrates together, it is poured over in a large bucket with lid and tumbled to mix everything. When mixed, I added 50gr Biotabs Startrex and tumbled it some more until everything was thoroughly mixed. After which it is put back in the fabric pot. This process is repeated for all 3 pots separately.
Back in the pots all three received 1L of a Bactrex (1gr/L) and Orgatrex (10ml/L) solution. After watering with the solution, the soil compacted a little, so I added ~3 hands of Lightmix to the top and mixed it a bit with the top layer.
After waiting a few hours to let everything set, I have added 2 Biotabs fertiliser tablets, on opposing sides, to each pot.
A hole, of ~10cm wide and ~5cm deep, is made in the middle and 4gr of Mycotrex is sprinkled in. After which the hole was carefully closed again. A new smaller hole (~1cm diameter) is made in the middle in which the remaining 1gr Mycotrex was sprinkled and the Royal Critical auto seed is planted. A little bit of soil is carefully put over the seed, sprayed moist and a clear cup put over it.
The third pot went through the exact same process but, due to not having enough Mycotrex, RQS easy roots Mycorrhiza was used with the same quantities.
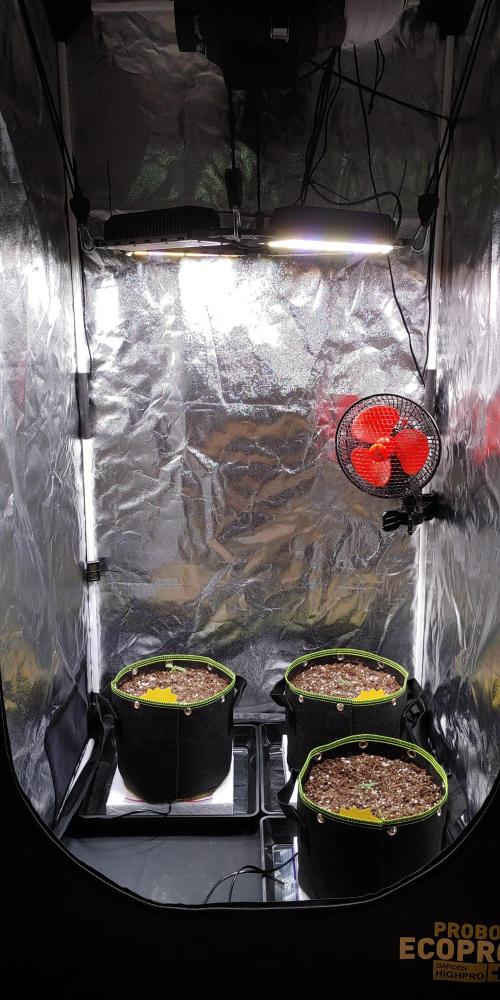
2 out of 4 lamps are turned on, on a 24h schedule at a height of ~90cm. The extraction fan and oscillating fan are turned off for now.
08/12/2025
All three pots received a thermal pad (5W) under them at 50% power.
Each pot received a few sprays of water on the seed location, to keep the soil moist.
10/12/2025
Sprayed the top layer of each pot with water until moist.
Plant #1 and #2 are showing fungal filaments on the top soil under the cup, indicating that the Mycotrex successfully inoculated.
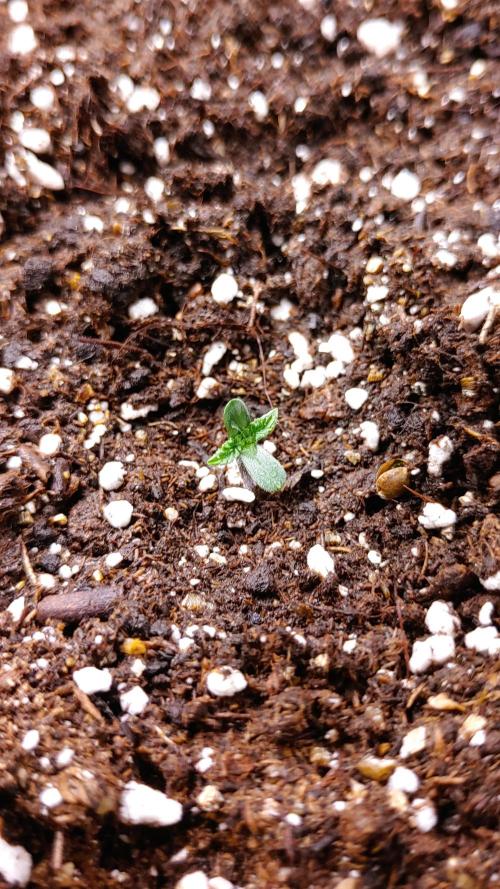
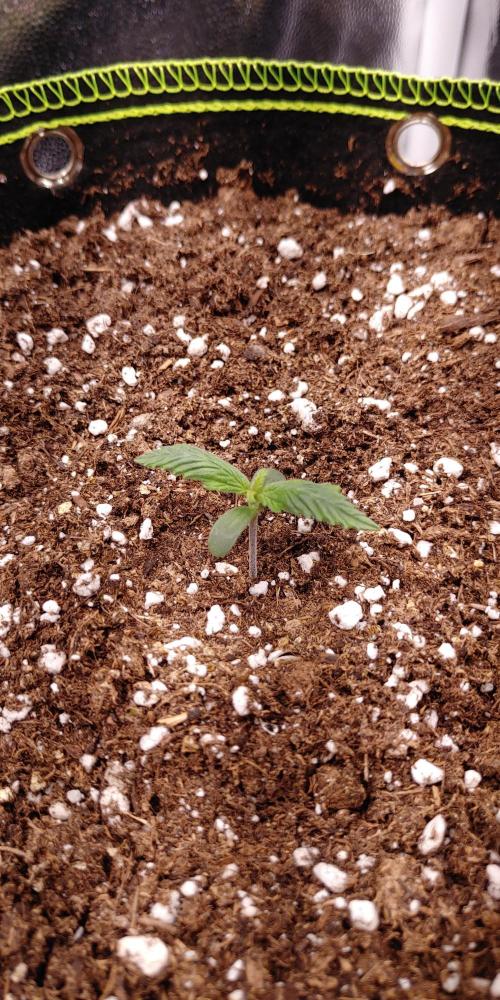
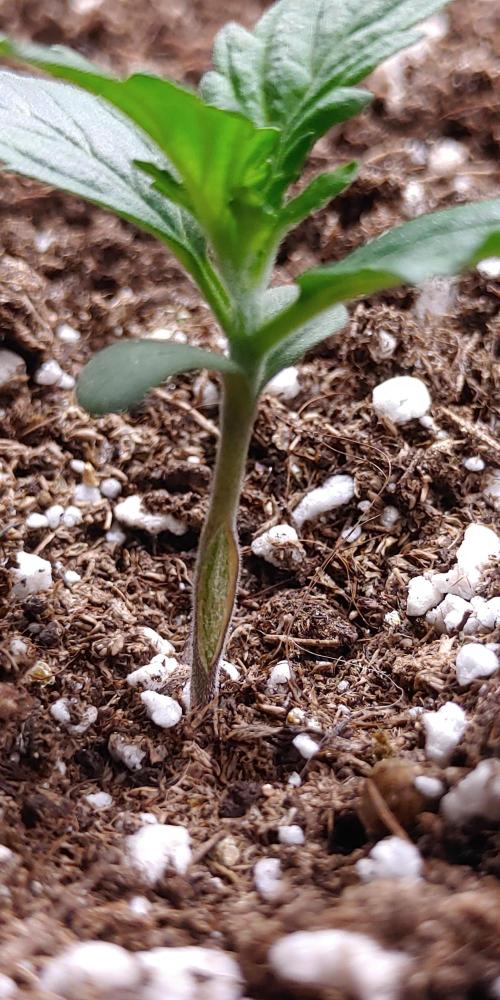
Carefully removed a bit of soil, to check if the seeds have germinated (I'm impatient). All three seeds appear to have germinated successfully. Although seed #1 and #2 appear to be a bit to deep in the soil. Unfortunately, I can't fix it any more since they both have taken root.
After I was done, I carefully, and loosely, put a bit of soil back on top of the seeds.
11/12/2025
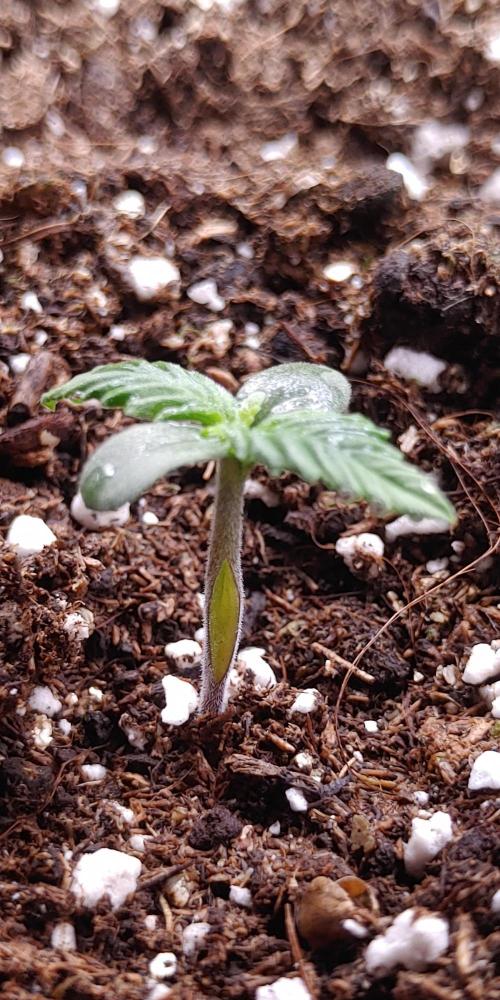
Plant #3 officially sprouted today. The seed shell and membrane was still on the plant, so I helped it out carefully with a rounded tweezer.
It appears that I have put too much soil back on top of seed #1 and #2. Because of this the plants appear to have trouble finding the top and are growing downwards a little. To help them out a bit I have removed most of the soil that was on top to let the light penetrate a bit better. This way the plants have a guiding star to find their way out.
12/12/2025
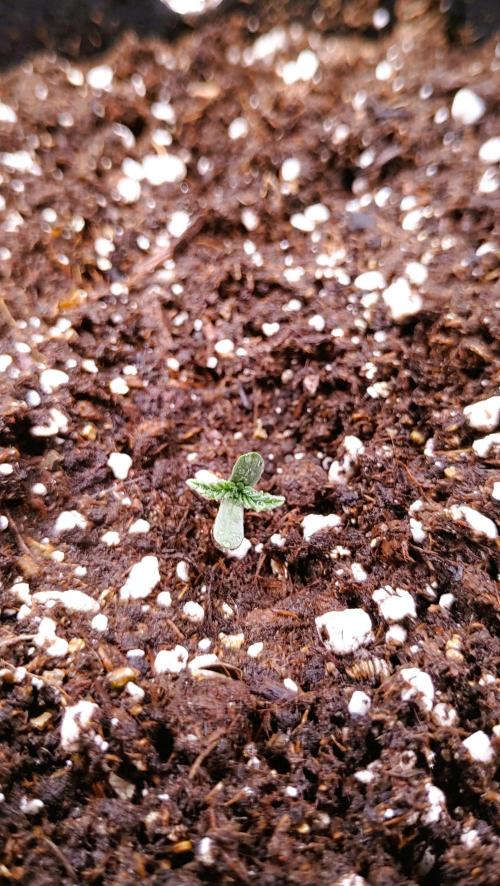
#3 is looking very healthy and appears to have had a great start. Sprayed it with a bit of water and made sure no big droplets formed.
#1 and #2 are slowly making their way out of the soil.
13/12/2025
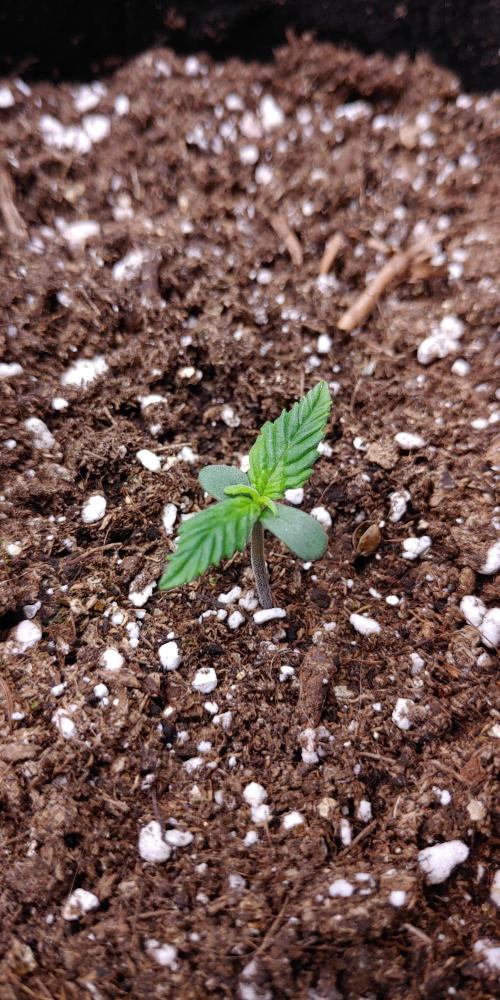
#1 and #2 have finally sprouted. Both still had their seed shell and membrane still on, so I helped them out a little.
#3 is looking very healthy and growing happily.
14/12/2025
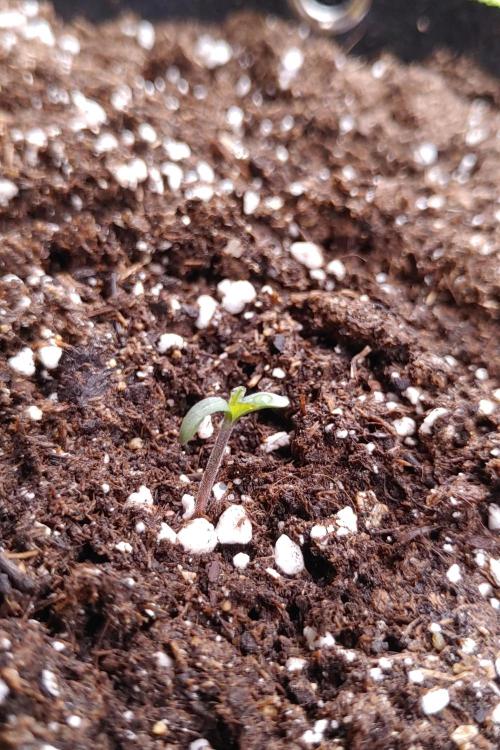
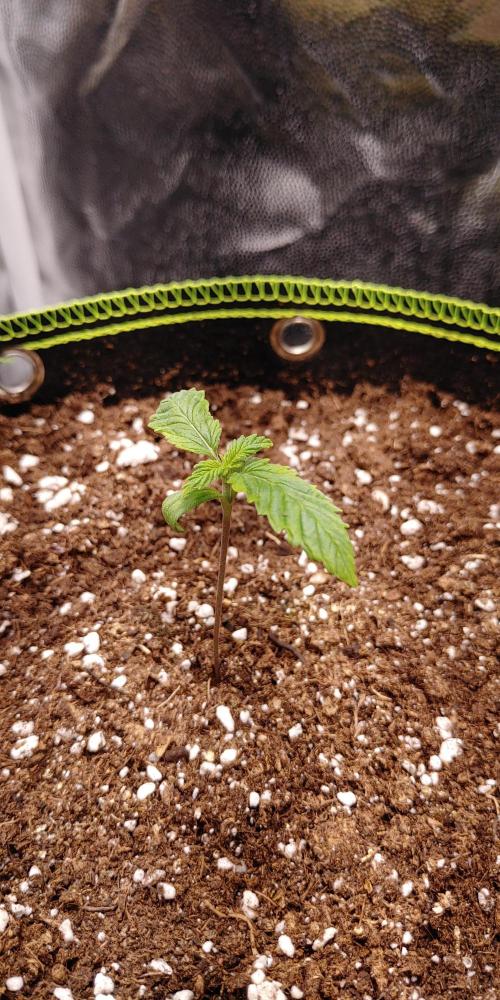
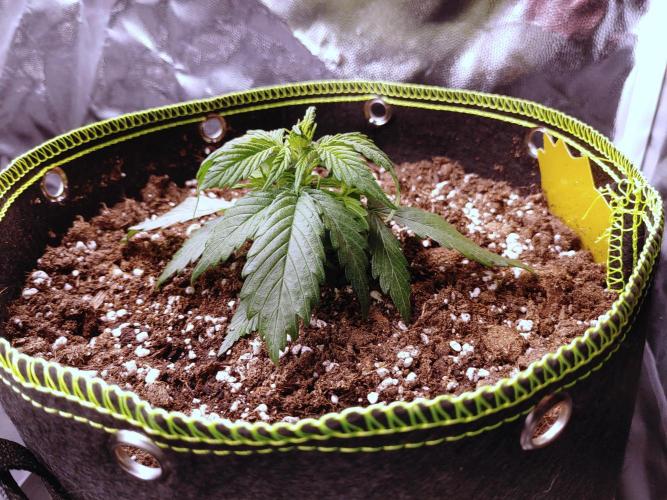
#1 and #2 are recovering well and both look healthy.
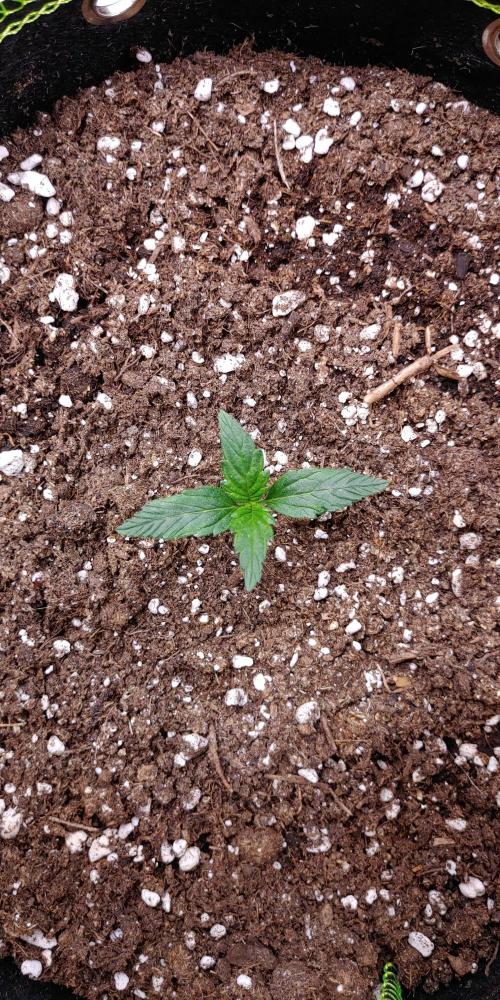
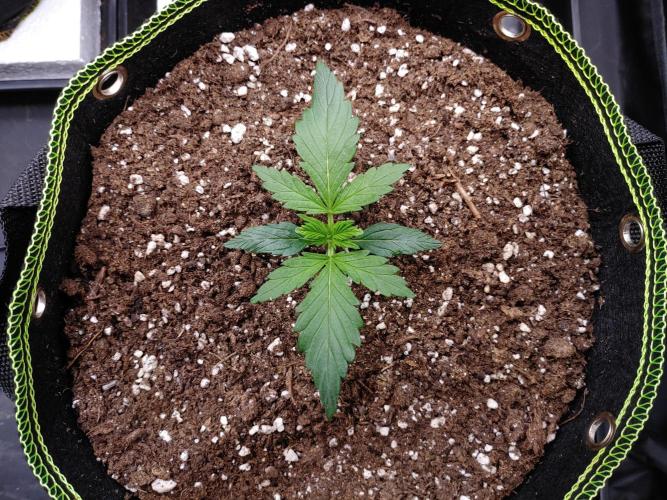
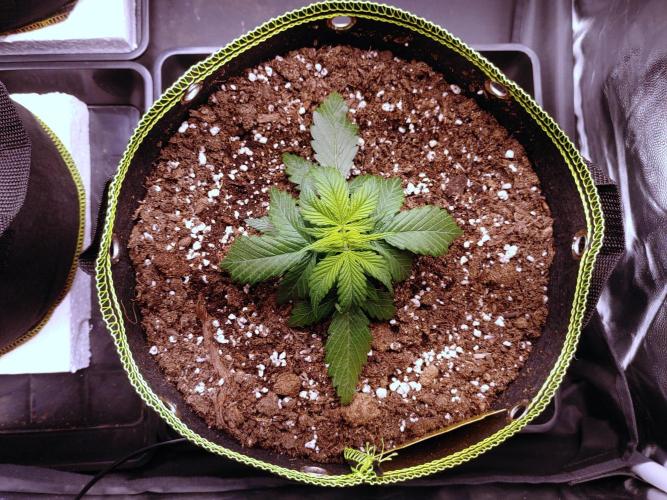
#3 is growing nicely and is almost 5cm tall.
7 likes
2 comments
Share
Used method
Directly In Substrate
Germination Method
1
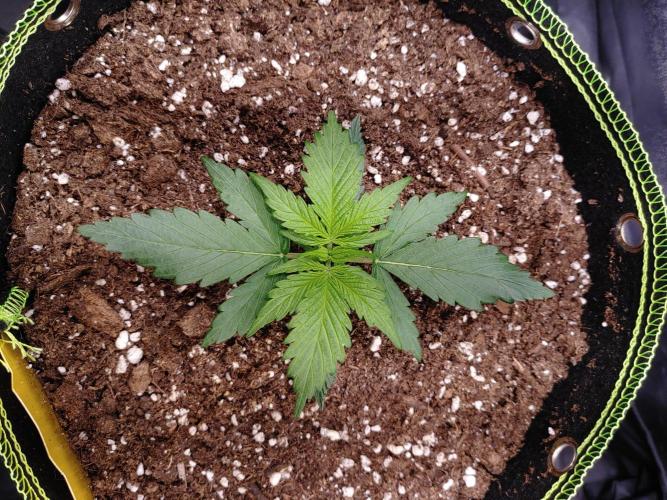
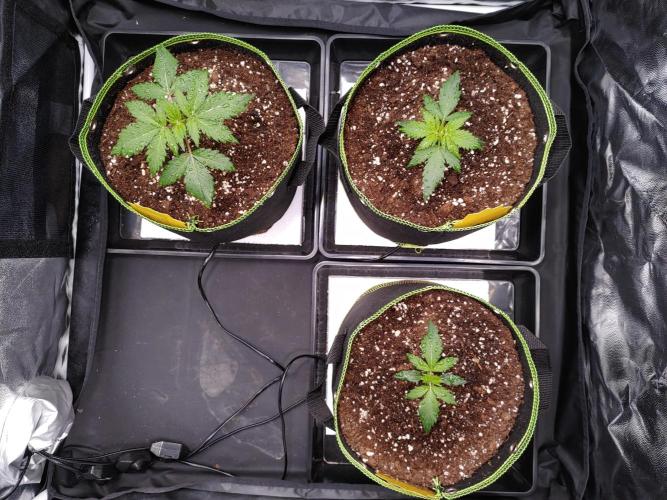
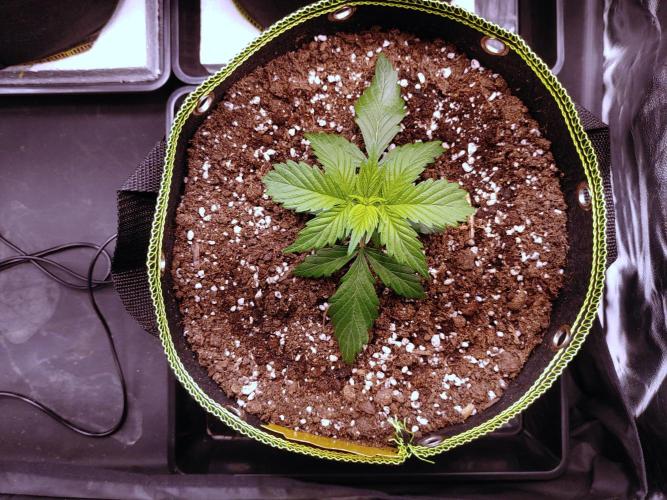
Week 1. Vegetation7mo ago
5 cm
Height
20 hrs
Light Schedule
19 °C
Day Air Temp
No Smell
Smell
55 %
Air Humidity
23 °C
Substrate Temp
18 °C
Night Air Temp
11 l
Pot Size
80 cm
Lamp Distance
Nutrients 1

BoomBoom Spray
5 mll
CountDoobie .
17/12/2025
Put some styrofoam under the heating pads.
Soil temperature is, after a few hours, ~23C at a depth of ~10cm.
18/12/2025
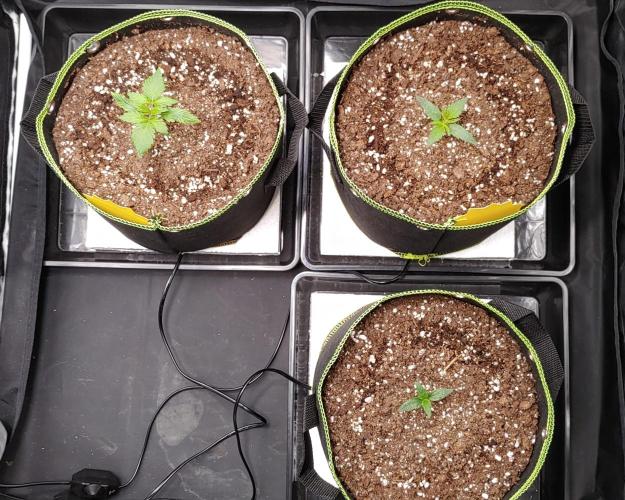
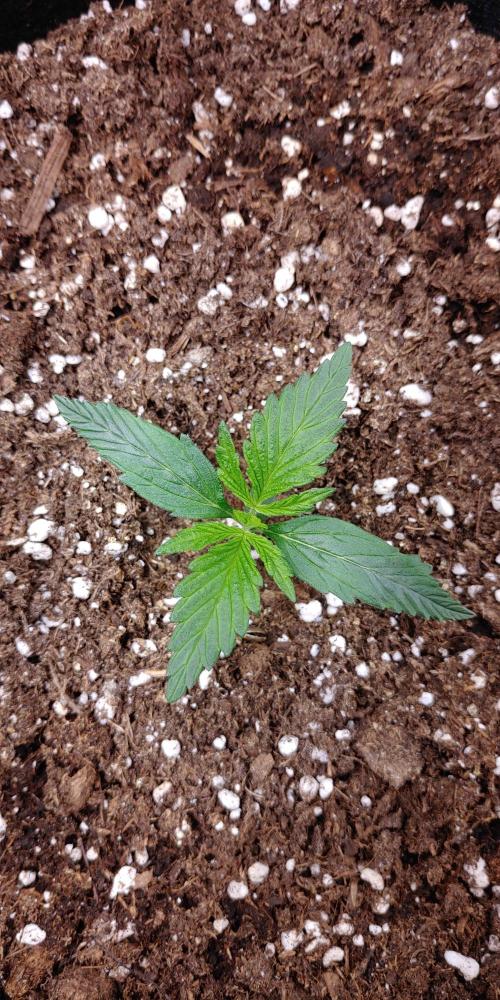
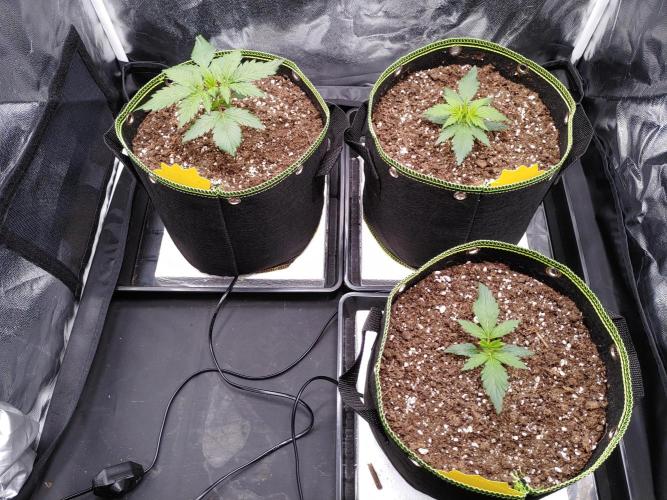
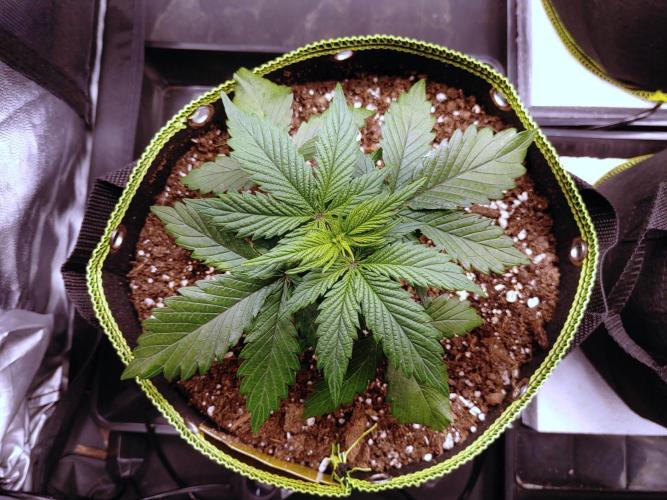
Plant #3 received 100ml of tap water around the edge of the pot, to promote root growth. This plant is growing well, the second set of leaves is already visible.
19/12/2025
Plant #1 and #2 received 100ml of tap water around the edge of the pot, to promote root growth.
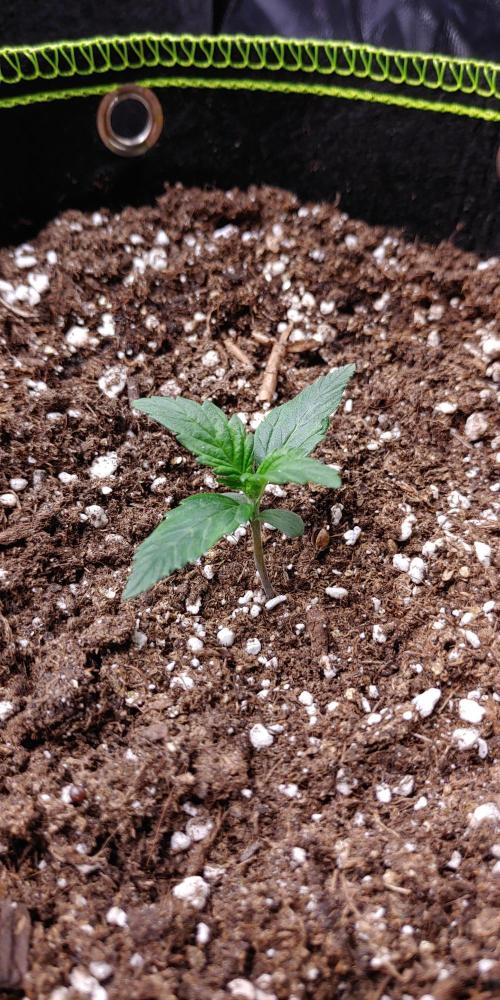
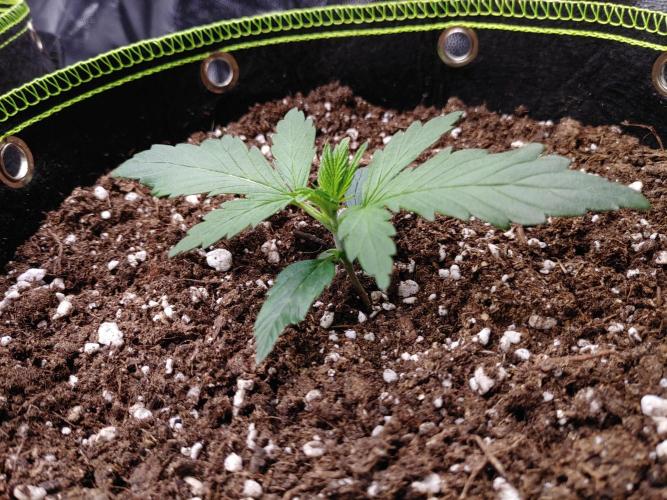
After some closer inspection, it appears that plant #1 has a burst stem (hypocotyl). After asking my fellow growers on this platform (see my grow-question), this is probably because of the humidity domes causing a too high humidity. The plant looks healthy otherwise, but a little smaller than the others.
Removed the cups from the plants.
20/12/2025
All 3 plants received Biotabs BoomBoom spray. A 100ml solution (5ml/L) was mixed, with which all the leaves where sprayed dripping wet, top and bottom, just after lights on. After only a few hours there was actually a notable difference in the leaf colour. Since these plants don't have that much leaf surface to spray, I used the rest on other house plants and they appeared to be enjoying it as well.
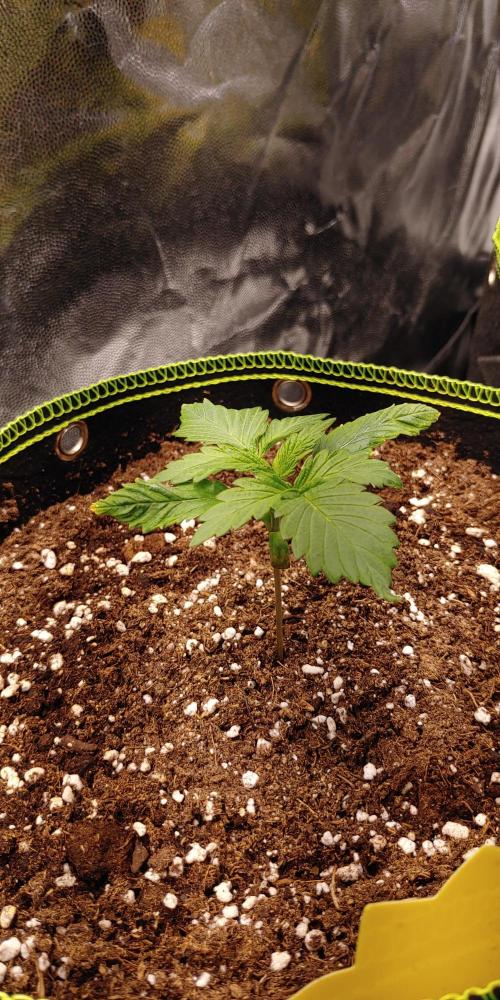
Raised the growing lights to ~80cm from the top of the highest plant (#3). Also turned on the oscillating fan, to increase air quality and strengthen the stems of the young plants (with indirect airflow).
7 likes
4 comments
Share
2
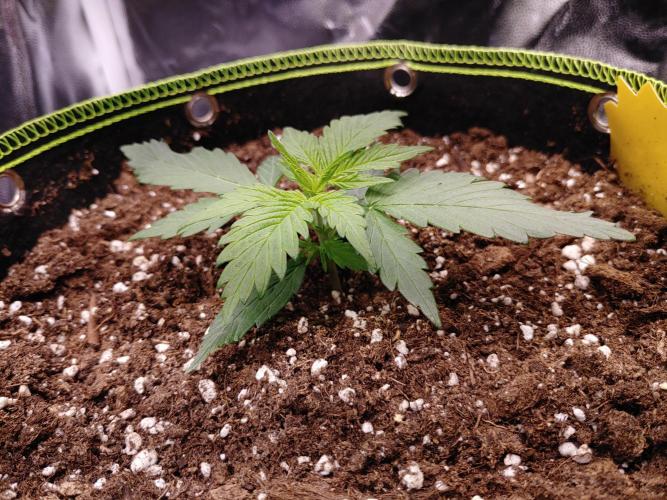
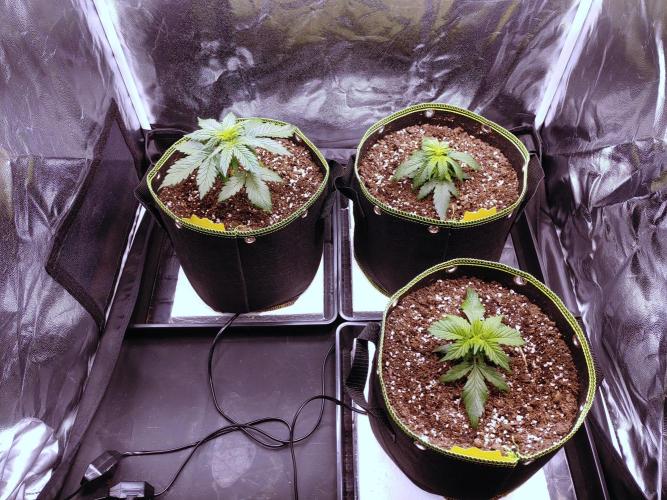
Week 2. Vegetation7mo ago

20 hrs
Light Schedule
17 °C
Day Air Temp
No Smell
Smell
55 %
Air Humidity
0 °C
Substrate Temp
15 °C
Night Air Temp
11 l
Pot Size
85 cm
Lamp Distance
CountDoobie .
22/12/2025
Moved the oscillating fan to the other side of the tent (diagonally), to blow over all three plants more equally.
The signs of overwatering are disappearing and the plants appear to be recovering well.
23/12/2025
Plant #1 and #2 received 250ml of tap water and #3 received 300ml.
Put the oscillating fan on a timer, with 30min on and 30min off.
27/12/2025
Plant #3 received 500ml, #2 received 300ml and #1 received 250ml of tap water.
All three plants look healthy but, #2 and #3 seem a little small, and #1 is noticeably behind. This is probably due to the colder environment and the plants being slightly overwatered in the beginning.
6 likes
comments
Share
3
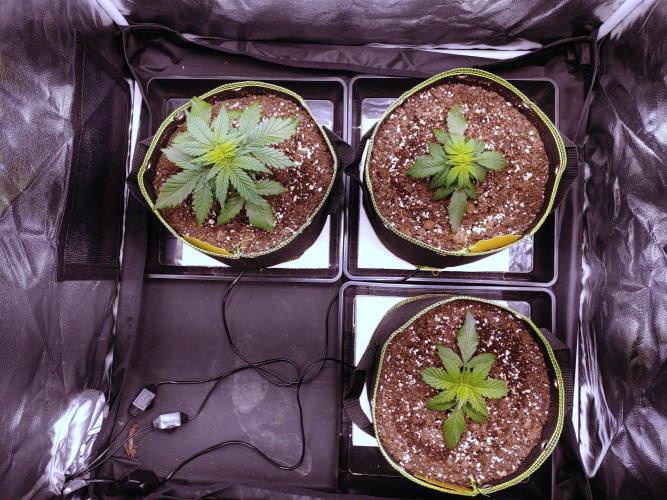
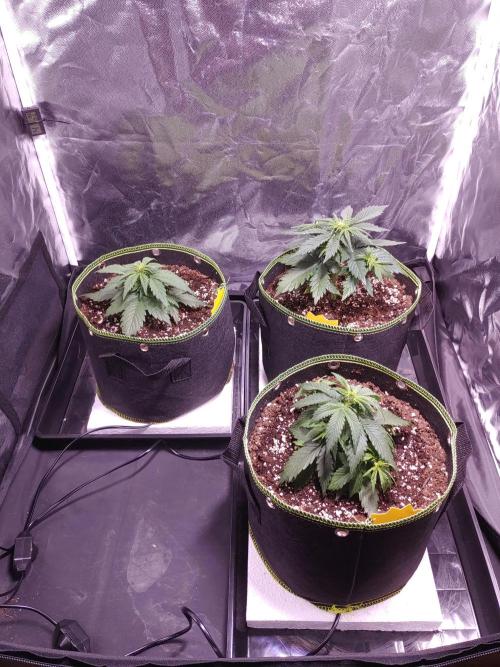
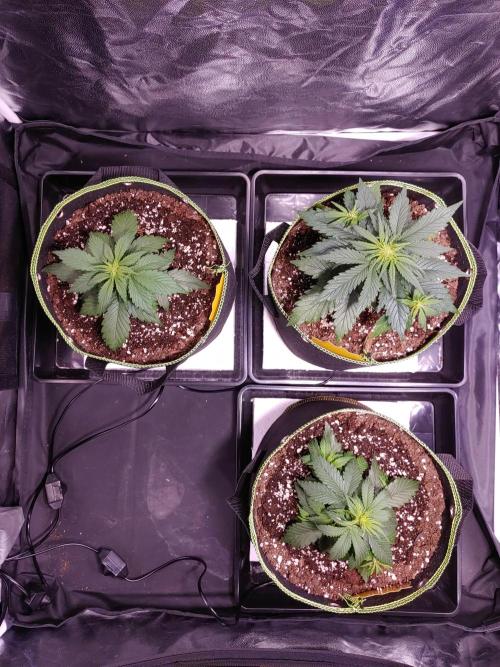
Week 3. Vegetation7mo ago

20 hrs
Light Schedule
17 °C
Day Air Temp
No Smell
Smell
50 %
Air Humidity
0 °C
Substrate Temp
16 °C
Night Air Temp
11 l
Pot Size
85 cm
Lamp Distance
Nutrients 1
BoomBoom Spray
5 mll
CountDoobie .
30/12/2025
Plant #2 and #3 received 500ml, and #1 received 400ml of tap water.
Plant #3 has started to produce a very faint, but very typical, cannabis smell.
02/01/2026
All three plants look healthy, but all are too small, especially Plant #1 is quite a lot behind in development, though its stem has healed nicely. I hope they will still grow out a bit in the coming weeks.
04/01/2026
I've decided to give the plants some Biotabs BoomBoom Spray, to help them out a bit.
All three plants got their leaves (top&bottom) sprayed with the solution (5ml/L), until dripping wet.
4 likes
1 comment
Share
4
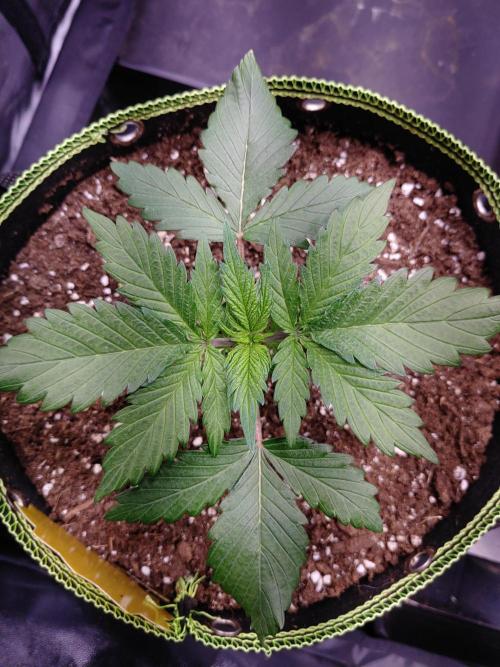
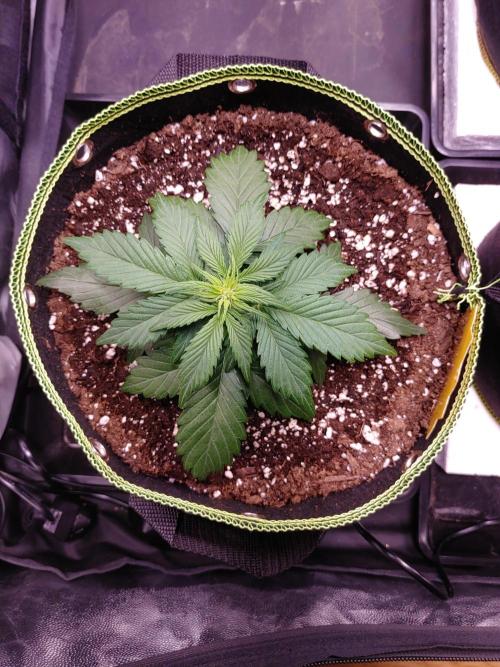
Week 4. Vegetation6mo ago
20 hrs
Light Schedule
16 °C
Day Air Temp
No Smell
Smell
40 %
Air Humidity
0 °C
Substrate Temp
15 °C
Night Air Temp
11 l
Pot Size
60 cm
Lamp Distance
Nutrients 1
BoomBoom Spray
5 mll
CountDoobie .
05/01/2026
All three plants look to be reacting well to the BoomBoom Spray, and developed a deep green colour.
06/01/2026
Lowered the grow light to ~70cm from the top of #3.
07/01/2026
Because it took 8 days before the plants needed watering, They only received 250ml tap water each this time.
The Third grow light has been turned on (150W total). All three plants have a grow light directly above them now.
10/01/2026
Plant #1 and #2 received 350ml and plant #3 received 400ml tap water.
The leaves of #2 were already hanging a bit.
11/01/2026
All three plants are sprayed with BoomBoom Spray, right after lights on.
The grow light has been lowered to ~60cm from the top of #3.
4 likes
1 comment
Share
Grow Questions

CountDoobiestarted grow question 6mo ago
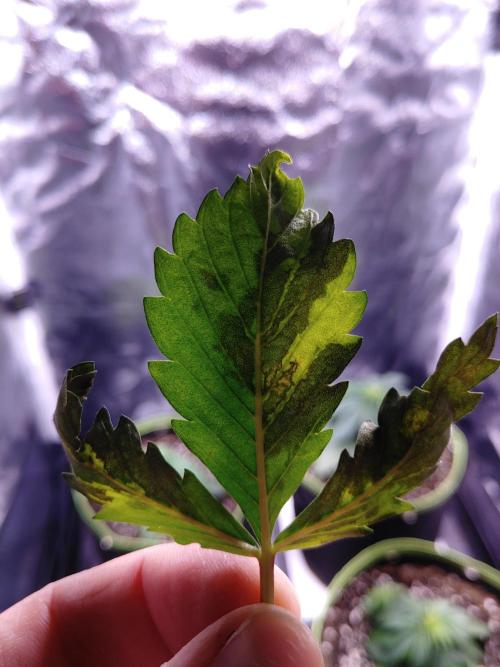
The fan leaves of the 2nd & 3th node have developed dark spots on the leave.
What is this? and what is best to do?
Open
Leaves. Color - Black or grey
likes
Answer

DrGruenanswered grow question 6mo ago
hi ......
das sieht mir nach Cal.-Mag Mangel aus.........Könnte allerdings auch eine Überdüngung sein......
würde Cal Mag nach Düngeschema des Herstellers giessen und die anderen Dünger weglassen.
Nach ein paar Tagen, siehst du ja woran es liegt und kannst dich genau darauf einstellen.
Viel Glück
likes
Complain

JUNGLE_B4RNSanswered grow question 6mo ago
This is nutrients burns.
Your problem is "wrong plant size in wrong pot size". Pouring small amounts of water and getting no drain, NaCl is building up.
Give your plants a good watering to get some drainage and everything will be alright.
likes
Complain

AestheticGenetixanswered grow question 6mo ago
Dechlorinate your water or boil and cool it.
Looks to be chlorine toxicity to me.
But the other option would be calcium magnesium deficiency/issues.
likes
Complain
5
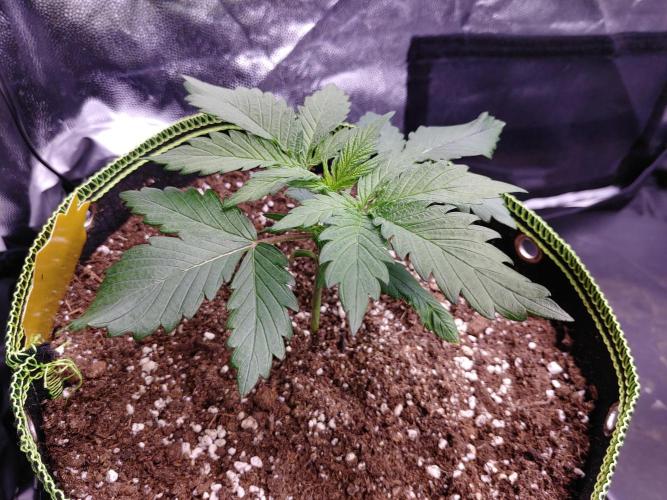
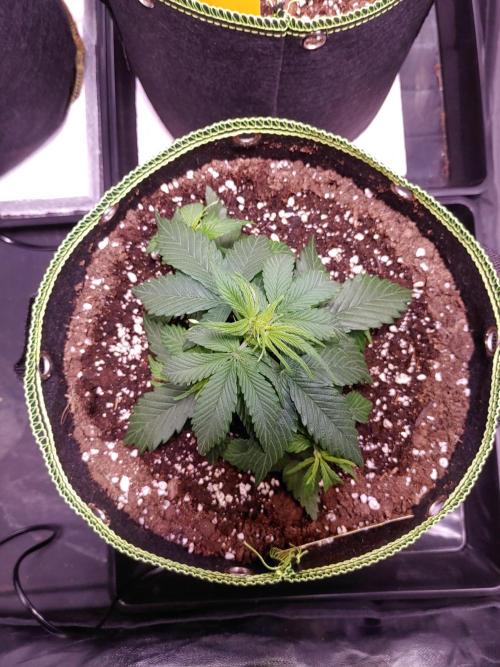
Week 5. Vegetation6mo ago

20 hrs
Light Schedule
19 °C
Day Air Temp
Weak
Smell
43 %
Air Humidity
0 °C
Substrate Temp
17 °C
Night Air Temp
11 l
Pot Size
60 cm
Lamp Distance
CountDoobie .
12/01/2026
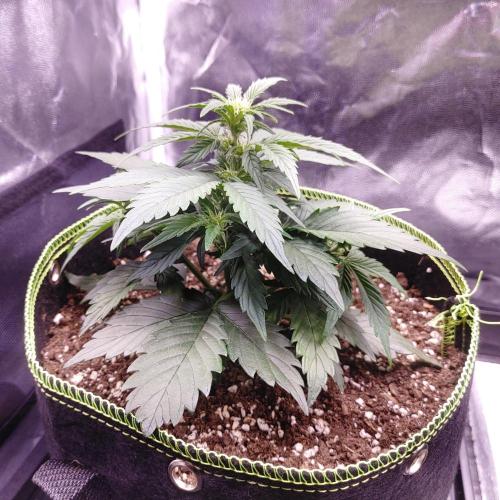
Plant #1 and #3 started showing pistils.
Plant #2 has no signs of pistils yet.
14/01/2026
Plant #1 received 350ml, #2 and #3 received 400ml of tap water.
Plant #2 and #1 have swapped places, because #2 appeared to be getting too much light. The top-right spot has the grow lights from top-left and bottom-right to either side, whilst the latter two spots only have a grow light on one side (the top-right light).
15/01/2026
Plant #2 is showing its pistils now as well.
Plant #1 and #3 swapped places, because #3 is the biggest plant it gets the spot with the most light.
Placing #1 on top-left, #2 on bottom-right and #3 on top-right.
17/01/2026
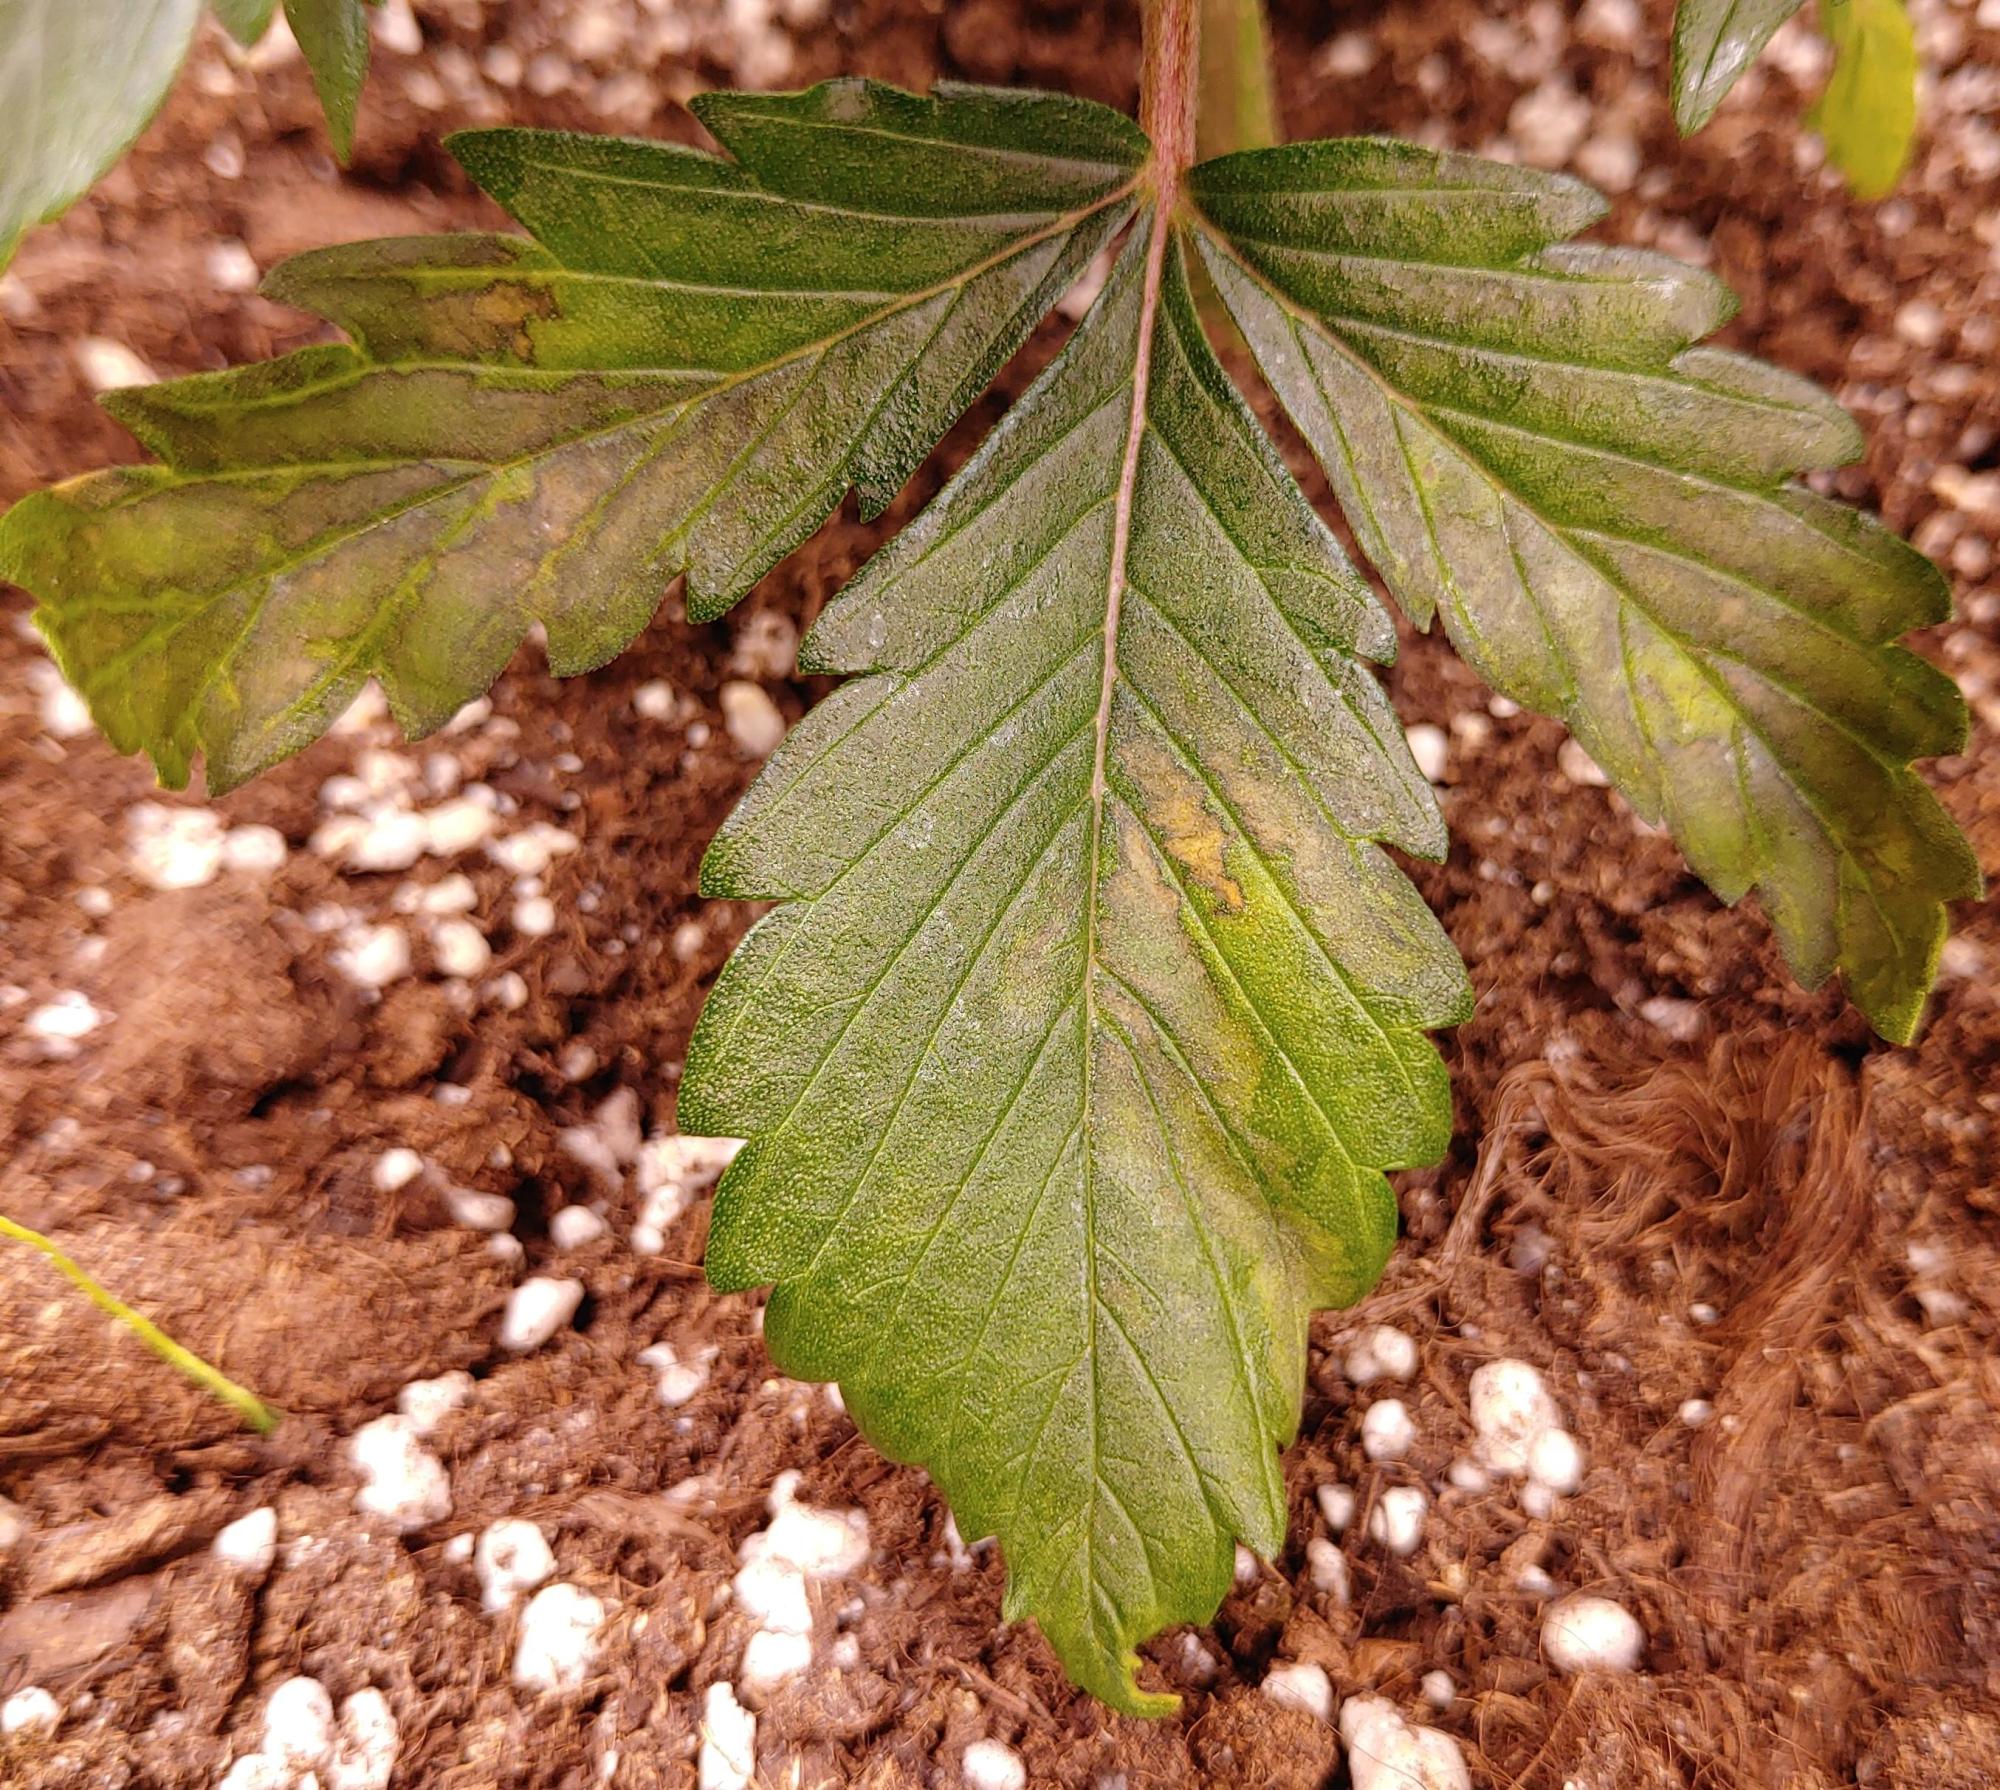
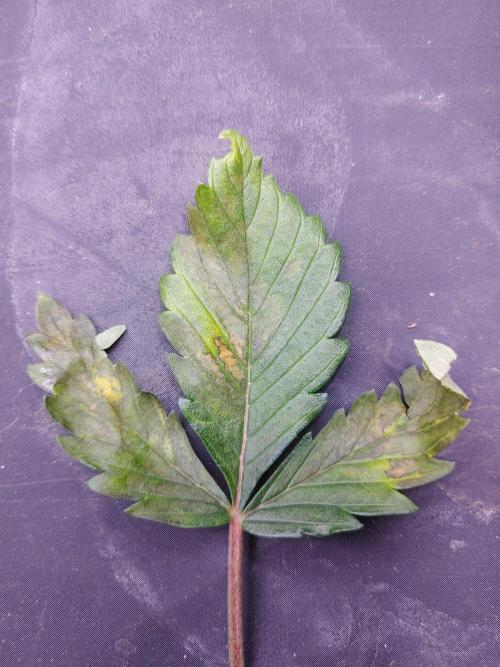
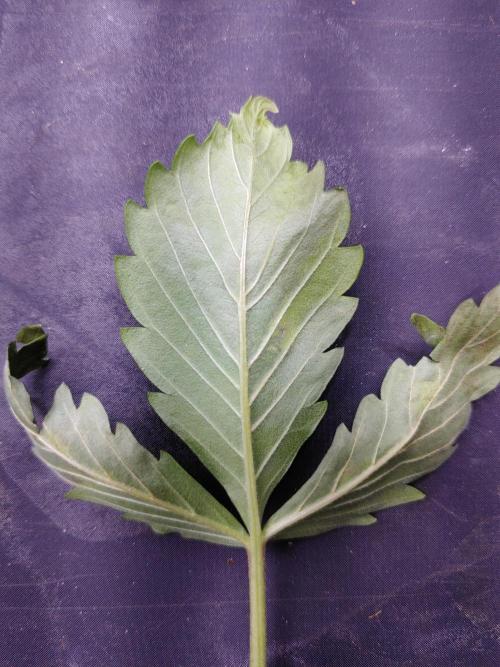
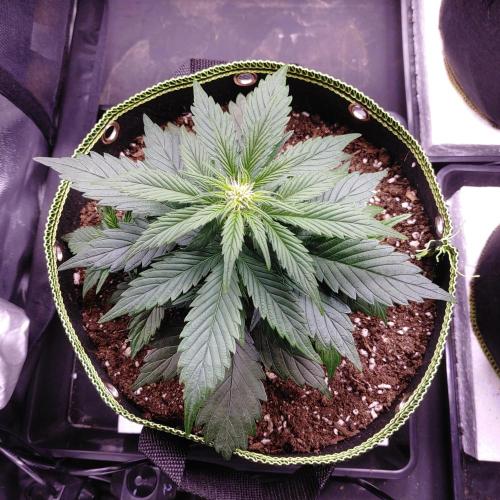
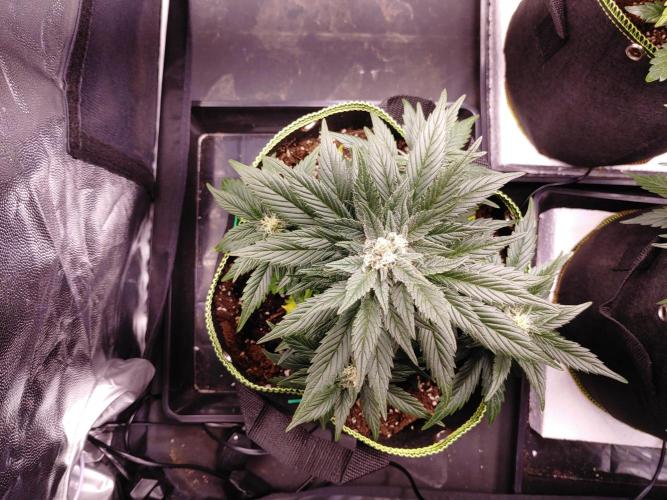
Plant #3 has developed dark (black/gray) areas in the fan leaves on the 2nd and 3th node.
After some literary research, I concluded that it's likely a nutrient problem.
18/01/2026
One of the affected leaves of #3 has, although still green, dried out and became quite brittle. After trimming this leaf, some closer inspection showed a few things:
-The stem of the leaf is on the top side fully red, while the bottom side is still green, and this spreads into the leaf veins.
-The dark areas have widened, but have become lighter in colour.
-Besides the dark areas, yellow/light green spots have developed adjacent to the dark spots.
Because its only on the 2nd and 3th node (the oldest), my suspicion is that a phosphorous deficiency is the most likely cause (maybe combined with a calcium deficiency).
A fungus infection seems quite unlikely to me, since humidity and temperature have been too low for this (~39%-50%RH, ~15-19C), and the symptoms also don't really match the literature.
A disease seems unlikely as well, because the symptoms don't really match the literature.
I could very much be mistaken though, thus any advise is always welcome.
Plant #2 has been growing well and is almost as tall as #3.
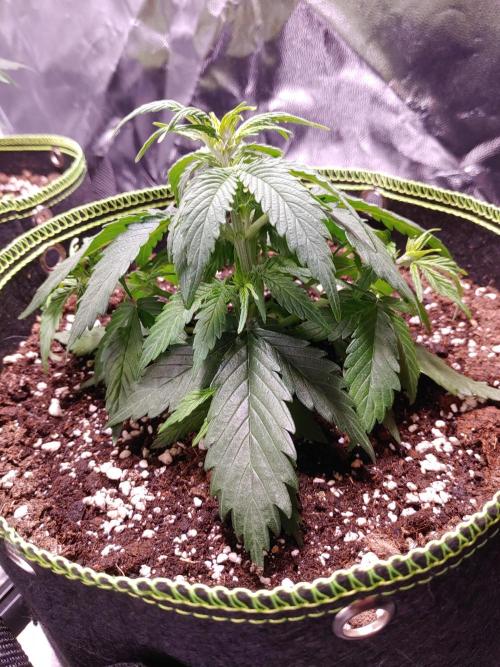
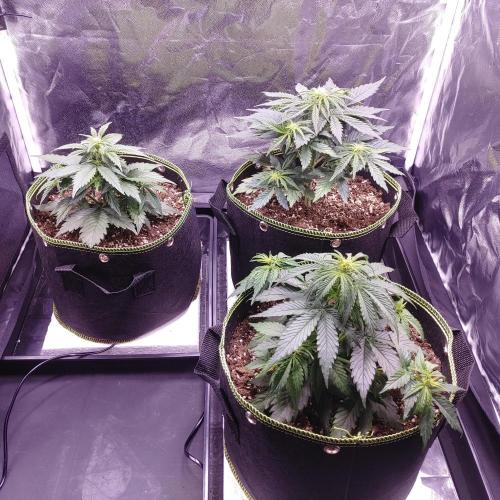
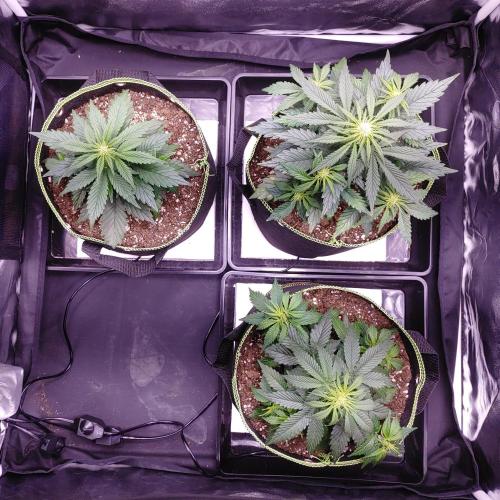
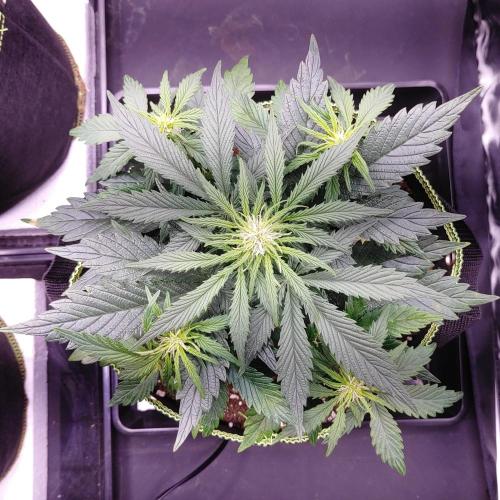
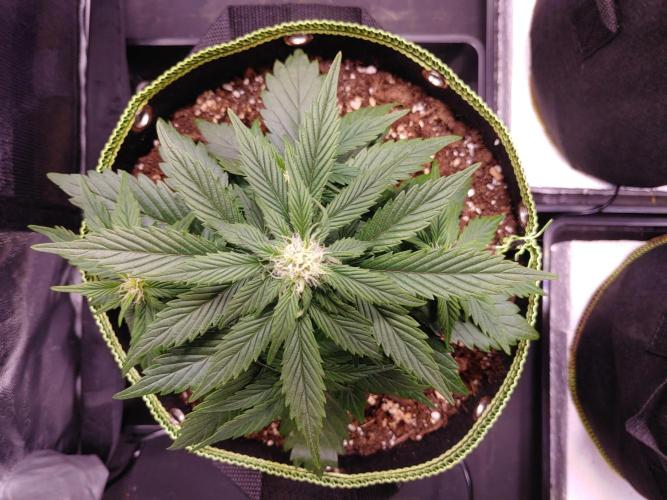
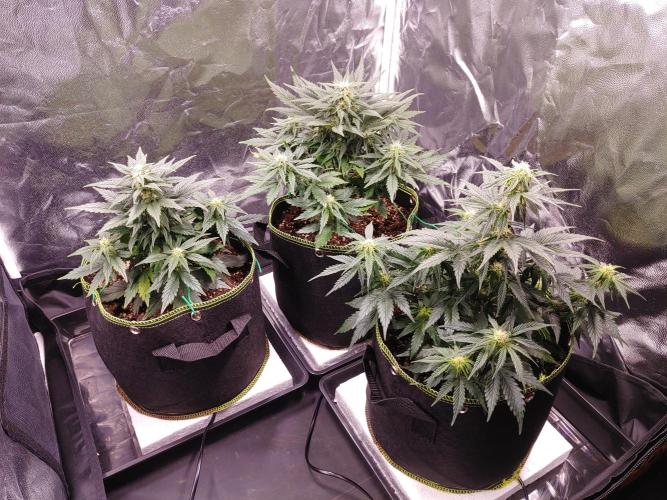
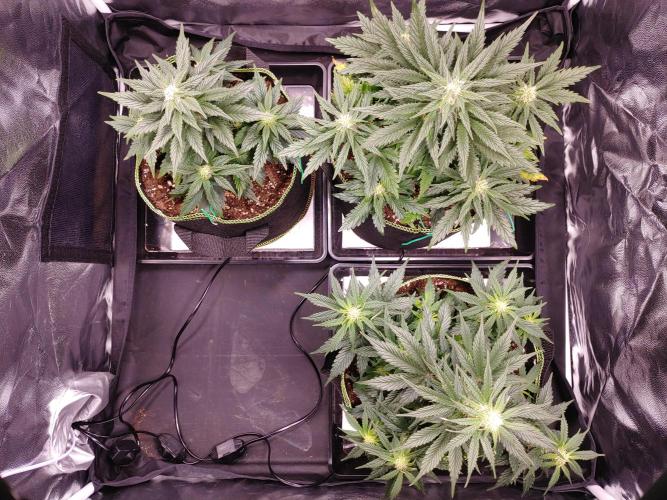
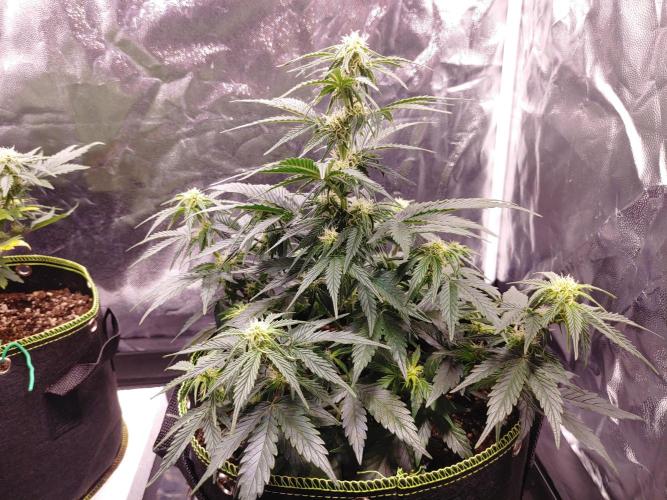
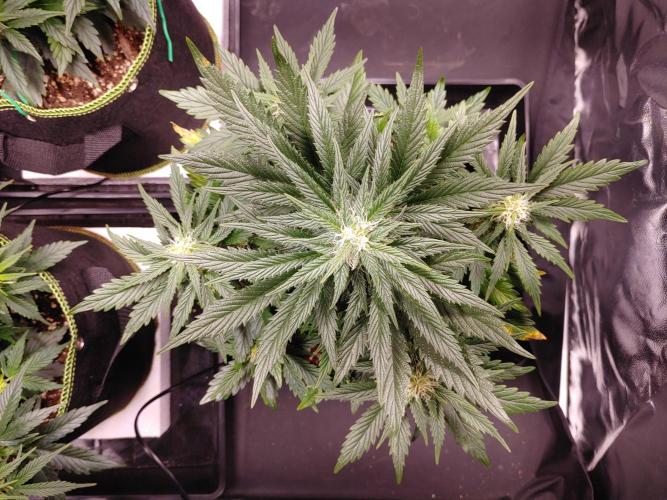
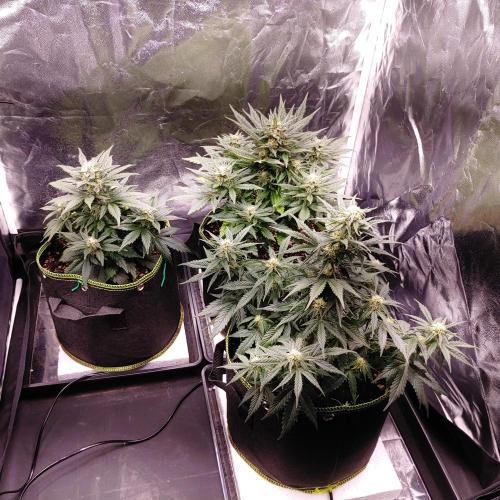
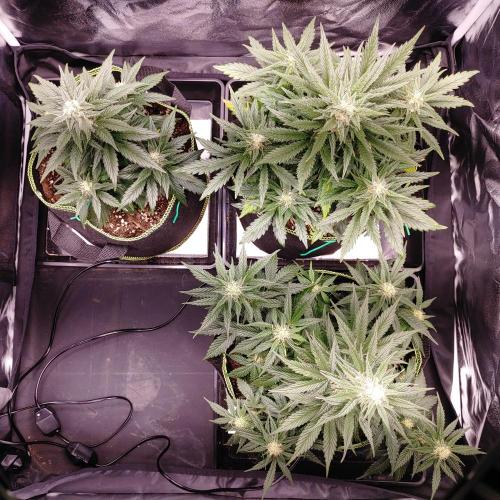
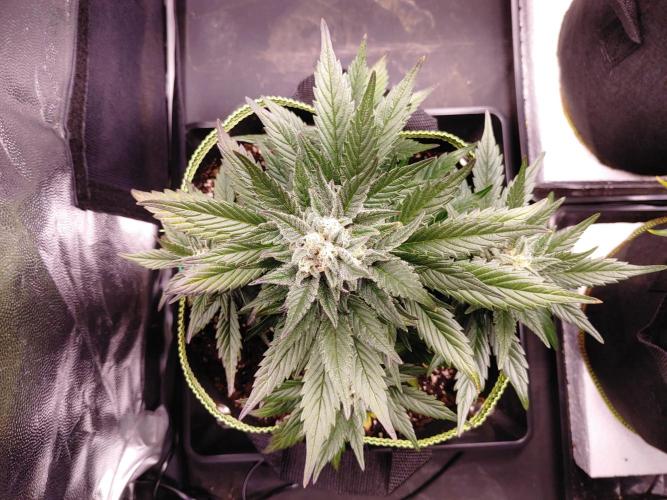
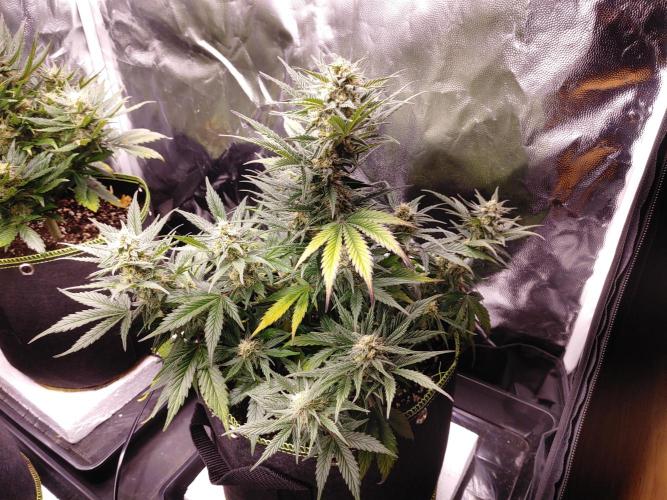
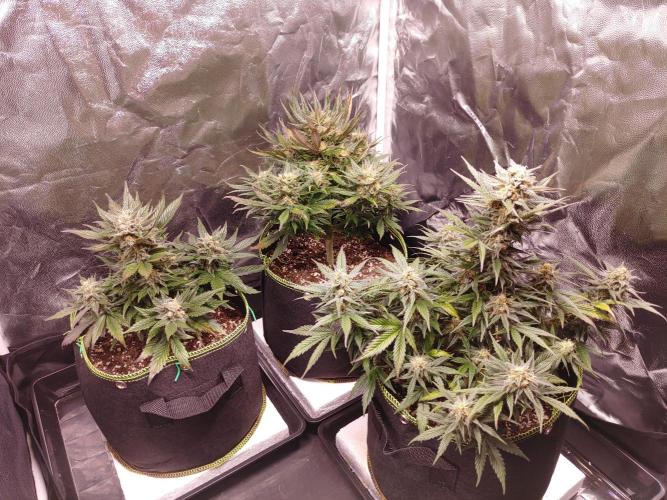
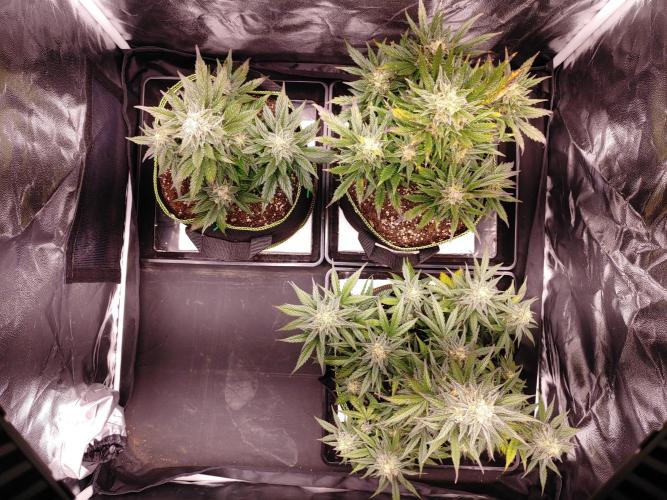
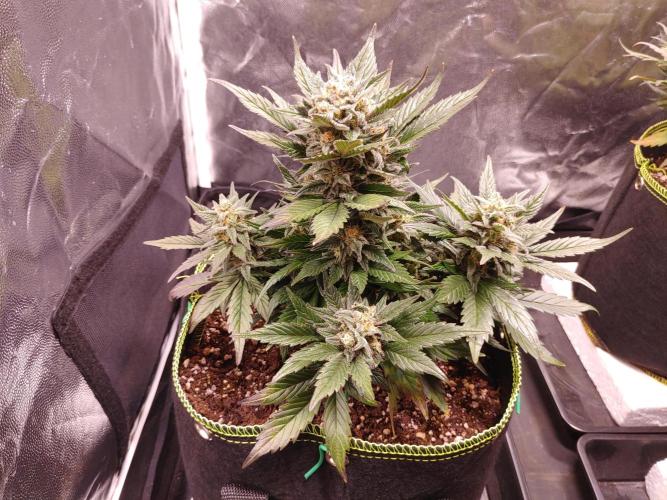
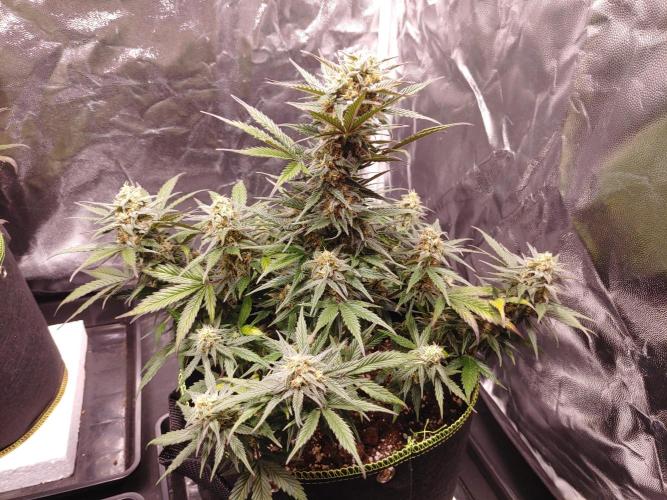
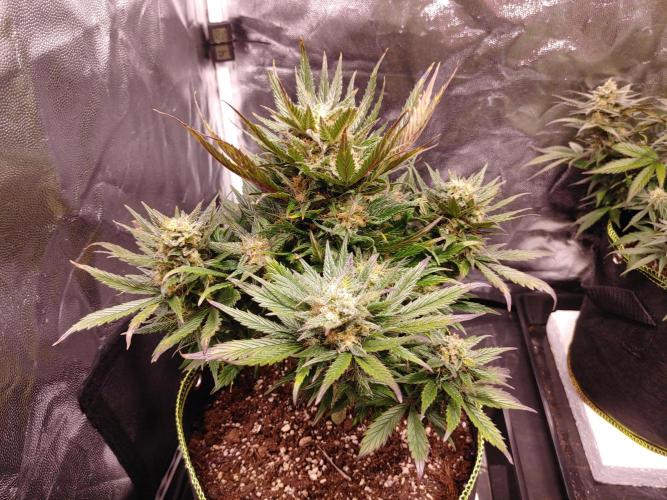
All three plants look to be fully in flower now, making this the last week of veg.
Plant #1 received 400ml, #2 and #3 received 500ml of tap water.
5 likes
1 comment
Share
6
Week 6. Flowering6mo ago
18 hrs
Light Schedule
18 °C
Day Air Temp
Weak
Smell
40 %
Air Humidity
0 °C
Substrate Temp
17 °C
Night Air Temp
11 l
Pot Size
60 cm
Lamp Distance
Nutrients 1

Bio PK 5-8
10 mll
CountDoobie .
19/01/2026
Changed the light schedule to 19.5/4.5h to gradually change it to 18/6h over the coming week. To give the plants a longer dark period during flower.
20/01/2026
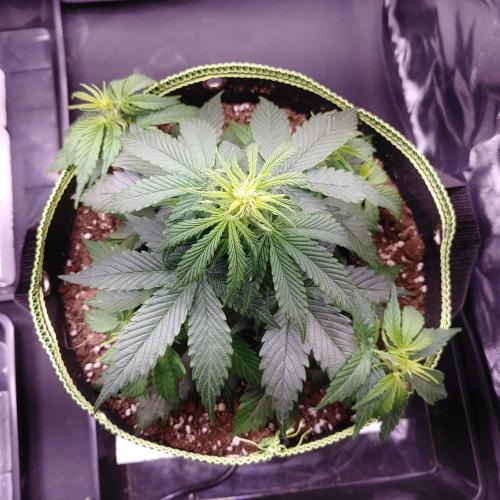
Plant #3 is showing the first signs, of the deficit, in the fan leaves in the 4th node. Although very small spots yet. Next watering the plants will receive their first dose of Bio PK5-8.
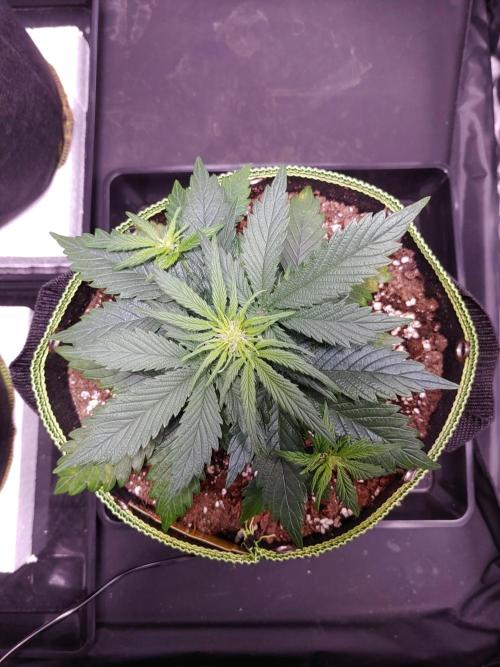
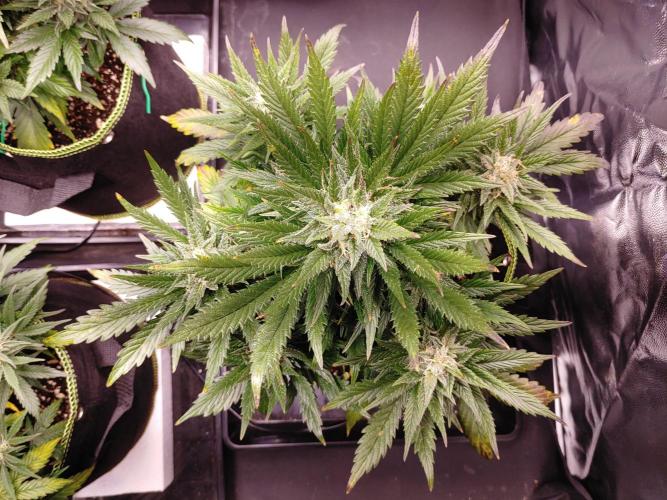
Defoliated the one fingered leaves of the first node on plant #2 and #3. On #2 were they only millimeters above the soil. On #3 were they yellowed/wilted.
Plant #1 gets to keep the first node for now, mostly because they don't present a problem, like on the other plants. But the first node is quite underdeveloped and I will most likely remove them anyway.
21/01/2026
Changed the light schedule to 19/5h.
22/01/2026
All three plants received 500ml of Bio PK5-8 solution (10ml/L).
The oscillating fan is turned off the reduce the cooling effect on the foliage and try to get temperature a little up, due to the cold weather.
24/01/2026
Changed the light schedule to 18.5/5.5h.
25/01/2026
Removed the branches of the first node, because they were underdeveloped and weren't going to produce anything significant.
Turned on the fourth grow light, with a total of 200W now.
5 likes
comments
Share
Used techniques
Defoliation
Technique
7
Week 7. Flowering6mo ago


18 hrs
Light Schedule
19 °C
Day Air Temp
Normal
Smell
39 %
Air Humidity
0 °C
Substrate Temp
17 °C
Night Air Temp
11 l
Pot Size
40 cm
Lamp Distance
Nutrients 2
Bactrex
1 mll
Orgatrex
20 mll
CountDoobie .
27/01/2026
All three plants received 400ml of water.
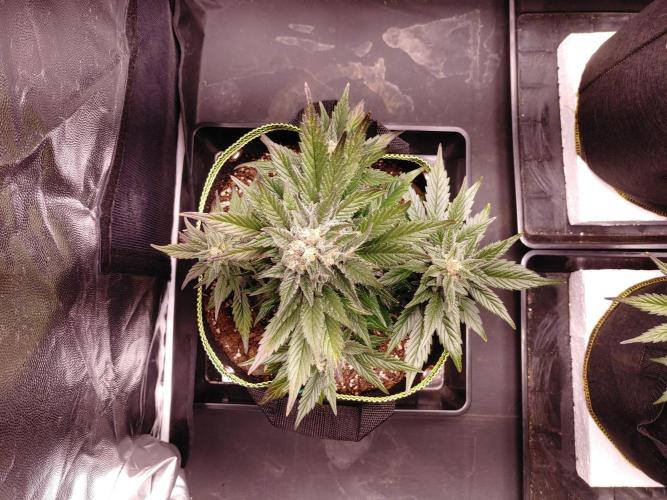
Did some light LST on Plant #3 to improve light penetration.
29/01/2026
Lowered the grow light to ~40cm from the canopy.
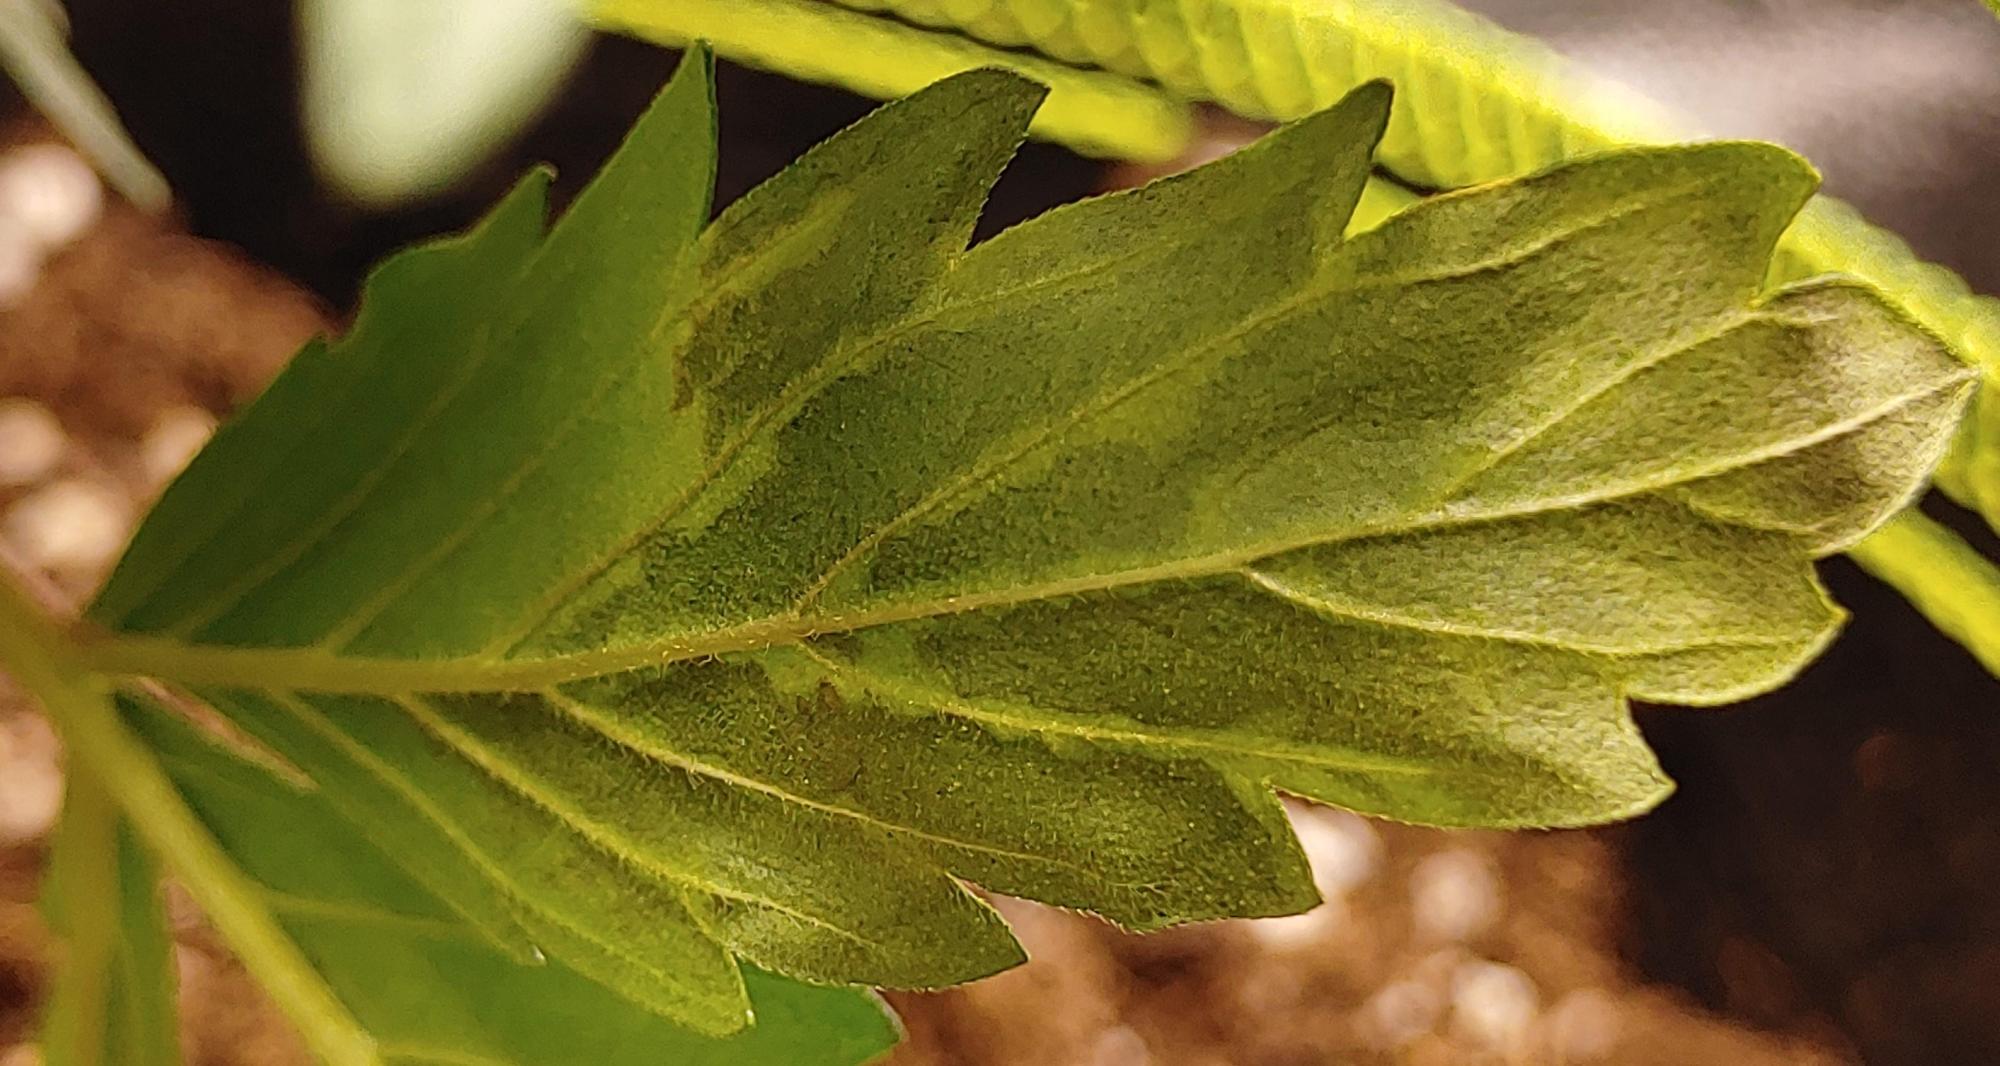
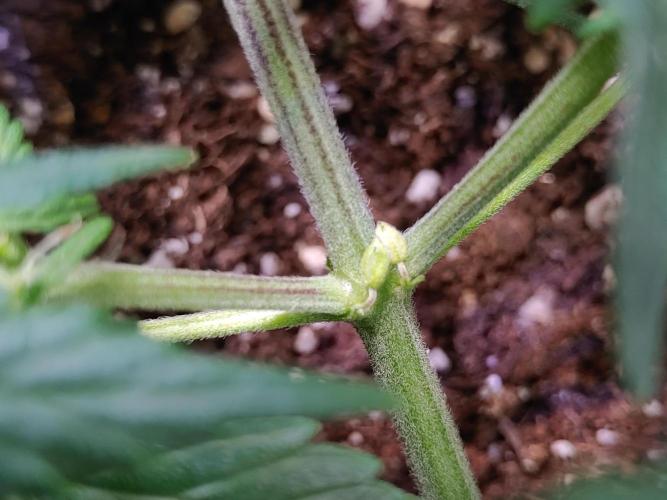
Plant #1 has some weird white spots/balls around the veins of the middle leaf finger, on one of the fan leaves from the 1st node. It's not coming off with brushing. Luckily, it doesn't seem to be spreading to other leaves (yet).
31/01/2026
All three plants received 500ml of a Bactrex (1gr/L) and Orgatrex (20ml/L) solution.
4 likes
3 comments
Share
Used techniques
LST
Technique
8
Week 8. Flowering5mo ago

18 hrs
Light Schedule
19 °C
Day Air Temp
Normal
Smell
42 %
Air Humidity
0 °C
Substrate Temp
18 °C
Night Air Temp
11 l
Pot Size
35 cm
Lamp Distance
Nutrients 1
Bio PK 5-8
10 mll
CountDoobie .
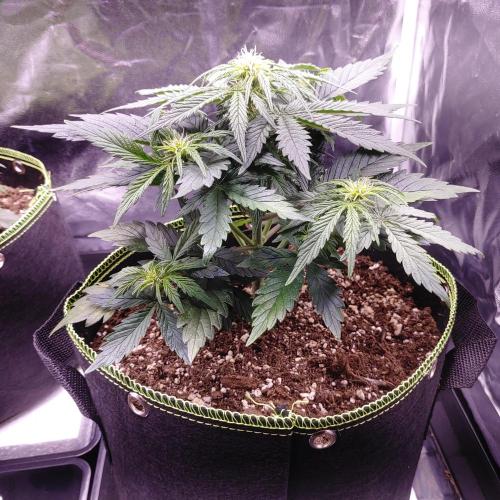
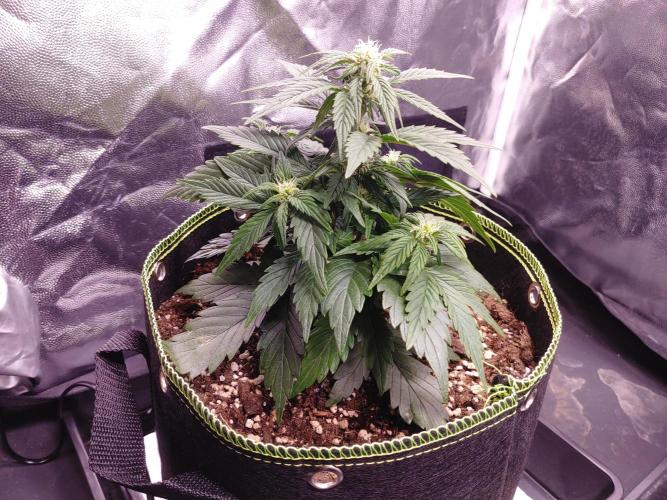
02/02/2026
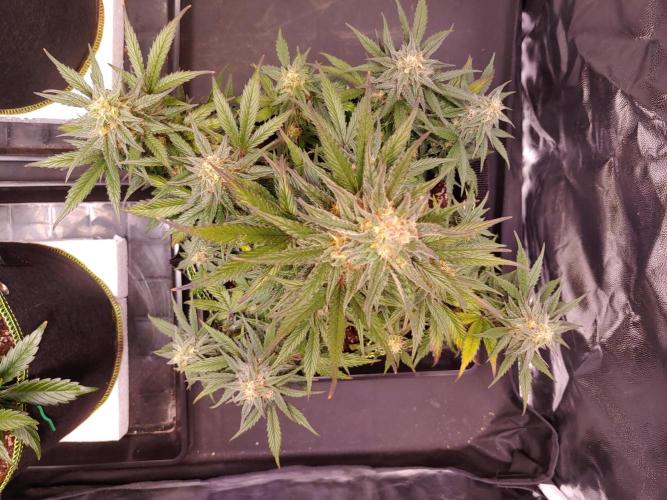
All three plants got a few fan leaves removed to improve light penetration.
03/02/2026
All three plants received 750ml of Bio PK5-8 (10ml/L).
05/02/2026
Did some light LST to plant #1 and #2, to spread the branches a bit and improve light penetration.
06/02/2026
Added a 100W heater in the grow tent to improve temperatures a little. After a few hours the temperature was raised with approx. 2C. A more powerful heater is probably better, but this will have to do for now.
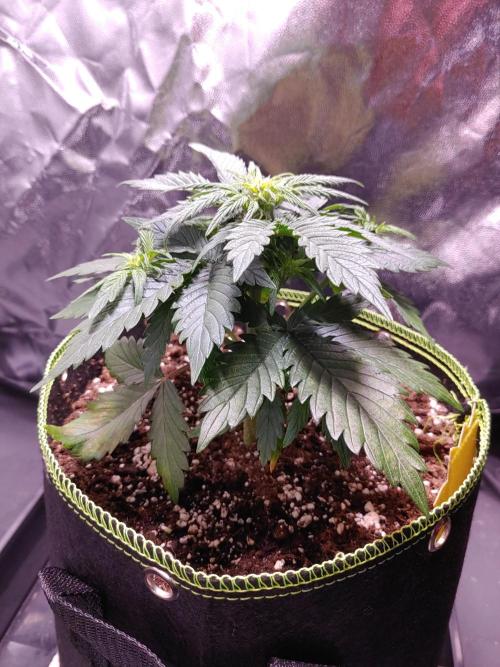
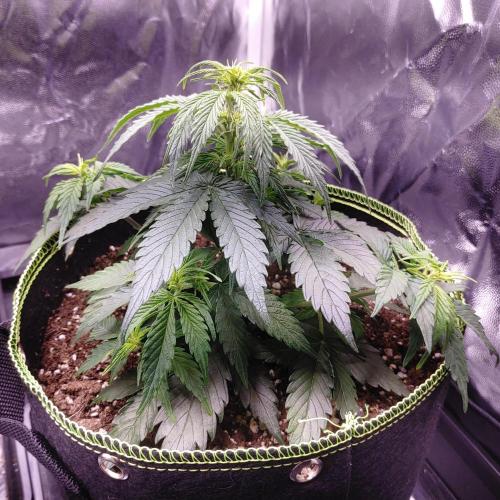
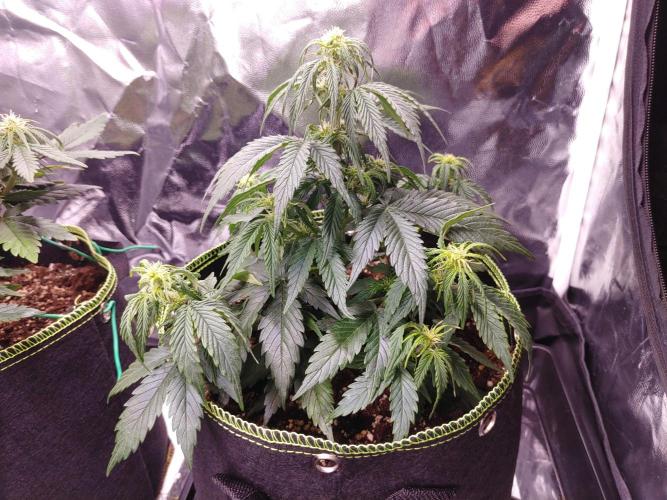
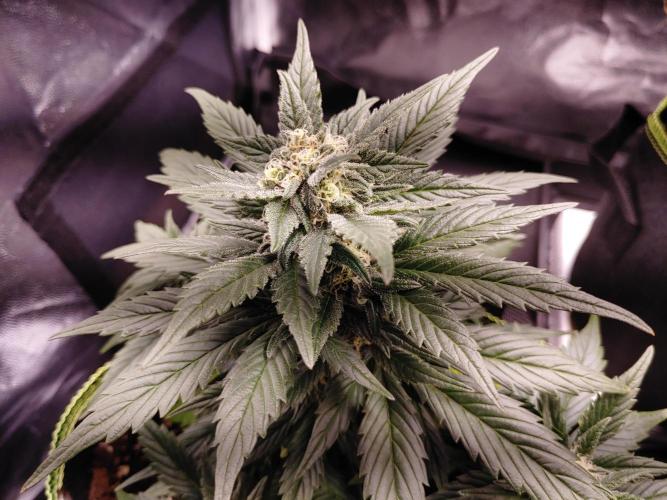
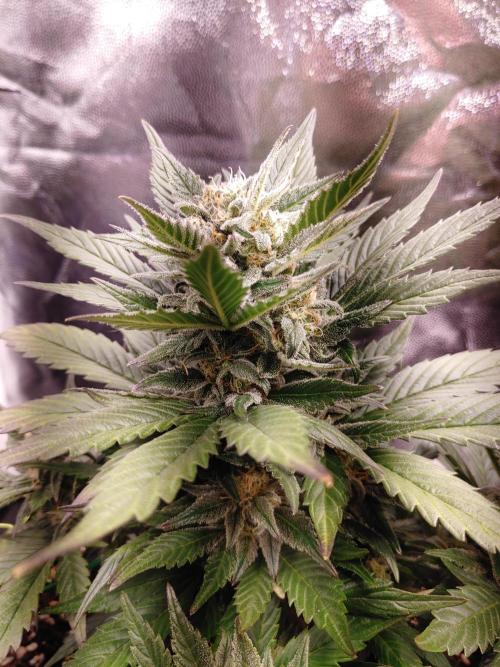
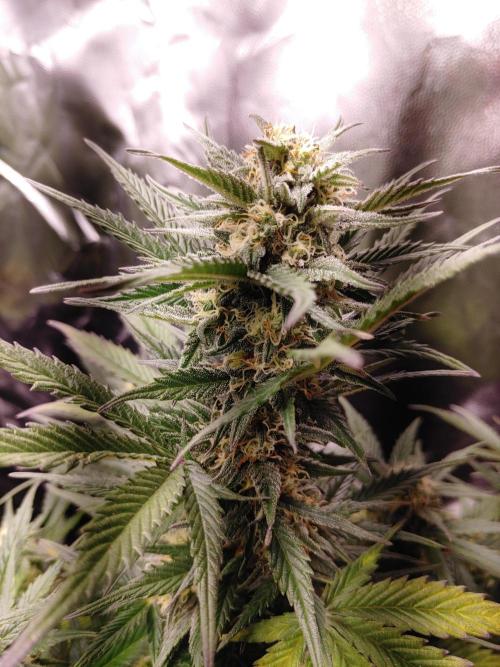
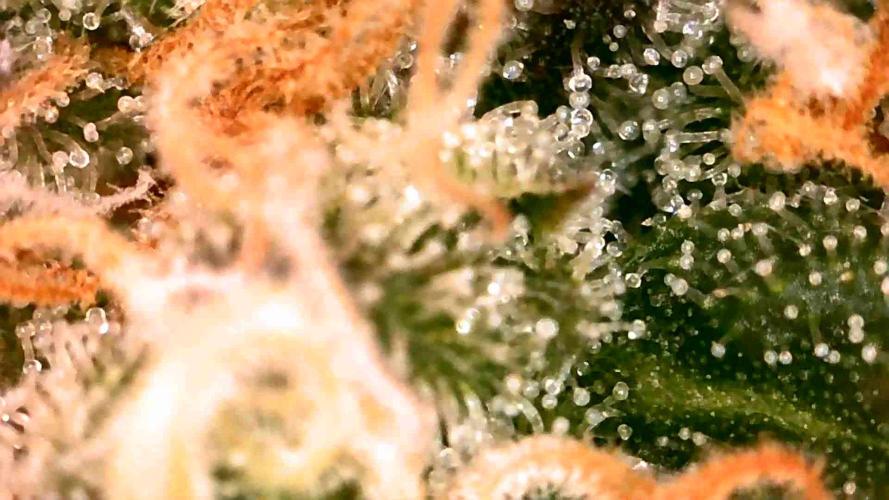
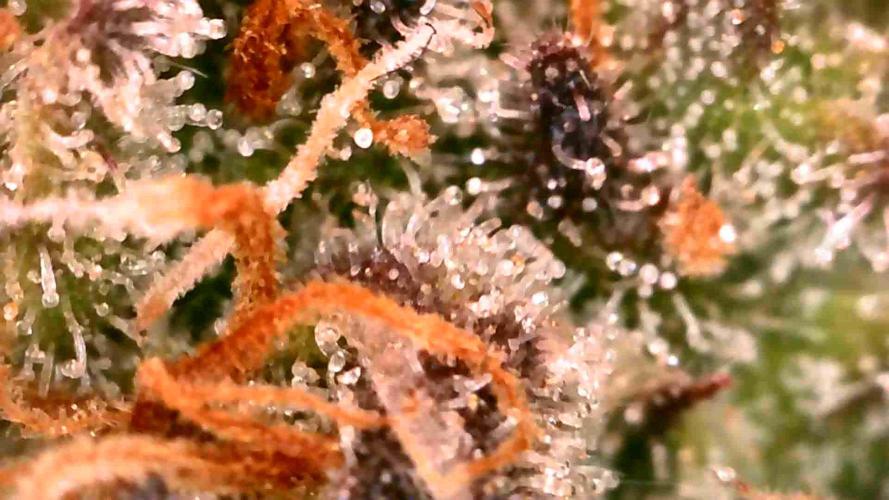
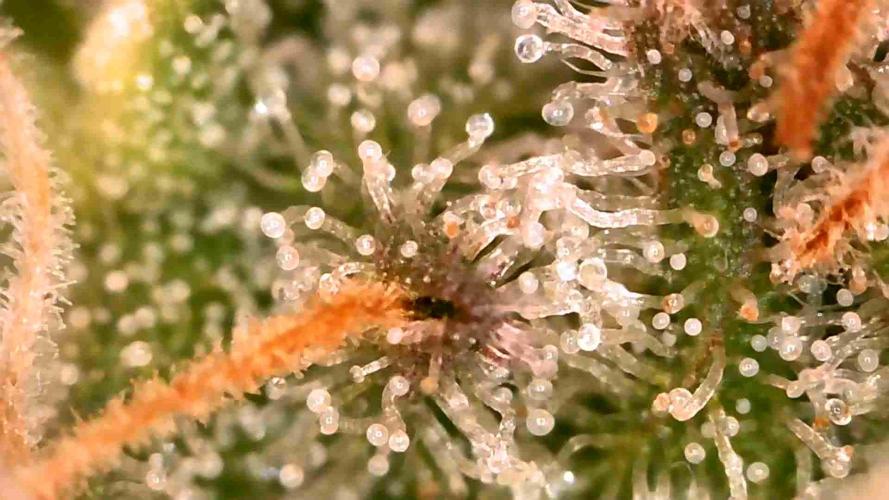
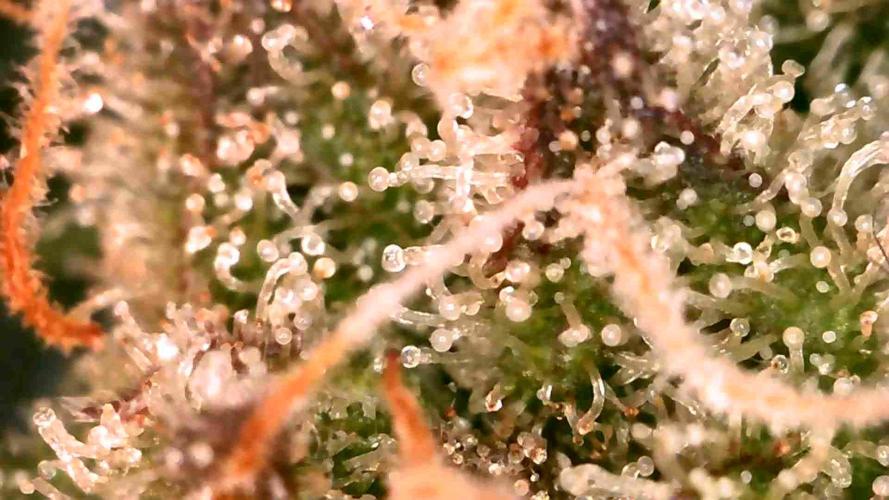
Plant #1 and #3 appear to be producing the first visible trichomes on the sugar leaves.
Plant #2 appears to be a little behind.
07/02/2026
Plant #2 and #3 received 750ml of water and plant #1 received 500ml (because the soil was still a bit too moist).
Lowered the grow light to ~35cm from the top of plant #2 and #3.
A growers nightmare has happened.
I feared this could happen due to the cold climate the plants are in. Unfortunately, plant #2 has grown some nanners. I first inspected the plant thoroughly and luckily it was just one set of balls. Because I don't want to terminate the plant, and it was only the single set of nanners, I've decided to castrate the plant. The nanners were very carefully removed with tweezers, by grabbing the little stem and trying not to touch the sack, and put in a piece of tape to prevent any pollen to escape. They appeared to be not fully developed, so I'm hoping I'm lucky and won't ruin my harvest from the other plants.
This plant will remain under close observation for the coming weeks.
6 likes
1 comment
Share
Used techniques
LST
Technique
9
Week 9. Flowering5mo ago

35 cm
Height
18 hrs
Light Schedule
21 °C
Day Air Temp
Normal
Smell
42 %
Air Humidity
0 °C
Substrate Temp
19 °C
Night Air Temp
11 l
Pot Size
35 cm
Lamp Distance
Nutrients 2

Calmag
0.8 mll
Bio PK 5-8
10 mll
CountDoobie .
09/02/2026
Plant #2 has developed the first trichomes on the sugar leaves as well now.
10/02/2026
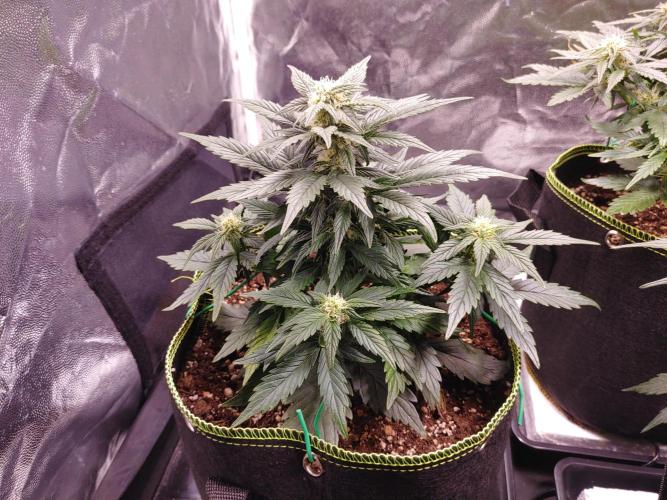
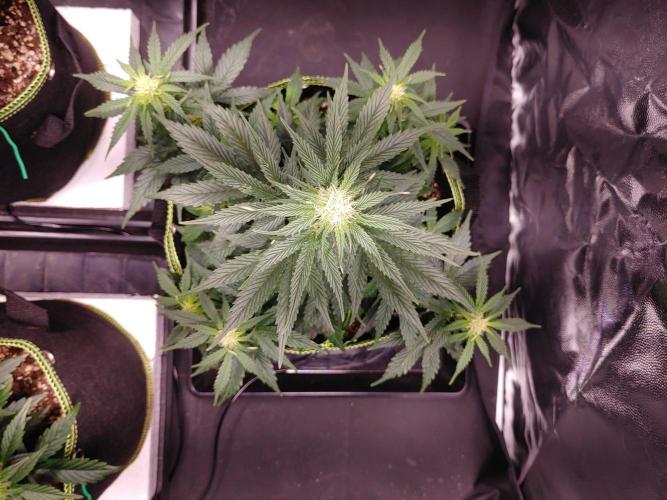
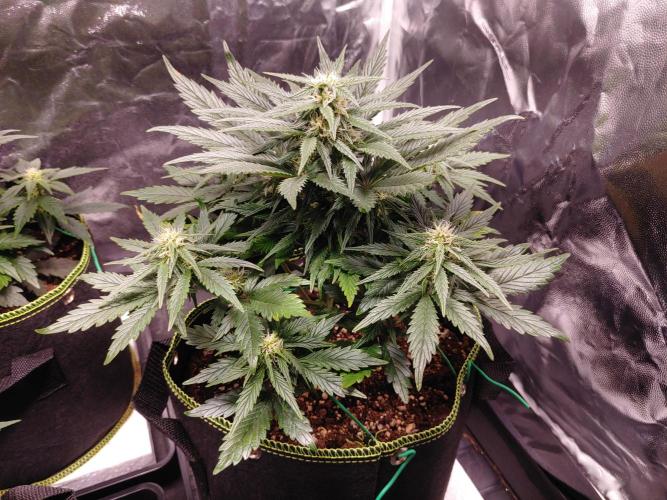
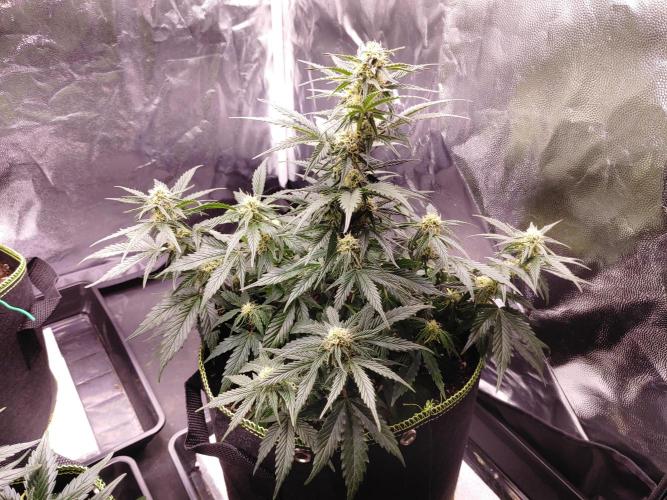
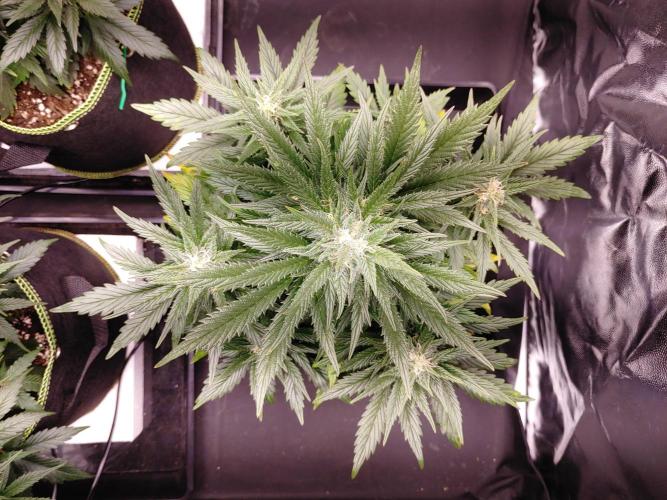
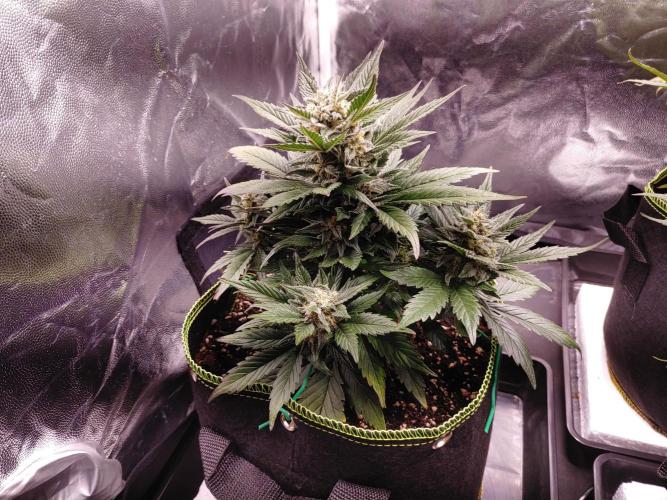
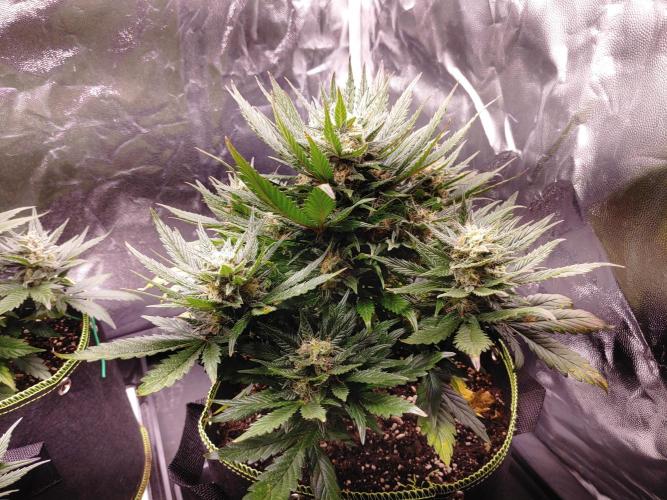
Plant #1 and #3 are bulking up their buds quite nicely.
Plant #2 is developing a lot of buds now, but is still ~1 week behind on the others.
The scent in the grow tent is increasing a lot in intensity.
11/02/2026
Plant #1 received 500ml and #2 received 1L of tap water. Plant #3 received 1L of Biobizz Calmag solution (0.8ml/L), because the calcium deficiency was progressing (very slowly) in the leaves.
There is a very noticeable sweet scent in the grow tent, which is quite a pleasant smell.
12/02/2026
Plant #2 has been thoroughly inspected again, and a single, very underdeveloped, sack was found and carefully removed with tweezers.
The other plants didn't show any nanners still.
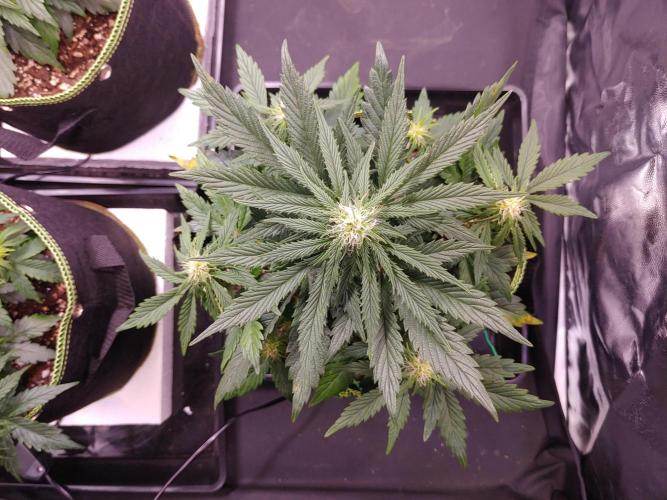
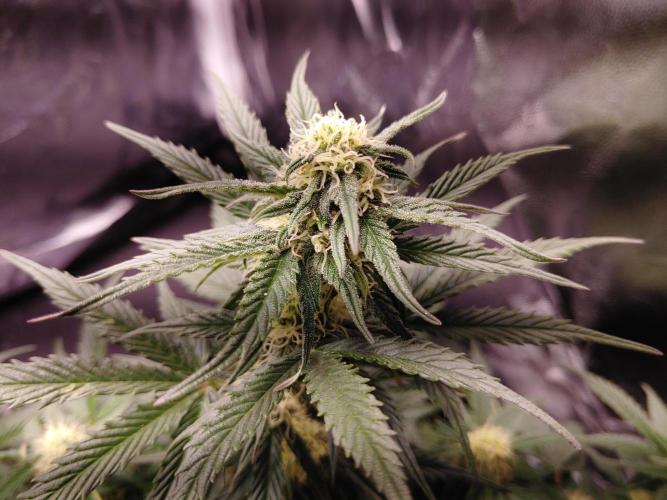
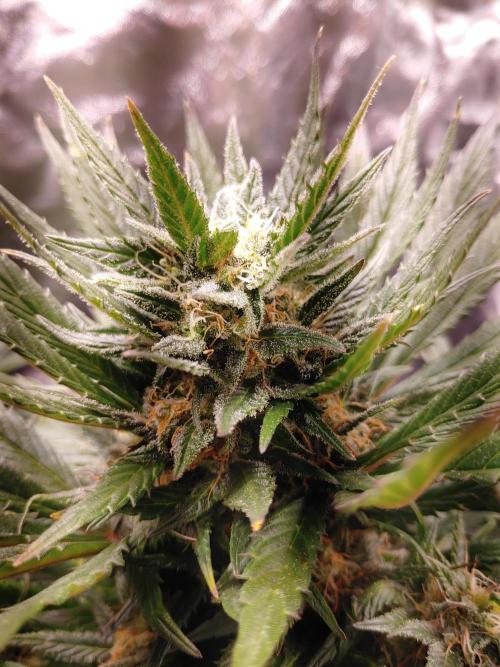
Plant #3 has started to get amber pistils on the main buds.
15/02/2026
Plant #1 received 750ml, #2 and #3 received 1L of Bio PK5-8 solution (10ml/L).
Plant #1 and #3 have started showing the first signs of senescence, with the lower/oldest fan leaves slowly yellowing.
Plant #2 is still behind on the others.
2 likes
1 comment
Share
10
Week 10. Flowering5mo ago
35 cm
Height
18 hrs
Light Schedule
20 °C
Day Air Temp
Normal
Smell
40 %
Air Humidity
0 °C
Substrate Temp
19 °C
Night Air Temp
11 l
Pot Size
35 cm
Lamp Distance
Nutrients 1
Calmag
0.8 mll
CountDoobie .
16/02/2026
Plant #2 has been thoroughly checked again, and a single banana was found (although very underdeveloped). The other two plants have been checked again. Plant #1 has nothing wrong, but plant #3 appeared to have a banana as well, but after close inspection this appears to be the only one.
19/02/2026
Plant #1 and #2 received 1L tap water. Plant #3 received 1L Biobizz Calmag solution (0.8ml/L)
The grow tent is filled with a really pleasant cannabis scent. With very sweet notes, almost like candy.
22/02/2026
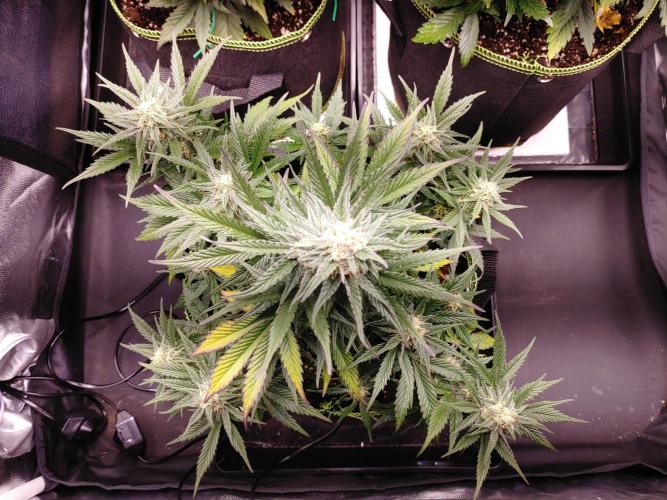
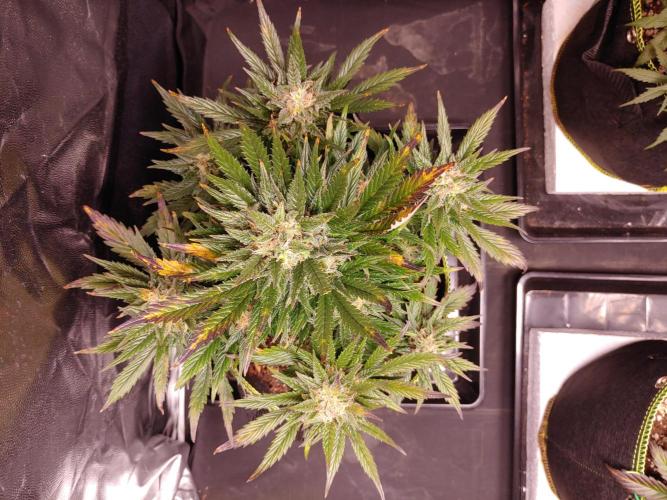
Defoliated the older, yellowing fan leaves on all three plants.
2 likes
comments
Share
Used techniques
Defoliation
Technique
11
Week 11. Flowering5mo ago
35 cm
Height
18 hrs
Light Schedule
21 °C
Day Air Temp
Normal
Smell
41 %
Air Humidity
0 °C
Substrate Temp
19 °C
Night Air Temp
11 l
Pot Size
35 cm
Lamp Distance
CountDoobie .
23/02/2026
Plant #1 received 750ml and plant #2 and #3 received 1L water.
25/02/2026
Checked the trichomes on all three plants.
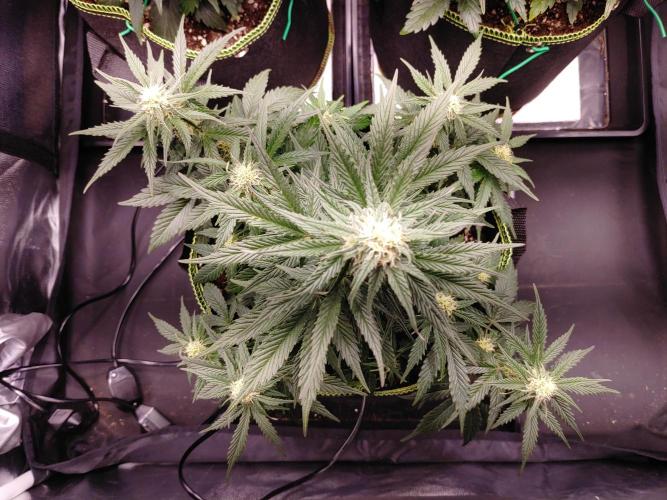
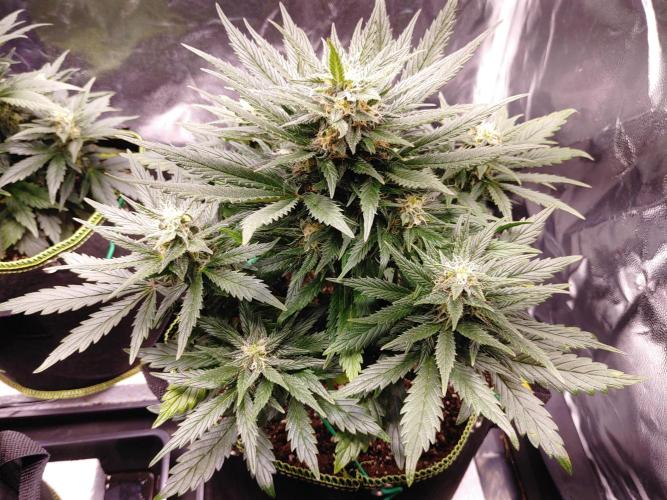
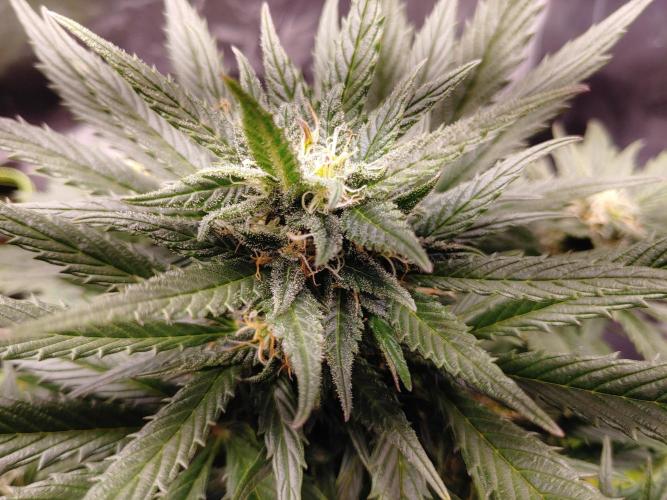
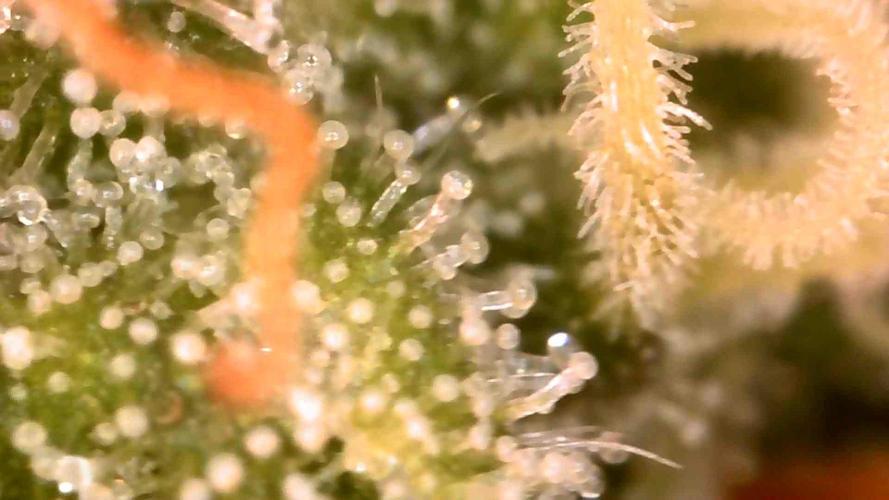
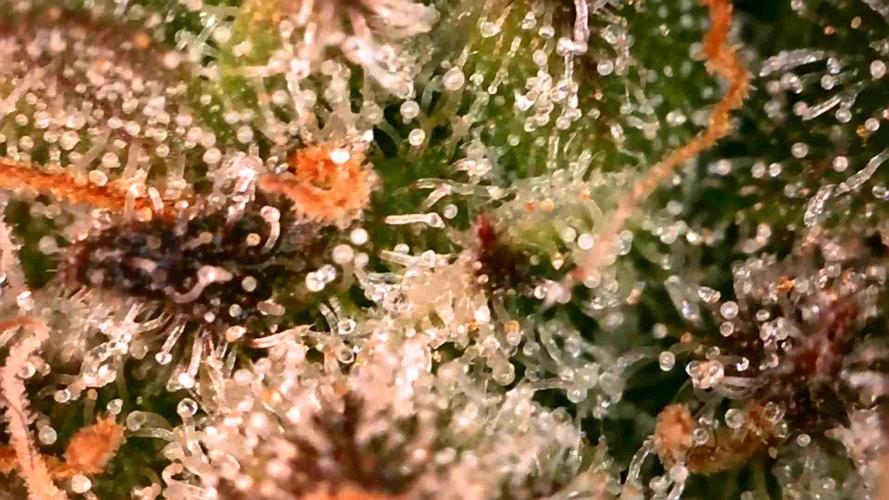
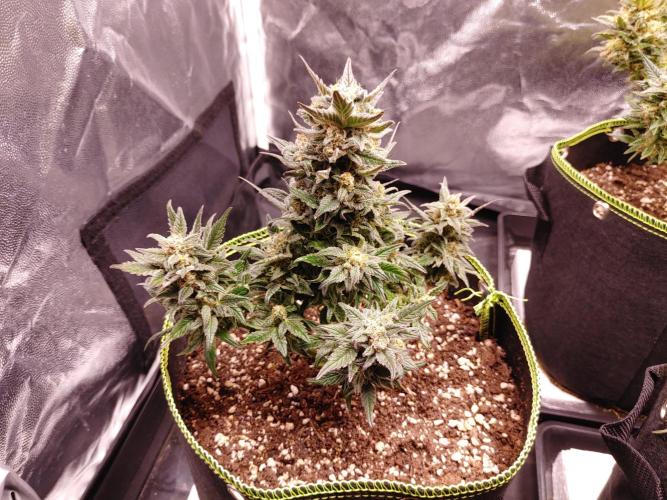
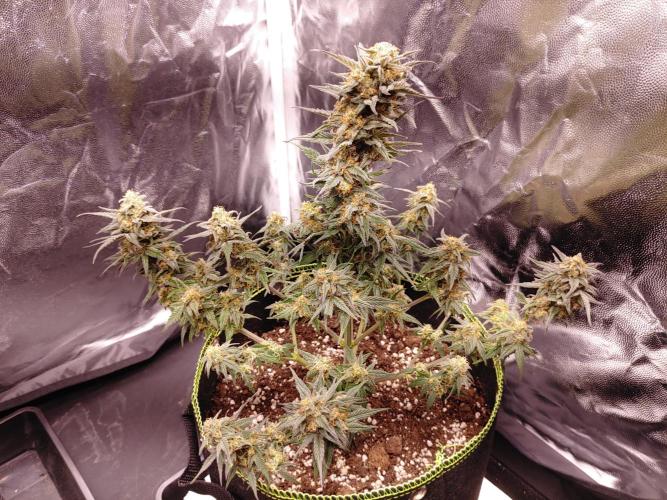
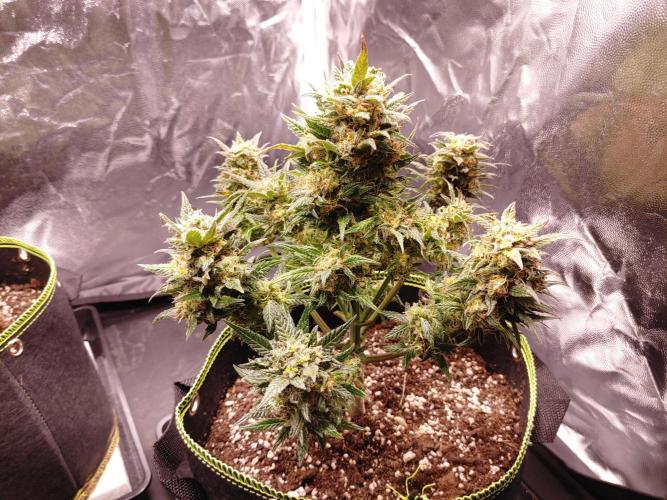
#1 has ~50% clear,50% cloudy and almost no amber coloured. #2 has ~70% cloudy, 30% clear and not really any amber coloured. #3 has a bit more amber coloured than #1 with the rest mostly cloudy and almost no transparent. This plant will probably be ready for harvest in approx. one week.
26/02/2026
Plant #1 received 750ml and plant #2 and #3 received1L water.
01/03/2026
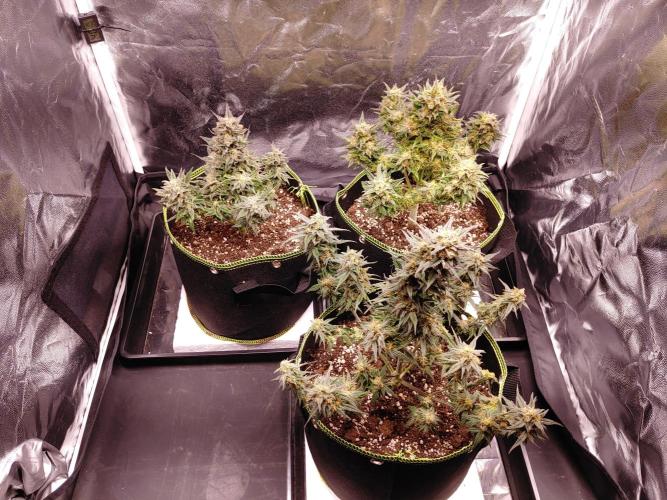
The older, yellowed fan leaves have been pruned on all three plants.
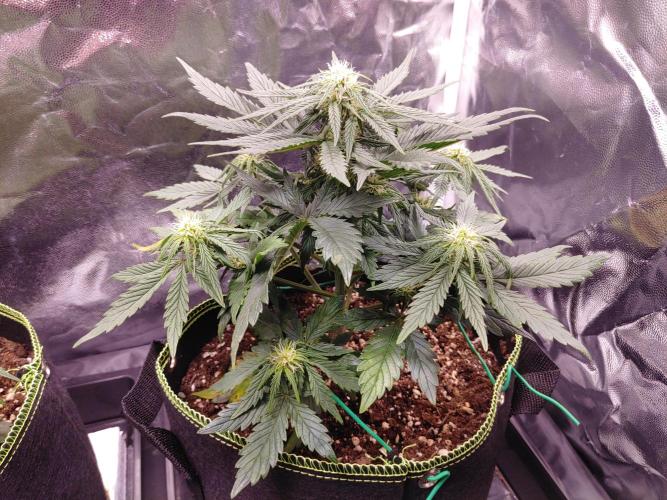
The trichomes are, on all three plants, almost completely cloudy, with just a few transparent left (#1 has a few more than the rest).
On plant #1 there are still not many amber coloured (less than 5%), Plant #2 has a few amber and plant #3 has approx. 5% amber.
All three plants have been inspected again.
Plant #2 has no new bananas and plant #1 is still healthy without any issues.
Unfortunately, plant #3 is a different story. Multiple bananas have been found, with most on the main cola.
During the removal of these, a few bananas were found that are matured. Unfortunately, before these were discovered, one had been tapped with the pincers and it released all of its pollen.
To prevent any seeds from developing, all three plants will be harvested in the coming week. Sadly, this is a week or two too early, considering the trichomes.
4 likes
comments
Share
Used techniques
Defoliation
Technique
12
Week 12. Flowering5mo ago
35 cm
Height
18 hrs
Light Schedule
22 °C
Day Air Temp
Normal
Smell
44 %
Air Humidity
0 °C
Substrate Temp
19 °C
Night Air Temp
11 l
Pot Size
35 cm
Lamp Distance
CountDoobie .
02/03/2026
Plant #2 got all fan leaves (not sugar leaves) pruned, in preparation for harvest.
03/03/2026
Plant #1 and #3 got their fan leaves pruned as well.
04/03/2026
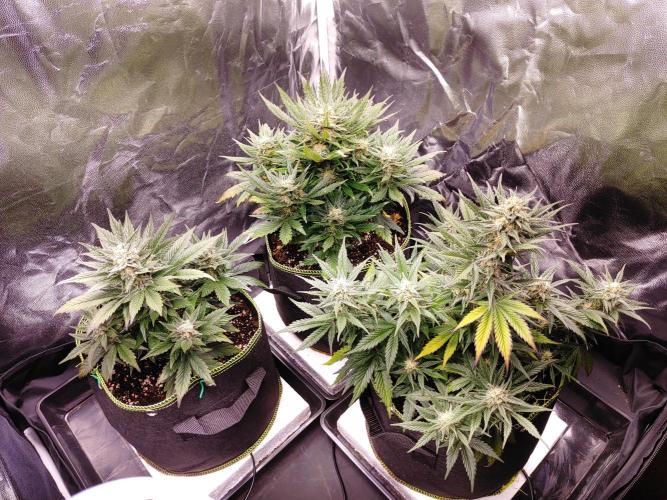
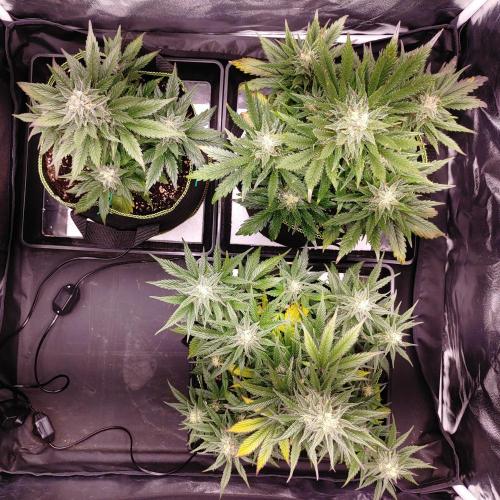
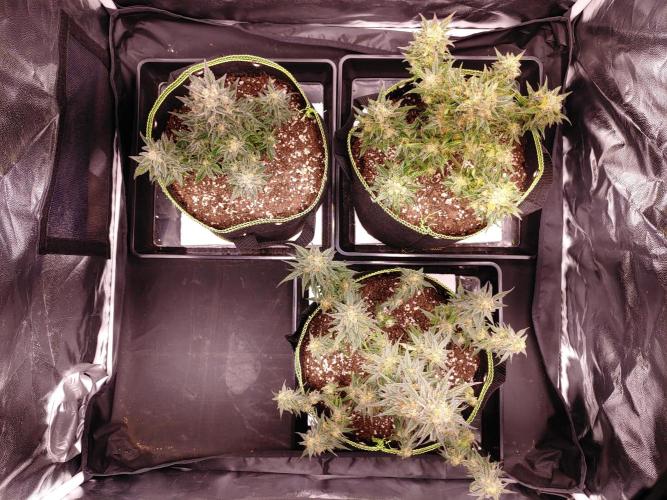
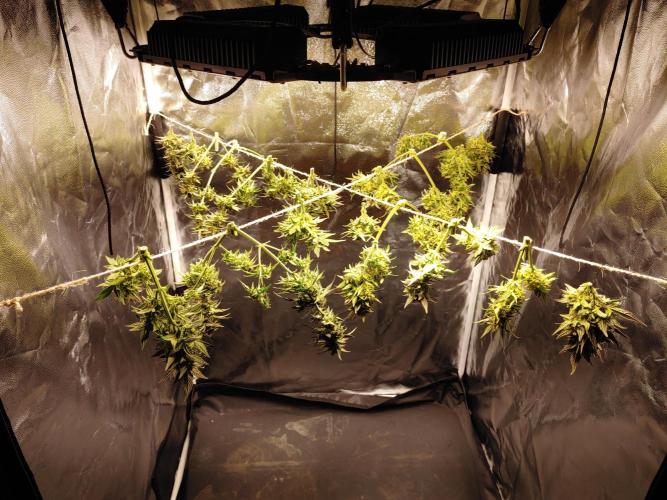
Today all three plants got chopped.
All three plants first got decapitated (cut the main cola) and the rest is cut after each node.
The grow light has been raised to make room for the plants to dry. Then, a rope is put up, where all the branches are hung from.
Now the only thing left to do is wait until the produce is ready for sampling and then curing.
8 likes
1 comment
Share
Used techniques
Defoliation
Technique
12
Week 12. Harvest4mo ago
Happy Harvest Day!


10/10
Rated
It is a fairly easy strain to grow. It was quite tolerant to the colder environment it was in, and grew in to nice looking smaller plants (mostly due to my mistakes. During flower it produced a very pleasant, sweet cannabis smell. The only disadvantage, that I don't consider to be caused by myself, was that one plant developed a calcium/phosphorus deficiency.
Show more
Translate
Spent 86 days
Ger Veg Flo Har
13.33 g
Bud dry weight per plant
3
Plants
0.64 m²
Grow Room size
Easy
Difficulty

Happy, Relaxed
Positive effects

Flowery, Sweet
Taste
Height
Day air temperature
Air humidity
Light schedule
Night air temperature
Substrate temperature
Pot size
Lamp distance
CountDoobie .
Unfortunately all my media got corrupted and wasn't recoverable, except for two pictures of the weight (which were stored on a different device).
04/03/2026
All plants got chopped today. First the main cola is cut, then the rest of the plant was cut at each node and hung to dry.
Raised the grow light to the top to make room for the drying lines, to dry the plants on. A rope is strung diagonally in the tent, on which the plants are hung to dry for the next two weeks.
10/03/2026
The root ball of all three plants are inspected today.
Plant #1 had the smallest root ball, but it was quite still dense in the top ~7cm of the soil.
Plant #2 had a quite dense root ball too, but also only in the top ~12cm of the soil.
Plant #3 Had the biggest root ball, but not that much more than #2.
All three plants appeared to have the tap root growing down, until approx. half way down, to then proceed growing horizontally, or even back up.
This was most likely caused by the thermal pads underneath the pots. Causing the bottom part of the soil to be too warm for the roots, and therefore the roots avoiding this part of the soil.
All three pots had almost no roots in the bottom 30% of the soil.
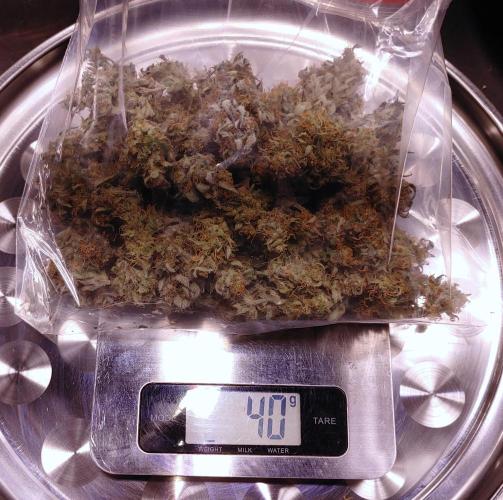
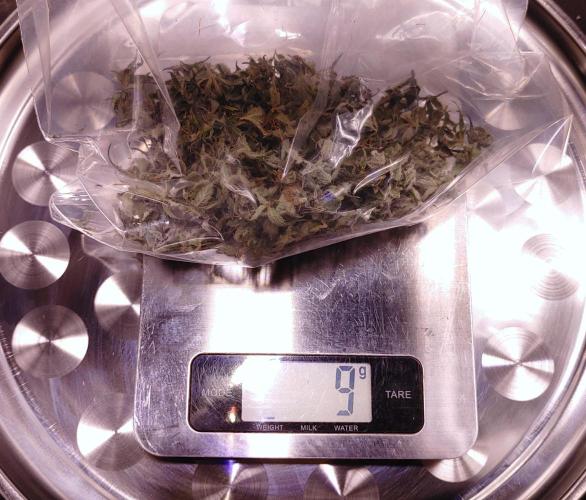
16/03/2026
All buds got a final trim today.
Total cutting weight:
9 gram
Total Bud weight:
40 gram
Even though the plants were harvested two weeks too early, this is still a respectable yield. And the scent profile is a true delight to smell.
The buds on the bottom of the plant were very "airy" and where probably not worth the labour it took. Some were so small, that they ended up with the cuttings. The buds that were higher up have developed nicely and, given enough time, could have produced a nice yield.
Some of the buds on plant #1 had xylem sap on them. Although harmless, it still got (mostly) cleaned off.
3 likes
comments
Share
Equipment Reviews


15 comments
Sort by
popularity
popularity
newest
oldest

India_Calcoen commentedweek 07mo ago
Interesting how you described how to grow with Biotabs. Have a nice grow! 🌱❤️
likes 5

James  commentedweek 07mo ago
Good luck and happy growing!! Keep us posted!
likes 4

Mia_BIOTABS commentedweek 17mo ago
enjoy your royal critical grow- what happened to the little stem?
i have never seen something- i dont think its because of your humidity domes-
looks like they got some injurie by handling them
likes 3
CountDoobie commented7mo ago
@Mia_BIOTABS, Thank you!
Not sure what the cause was, but I was extra careful not to touch the plants before this, so I think I didn't damage the plant directly.
Fortunately, the plant seems to be recovering well. The wound is already closing and becoming more hardened.
likes 2
Mia_BIOTABS commentedweek 95mo ago
happy forwarded flowering
likes 3
Mia_BIOTABS commentedweek 85mo ago
just inspect your plants daily for the next 2 weeks, most times you find all the sacs that develop
likes 3

DutchFarmer commentedweek 76mo ago
Looking awesome so far! 🌱🔥 Your grow diary is inspiring for real 💪👏 Much love! If you want, swing by my YouTube grow page and show some support 💚🙏📹
likes 3
Mia_BIOTABS commentedweek 76mo ago
To me the Girls look thirsty the most time-but besides that iam courious how this journey goes on
likes 3

RicoGrow commentedweek 56mo ago
"Hi, so no, it is not a calcium deficiency because the yellowing always starts from the center towards the edges. Neither is it over-fertilization. Actually, I notice that it is the lower leaves. When you water, there are 2 or 3 splashes on the leaves and it burns them, and the tips, if they are in contact with the soil, they touch the soil and thus also the fertilizer which burns them. Also, you have a slight pH issue. Finally, I allow myself to respond to you. Regards, Rico88." J ai pris un traducteur j espère que ca va
likes 3
DrGruen commentedweek 46mo ago
viel Glück😎
likes 3
Mia_BIOTABS commentedweek 37mo ago
they had very good 14 days andd shoed nice development-
likes 3
Mia_BIOTABS commentedweek 17mo ago
happy holidays!
likes 3

wolfvb commentedweek 17mo ago
Good luck ☘️ and happy growing 💗
likes 3
Mia_BIOTABS commentedweek 125mo ago
happy chopping
likes 2

the end.
Enjoying this diary? Follow for more updates!


Prefer the old Diary view?
Go back to the old Diary view