The Grow Awards 2026 🏆

NugNut Hut

2
8
1
20
3d ago
AJ Sour Diesel
Clone
Modified Grapes
Clone
Super Boof
Clone
Dante’s Inferno
Clone
Stonington Blend Growers Mix Soil
Coast of Maine
Indoor
Room Type
Transplantation
weeks 1, 3
LST
weeks 2-5
Manifolding
weeks 3
HST
weeks 3
Defoliation
weeks 3
26 liters
Pot Size
Start at 5 Week
1
Week 1. Vegetation
6d ago
45.72 cm
Height
18 hrs
Light Schedule
23 °C
Day Air Temp
6.5
pH
No Smell
Smell
70 %
Air Humidity
21 °C
Solution Temp
18 °C
Substrate Temp
20 °C
Night Air Temp
2.84 liters
Pot Size
76.2 cm
Lamp Distance
NugNut Lanky stretched clones transplanted to soil.
1 like
comments
Share
Used techniques
Transplantation
Technique
2
Week 2. Vegetation
6d ago
30.48 cm
Height
18 hrs
Light Schedule
23 °C
Day Air Temp
6.5
pH
No Smell
Smell
70 %
Air Humidity
21 °C
Solution Temp
18 °C
Substrate Temp
20 °C
Night Air Temp
2.84 liters
Pot Size
91.44 cm
Lamp Distance
NugNut Let’s call it MST 😁
1 like
comments
Share
Used techniques
LST
Technique
3
Week 3. Vegetation
6d ago
25.4 cm
Height
18 hrs
Light Schedule
24 °C
Day Air Temp
6.5
pH
Weak
Smell
60 %
Air Humidity
21 °C
Solution Temp
20 °C
Substrate Temp
20 °C
Night Air Temp
26.5 liters
Pot Size
91.44 cm
Lamp Distance
Nutrients 1
Pure Blend Pro Grow  - Botanicare
Pure Blend Pro Grow
1.849 mll
NugNut The girls got a workout this week. LST and transplant to large fabric pots. Showing signs of shock.
1 like
comments
Share
Used techniques
HST
Technique
LST
Technique
Manifolding
Technique
Defoliation
Technique
Transplantation
Technique
4
Week 4. Vegetation
6d ago
30.48 cm
Height
18 hrs
Light Schedule
24 °C
Day Air Temp
6.5
pH
Weak
Smell
60 %
Air Humidity
24 °C
Solution Temp
20 °C
Substrate Temp
20 °C
Night Air Temp
26.5 liters
Pot Size
101.6 cm
Lamp Distance
Nutrients 2
Cal-Mag Plus  - Botanicare
Cal-Mag Plus
0.793 mll
Pure Blend Pro Grow  - Botanicare
Pure Blend Pro Grow
5.283 mll
NugNut Appears to have nutrient deficiency
4 likes
comments
Share
Used techniques
LST
Technique
Grow Questions
NugNut
NugNutstarted grow question 6d ago
Picked up some clones for the first time. They were let’s say slim pickings by the time I got them. Stretched and lanky but was determined to try a clone grow. Been doing some aggressive training for a month
Open
likes
Answer
RasendeRollo92
RasendeRollo92answered grow question 5d ago
Hi 🙋‍♂️, Deine Clone sollten wachsen wie jede gewöhnliche Pflanze auch… Demnach benötigen sie die selbe Pflege :) Worauf die bei den Colonen achten musst sind definitiv die Wurzeln… sind diese nicht anständig ausgebildet, dann wird das nichts. Natürlich auch auf die Genetik, aber das setze ich voraus beim Kauf von Colonen… Viel Erfolg beim grow, bin gespannt auf den weiteren Verlauf 👊🤞🏽👍
likes
Complain
00110001001001111O
00110001001001111Oanswered grow question 5d ago
As far as how to treat and train... they are just plants once rooted. Treat them as you would any other plant. Asymetrical growth may make LST superior to topping? A clone is an 'old' plant. it's as old as the from-seed plant it came from - regarldess of how many clones of a clone occured between. So, you will have asymmetrical growth on clones, but this won't impact yield at all. If you plan to mainline or manifold, it makes it less ideal, but still doable. obviously, get them healthy and well-rooted like a normal plant would be before putting into flower...
likes
Complain
AestheticGenetix
AestheticGenetixanswered grow question 5d ago
Are they quality clones? Clones are the number 1 game changer for me but they have to be legit. If it's just some clone that someone hunted from their own seeds they purchased them you'll have the same luck as with seeds But my grows that are gelato, blueberry muffin, cap junky, RS11, purple chrome and purple octane are all from legit clones from breeders. They're the best genetics I have ever had. Keep it alive and it'll reward you kindly. Make sure you keep it around whether that's cloning or revegging
likes
Complain
NugNut
NugNutstarted grow question 6d ago
Any advice on lighting distance and setting?
Open
likes
Answer
00110001001001111O
00110001001001111Oanswered grow question 5d ago
sorry, i said 1:1 proportional.. that's false... it is directly proportional though... inversely proportional to hours of operation.. each statement assumes only 1 factor changes at a time. a drop of klux 50% is a drop of ppf 50%.
likes
Complain
00110001001001111O
00110001001001111Oanswered grow question 5d ago
1,585 PPF -- on GD's page for this light. Good for them for using the proper measurement. Many companies would call that ppfd or worse, lol. Full power or 'vege' power if growing photoperiods... Hanging distance when light is properly sized for area of coverage should be about a good spread of light across canopy without sacrificing overall average of entire canopy. A light meter can help... What is 'best' is a bit of a grey area due to variables that impact 'max' DLI you can provide. Also, maybe a little sacrifice of overall average to improve edges or sides a bit might be worth it? I wouldn't assume, but either way will be in the vicinity of what is best without proper testing various options in this regard. It's a quantum board, so probably better 20-24" away to improve spread of light. Good starting point for power: 600 ppf per m^2 for 18h operation 900 ppf per m^2 for 12h operation
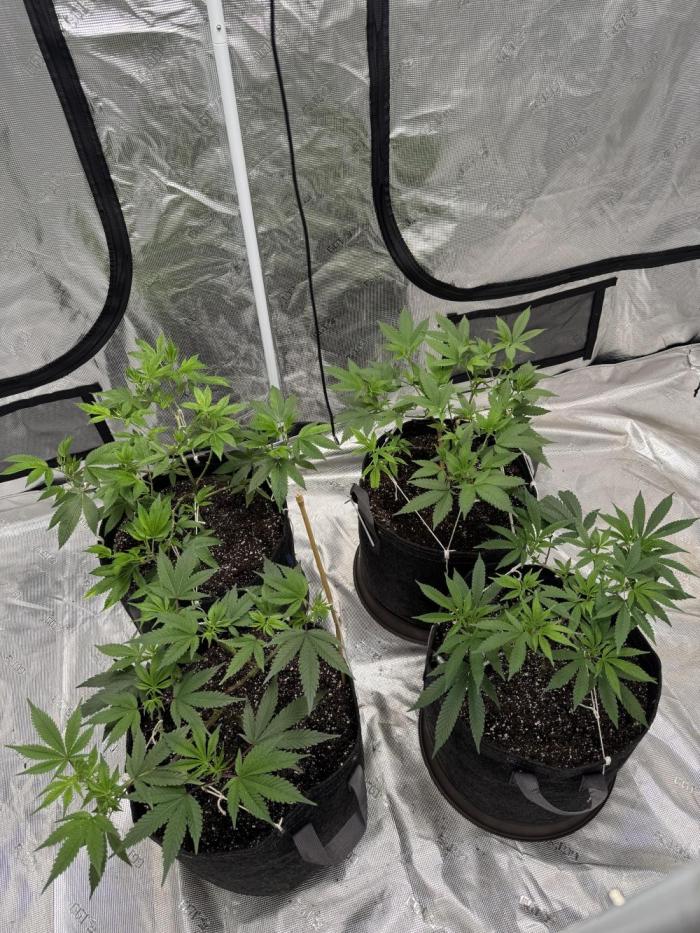
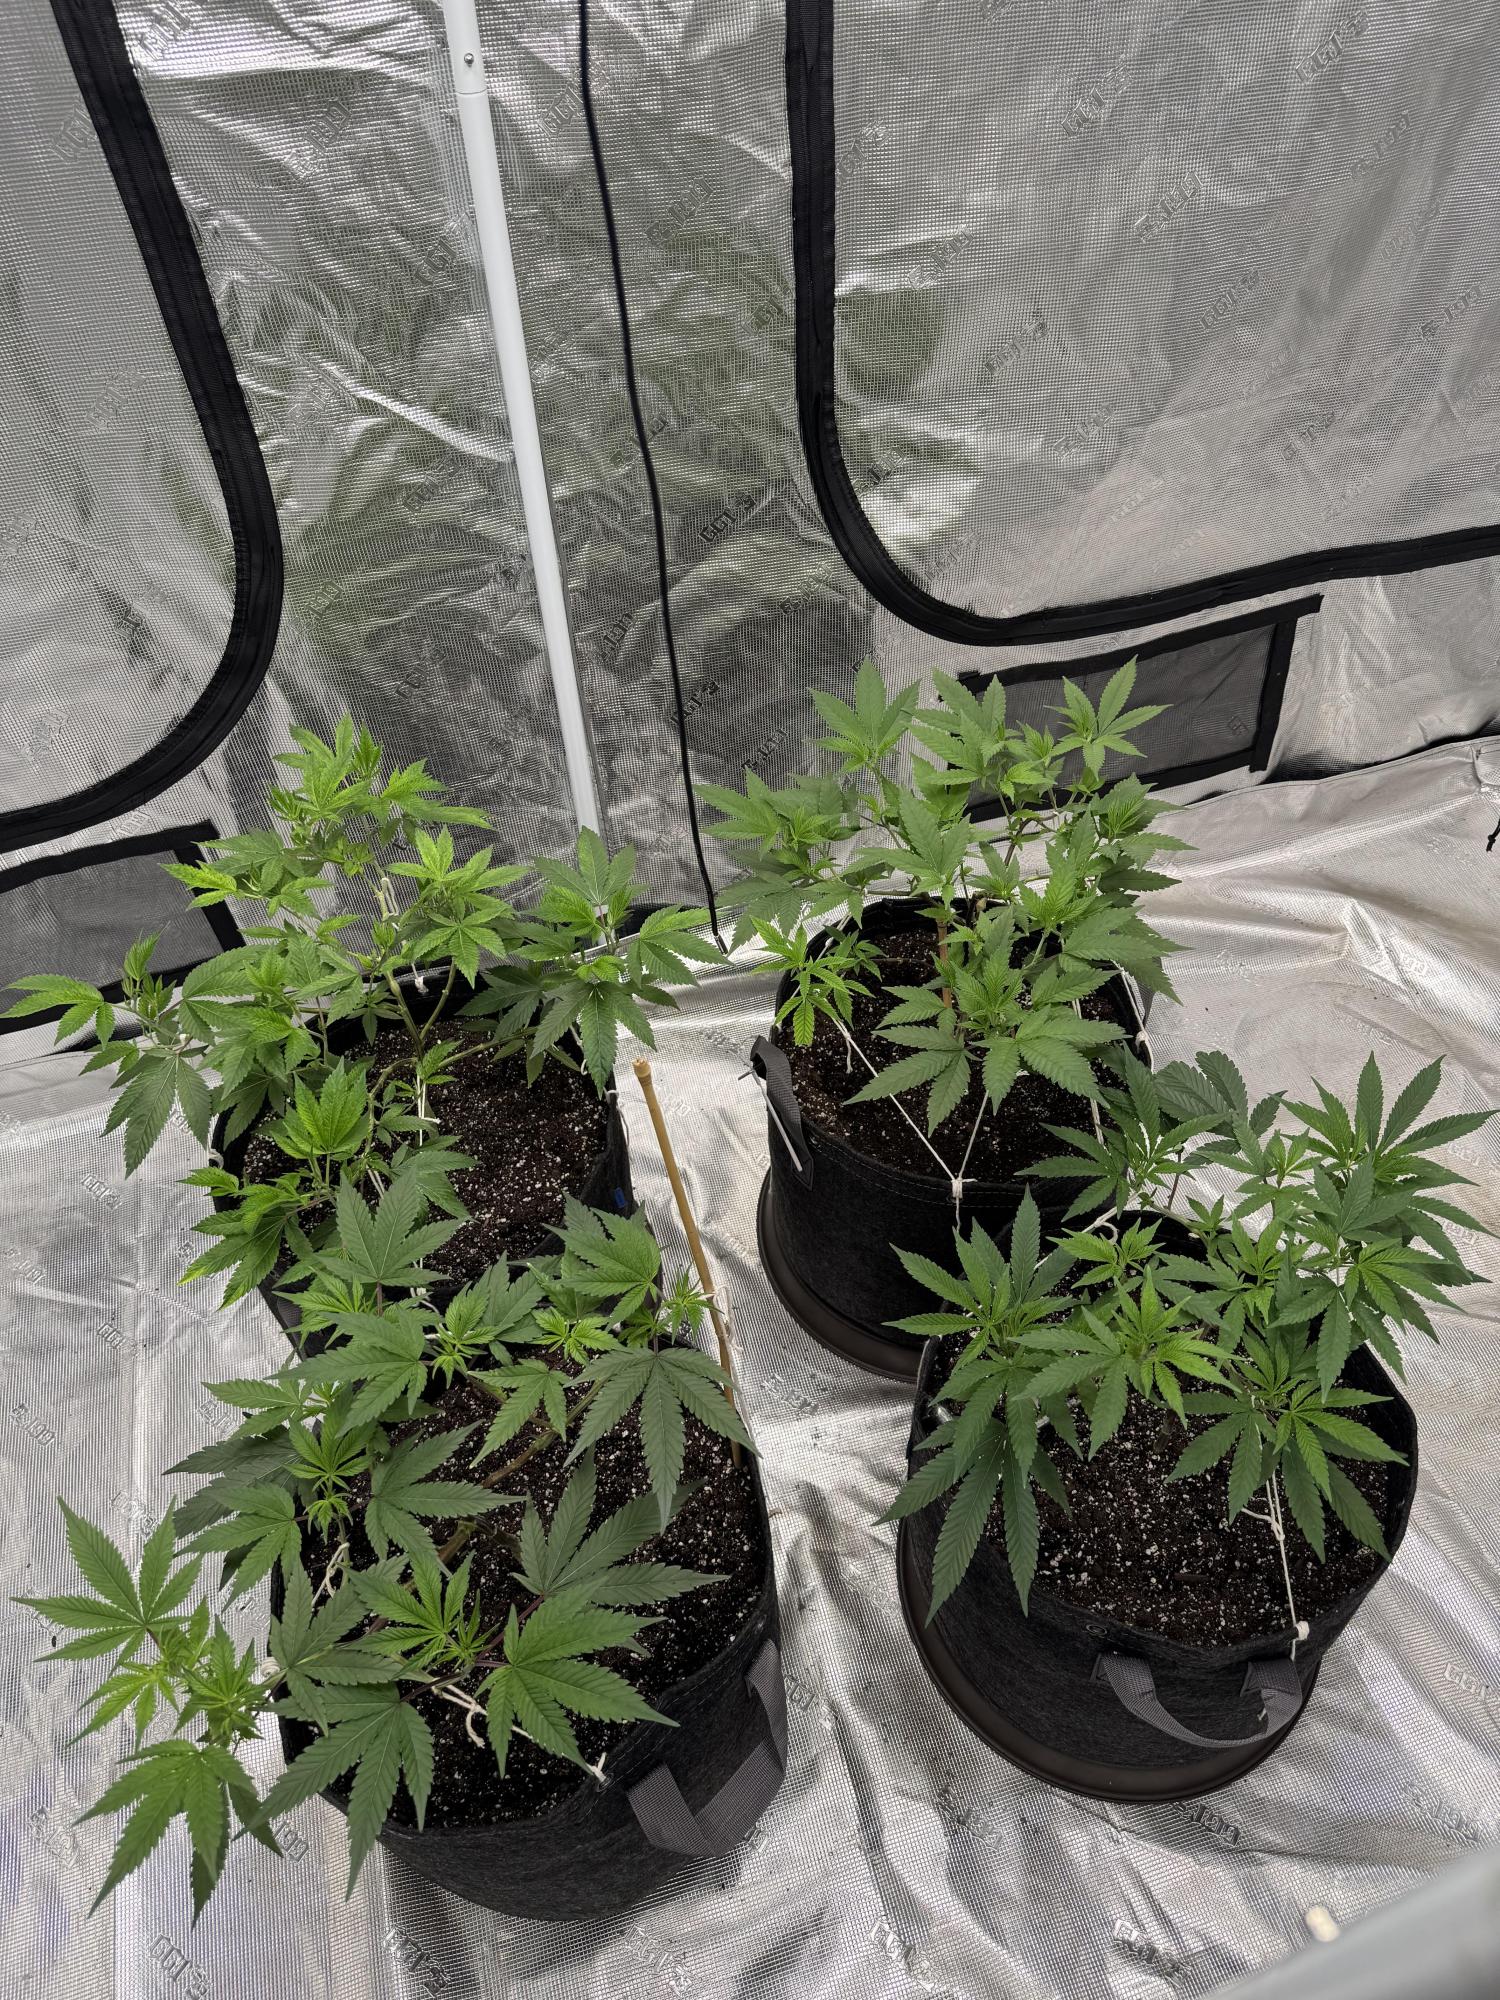
 2 lights = 3170 ppf 32 sq ft converted to 2.97m^2, call it 3m^2 for fun. So, 1800 ppf and 2700 ppf are the targets, respectively. 1800 / 3170 = 56.8% power -- just a ball park. Whether you do 50-55-60% for 18h operation to start, you still need to observe plant and make and adjustments based on node spacing. How the plant grows will dictate the exact power you want to use. 2700 / 3170 = 85% So, these lights give more than you need for 32 sq ft. That's good. A little extra means you can ramp them up over the years to mitigate any dimming that occurs. By 30-40k hours, it'll be 90% of original intensity. I can tell by the 2.5umol/J efficacy that they do not adhere to samsung.com testing paramaters, so the L90 (when it hits 90% of original intensity) will be faster than the common 50k hours advertised longevity - bsed on L90 rating. If you measure a specific distance from center under the light and compare over the years, you'll see that value slowly fall... this can tell you when to add a bit more juice as time goes by. Klux is 1:1 proportional, so a 10% drop in klux is a 10% drop in photon output of that light. This sort of tool is also handy when deciding on hanging distance. How much of a proportional difference do you see from center readingsn to corners/sides? That is the percent-difference in PPF too, even if you don't know that value or don't have a quantum meter. Don't pay 500 usd for a quantum meter, lol. You can shave down the learning curve just as easily with a free app and a little math comprehension. knowing the exact PPF of any single location measurement doesn't really matter. You don't know the target "maximum" without trial and error because Temp, RH and ambient CO2 all impact what that number is... it is a floating value based on those variables. Observe and adjust is necessary regardless of whichever advice you take. There is no one-size fits all answer. Less than full power -- Can reduce power significantly, reduce distance from plants and cover a much smaller area, if needed for seedlings and small vege plants. Better to buy a smaller light to handle that stuff as the size of the frame is a bit of a limit here as far as saving watts covering a much smaller footprint of plants. Probably won't be using this light with seedlings... but again, here is where a lux metere can help, if you have hammered out how to use it for the full power vege or flower contexts above. If you want to give a seedling 50% of that, you'll want the power and distance to refelct a 50% klux reading. i find seedlings want near-max light within 48 hours. If i don't I get a shit-ton of stretch, so not sure how people get away with much lower values than that... again, no matter what the suggestion, the reatilty of the plant infront of you is the most important thing to pay attention to. Growth pattern will tell you if it's happy with the light intensity, and that happiness will automatically consider all the various factors involved - temp, rh, co2. If you get a healthy node spacing, you know it's as much as the plant can handle without damage. How much the plant can handle can vary by seasons, even indoors. Less ideal VPD in winter will result in a much lower max DLI that you can provide without damge, e.g. The more tightly you control your climate, the more consistent this will be throughout the year.
likes
Complain
Green_claws
Green_clawsanswered grow question 3d ago
​What You’re Crushing Right Now 🚀 ​First off, credit where it’s due: your proactive approach to environment control is exactly what separates the pros from the hobbyists. Most people wait until their plants are stretching or bleaching to ask these questions, but you’re getting ahead of the curve. That attention to detail is the foundation of a massive harvest. ​The Potential Pitfalls & The Pro Fixes 💡 ​Even with the best hardware, a few inches can be the difference between a "record yield" and "crispy leaves." Here is the breakdown of what usually goes wrong and how we’re going to master it: ​The Problem: Light Stress & Bleaching ☀️ ​The Symptom: If your lights are too close, the top leaves will turn white or yellow (often mistaken for a nutrient deficiency), even if the temperature is fine. ​The Fix: Increase the distance immediately. For high-intensity LEDs, maintain at least 18–24 inches during the vegetative stage and 12–18 inches during flower. ​The Problem: Node Stretching (The "Leggy" Plant) 🦒 ​The Symptom: If the light is too far away or the intensity is too low, the plant "stretches" to find the sun, resulting in weak stems and sparse yields. ​The Fix: Lower the light or turn up the dimmer. You want your internodal spacing (the gap between leaves) to be tight and stacked. ​The Problem: Heat Sink Issues 🌡️ ​The Symptom: Poor airflow around the light fixture causes the diodes to run hot, shortening their lifespan and cooking the tent air. ​The Fix: Ensure you have a dedicated oscillating fan blowing between the light and the canopy. This breaks up the "heat pocket" and allows you to keep the lights slightly closer for maximum penetration. ​How to Stay Ahead of the Game 🏆 ​To avoid these issues entirely, you need to stop guessing and start measuring. Here is my "knowledge-rich" cheat sheet for you: ​Use a Lux Meter or PAR App: Download a PAR meter app on your phone. It’s not as perfect as a 0 sensor, but it gives you a baseline. Aim for 300–500 μmol/m²/s for veg and 600–900 μmol/m²/s for flower. ​The "Hand Test": If you don't have a meter, place the back of your hand at the top of the plant canopy. If it feels uncomfortably warm to you after 30 seconds, it is definitely too hot for the plants. ​The 10% Rule: When adjusting settings, never jump from 50% power to 100% overnight. Increase intensity by 10% every few days to let the plant’s "cellular machinery" adapt to the increased energy.
likes
Complain
5
Week 5. Vegetation
3d ago
33.02 cm
Height
18 hrs
Light Schedule
24 °C
Day Air Temp
6.0
pH
Weak
Smell
55 %
Air Humidity
24 °C
Solution Temp
20 °C
Substrate Temp
20 °C
Night Air Temp
26.5 liters
Pot Size
99.06 cm
Lamp Distance
Nutrients 2
Cal-Mag Plus  - Botanicare
Cal-Mag Plus
0.793 mll
Pure Blend Pro Grow  - Botanicare
Pure Blend Pro Grow
5.283 mll
NugNut Starting to look happy. Bumped light to setting 4.5. Got the Photone App and PAR is 420 at canopy.
1 like
1 comment
Share
Used techniques
LST
Technique
Grow Questions
NugNut
NugNutstarted grow question 2d ago
Think I have a low PH issue. Have a digital probe that says @ 5 near bottom of pot and @ 8 near top where dry. Coast of Maine soil stays wet long time this grow. It also looks and feels different than previously. What best to raise ph in this soil if probe is somewhat accurate
Open
likes
Answer
JUNGLE_B4RNS
JUNGLE_B4RNSanswered grow question 21h ago
Is it the kind of probe with 2 longs copper nails where you can switch from Humidity to pH that cost around 30 bucks ? 😊 Or did you really get a serious probe costing around 500 bucks ? One or another, this isn’t really a big deal, I have issues with my soil , just have a look on my last diary, seeds started to grow in a soil at pH 3.5-3.8 and plants are now growing at pH 4.5-4.8 And finally, just look at your plants, they are healthy
likes
Complain
AsNoriu
AsNoriuanswered grow question 1d ago
First you strip plants heavily and expect that they will drink same or even more after that .... Second , your light too weak, by week 5 branches should be way thicker. Third, most probably you have cheap worthless soil meter for 5$ and expect it to do work of 300-400$ probe ... that meter shows milk fat better than ph of soil. Create watering rhythm, lift pots to understand when to water. Review lights and feeding too ...
likes
Complain
00110001001001111O
00110001001001111Oanswered grow question 1d ago
add more perlite or vermiculite if staying wet too long ... a 'soil' should have roughly 50% of volume be some sort fo drainage amenment. I like vermiculite becuase it adds some plant-avaialble silica over time. Add to whatever comes in it to get to 50% of volume... it may require more frequent irrigation, but the roots will be happier. Also, it dilutes the nutrition content per volume so expect to fertilize a bit sooner than normal too.
likes
Complain

Login

1 comment
Sort by
popularity
popularity
newest
oldest
UnorthadoxDude
UnorthadoxDude commentedweek 51d ago
Looking nice here in week 5, good colour! Thanks for running the diary and welcome to the community!
Enjoying this diary? Follow for more updates!
NugNutNugNut
Follow Author
OR
NugNut HutNugNut Hut
Follow Diary
Prefer the old Diary view?
Go back to the old Diary view