Green_Claws 🗓️ Germination: The "F025" Files 📂🕵️♂️
Status: The journey begins! A massive thank you to SSSC (Super Sativa Seed Club) and Dutch Passion for the opportunity to run this coded tester. 🤝💎 There’s no official description for F025, but the temporary name alone has me buzzing: "The White Sweet Candy OG One." 🍭❄️⛽
🌱 The Launch: 3 Days from Soak
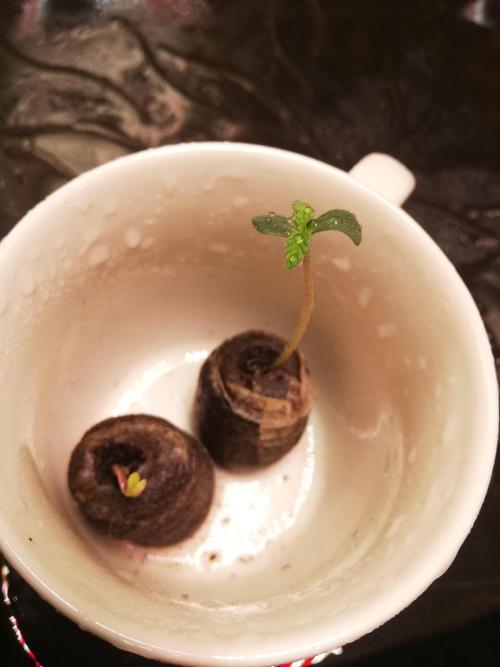
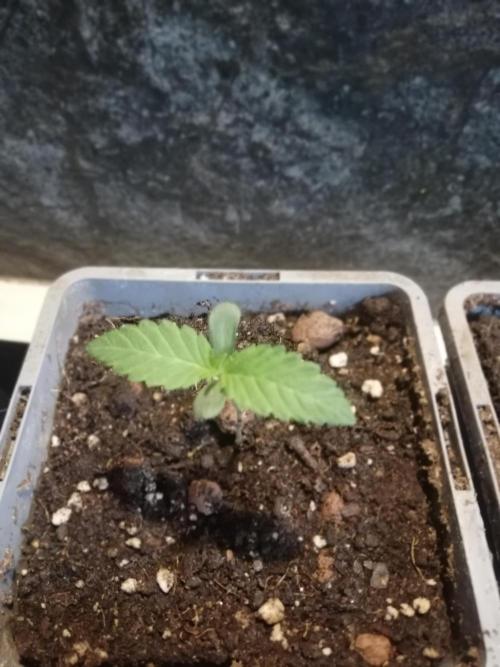
The Start: I officially dropped the seeds into a soak 3 days ago. 💧
The Result: We have lift-off! 🚀 As you can see in the photos, the taproots are out and they are hungry for the soil. The vigor on these Dutch Passion genetics is already showing—clean, fast, and strong. ⚡
The Plan: Today, they hit the starter pots. We’re going to see exactly what this "White Sweet Candy" is all about. 🍬🍬
The Strategy: Organic Mystery
The Goal: Since I don’t have a map for this strain, I’m going to use my signature Organic "Melt" Method to see how she responds. 🌋
The Focus: I’ll be watching for that "White" frosting (Trichome density) and that "Sweet Candy" nose as soon as she hits veg. Is it a gassy OG with a sugar coating? Or a candy strain with an OG frame? Time will tell! 🕵️♂️🔍
🌿 The Outlook
The "Stick Broccoli" and "Grandpa Zombie" are doing their thing in flower, but all eyes are now on this F025 baby. 👶✨ Let’s see if we can push these Dutch Passion testers to their absolute limit. 📈🏆
💡 Reader Pro-Tip: The "Tester" Mindset 🕵️♂️📝
The Hint: When growing a coded strain like F025, your diary is more than just a log—it’s data! 📊
The Secret: Because there’s no "official" description, we look for Genetic Markers.
Action Item: This week, watch the Cotyledons (the first round leaves) and the first set of True Leaves. 🍃 If they are fat and wide, we’re looking at an Indica-leaning OG. If they are serrated and thin, the "Sweet Candy" might bring some Sativa energy to the party. I'm document everything! 🖊️📸
Thanks for dropping by.. ✌️💚 Grow on...
31 likes
6 comments
Share
1
Week 1. Vegetation
4mo ago
1/6
4 cm
Height
18 hrs
Light Schedule
23 °C
Day Air Temp
No Smell
Smell
60 %
Air Humidity
18 °C
Night Air Temp
1 l
Pot Size
40 cm
Lamp Distance
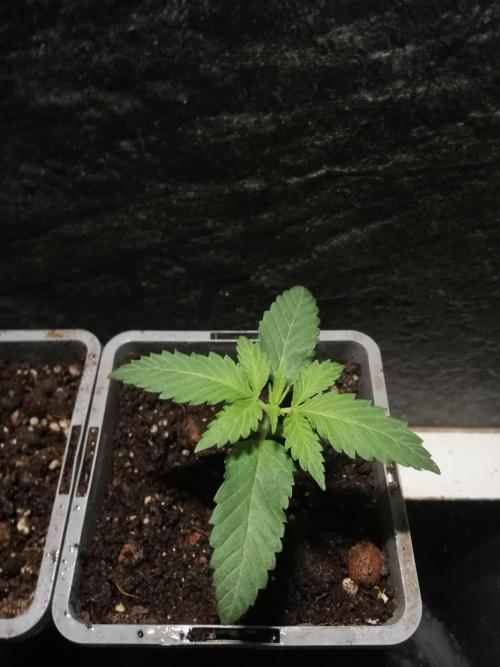
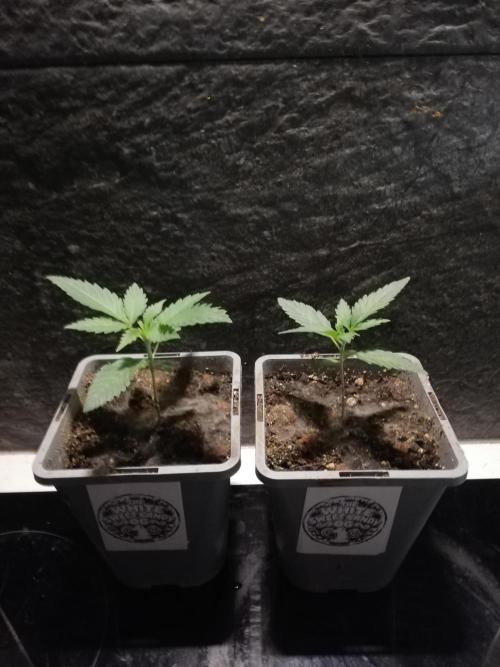
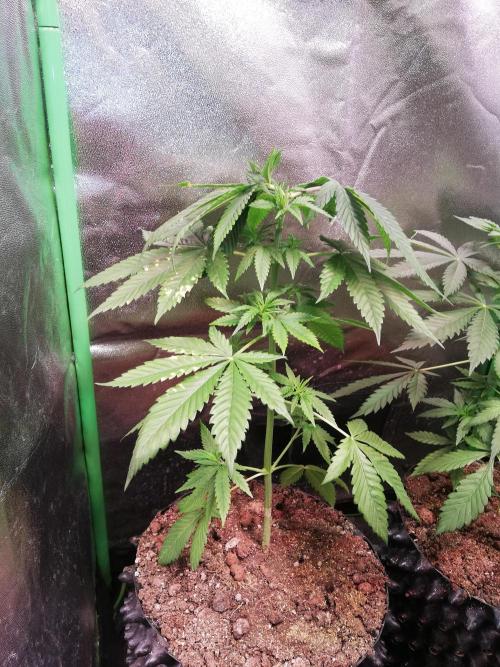
Green_Claws 🗓️ Week 1 (Veg): F025 — The "White Sweet Candy OG" Breaks Ground 🌱🔎
Status: Germination is officially over, and we are on Week 1 of Veg! 🏁Again a massive shoutout to SSSC / Dutch Passion for letting me run this coded F025 tester. We only have the temporary name—"The White Sweet Candy OG One"—so the forensic pheno-hunt begins right now. 🕵️♂️🍬⛽
🌱 Observations: The First True Leaves
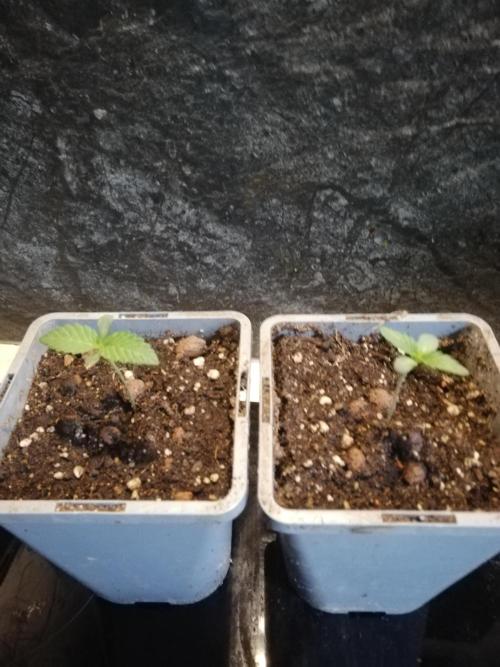
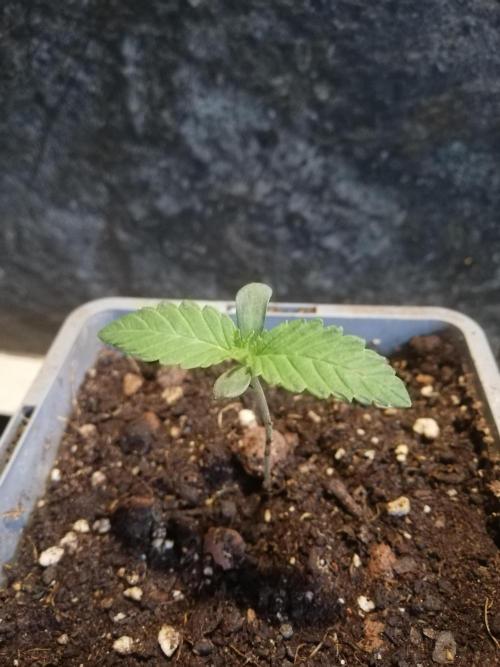
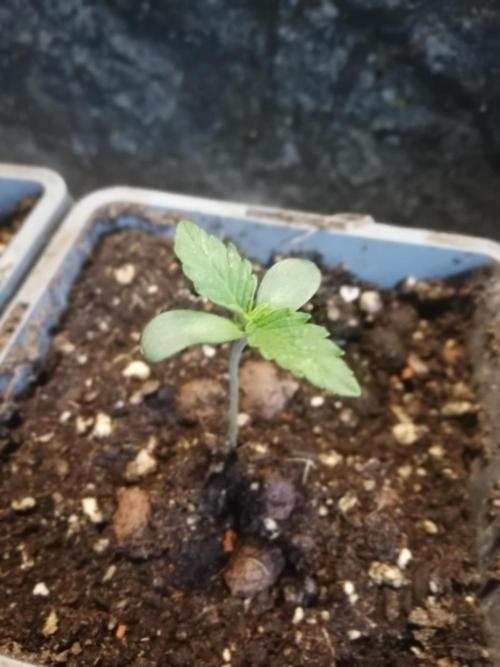
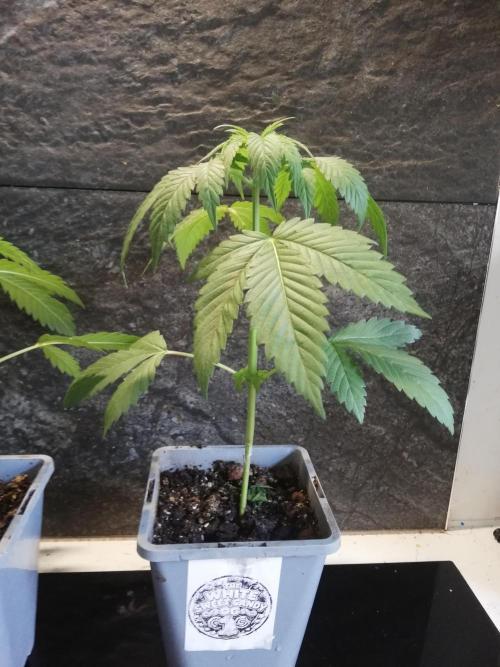
The Structure: Looking at the photos, the girls have broken ground beautifully. ☀️ The stems are short, sturdy, and standing straight up—no lanky stretching here, which means the light intensity is dialed in perfectly. 📏
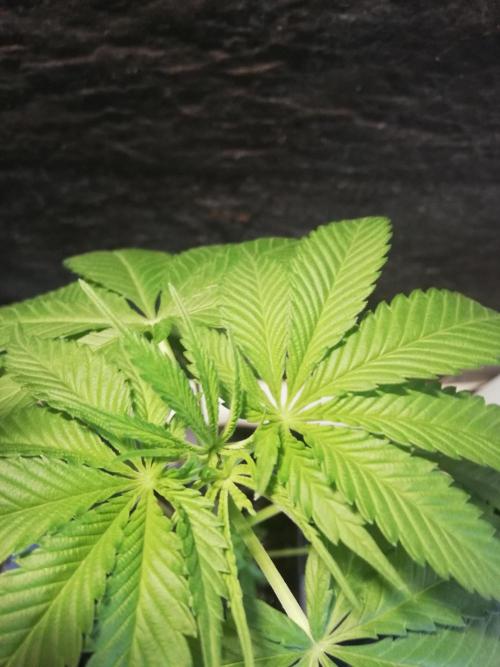
The Leaves: The cotyledons (the round starter leaves) are a rich, healthy green. But more importantly, the first set of true serrated leaves has unfurled! 🍃 They are looking quite broad and fat right out of the gate, which is an early hint pointing toward that heavy OG/Indica lineage.
The Soil: They are settled into their starter pots. You can see the organic mix with some clay pebbles (hydroton) mixed in to ensure the soil stays aerated and draining well while these fragile taproots establish themselves. ?💧
🥗 Early Stage Care
The Feed: Absolutely zero nutrients right now. 🚫 Just plain, de-chlorinated water (and maybe a tiny drop of LABS to keep the biology awake). 💧 The seed contains all the energy the plant needs for these first few days.
The Environment: Keeping the humidity high in the tent so they can pull moisture through those tiny new leaves while the root system builds out beneath the soil. 🌊🌡️
🌿 The Outlook
The vigor on these Dutch Passion genetics is obvious. 🚀 They didn't struggle to break the surface, and they are already praying to the light. I can’t wait to see what kind of structure these build over the next few weeks. Will the "Candy" bring out some wild colors, or will the "White OG" dominate with thick, frosty stems? Let’s see what we can do with these...
💡 Reader Pro-Tip: The "True Leaf" Milestone 🏁🍃
The Hint: When does a seedling actually become a "vegging" plant? 🤔
The Secret: The clock for Week 1 Veg doesn't start when the seed pops out of the dirt! It starts when the first set of True Leaves (the ones with serrated edges) fully open. 🌿 Up until that point, the plant is surviving entirely on the energy stored inside the seed casing.
Action Item: During this first week, your biggest enemy is overwatering. Let the top layer of that starter pot dry out slightly before watering again. This forces the taproot to "search" for water, creating a massive, healthy root system for your organic run! 📉🚰..
Thanks for dropping by.. ✌️💚 Grow on..
22 likes
2 comments
Share
2
Week 2. Vegetation
4mo ago
1/8
4 cm
Height
18 hrs
Light Schedule
23 °C
Day Air Temp
No Smell
Smell
60 %
Air Humidity
18 °C
Night Air Temp
1 l
Pot Size
40 cm
Lamp Distance
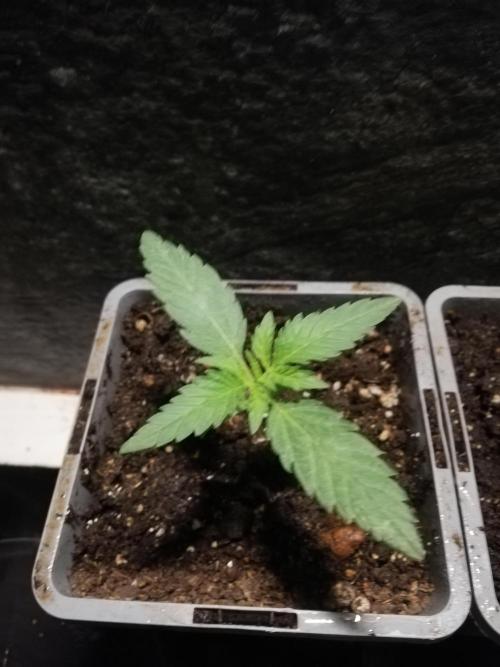
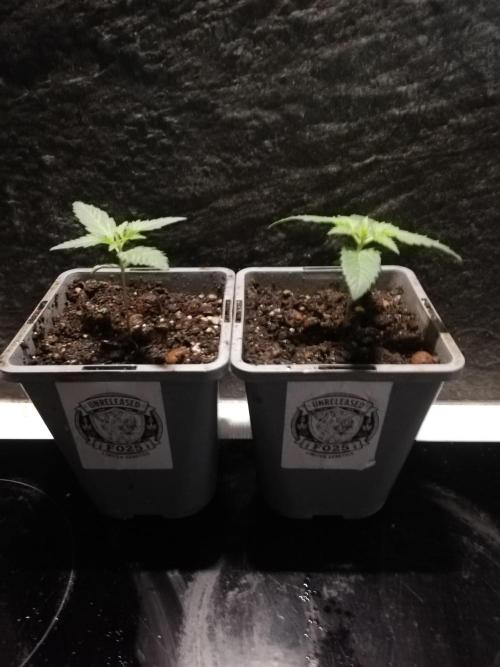
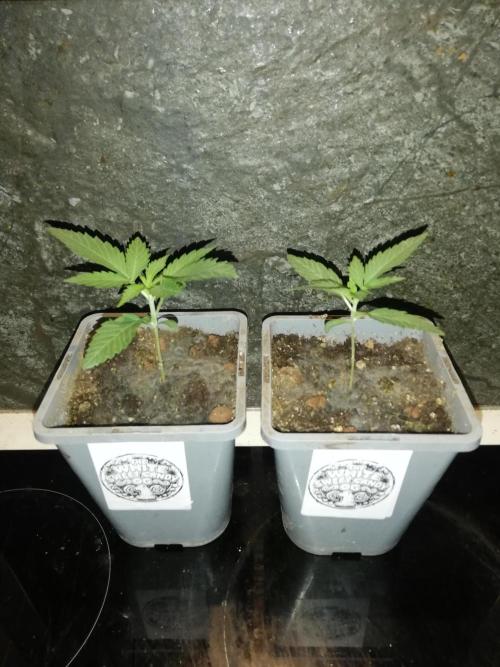
Green_Claws 🗓️ Week 2 (Veg): F025 Testers — The Pheno Hunt Begins! 🔍
*EDITED MID WEEK*
Added last 3 pictures midweek, can also see the fuzz on the top soil from Alfalfa and mycorrhizal that I have mixed together to make 100X the amount of mycorrhizal innoculant than originally having..
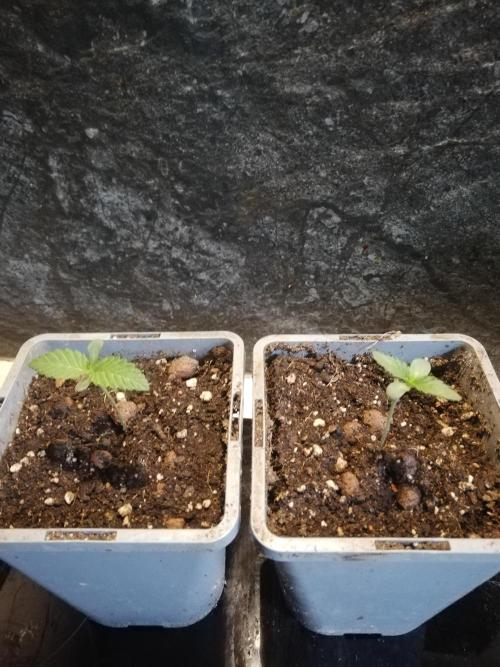
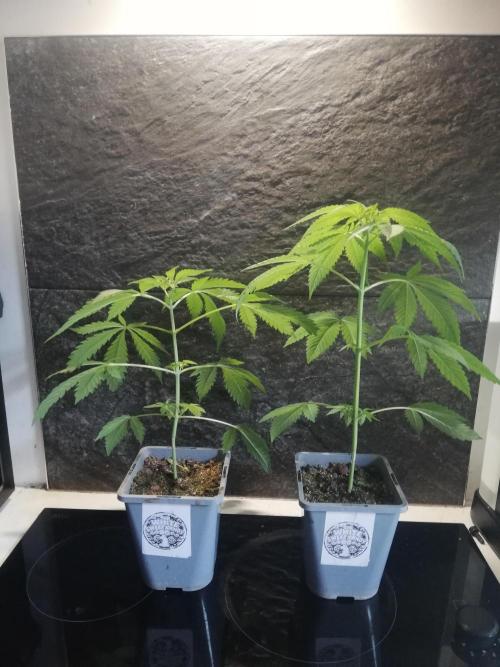
Status: The F025 unreleased testers are officially cruising through Week 2 of Veg! We have two distinct survivors locked in their starter pots, and so far, it has been completely smooth sailing with zero problems.
📏 Structure & Phenotype Expressions
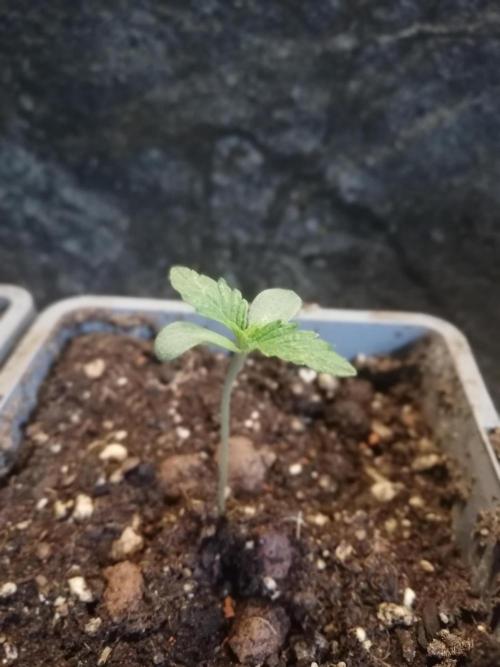
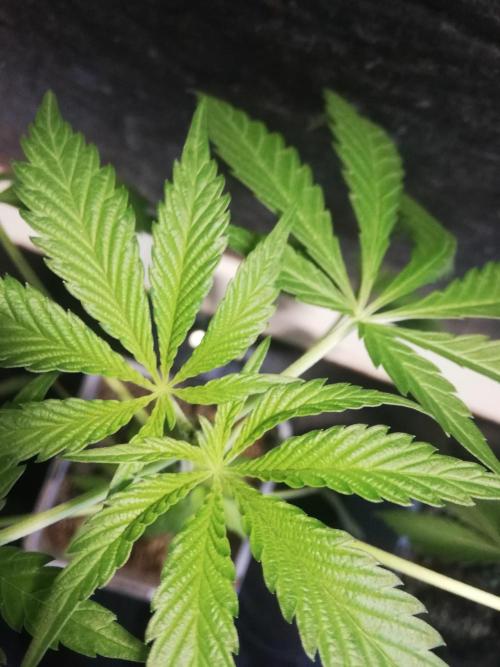
The Leaves: Both seedlings are currently pushing out their very first set of true "3-leafers" (three-fingered leaves), but they are already showing two completely different genetic expressions! 👯♀️
Pheno #1 (The Broadleaf): One seedling is staying short and squat, throwing out wide, fat leaves that point toward a heavy Indica structure.
Pheno #2 (The Narrowleaf): The second plant is showing a bit more stretch, displaying much longer, thinner leaflets. This early variation is exactly what makes testing unreleased genetics so exciting—we get to see the full spectrum of the parents! 🔬
💧 Feed & Soil Maintenance
The Top-Dress: To kickstart their vegetative growth, I gave both pots a light top-dress of Alfalfa Meal and Mycorrhizal Fungi. 🌾🍄
The Watering: I watered that dry amendment straight into the medium using the standard
protocol: plain water mixed with our staple Potassium Humate. 🌊🌋 The humate acts as the catalyst, ensuring the nitrogen and trace minerals from the alfalfa become instantly bio-available as the water hits the root zone.
💡Reader Pro-Tip: The Mycorrhizal Connection🍄🤝
The Hint: Why add Mycorrhizal fungi so early when the plant barely has any roots? 🤔
The Secret: Mycorrhizae are beneficial fungi that physically attach to the plant's root system. They act like a massive, microscopic extension of the roots, reaching deep into the soil to mine for water and Phosphorus that the baby plant couldn't reach on its own.
Action Item: Always introduce Mycorrhizae as early as possible (like during transplanting or early veg top-dresses). The sooner that fungal network connects to your seedling, the faster it will explode with aggressive vegetative growth! 📈🌱.
Thanks for dropping by, much love ✌️💚
Grow on
23 likes
2 comments
Share
4
Week 4. Vegetation
3mo ago
1/3
28 cm
Height
18 hrs
Light Schedule
23 °C
Day Air Temp
No Smell
Smell
60 %
Air Humidity
18 °C
Night Air Temp
1 l
Pot Size
40 cm
Lamp Distance
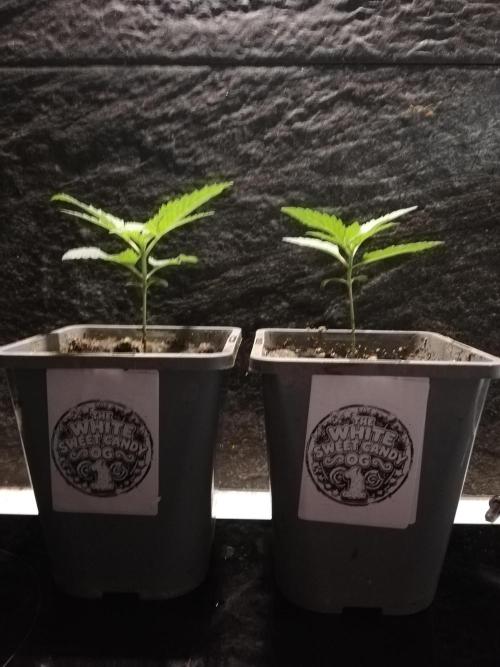
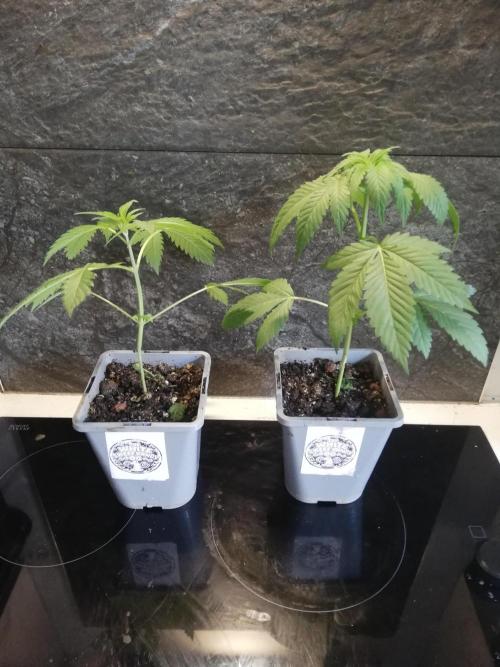
Green_Claws 🗓️ Week 4 (Veg): White Sweet Candy OG — The Windowsill Retrospective 🍭☀️
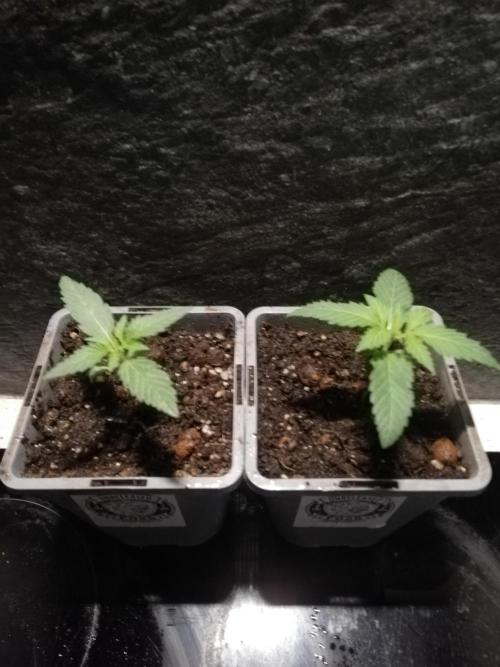
The Data Dump: We’re two weeks deep into the current cycle, and the White Sweet Candy OG has been quietly building metabolic momentum. Despite the variable conditions of an ambient solar environment (the windowsill phase), the plants are showing high-level stability. We’re officially wrapping up the "nursery" stage and prepping for a major strategic pivot.
Morphological Breakdown: Stability vs. Stature
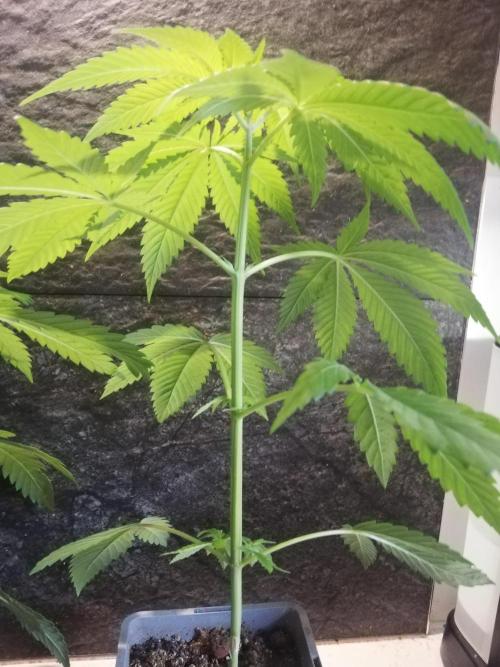
Phenotypic Consistency: Aside from a variance in verticality, these specimens are virtually clones in their expression. We’re seeing a high degree of morphological homogeneity—the serration patterns, vascular architecture, and chlorophyll density are locked in. This is a sign of solid genetics.
The "Phototropic" Stretch: If you’re looking at the height difference, don’t mistake it for a different pheno. What we’re seeing is a textbook phototropic response. One specimen has been more aggressive in its search for photons, leading to increased internodal elongation.
Turgor Status: Both plants are maintaining optimal hydraulic pressure. The leaves are rigid and productive, proving the root systems are effectively mining the current substrate.
The Botanical Bio-Hack: Alfalfa & Humates
We aren’t just "watering" these plants; we’re optimizing the Rhizosphere for the heavy work ahead.
Triacontanol Surge (Alfalfa): By top-dressing with alfalfa, we’ve introduced a powerful growth regulator. Triacontanol is essentially a natural performance enhancer—it triggers an increase in CO₂ assimilation and enzyme activity, making sure the plants capitalize on every bit of windowsill light they can get.
The Humate Bridge: Potassium Humate has been our primary tool for maximizing Cation Exchange Capacity (CEC). It’s the "glue" that keeps the rhizosphere buffered and ensures the minerals released by the alfalfa are immediately bioavailable.
🚀 The Strategic Pivot: Up-Potting & Power Up
The plants have officially outgrown their "ambient solar" phase. To keep the growth velocity from stalling, we are initiating a total environmental shift.
Rhizosphere Expansion: We are moving into larger containers to prevent the specimens from becoming root-bound. A larger root volume = a larger final canopy.
Environmental Upgrade: Moving from the window to a dedicated tent means a massive jump in PPFD (Light Intensity) and a more precise Vapor Pressure Deficit (VPD).
The Goal: We’re moving from "surviving" on the windowsill to "thriving" under the LEDs. Watch for a total explosion in biomass over the next 7 days.
💧 The Feed Log (The Minimalist Protocol)
Base: De-chlorinated H2O.
Conditioner: Potassium Humate (Carbon-loading the medium).
Amendment: Alfalfa (Phytohormonal catalyst)
Thanks for dropping by ✌️💚
19 likes
6 comments
Share
5
Week 5. Vegetation
3mo ago
1/5
35 cm
Height
18 hrs
Light Schedule
25 °C
Day Air Temp
No Smell
Smell
60 %
Air Humidity
18 °C
Night Air Temp
1 l
Pot Size
40 cm
Lamp Distance
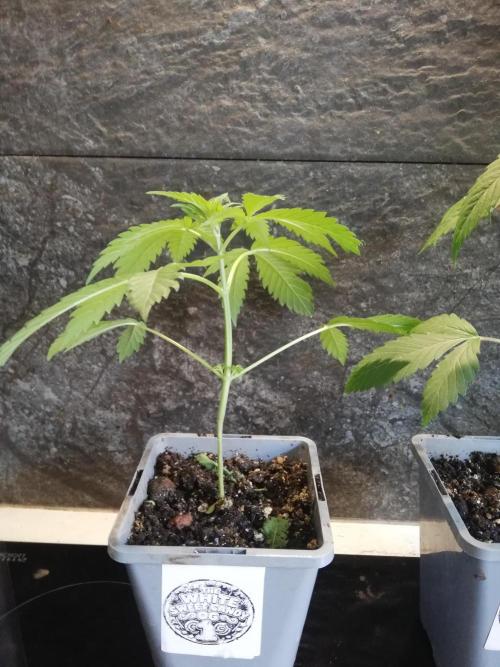
Green_Claws 🗓️ Week 5 Veg: The White Sweet Candy OG One — The Strategic Transition 🌱
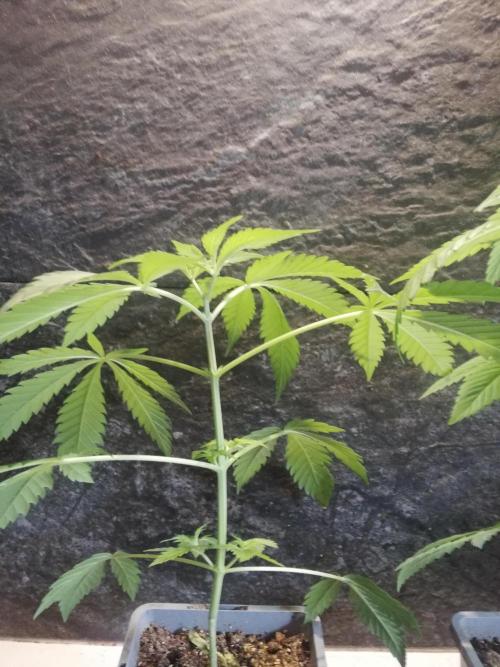
Status: there looking fantastic and holding steady on the windowsill. After topping her two days ago, I’m giving her this short window of rest to ensure she’s fully recovered before moving her out of the 1-liter pot.
📏 Structure & Canopy
Growth: The topping has been successful, apical dominance is broken, and she is starting to redirect her energy to those lower nodes for a bushier structure.
Observations: Stem thickness is improving, and the foliage remains a deep, healthy green. Waiting those extra 48 hours is clearly paying off as she hasn't skipped a beat.
💧 Feed & Environment
The Feed: Building on last week’s seaweed liquid "stress-shield," I’ve top-dressed with alfalfa meal and watered it in with potassium humate for a steady nutrient release.
The Environment: Still enjoying the natural light of the windowsill, but there definitely ready for more root space in the next day or two.
💡 Reader Pro-Tip: The Pre-Stress Shield 🧠🌿
The Hint: Is there a way to "immunize" a plant against the shock of topping or transplanting?
The Secret: Seaweed/kelp contains natural cytokinins and trace minerals that act as an anti-stress tonic. By giving her a small dose before the topping and transplanting, you're essentially loading her cells with the tools she needs to repair tissue and resist environmental shock.
Action Item: Always plan your "stress prep" 5–7 days in advance. A light kelp or seaweed feed a week before training makes a world of difference in recovery speed.
The Bio-Fuel Lab: The Alfalfa-Humate Power Couple 🌿
Status: We are utilizing a potent organic combination to fuel the post-topping recovery and prepare the microbial life for the upcoming larger pot.
🎯 The Objective
Why we need it: Alfalfa provides the growth hormone triacontanol for rapid recovery, while potassium humate chelates those nutrients, making them immediately available. The seaweed from last week provided the hormonal foundation to handle the stress.
When to use it: Perfect for the mid-veg "bridge" between training (topping) and the next growth phase (up-potting).
📋 The Ingredients
Alfalfa meal (1-2 tablespoons)
Potassium humate (liquid concentrate or powder)
1 Liter of dechlorinated water
🛠️ Step-by-Step: The Process
Step 1: The Nutritional Foundation
Apply a thin layer of alfalfa meal to the soil surface. This provides the nitrogen and hormones needed for the new shoots to explode after topping.
Step 2: The Humic Delivery
Mix the potassium humate into your water until you reach the desired "dark tea" color. This is the key to unlocking the alfalfa's potential.
Step 3: The Activation Water
Slowly water the pot, ensuring the humate solution saturates the alfalfa meal. This washes the nutrients into the root zone, priming the plant for the upcoming transplant.
💡 Reader Pro-Tip: The Hormonal Synergy
The Hint: Why use seaweed and alfalfa together in the same cycle?
The Secret: It’s all about the hormones. Seaweed is rich in cytokinins (cell division), while alfalfa is rich in triacontanol (growth signaling). When used in sequence, you aren't just feeding the plant "food"—you're giving it the instructions to grow faster and stronger.
Action Item: Don’t overdo it. Small, consistent doses of these organic inputs are much more effective than one heavy application, especially when the plant is in a smaller container like a 1-liter pot.
Thanks for stopping by ✌️💚
20 likes
8 comments
Share
6
Week 6. Vegetation
3mo ago
1/3
35 cm
Height
12 hrs
Light Schedule
25 °C
Day Air Temp
No Smell
Smell
50 %
Air Humidity
18 °C
Night Air Temp
11 l
Pot Size
0.5 l
Watering Volume
40 cm
Lamp Distance
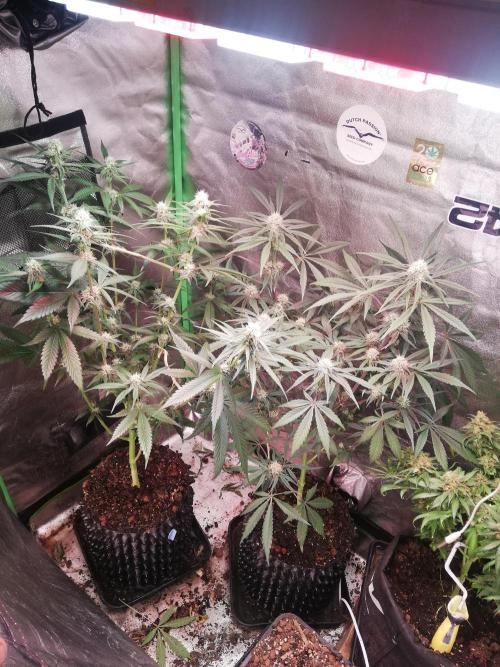
Green_Claws 🗓️ Week 6: The Flip — Big Pots, 12/12, & The Magnesium Struggle 🌱➡️🌸
Status: We’ve officially left the windowsill! The two White Sweet Candy OG girls have been up-potted and moved into their final home: the flowering tent. They’ve been under the 12/12 light cycle for 4 days now. While they are adapting to the new environment, the intense light is already putting their metabolism to the test.
📏 Structure & Canopy
The Topping: I topped them again 2 days ago to keep that canopy managed. Despite the move, they didn't skip a beat—apical dominance is gone, and the side branches are now in full motion, reaching up to fill out the new space.
Observations: They’ve exploded in size since getting more root room, but the new growth is looking a bit "bright." This light is powerful—it’s absolutely sucking the chlorophyll out of the leaves as the plants try to keep up with the increased photon count.
💧 Feed & Environment
The Environment: They’ve traded natural sunlight for the tent. The transition to 12/12 is a huge metabolic shift, and they are currently "finding their feet" in the new intensity.
The Feed: This week has been water only. I’m letting the roots settle into the fresh soil and work through the alfalfa/humate transition from last week. I’m still using my standard potassium humate in the water to keep the soil chemistry unlocked and the microbial life thriving during this move. 🌊🌋
💡 Reader Pro-Tip: The "LED Suntan" & Mg Demand 🧠🔦
The Hint: Why do leaves turn pale or show interveinal yellowing right after moving under high-intensity lights?
The Secret: High-intensity light (especially LEDs) accelerates photosynthesis so fast that the plant often can’t move Magnesium (Mg) quickly enough to keep up. Magnesium is the central atom of the chlorophyll molecule—without it, the plant can't maintain that deep green color under intense "pressure."
Action Item: When "flipping" to a powerful light, always keep an eye on the mid-to-lower leaves. If they start looking "shy" or pale between the veins, your Magnesium demand has officially peaked.
The Bio-Fuel Lab: The Magnesium Rescue Drench 🌿
Status: Seeing that slight Mg deficiency means we need to act before the stretch really kicks in. We’re going to use a simple, organic-friendly fix to get that chlorophyll production back on track.
🎯 The Objective
To provide a fast-acting, bio-available hit of Magnesium to darken those leaves and ensure the plant has the "solar panels" (chlorophyll) it needs to power through the upcoming flowering stretch.
📋 The Ingredients
Epsom Salts (Magnesium Sulfate - Unscented/Plain)
Potassium Humate (To act as the carrier/chelator)
De-chlorinated Water
🛠️ Step-by-Step: The Process
Step 1: The Dissolve
Mix 1/2 teaspoon of Epsom salts per gallon of water. Make sure it is completely dissolved. Magnesium sulfate is highly water-soluble, making it a perfect quick-fix.
Step 2: The Humic Bridge
Add your Potassium Humate to the mix. The humic acid will help "chelate" the magnesium, making it even easier for the roots to pull in and transport up to the hungry leaves.
Step 3: The Root Drench
Water the plants thoroughly with this solution. You should see the leaves start to "green up" and regain their luster within 3–5 days as the chlorophyll levels stabilize. ⏱️
💡 Reader Pro-Tip: Foliar vs. Drench 🛡️🍃
The Hint: Can I fix this faster?
The Secret: Yes. If the "chlorophyll suck" is looking severe, you can use the same Epsom salt mix (at half strength) as a foliar spray (lights off!). The leaves will absorb the Mg directly, bypassing the roots for an almost overnight green-up.
Action Item: Only spray when the lights are off or just about to go off to avoid burning the leaves under that intense light!
Thanks for stopping by ✌️💚
18 likes
comments
Share
10
Week 10. Flowering
2mo ago
1/3
35 cm
Height
12 hrs
Light Schedule
25 °C
Day Air Temp
No Smell
Smell
50 %
Air Humidity
18 °C
Night Air Temp
11 l
Pot Size
0.5 l
Watering Volume
40 cm
Lamp Distance
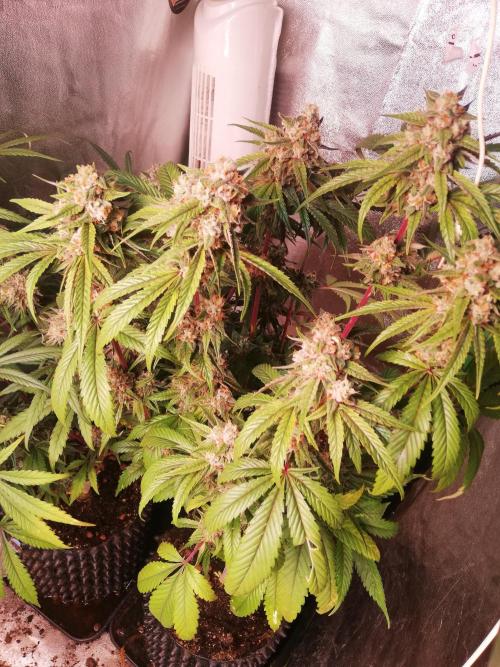
Green_Claws A lots happened in 4 weeks since the last update. Buds forming quick time
19 likes
5 comments
Share
14
Week 14. Flowering
18d ago
1/7
55 cm
Height
12 hrs
Light Schedule
25 °C
Day Air Temp
No Smell
Smell
50 %
Air Humidity
18 °C
Night Air Temp
11 l
Pot Size
0.5 l
Watering Volume
40 cm
Lamp Distance
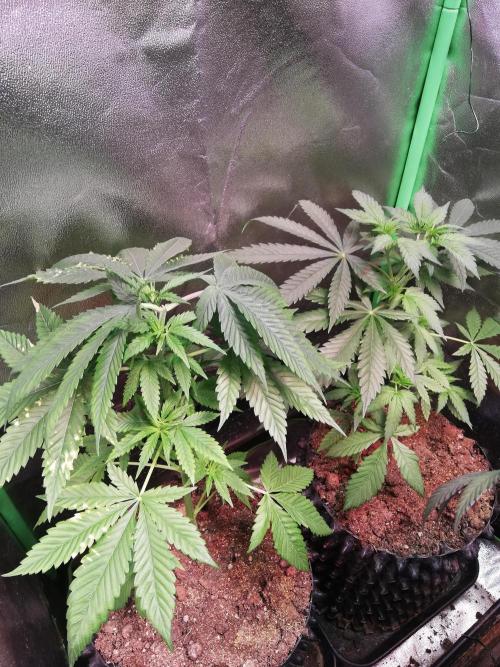
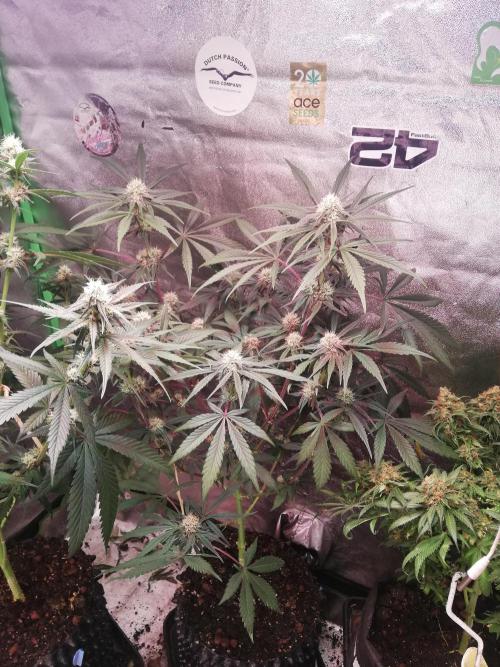
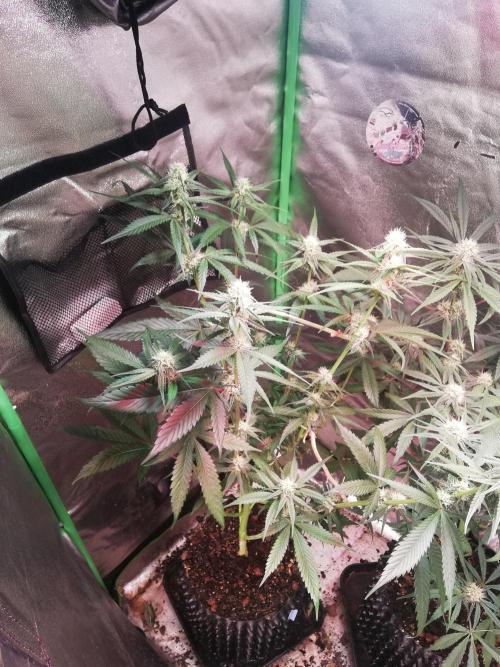
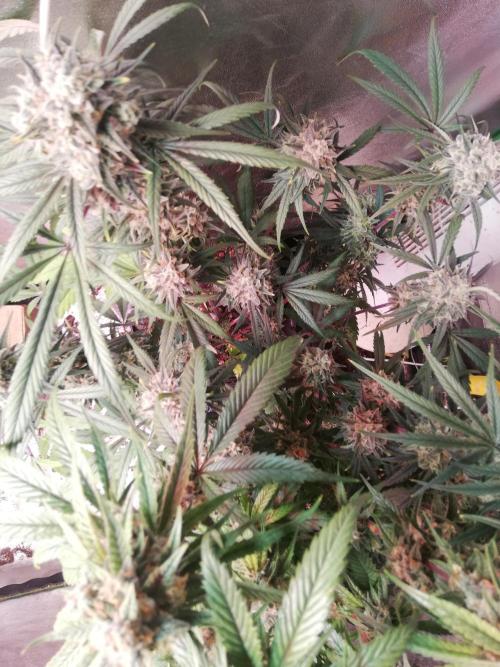
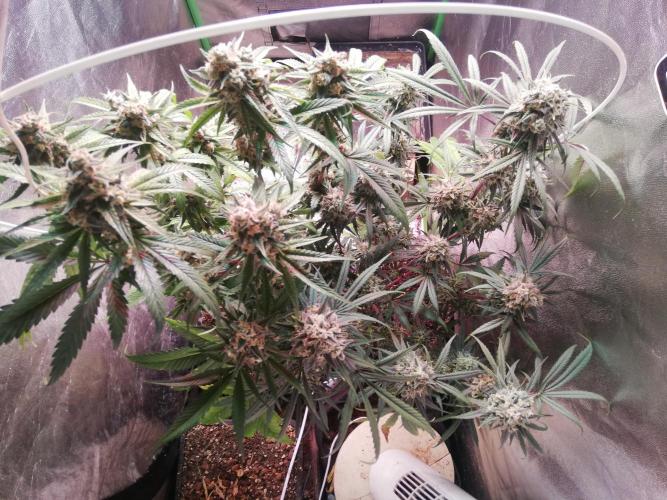
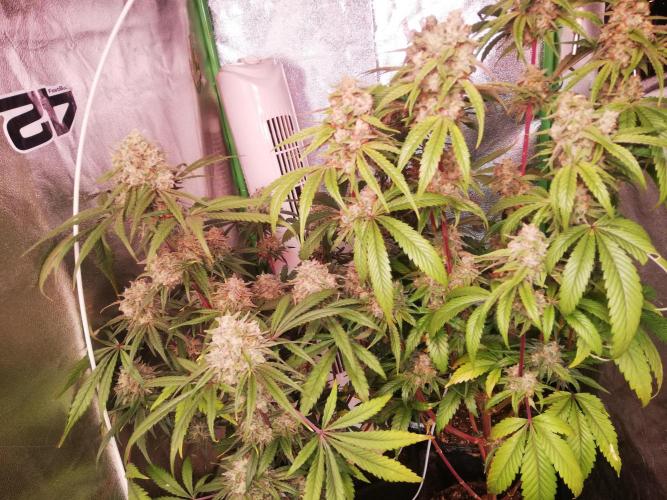
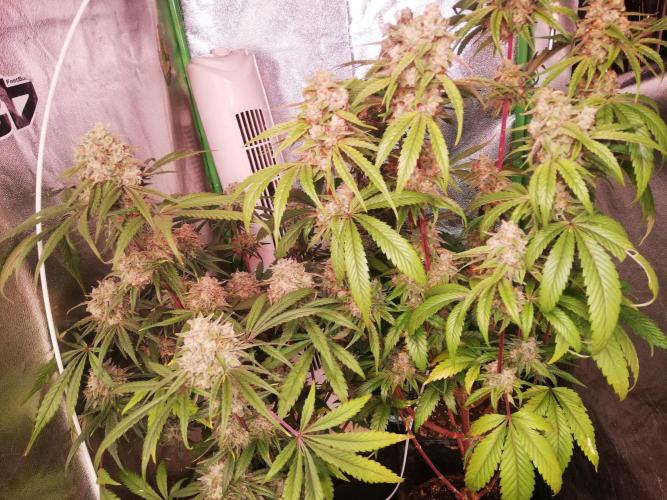
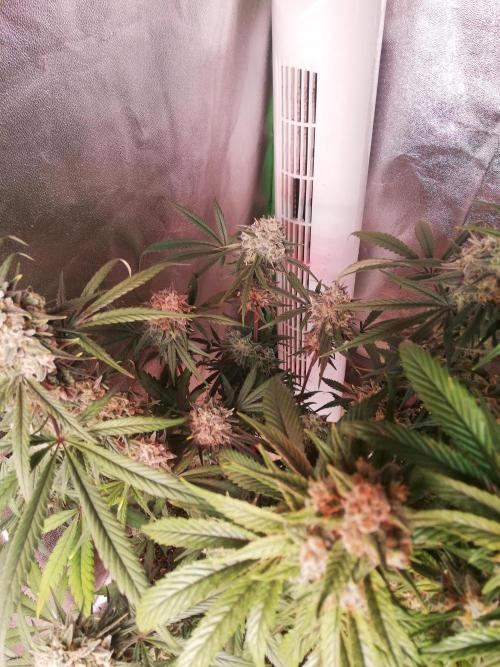
Green_Claws ❄️ Week 8: The Frost Explosion & Terpene Overload (The White Sweet Candy OG One)
It’s been four weeks since the last check-in, and the transformation in this tent is nothing short of spectacular. The ladies have officially gone into overdrive.
Walking into the room right now is a full sensory experience—the smell hitting the nostrils is absolutely immense. A heavy, rich, sugary aroma is completely filling the air, letting you know the terpene production on this candy project is operating at absolute peak capacity.
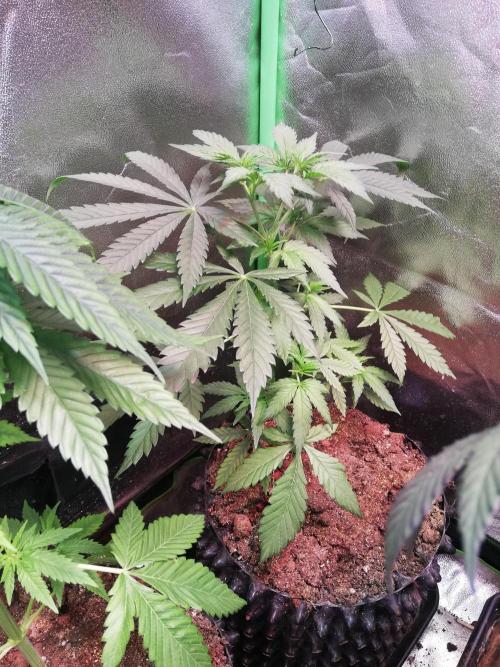
While the entire tent is thriving in their 11L Air-Pots, the lady on the left is stealing the absolute spotlight this week. The sheer development, weight, and frost coverage on her are next-level.
📸 Tent Breakdown: Visuals & Progress
Looking closely at the canopy layout, the structural payoff of our early training and organic base is fully visible:
The Left Plant (The Showstopper): Just look at the stacking on those main colas! They have swollen into dense, chunky, frost-covered clubs. True to her name, the trichome coverage is spilling heavily onto the sugar leaves, giving the upper canopy a brilliant, snow-dusted candy coating.
The Crimson Fade: A gorgeous natural feature showing up right now is the deep red and purple hues locking into the petioles and leaf stems. It’s a clear sign she’s processing her nutrients beautifully as she funnels all her remaining energy directly into bud mass.
Canopy & Support: The space is tight, but the Air-Pots have done their job perfectly. The structure is holding up these heavy, resin-loaded tops flawlessly under the fans, keeping airflow pristine right through the dense center of the canopy.
The Living Soil Payoff
Every bit of this explosive swelling and insane resin production comes down to the solid foundation we built. No chemical synthetic boosters, no artificial ripening agents—just pure biological synergy, clean organic inputs, and letting these sweet genetics do exactly what they were bred to do.
The finish line is well and truly in sight. Drop a comment, tell me what you think of that left-side stack, and stay tuned for the final swell! ✌️💚 🚀🍬❄️
@Natrona, never tried it I heard leaving the wound to air was best, never tried ointment in this way maybe an experiment in the future. Yeah bvits.. SuperThrive is jam packed.. I use jaggery in my quick over night ferments before watering in. Love makuka honey myself though
@Green_Claws, the flower time is approx 9 weeks but it's also a bit personal. If you want to experience the full effect 9 -10 weeks max and if you prefer to harvest a bit earlier the effect will be more uplifting but less stoned.