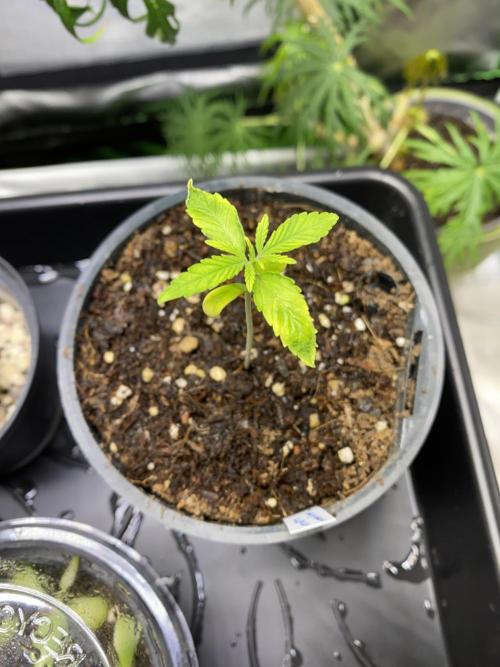
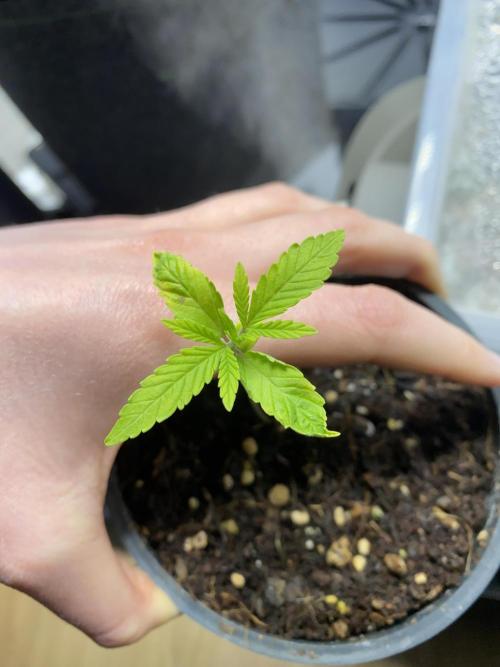
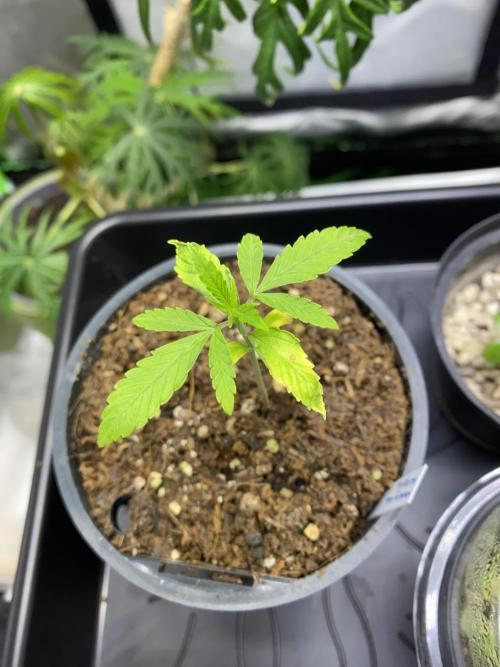
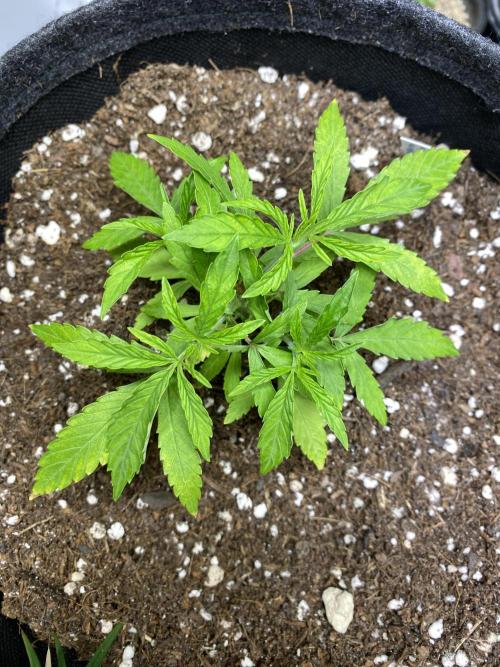
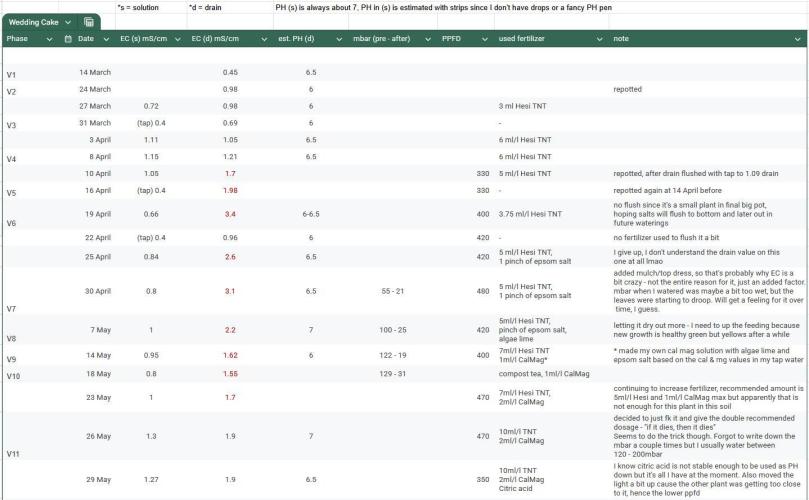
kaeba Don't have any pictures until week 2 unfortunately. Seed popped within 24 hours in the damp kitchen towel, transplanted it to the BioBizz Light Peat-Free Mix with some additional perlite. Think this is also where the stunted growth comes from, since this mix has a lot of material that leeches N... will avoid it in the next grow, but too late for this plant. Just have to be patient. Also light was too close.
2 likes
comments
Share
Used method
Paper Towel
Germination Method
1
Week 1. Vegetation
4mo ago
18 hrs
Light Schedule
25 °C
Day Air Temp
6.5
pH
No Smell
Smell
225 PPM
TDS
70 %
Air Humidity
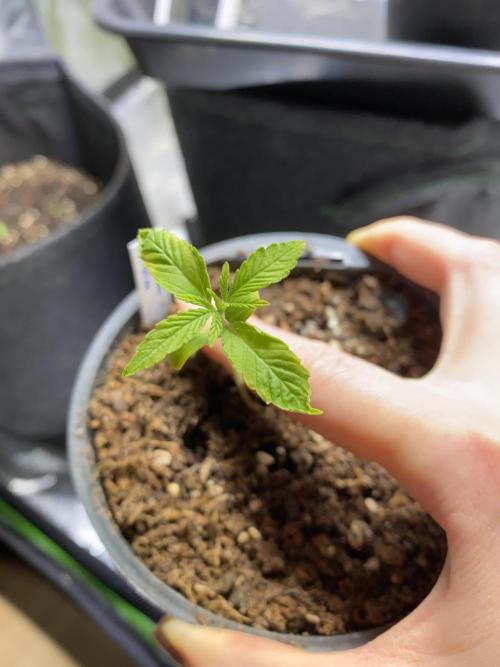
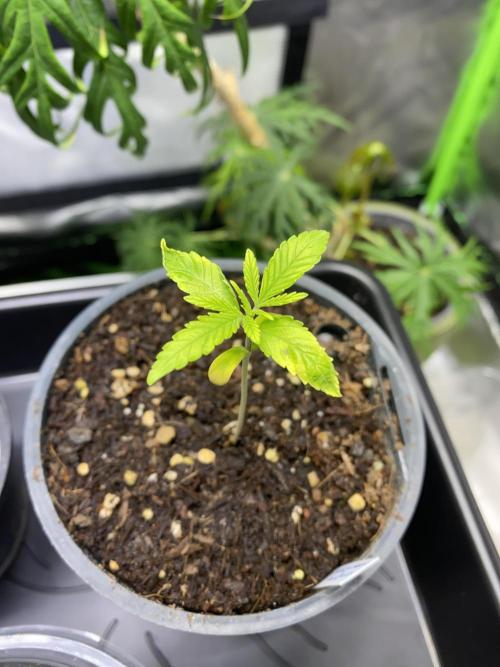
kaeba Still no pics. Light was too close to the plant, PPFD was about 250-300, but heat probably damaged leaves and made them curl up.
2 likes
comments
Share
2
Week 2. Vegetation
4mo ago
1/6
18 hrs
Light Schedule
25 °C
Day Air Temp
6.0
pH
No Smell
Smell
450 PPM
TDS
70 %
Air Humidity
Nutrients 1
TNT Complex
2 mll
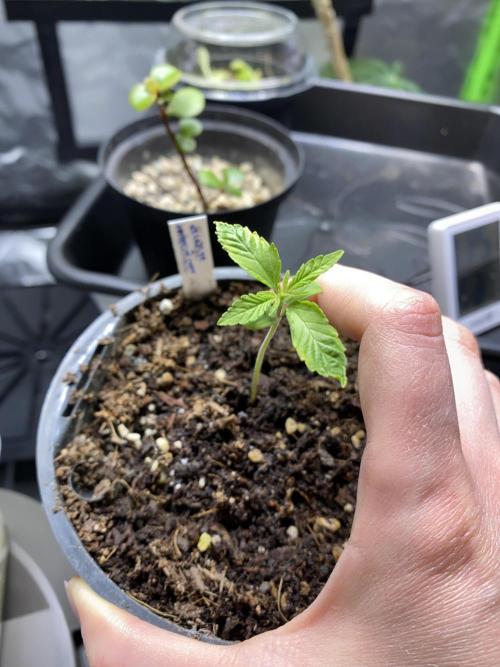
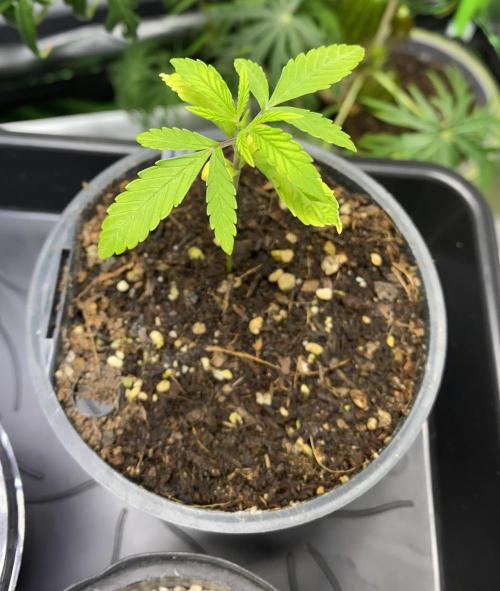
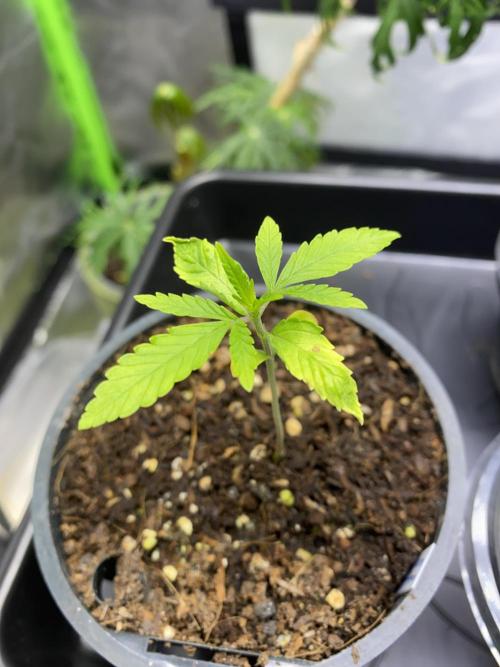
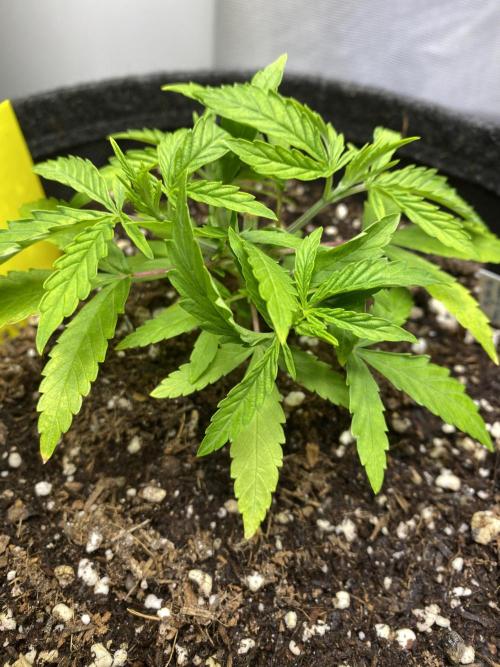
kaeba Very light leaves, visible damage. I did some light feeding since the previous grow attempt failed because the substrate had an insane EC of 4-5mS/cm (got the EC pen late, so I noticed only after they were basically dead). Flushed the medium but still careful to not fry the second attempt. Will feed more though as I notice the symptoms persisting. Guess it's the woody soil that's damaging here... lesson learned for next time.
1 like
comments
Share
3
Week 3. Vegetation
4mo ago
1/4
18 hrs
Light Schedule
25 °C
Day Air Temp
6.0
pH
No Smell
Smell
350 PPM
TDS
65 %
Air Humidity
Nutrients 1
TNT Complex
5 mll
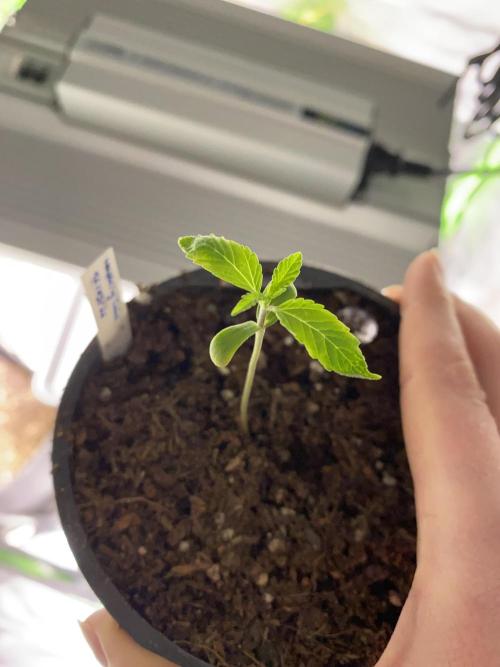
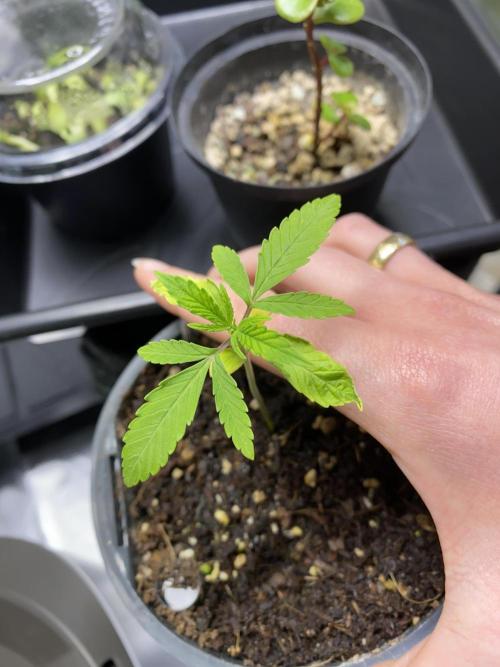
kaeba Same as last week. Will need to slowly feed more until plant is happy again.
likes
comments
Share
4
Week 4. Vegetation
3mo ago
1/3
18 hrs
Light Schedule
25 °C
Day Air Temp
6.0
pH
Weak
Smell
550 PPM
TDS
65 %
Air Humidity
40 cm
Lamp Distance
Nutrients 1
TNT Complex
5 mll
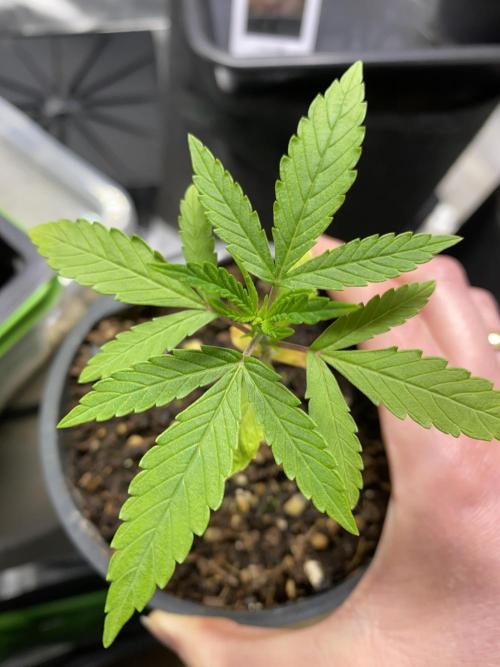
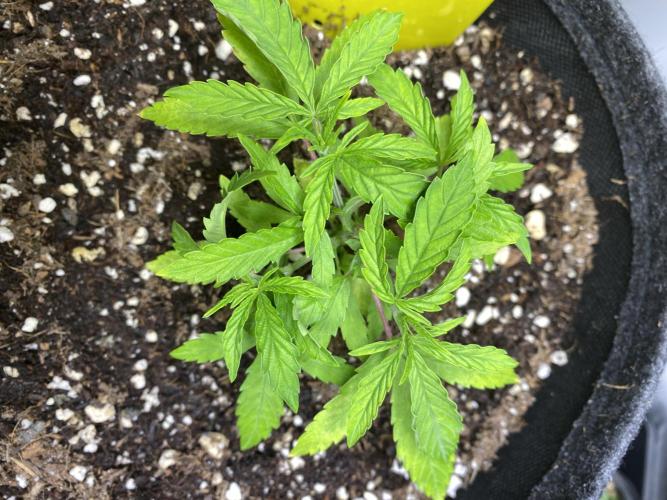
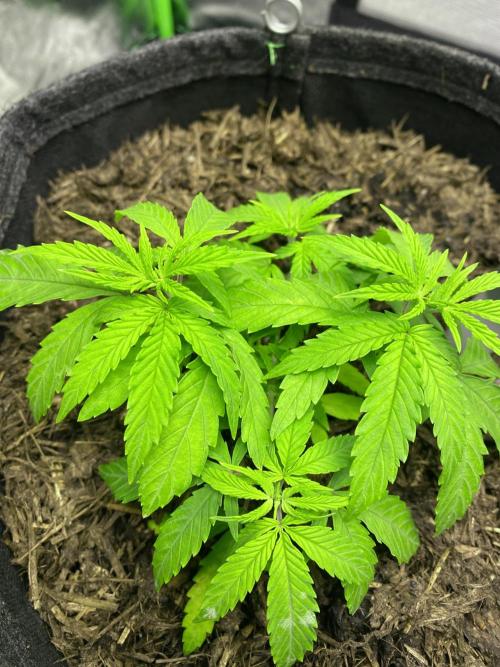
kaeba Root growth was very healthy, started poking out of the bottom after a few days. Waited a bit for roots to establish more before repotting it. First drain after repotting was 1.7mS/cm, idk what the hell is up with the soil. Flushed down to 1.1mS/cm with pure tap water.
2 likes
2 comments
Share
Used techniques
Transplantation
Technique
5
Week 5. Vegetation
3mo ago
1/3
18 hrs
Light Schedule
25 °C
Day Air Temp
6.0
pH
Weak
Smell
200 PPM
TDS
65 %
Air Humidity
40 cm
Lamp Distance
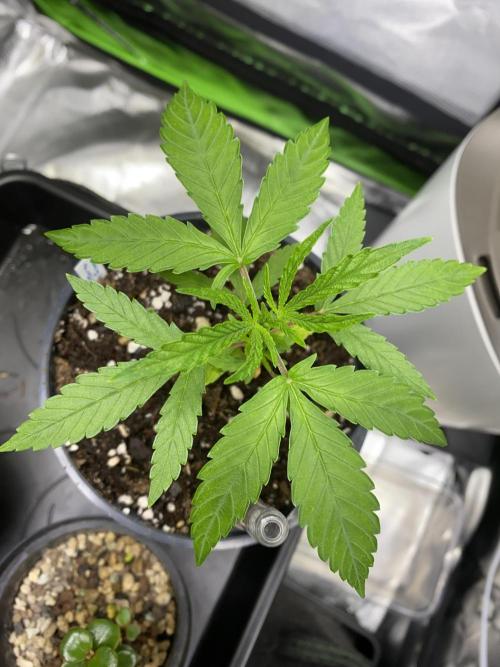
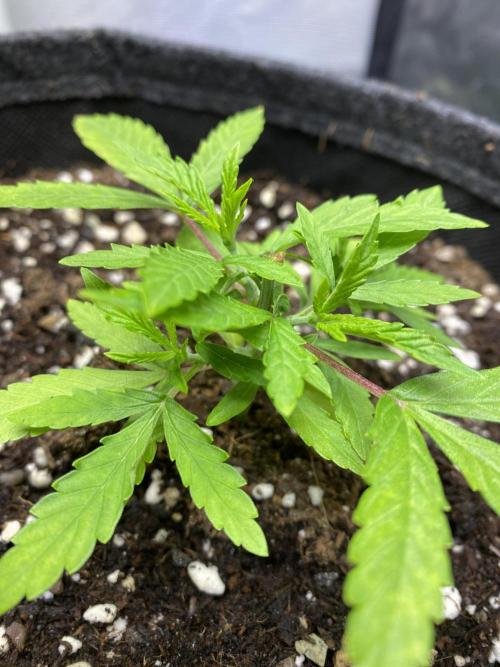
kaeba Roots poked out the bottom again a day or so after repotting. Waited a few more days and then finally repotted into the final 11L fabric pot - once again got an insane drain EC of 2mS/cm, watered only with tap water (0.4mS/cm) because I thought this would happen. (I know the pic after watering looks very spotty, but I took care to water slowly in a circle around the plant multiple times while waiting shortly in between. The water spread more evenly after the pic was taken.)
Not sure if I will use fertilizer on the next watering or wait one more time to make sure the EC goes down a bit.
Also topped it below the fourth node. Would've loved to wait longer until it was better established, but the side shoots were already starting to push. So far it's taking the chop very well, will see how it develops.
4 likes
3 comments
Share
Used techniques
Topping
Technique
Transplantation
Technique
6
Week 6. Vegetation
3mo ago
1/6
18 hrs
Light Schedule
26 °C
Day Air Temp
6.0
pH
Weak
Smell
200 PPM
TDS
65 %
Air Humidity
22 °C
Solution Temp
11 l
Pot Size
35 cm
Lamp Distance
Nutrients 1
TNT Complex
3 mll
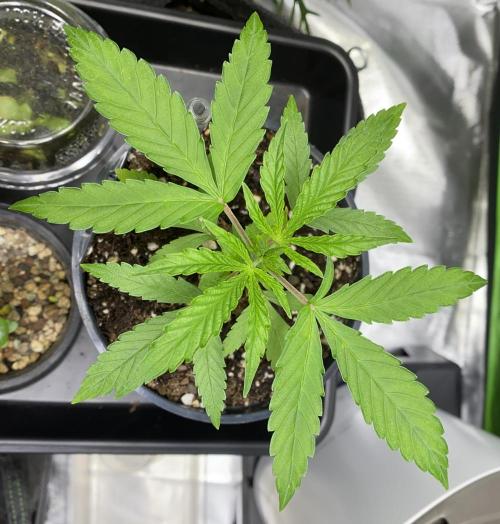
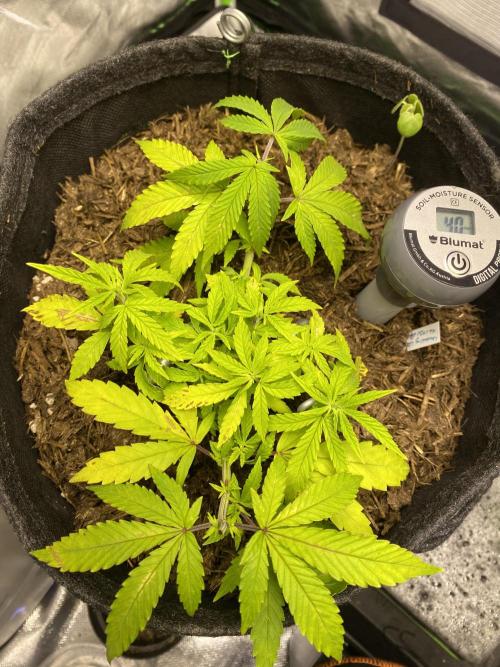
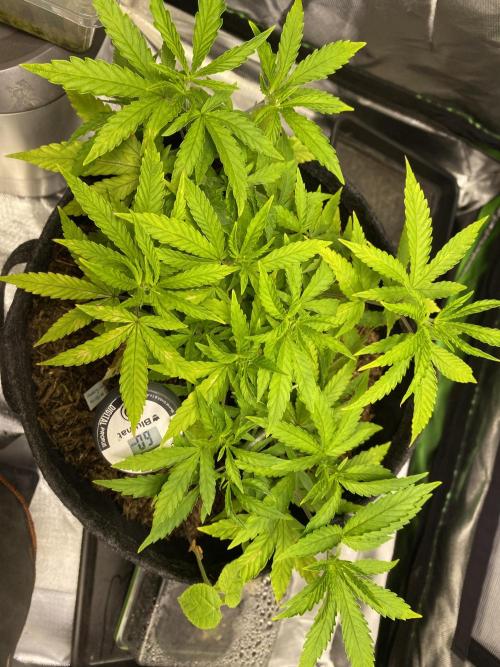
kaeba Since the first drain after repotting was insane, I was hesitant to use nutes at first. I'm seeing some light yellowing on the lower leaves though and some slight discoloration overall, so I will return to feeding again on the next water in the next couple days. So far it's growing very compact, if very slow. I'm waiting for it to get a bit stronger and more vigorous and will top the side shoots again then. The goal is to top again and again until the whole pot area is filled with side shoots :)
Note to myself: Will definitely switch to a different soil for the next attempt though, maybe even just coco and perlite. Read some Reddit post yesterday of another person having the same issues with this exact soil.
Also, there's a sudden fungus gnat infestation happening now. Had some of those yellow sticky things still here that I'm using until the nematode order arrives. Hope that'll help.
2 likes
3 comments
Share
7
Week 7. Vegetation
3mo ago
1/5
18 hrs
Light Schedule
26 °C
Day Air Temp
6.5
pH
Weak
Smell
400 PPM
TDS
65 %
Air Humidity
22 °C
Solution Temp
11 l
Pot Size
30 cm
Lamp Distance
Nutrients 2
Epsom Salt
0.5 mll
TNT Complex
5 mll
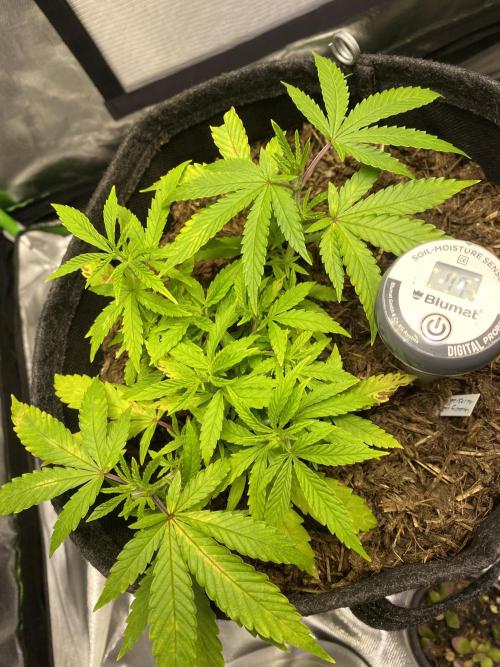
kaeba Still growing, got a tensiometer to get a feeling for watering big pots correctly. Def need to let it dry out a bit more.
Some pics appear a little yellow tinted, that's just the camera being funky with the bright LEDs. Plant is a healthy green, even if the color is a bit light, no yellow tint irl though.
Applied some mulch/top dressing made of fermented manure and straw because the top layer dried super quickly in comparison to the rest every time.
I applied a second topping on the upper branches and pinned the branches down to let in more light for the new shoots. Plan is to just let it grow more, let it fill out the space and then eventually send it into flower. It's very slow going considering the size and that it's already week 6, but whatever, I'm in no hurry. :)
2 likes
comments
Share
Used techniques
Topping
Technique
LST
Technique
8
Week 8. Vegetation
2mo ago
1/5
18 hrs
Light Schedule
26 °C
Day Air Temp
6.5
pH
Weak
Smell
500 PPM
TDS
65 %
Air Humidity
22 °C
Solution Temp
11 l
Pot Size
30 cm
Lamp Distance
Nutrients 3
Epsom Salt
0.5 mll
Algae Lime
0.5 mll
TNT Complex
5 mll
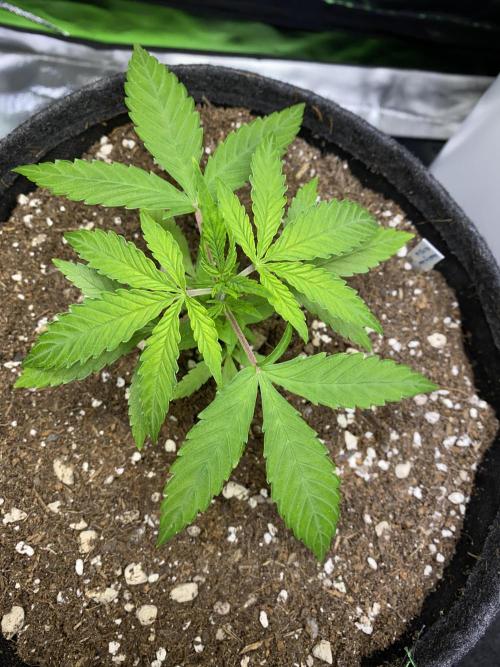
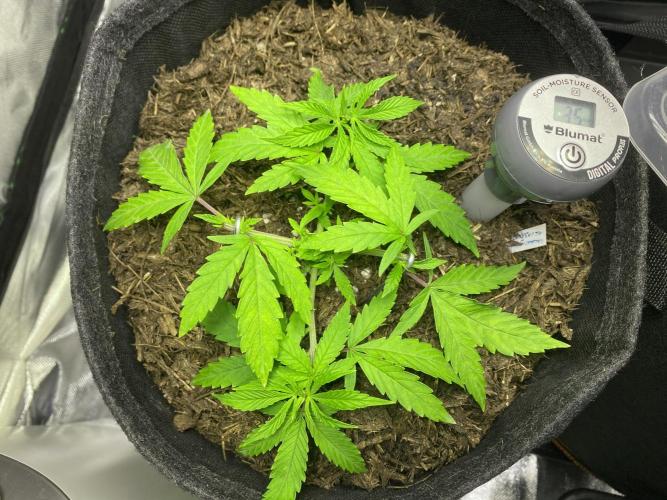
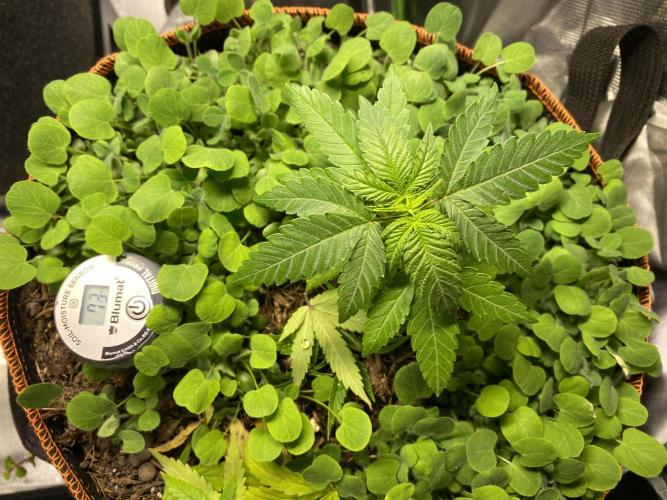
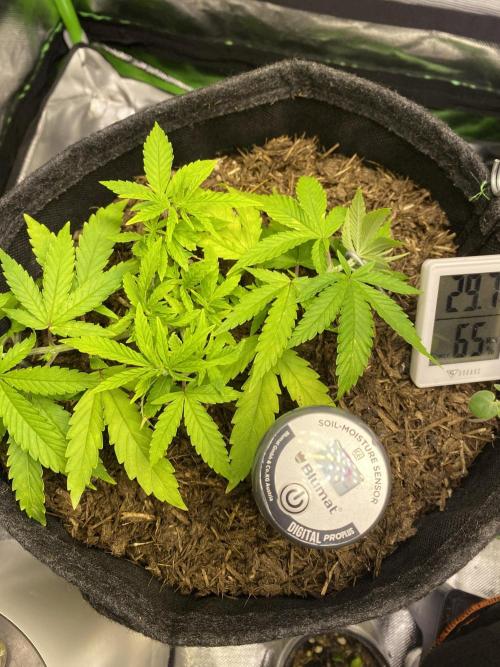
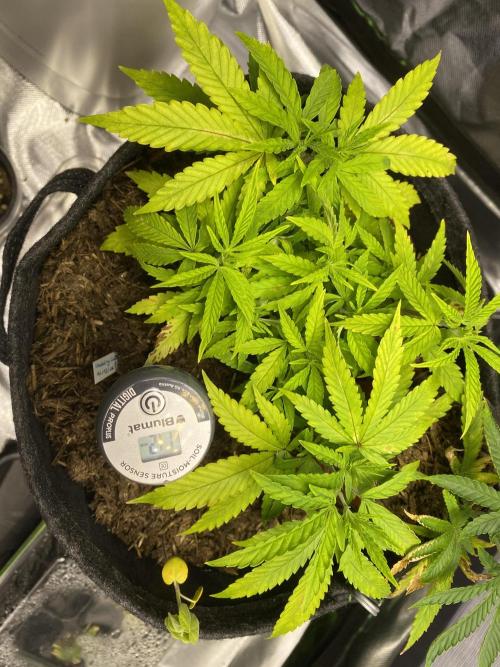
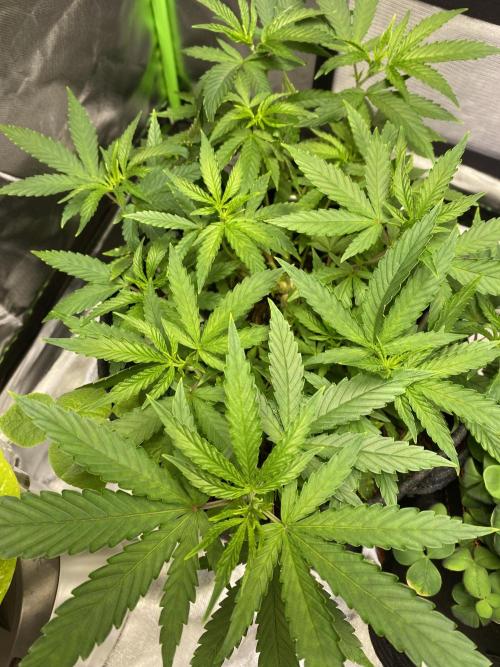
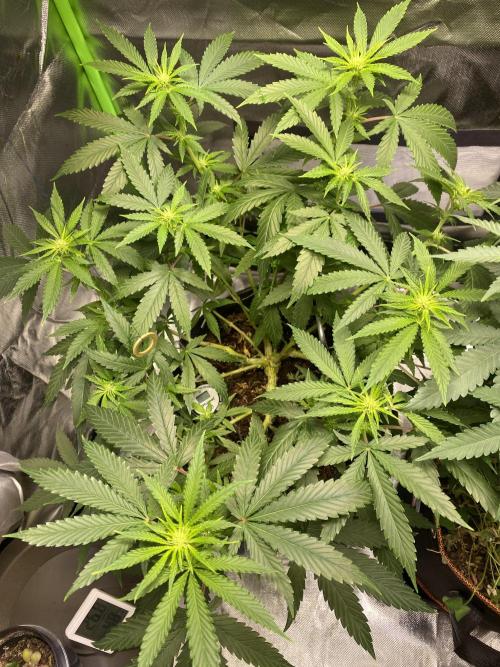
kaeba Plant is still growing, still slow, getting too yellow for my taste. I potted up a much younger plant that was similarly struggling in the same soil into a 20L fabric pot with living soil - no peat or coco or wood pulp, with cover crop, worms from the angler shop, the whole shebang. What can I say, within one week of sad struggling growth this thing started to explode with healthy green and big growth. Just look at the before and after glow up.
I will definitely throw out the other soil / get it composted after the grow because she is looking SO SAD. Also need to be more generous with the fertilizer for the WC because her new growth starts a somewhat healthy green but yellows real quick and she's starting to get spots, so probably a N + Mg deficiency or something.
Tbh I'm only waiting for the smaller plant (Wifi OG Haze) to catch up a little in size, probably won't even top it just to experiment with leaving the plant as is and also so it won't take up too much time and then fiiiinally send them into flower. V8 and the WC is so tiny, geez.
2 likes
comments
Share
Used techniques
LST
Technique
Topping
Technique
9
Week 9. Vegetation
2mo ago
1/4
18 hrs
Light Schedule
26 °C
Day Air Temp
6.5
pH
Weak
Smell
475 PPM
TDS
65 %
Air Humidity
22 °C
Solution Temp
11 l
Pot Size
30 cm
Lamp Distance
Nutrients 2
CalMag
1 mll
TNT Complex
7 mll
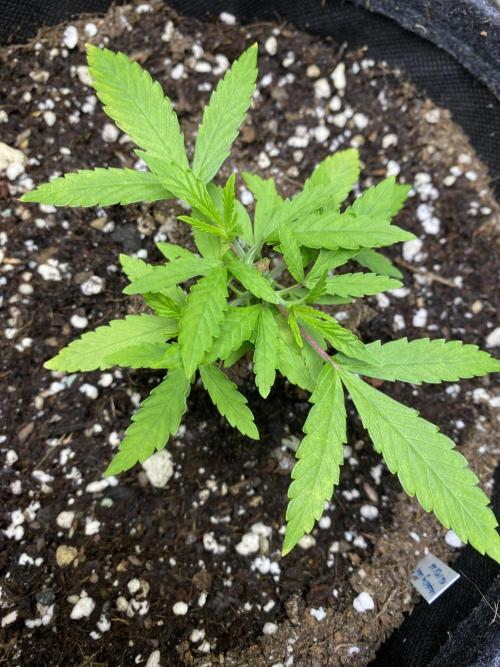
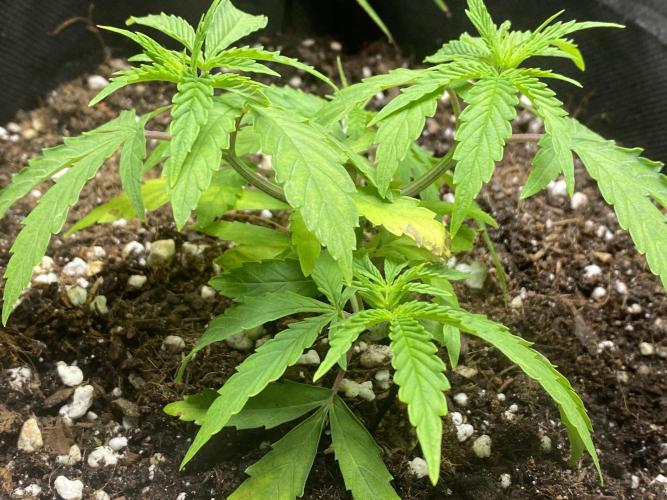
kaeba Haven't updated in a while. In V9 it's still quite yellow and getting more and more sickly - don't worry though, this will be fixed in the future as you'll see. Up until now I was too hesitant to go further than the recommended max dosage of fertilizer which is 5ml/l, which was a mistake. Definitely not going to use this soil again - attached another comparison picture of a plant that is in living soil, no fertilizer at all. Crazy difference in color - and in growth soon as well as you will see.
2 likes
comments
Share
Used techniques
LST
Technique
10
Week 10. Vegetation
2mo ago
1/4
18 hrs
Light Schedule
26 °C
Day Air Temp
6.5
pH
Weak
Smell
400 PPM
TDS
65 %
Air Humidity
22 °C
Solution Temp
11 l
Pot Size
30 cm
Lamp Distance
Nutrients 1
CalMag
1 mll
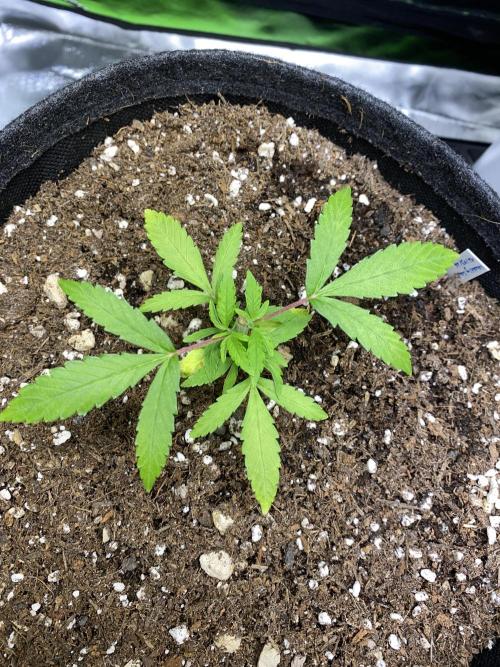
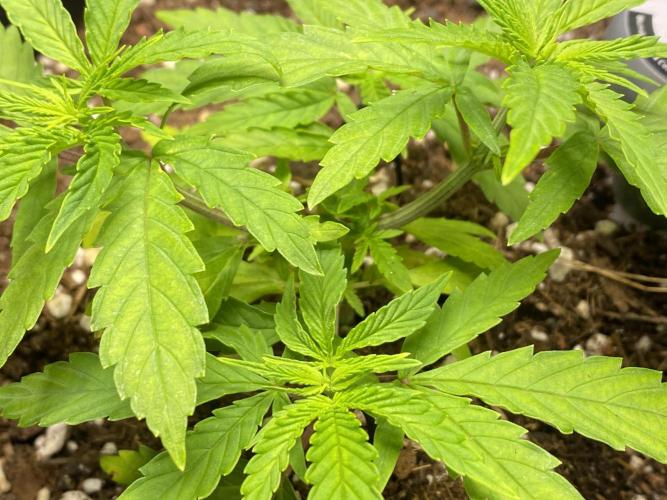
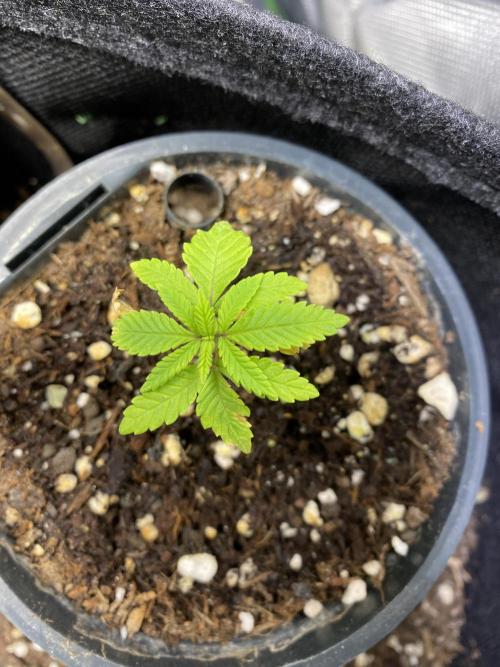
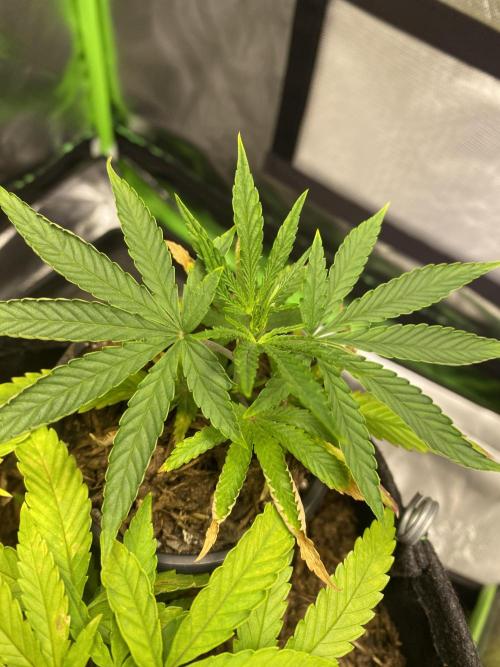
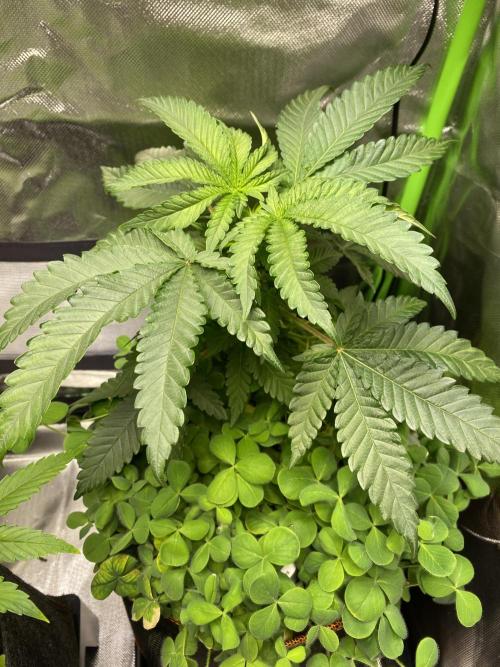
kaeba No Hesi TNT this time, only CalMag and compost tea in hopes of adding beneficial bacteria and fungi to break down the large wood pulp part in the soil faster. Also attached a picture of a clone I took from topping a while ago - it's in a different soil, you can see the stark contrast in color.
3 likes
comments
Share
Used techniques
LST
Technique
11
Week 11. Vegetation
2mo ago
1/2
18 hrs
Light Schedule
26 °C
Day Air Temp
6.5
pH
Weak
Smell
650 PPM
TDS
65 %
Air Humidity
22 °C
Solution Temp
11 l
Pot Size
30 cm
Lamp Distance
Nutrients 2
CalMag
2 mll
TNT Complex
10 mll
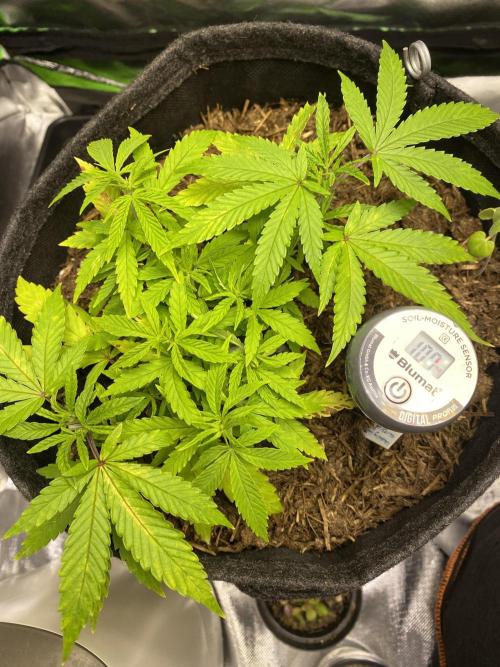
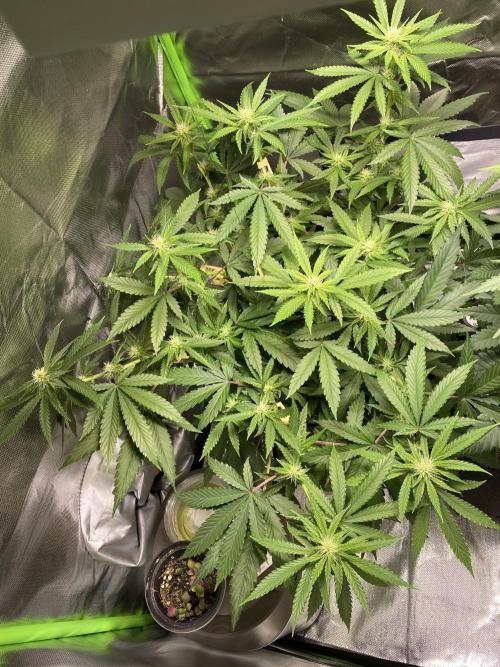
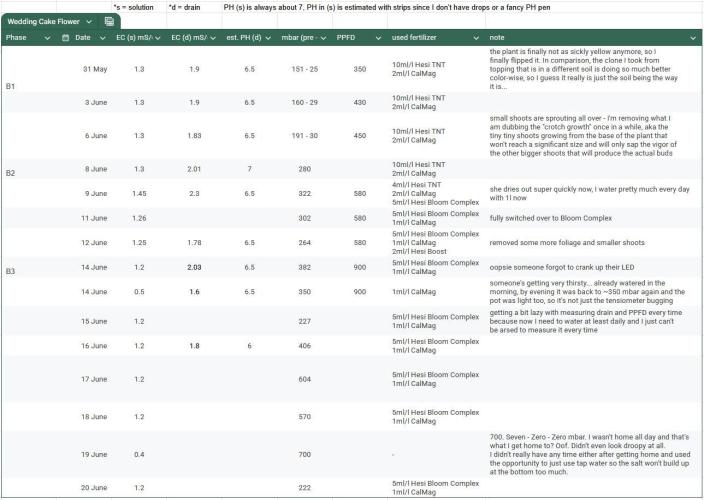
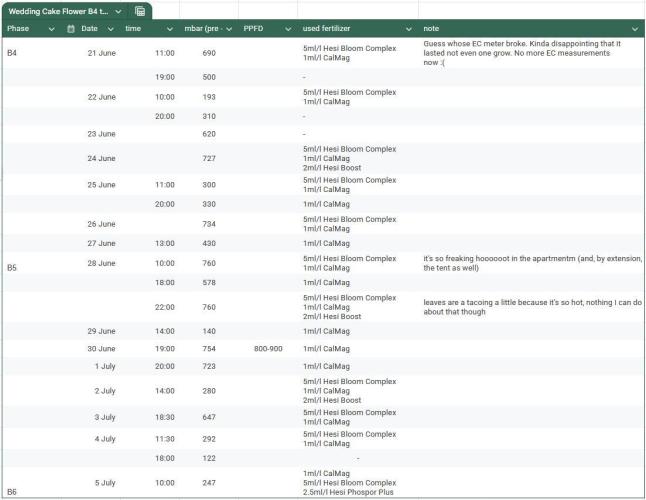
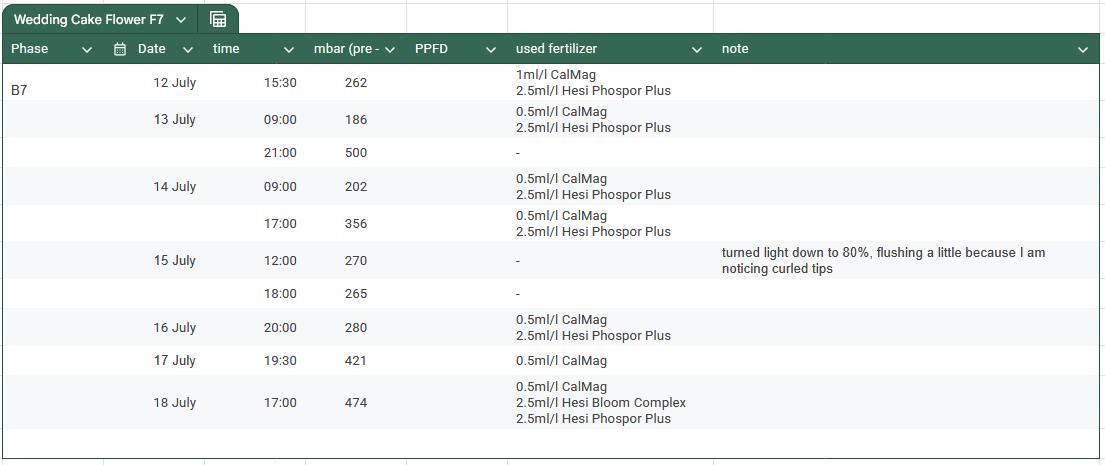
kaeba Decided to just fuck it and give the double recommended dosage - "if it dies, then it dies". Seems to do the trick though, it's losing the sickly color. Forgot to write down the mbar a couple times for the spreadsheet but I usually water between 120 - 200mbar.
It's also starting to drink more, need to water twice a week now. Only one picture for this week, got a bit behind on taking daily pics.
4 likes
comments
Share
Used techniques
LST
Technique
12
Week 12. Flowering
2mo ago
1/5
12 hrs
Light Schedule
26 °C
Day Air Temp
6.5
pH
Normal
Smell
650 PPM
TDS
65 %
Air Humidity
22 °C
Solution Temp
11 l
Pot Size
35 cm
Lamp Distance
Nutrients 2
CalMag
2 mll
TNT Complex
10 mll
kaeba The double dosage seems to be exactly what it needed. It's not quite on the level of healthy color that the clone and the other plant has, but it's good enough for me to finally pull the trigger. I want to get this plant and this soil out of the tent to have an actually decent run with good soil. I attached another comparison picture of the other plant in living soil. Look at how vigorous and healthy it is, that's a huge difference.
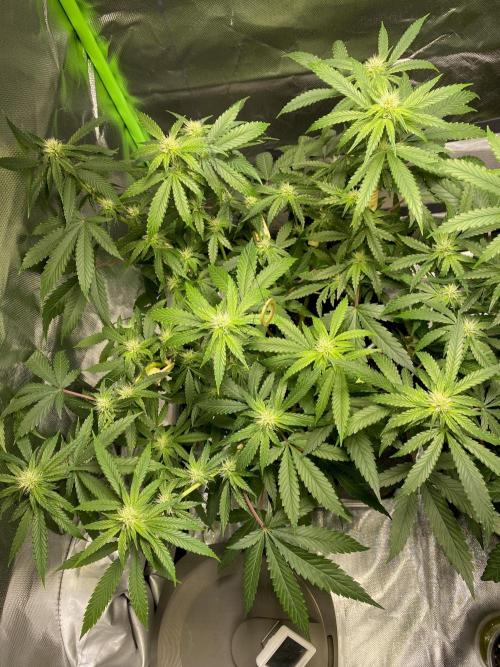
Anyway, I flipped the timer to 12-12 on the first day of what would have been V12 and I know that some (most?) people start counting it only as flower week 1 once the first flowers appear, but I'll start counting with the flip. I'm curious to see if this plant will have a significant stretch or stay stunted.
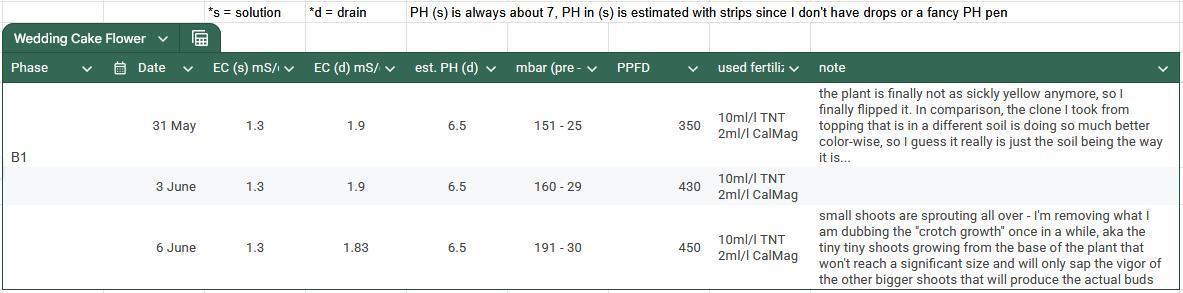
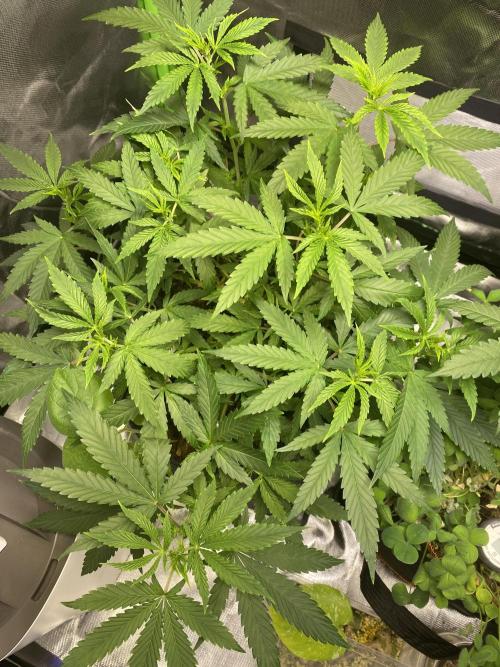
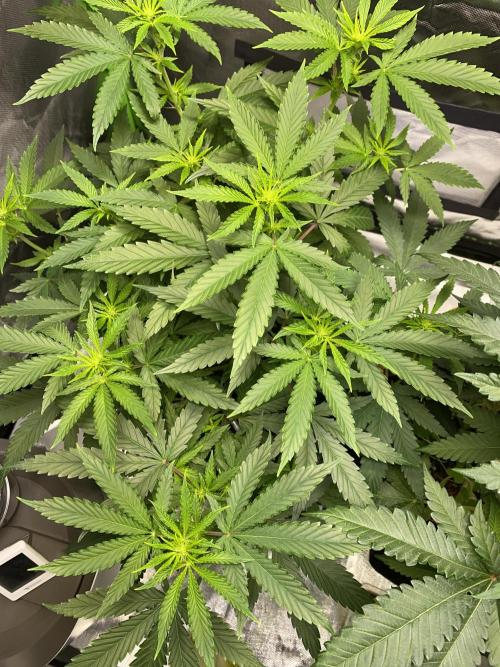
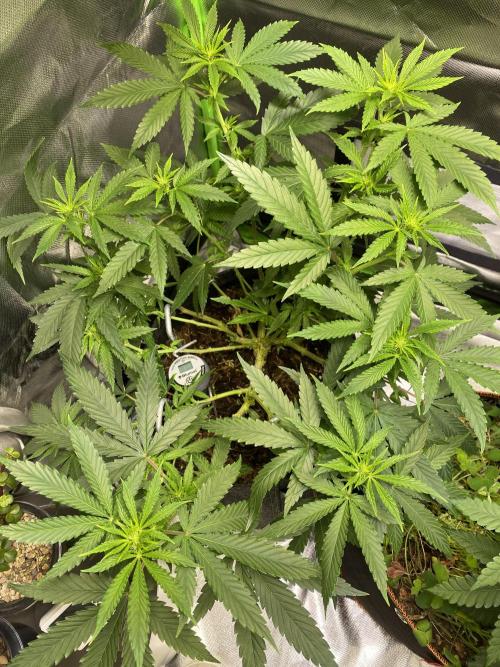
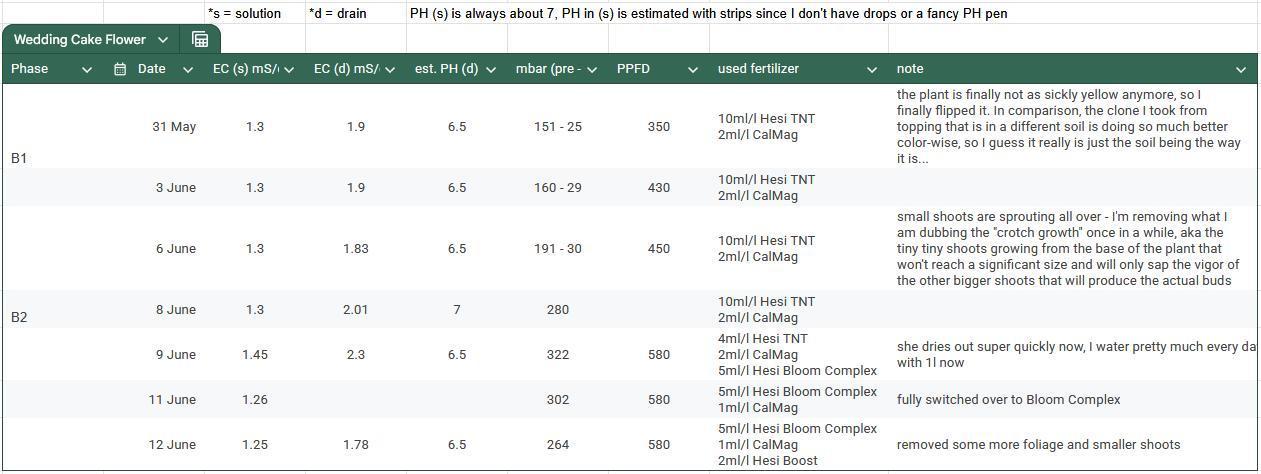
Edit as of June 6th: Small shoots are sprouting all over - I'm removing what I am dubbing the "crotch growth" once in a while, aka the tiny tiny shoots growing from the base of the plant that won't reach a significant size and will only sap the vigor of the other bigger shoots that will produce the actual buds.
6 likes
comments
Share
Used techniques
LST
Technique
Defoliation
Technique
12-12
Technique
13
Week 13. Flowering
1mo ago
1/5
12 hrs
Light Schedule
26 °C
Day Air Temp
6.5
pH
Normal
Smell
650 PPM
TDS
65 %
Air Humidity
22 °C
Solution Temp
11 l
Pot Size
1 l
Watering Volume
30 cm
Lamp Distance
Nutrients 3
CalMag
1 mll
Bloom Complex
5 mll
Boost
2 mll
kaeba She gets very thirsty now, I almost water every day. By the end of the week I have fully switched over from TNT to Bloom Complex and I've also removed a lot of foliage from the middle and smaller shoots that would end up as popcorn buds.
2 likes
2 comments
Share
Used techniques
Defoliation
Technique
12-12
Technique
LST
Technique
14
Week 14. Flowering
1mo ago
1/6
12 hrs
Light Schedule
30 °C
Day Air Temp
6.3
pH
Strong
Smell
600 PPM
TDS
65 %
Air Humidity
22 °C
Solution Temp
11 l
Pot Size
1 l
Watering Volume
30 cm
Lamp Distance
Nutrients 2
CalMag
1 mll
Bloom Complex
5 mll
kaeba It's getting hot again, I get why people take a break from growing in the summer. I may have forgotten to crank up the LED to 100% until this week, oops. Now that I did.... it's getting real warm in there. The ladies (this one and the haze that doesn't have a diary) are also really really thirsty now, even with daily watering I get home after work to up to 700(!!!)mbar in the soil. They're never droopy, but sticking a finger in the soil and lifting the pot tells me the tensiometer is telling the truth. They're also starting to get smelly, very cheesy.
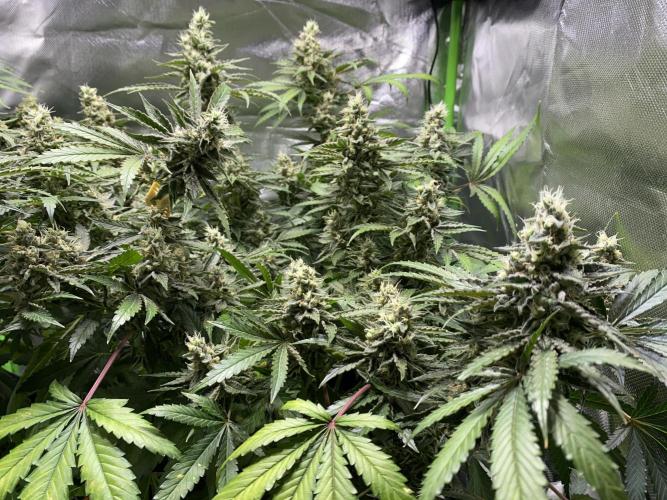
I've carefully bent the upper shoots to the side so they won't overshadow the ones that didn't stretch as much. Also taking off some foliage and forming popcorn buds every now and then, she's growing like crazy.
likes
comments
Share
Used techniques
Defoliation
Technique
12-12
Technique
LST
Technique
15
Week 15. Flowering
25d ago
1/5
12 hrs
Light Schedule
33 °C
Day Air Temp
Strong
Smell
600 PPM
TDS
50 %
Air Humidity
22 °C
Solution Temp
30 °C
Night Air Temp
11 l
Pot Size
2.5 l
Watering Volume
30 cm
Lamp Distance
Nutrients 3
CalMag
1 mll
Bloom Complex
5 mll
Boost
2 mll
kaeba It's so freaking hot. This heat wave is killing me and my "normal" plants outside on the balcony, it's devastating. I know the high temps of up to 33°C in the tent sucks for the terps, but there's nothing I can do about it. Please send ACs my way lmao.
Also, my EC pen broke, it always shows 0.0mS. Kinda disappointing that it didn't even last one grow despite being reputable.
likes
comments
Share
Used techniques
LST
Technique
12-12
Technique
Defoliation
Technique
16
Week 16. Flowering
18d ago
1/6
12 hrs
Light Schedule
33 °C
Day Air Temp
Strong
Smell
50 %
Air Humidity
22 °C
Solution Temp
30 °C
Night Air Temp
11 l
Pot Size
2.5 l
Watering Volume
30 cm
Lamp Distance
Nutrients 3
CalMag
1 mll
Bloom Complex
5 mll
Boost
2 mll
kaeba The heatwave has been insane. Reached up to 36 degrees inside the apartment and no, I don't have an AC. The humidifier helped somewhat to cool the tent down to 3 degrees lower (and it was fine since the humidity was like 20-30% inside the apartment thanks to the heatwave).
Plants are still very thirsty, but if I'm away all day at work I can only water in the evening (the lights are still off when I go to work). I'll consider getting a drop watering system or autopots even for the next grow maybe.
As you can see, there's been some tacoing going on. There's none on the other plant that's in the tent which is ironically closer to the light, but it's also in a 20L pot opposed to this one that's in a 11L pot.
2 likes
comments
Share
Used techniques
12-12
Technique
17
Week 17. Flowering
12d ago
1/6
12 hrs
Light Schedule
28 °C
Day Air Temp
Strong
Smell
50 %
Air Humidity
22 °C
Solution Temp
24 °C
Night Air Temp
11 l
Pot Size
2.5 l
Watering Volume
30 cm
Lamp Distance
Nutrients 4
CalMag
1 mll
Bloom Complex
5 mll
Boost
2 mll
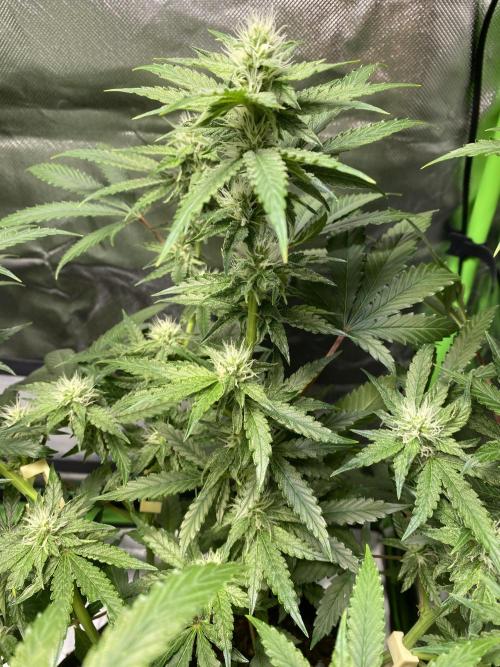
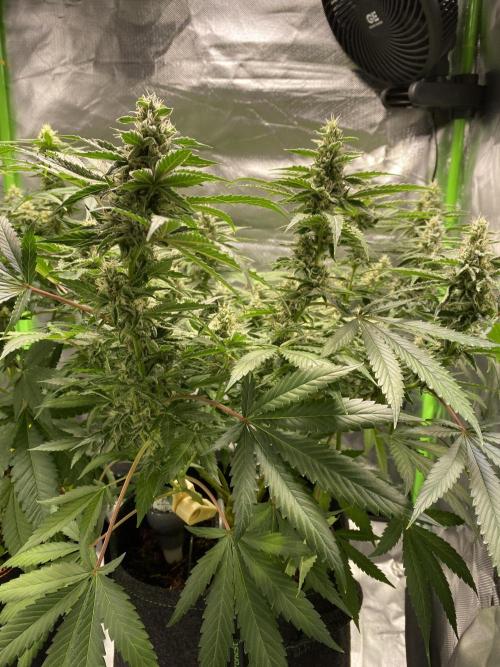
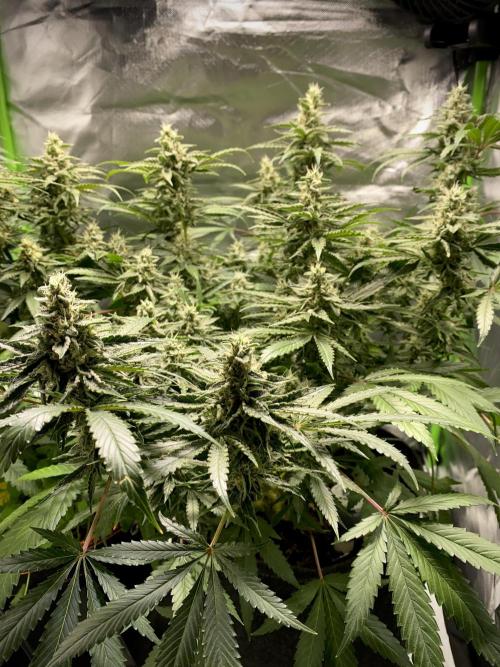
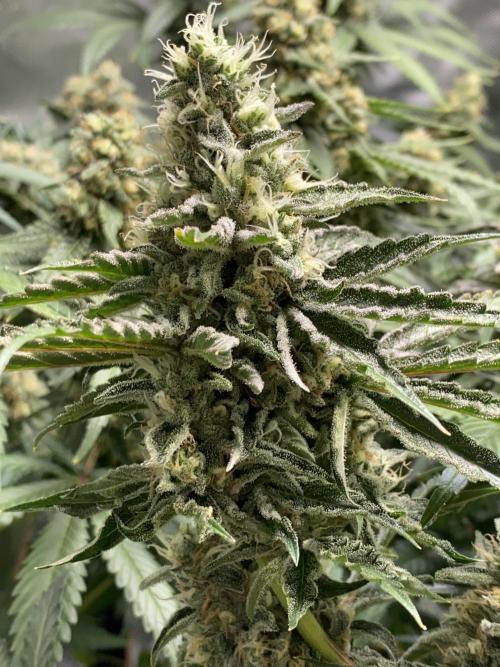
kaeba Not much to be said for this week except that the colas are fattening up nicely. I should really find a solution to water during the day while I'm not home because watering once isn't enough, but... eh. Next grow.
Other than that, there is some slight clawing but that could just be from the leaves brushing the tent wall (I rotate the plant semi-regularly) and the previously mentioned tacoing that hasn't gotten worse since the heatwave passed.
Highkey hoping the next heatwave will wait until harvest, I don't want 35 degrees in the tent again during the final days...
likes
comments
Share
Used techniques
12-12
Technique
18
Week 18. Flowering
4d ago
1/7
12 hrs
Light Schedule
28 °C
Day Air Temp
Strong
Smell
50 %
Air Humidity
22 °C
Solution Temp
24 °C
Night Air Temp
11 l
Pot Size
2 l
Watering Volume
30 cm
Lamp Distance
Nutrients 4
CalMag
0.5 mll
Bloom Complex
2.5 mll
Boost
2 mll
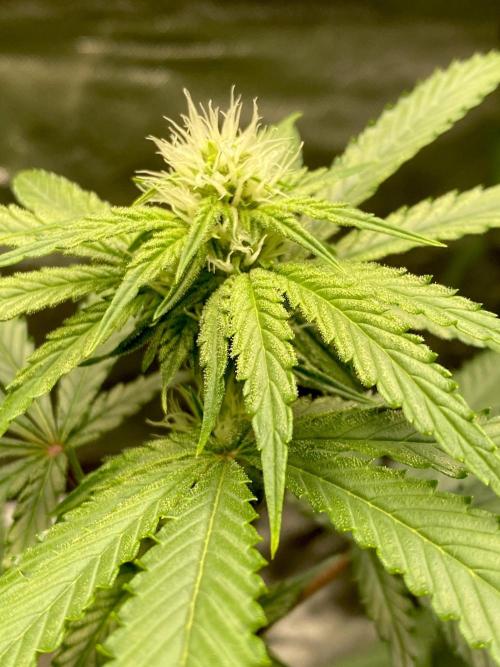
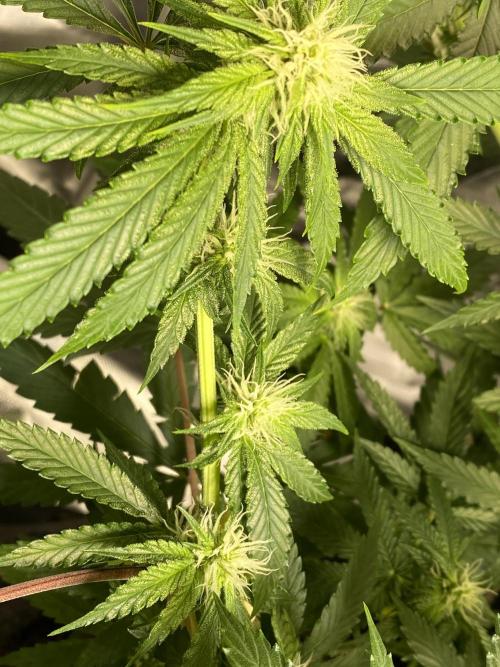
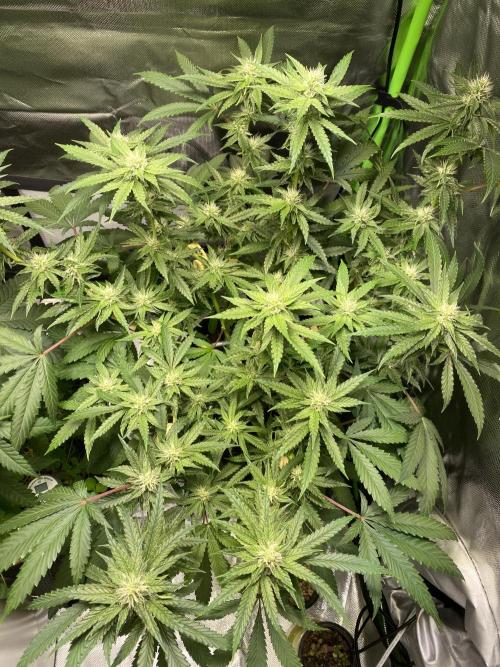
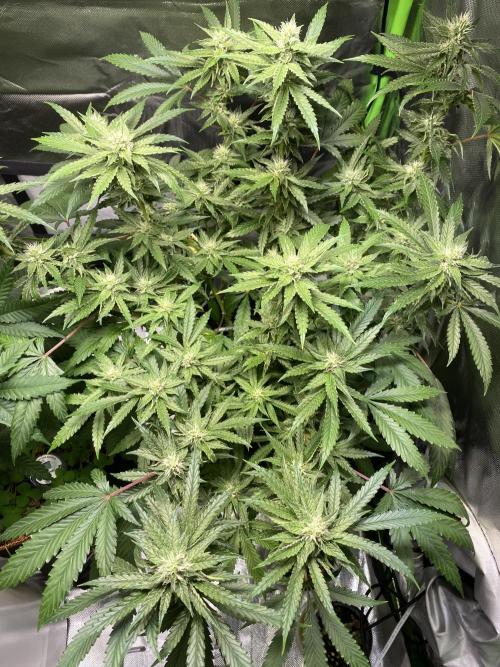
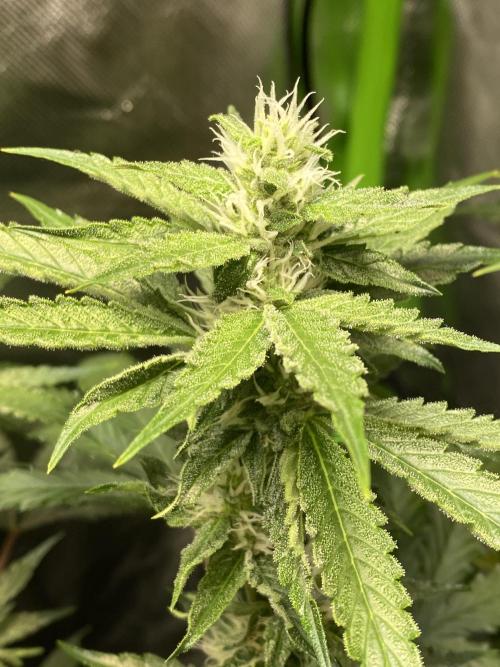
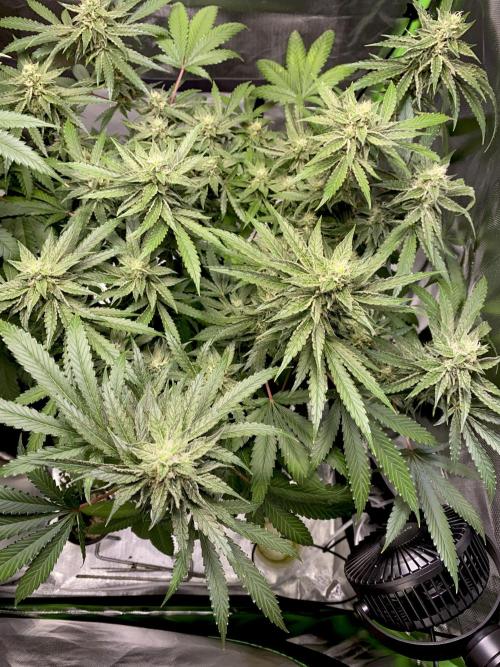
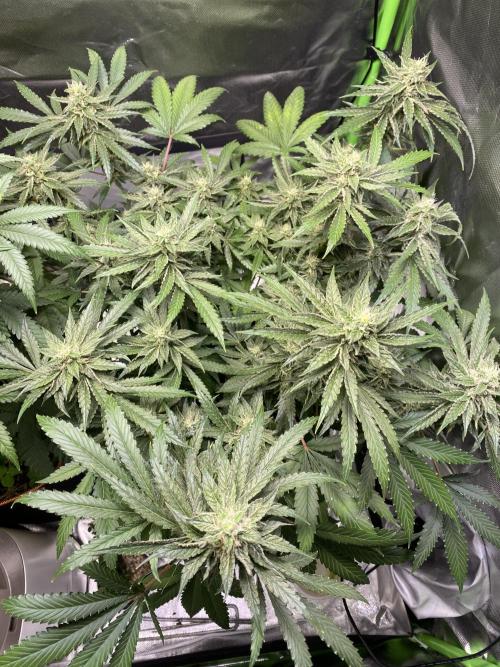
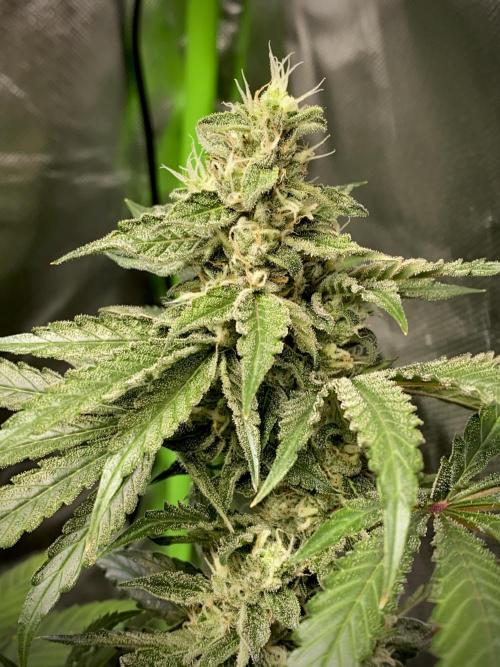
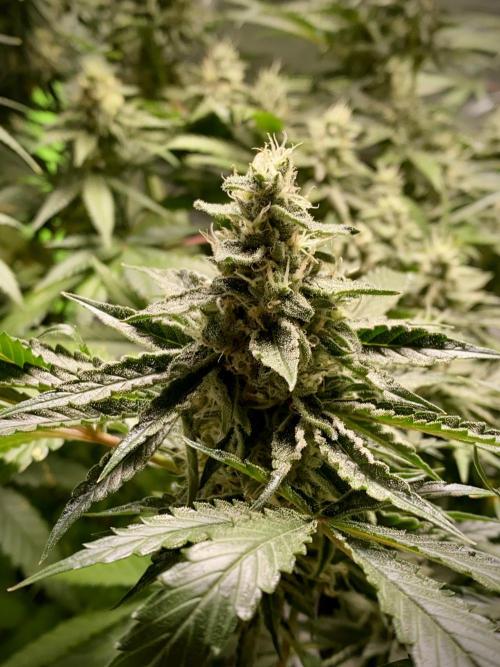
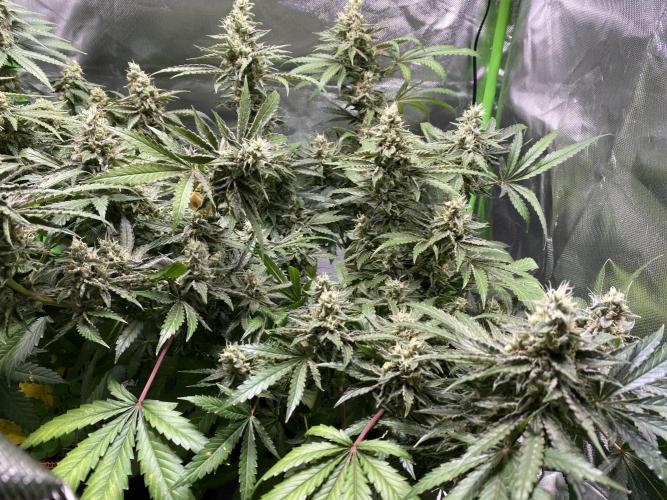
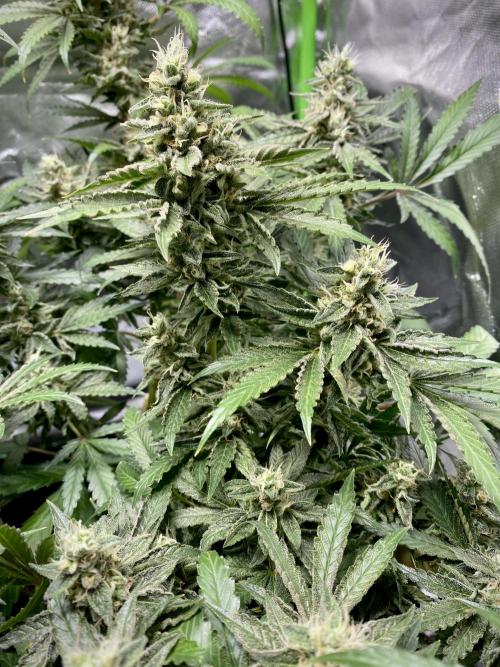
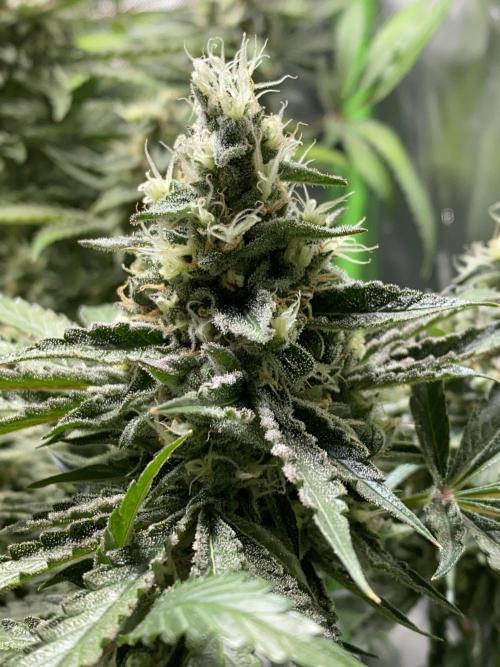
kaeba Tacoing is more noticeable now. I think 2 more weeks and she might be done? We'll see. I'm checking the trichomes once in a while, can't take pictures of it though because they're too shaky. Don't see any ambers yet, many cloudy, but also still clear ones.
@Growingdaddyo, Definitely. The amount of shredded wood and fiber that's in this peat-free soil is said to drain the Nitrogen or at least hinder the uptake a lot. I'm maybe being a bit too careful here with the feeding, but the drain EC values were a bit scary so I thought I'd rather have it a little stunted rather than burn it to a crisp with salts - guess this is a great opportunity to learn how to recognize deficiencies haha :D
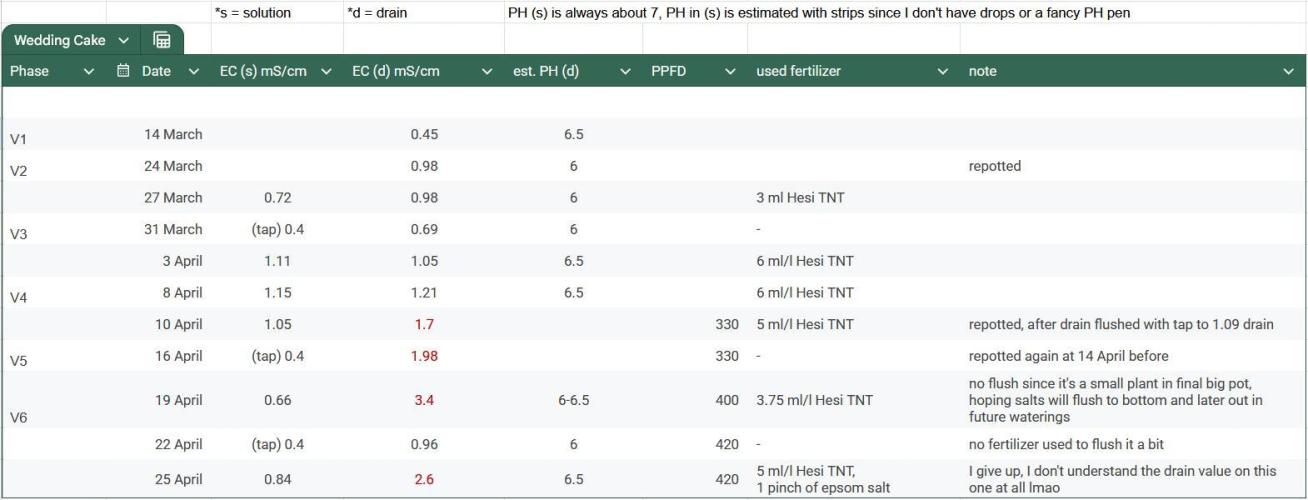
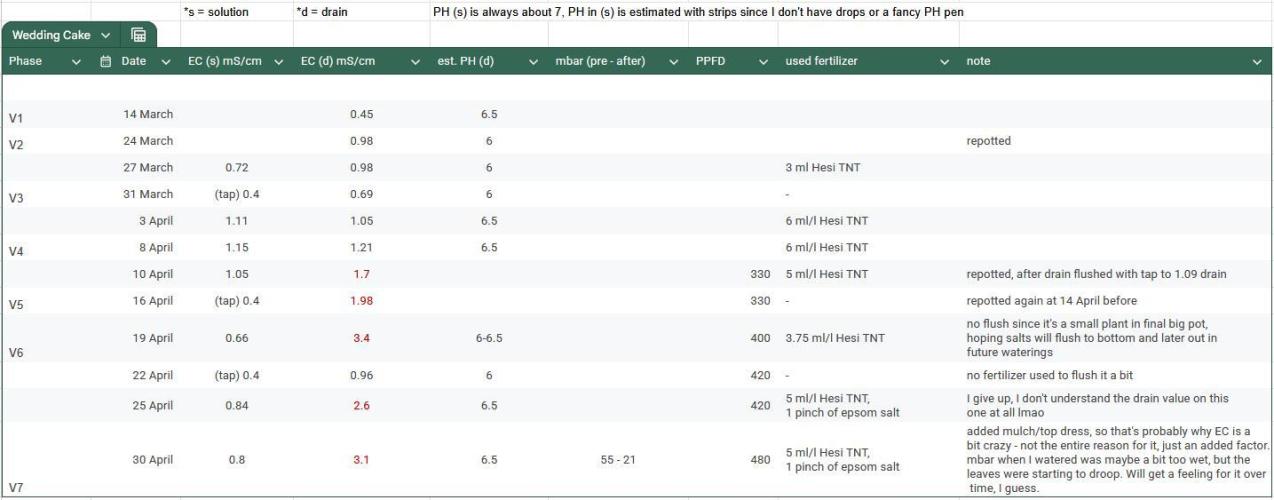
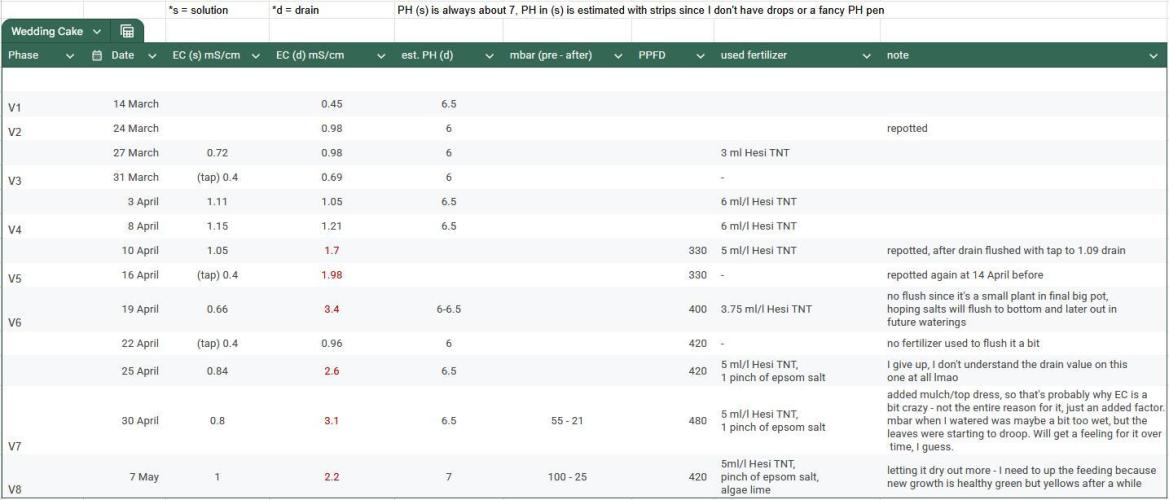
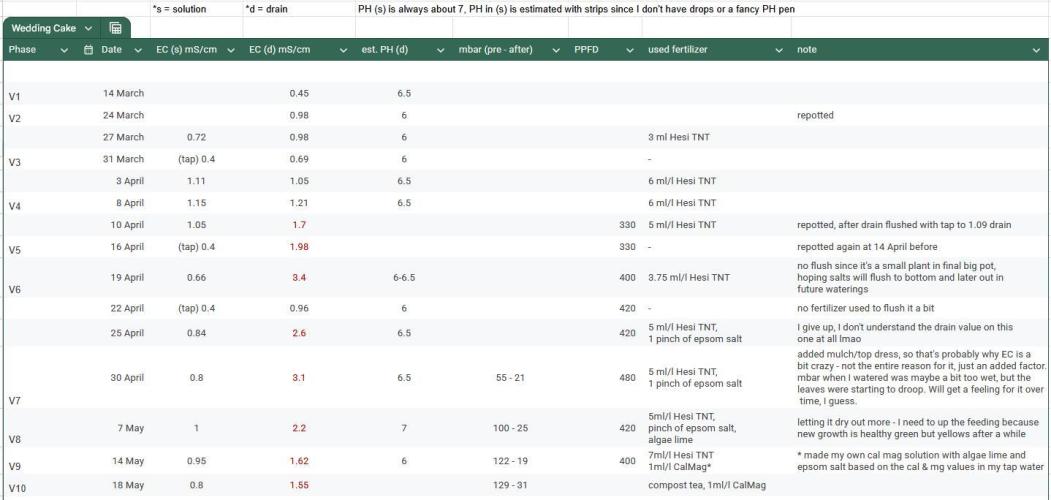
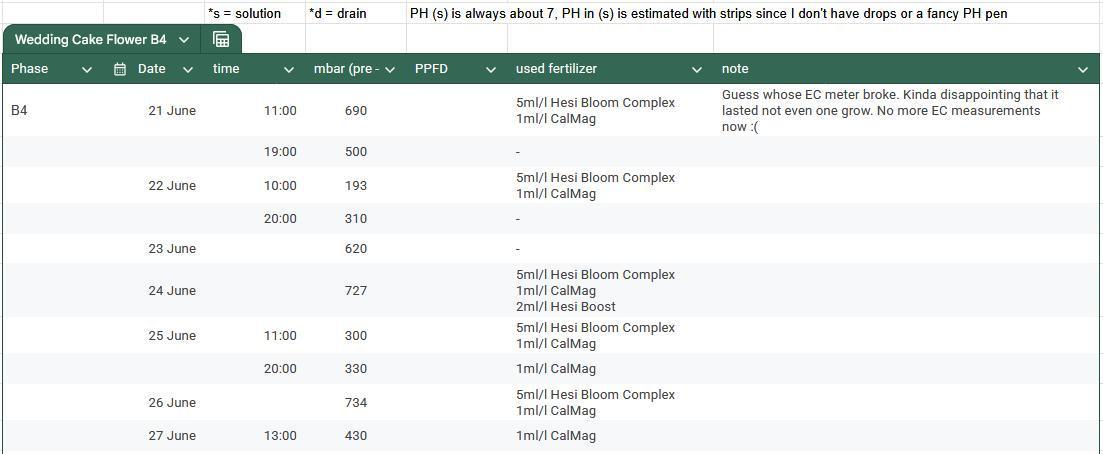
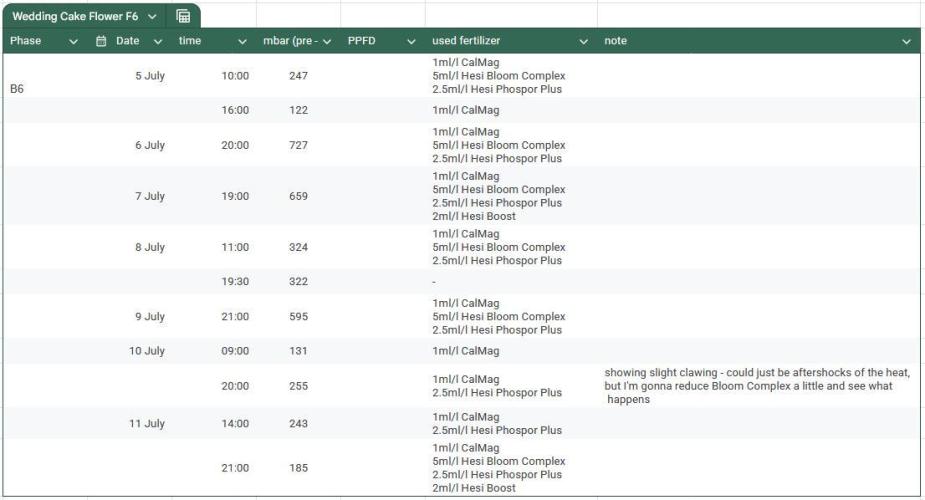
@Cooky_420L, Yes, I do. I don't have an accurate test pen, just the strips (I know they're worse than the drops, but it's all I got right now). PH of water I use is about 7, maybe slightly below that. Drain is usually somewhere between 6-6.5 I'd say. I started adding screenshots of the PH, EC, etc values I'm measuring, I started adding it since V6.
@kaeba, les bandelettes c'est mieux que rien .. tant que ton PH reste entre 6 et 7 c'est bon . ( 6.2 croissance, 6.6 floraison )
TTu dois trop arroser tes pots , l invasion de moucherons c'est à cause d'un terreaux trop humide e faite.
@UnorthadoxDude, Thank you! Yeah, I didn't really think she'd ever recover, but I don't like giving up on plants ("normal ones" since this is my first grow). Glad I didn't, now she looks good and I had the opportunity to experiment a little with fertilizer amounts.