floristician GERMAN and ENGLISH
Titel: Woche 1: Keimung erfolgreich & Meine foolproof Methode 🌱
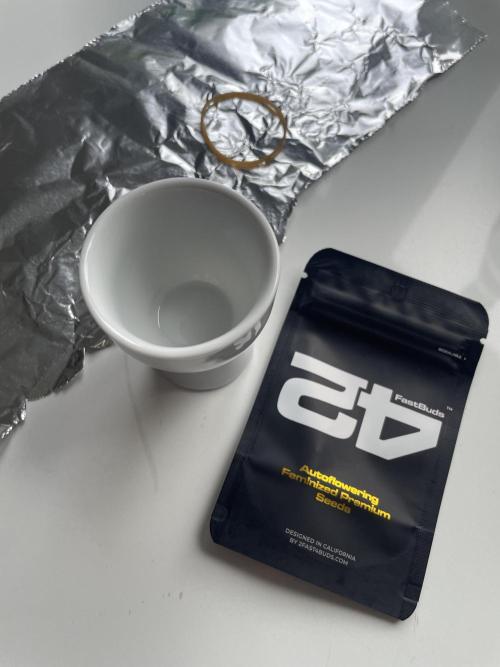
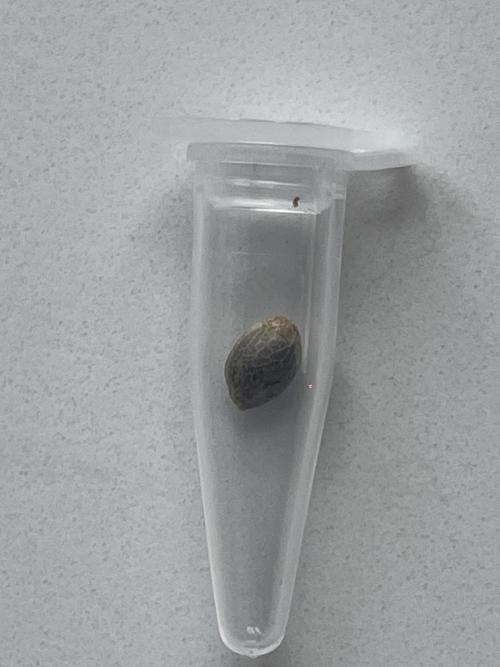
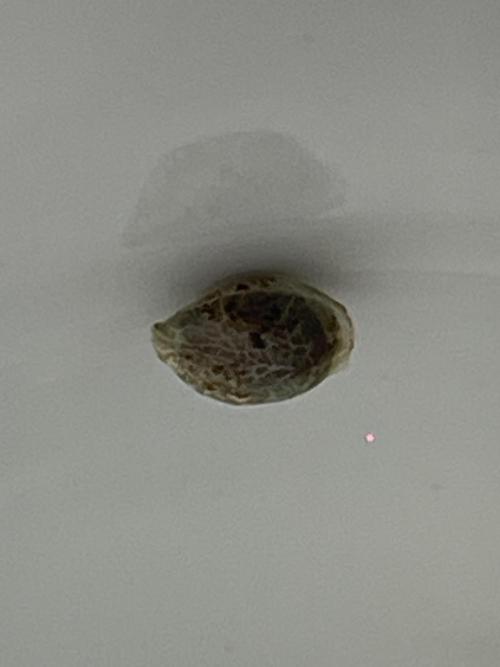
Sorte: CBD Crack Auto (FastBuds)
Timeline:
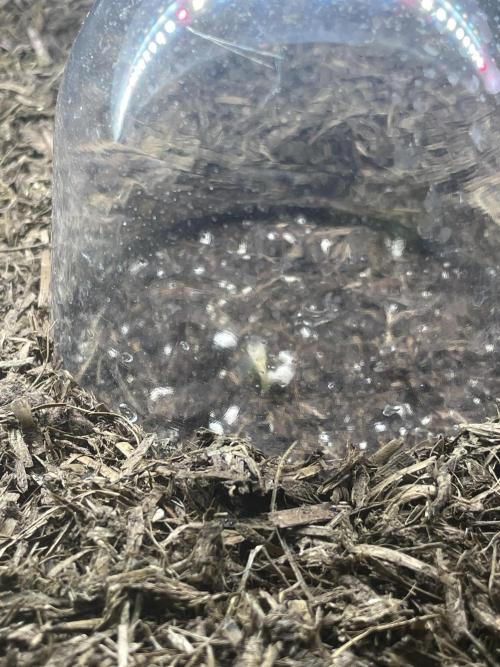
• 11.05.: Samen in einen Eierbecher mit Wasser und ein paar Tropfen Wasserstoffperoxid (H_2O_2) gegeben.
• 13.05.: Der Samen hat sich geöffnet! Direkt in den Endtopf mit Erde umgetopft.
• 17.05.: Sie hat die Erdoberfläche durchbrochen und erblickt das Licht!
Meine Keimphilosophie:
Nach einigem Ausprobieren habe ich die für mich perfekte Keimmethode gefunden:
1. 24 Stunden im Eierbecher mit Wasser (ggf. mit etwas Wasserstoffperoxid oder Alfaboost).
2. Danach in feuchte Wattepads und ab in eine Dose, regelmäßig kontrollieren.
3. Der Schlüssel: Sobald der Samen minimal geöffnet ist und die kleine Wurzel rausguckt, geht es direkt in die Erde! Ich will keine lange Pfahlwurzel in den Wattepads, damit die empfindlichen Wurzelhärchen beim Umtopfen nicht beschädigt werden.
Aktuelle Pflege:
Die Erde im Endtopf halte ich in der perfekten Balance – nicht zu nass und nicht zu trocken. Sobald der Samen in der Erde liegt, wird nur noch mit der Sprühflasche genebelt. Kein klassisches Gießen, um den Keimling nicht zu ertränken oder wegzuspülen.
Ein super Start für die CBD Crack! Mal sehen, wie sie sich entwickelt. 🚀
ENGLISH
Title: Week 1: Germination Success & My Foolproof Method 🌱
Strain: CBD Crack Auto (FastBuds)
Timeline:
• May 11th: Seed went into an eggcup with water and a few drops of Hydrogen Peroxide (H_2O_2).
• May 13th: The seed cracked open! Transferred it directly into the final pot with soil.
• May 17th: She broke through the surface and welcomed the world!
My Germination Philosophy:
After some testing, I have finally found the perfect germination method for me:
1. 24 hours in an eggcup with water (adding a bit of Hydrogen Peroxide or Alfaboost).
2. Transferred to damp cotton pads inside a closed container, checking regularly.
3. The Key: As soon as the seed opens slightly and the tiny taproot becomes visible, it goes straight into the soil! I don't want a long taproot growing into the cotton pads, as this risks damaging the sensitive root hairs during transplanting.
Current Care:
The final pot's soil is kept at a perfect balance—neither too wet nor too dry. Now that the seed is in the ground, I only use a spray bottle to mist the surface. No heavy watering to prevent drowning or washing the seedling away.
Off to a great start with this CBD Crack! Let's see how she develops. 🚀
5 likes
comments
Share
Used method
Glass Of Water
Germination Method
1
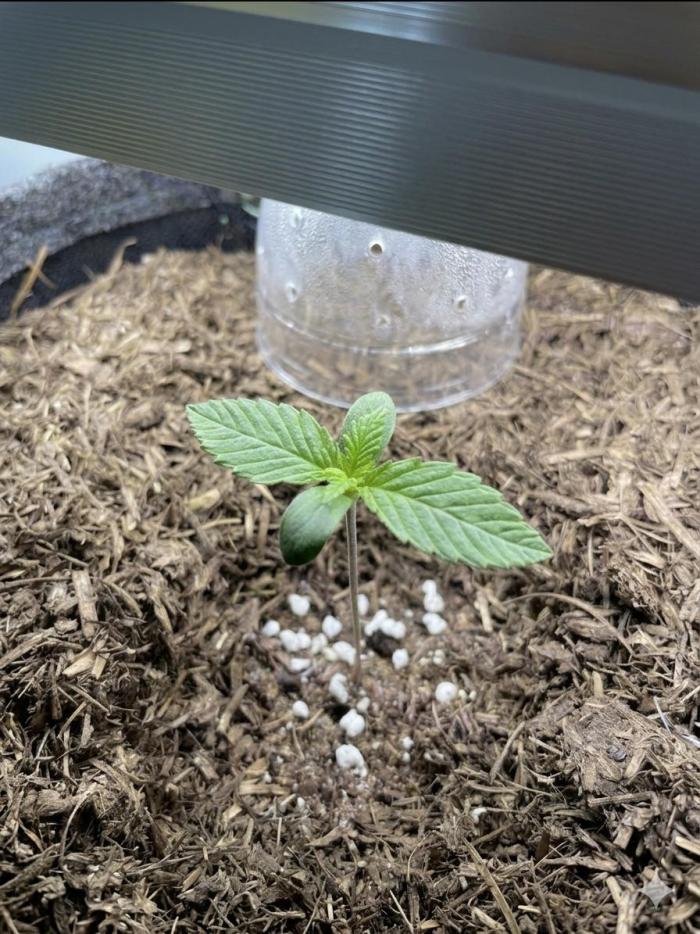
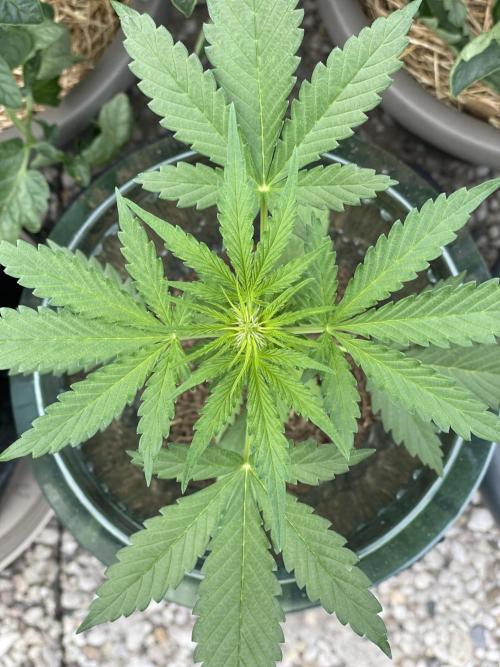
Week 1. Vegetation
2mo ago
4 cm
Height
18 hrs
Light Schedule
22 °C
Day Air Temp
No Smell
Smell
20 °C
Solution Temp
20 °C
Night Air Temp
11 l
Pot Size
Nutrients 2
Startrex
5 mll
Mycotrex
1 mll
floristician DEUTSCH / ENGLISH ⬇️
Woche 1: Toller Start, Setup & angepasste BioTabs-Strategie 🌱
Sorte: CBD Crack Auto (FastBuds)
Die Pflanze hat einen tollen Start hingelegt! Ich hatte sie zuerst drinnen unter einer schwachen Lampe stehen. Leider hat sie dadurch ein kleines bisschen gespargelt, aber sie steht stabil da.
Setup & Bodenvorbereitung:
- Topf: Finaler 11-Liter-Stofftopf.
- Drainage: 1 cm hohe Drainageschicht aus Blähton ganz unten gegen Staunässe.
- Nährstoff-Basis: Ich habe bereits 50g Startrex in die Erde eingearbeitet. Zusätzlich gab es eine Ladung Mykorrhiza direkt in das Pflanzloch, damit die junge Wurzel von Tag 1 an mit den nützlichen Pilzen verschmilzt.
- Mulchschicht: Oben drauf schützt eine Mulchschicht die Erde vorm Austrocknen.
Dünge- & Autoflower-Strategie:
Da es sich um eine Autoflower handelt, passe ich das BioTabs-Schema zeitversetzt an. Automatiks brauchen am Anfang nicht so viele Nährstoffe, und der große Endtopf hat erst mal genug Futter.
Aktuell wird nicht gedüngt. Das erste Gießen mit Orgatrex und Bactrex gibt es erst gegen Ende der 2. Woche.
Auch der BioTab kommt erst Ende Woche 2 in die Erde, um eine Überdüngung der jungen Pflanze zu vermeiden.
Nächste Schritte:
In der zweiten Woche beginne ich damit, sie schrittweise an die echte Sonne im Outdoor-Bereich zu gewöhnen. ☀️
ENGLISCH
Week 1: Great Start, Pot Setup & Adjusted BioTabs Strategy 🌱
Strain: CBD Crack Auto (FastBuds)
She has had a wonderful start so far! Initially, I placed her indoors under a low-powered light. She stretched just a little bit, but nothing to worry about – she is looking strong and healthy now.
Setup & Soil Preparation:
Pot: Final 11-liter fabric pot.
Drainage: A 1 cm layer of expanded clay pebbles at the bottom for optimal drainage.
Nutrient Foundation: I already mixed 50g of BioTabs Startrex into the soil. Additionally, I added Mycorrhizae directly into the planting hole before placing the seed, ensuring the young root bonds with beneficial fungi right from the start.
Mulch Layer: The top is covered with a mulch layer to retain moisture and keep the soil from drying out.
Feeding & Autoflower Strategy:
Since this is an automatic strain, I am adjusting the standard BioTabs schedule. Autoflowers don't need a heavy nutrient load early on, and the large amount of fresh soil in the final pot provides plenty of food for the first weeks.
I will not feed yet. The first watering with Orgatrex and Bactrex will happen towards the end of Week 2.
The actual BioTab will also be pushed into the soil at the end of Week 2 to prevent early nutrient burn.
Next Steps:
During the upcoming second week, I will slowly start hardening her off and getting her used to the real sun outdoors. ☀️
6 likes
comments
Share
Used techniques
Transplantation
Technique
2
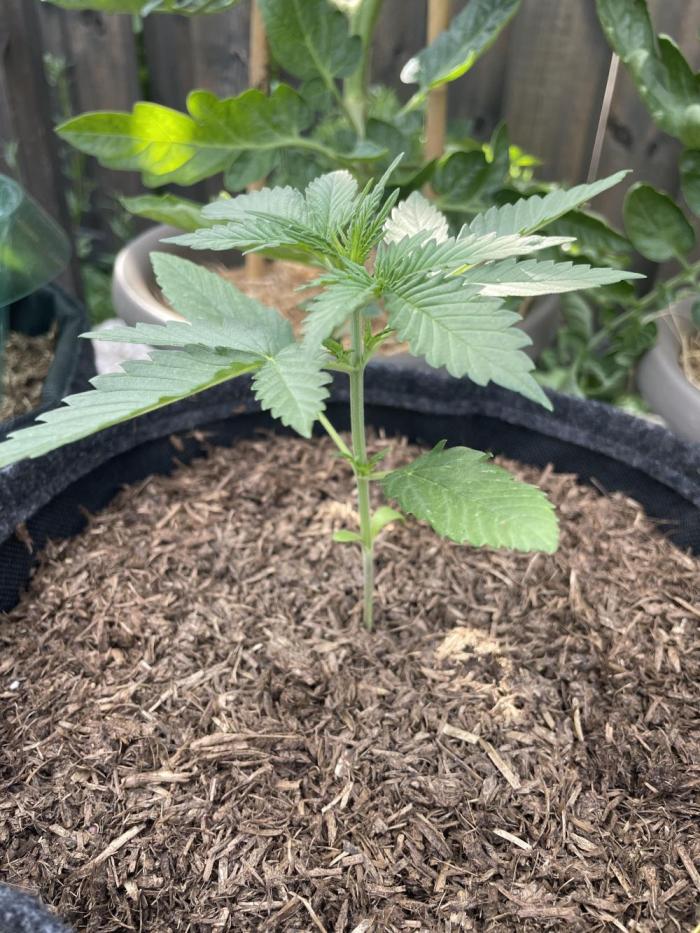
Week 2. Vegetation
2mo ago
10 cm
Height
18 hrs
Light Schedule
0 °C
Day Air Temp
No Smell
Smell
0 °C
Solution Temp
0 °C
Night Air Temp
11 l
Pot Size
Nutrients 3
Organic Fertiliser Tablets
1 mll
Orgatrex
10 mll
Bactrex
1.3 mll
floristician DEUTSCH/ ENGLISH ⬇️
BioTabs aktiviert & bereit für die dauerhafte Outdoor-Phase
Die Pflanze entwickelt sich wirklich gut! Wie geplant war es diese Woche an der Zeit, die Düngestrategie anzupassen, da sie jetzt bereit dafür ist.
Fütterung & Erde:
BioTab gesetzt: Ich habe eine BioTabs-Tablette ca. 5 cm tief in die Erde gesteckt.
Erster echter Feed: Gegossen wurde das Ganze mit 1 Liter Wasser, angereichert mit 10 ml Orgatrex und 1g Bactrex, um das Bodenleben und den Tab perfekt zu aktivieren.
Licht & Umgebung:
In der letzten Woche habe ich noch eine Hybrid-Routine gefahren: Tagsüber stand sie draußen, um sich an die Natur zu gewöhnen, und nachts kam sie rein, um noch ein paar Stunden künstliches Licht zu bekommen.
Sie steht mittlerweile so stabil da, dass sie in den nächsten Tagen auch nachts komplett draußen bleiben wird.
Ich freue mich riesig auf die kommenden Wochen und bin gespannt auf den Wachstumsschub! 🚀☀️
ENGLISH
BioTabs Activated & Moving Outdoors Full-Time 🌱
The plant is developing really well! As planned, it was time to step up the feeding strategy this week to match her growth.
Feeding & Soil Update:
BioTab Added: I pushed one BioTab tablet about 5 cm deep into the soil.
First Real Feed: I watered her with 1 liter of water, mixed with 10 ml of Orgatrex and 1g of Bactrex to fully activate the organic soil life and the tab.
Light & Environment:
Over the last week, I kept a hybrid routine: she spent her days outside getting used to the elements, and I brought her inside at night to give her a few extra hours under artificial light.
She is looking strong enough now, so within the next few days, she will start staying outdoors full-time—even through the night.
I'm really excited to see how she explodes in the coming weeks! 🚀☀️
6 likes
1 comment
Share
3
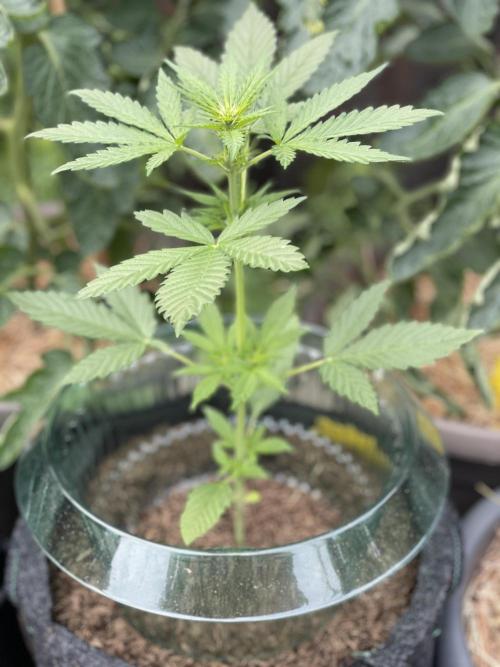
Week 3. Flowering
1mo ago
1/2
20 cm
Height
18 hrs
Light Schedule
0 °C
Day Air Temp
Weak
Smell
0 °C
Solution Temp
0 °C
Night Air Temp
11 l
Pot Size
floristician DEUTSCH / ENGLISH ⬇️
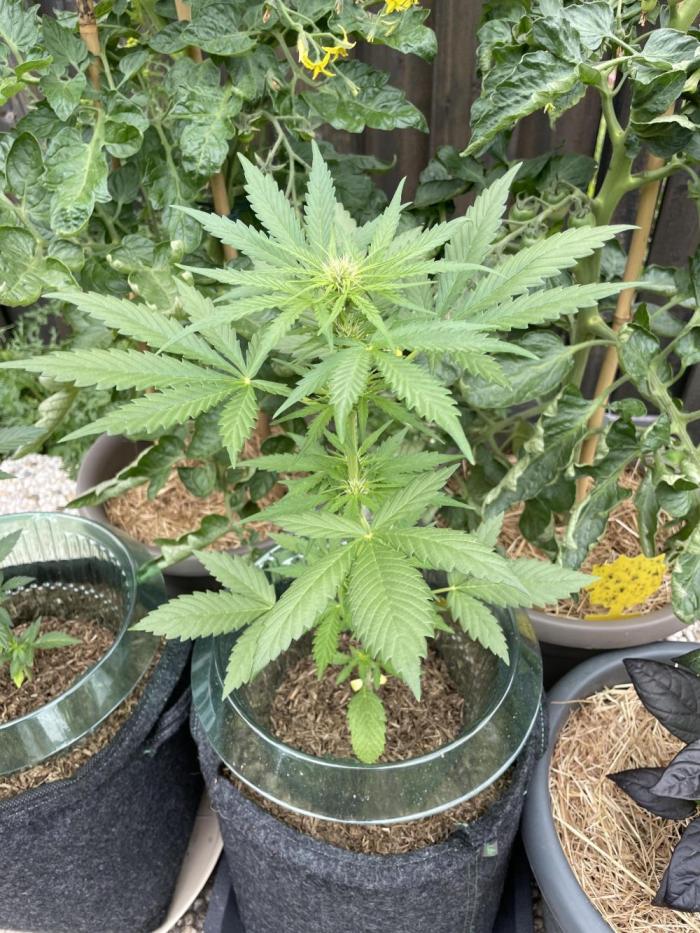
Frühe Blüte & robuste Genetik 🌸
Die Pflanze ist jetzt ziemlich schnell in die Blüte gegangen! Sie hat meine andere Outdoor-Pflanze in der Entwicklung bereits überholt und hat bis jetzt eine wirklich angenehme Größe erreicht.
Wetter & Widerstandskraft:
Ich denke, bei besserem und wärmerem Wetter wäre sie in der Wachstumsphase noch etwas größer geworden. Aber sie hat die Kälte in den Nächten extrem gut weggesteckt, was absolut für die Genetik spricht.
Nächste Schritte:
Jetzt, wo die Blüte eingesetzt hat, bin ich super gespannt, wie sich der Stretch in den nächsten Tagen entwickelt. Da kommt bestimmt noch einiges an Höhe dazu! 🚀🌿
Early Flowering & Resilient Genetics 🌸
She shifted gears into the flowering stage pretty quickly! She has already overtaken my other outdoor plant in development and has reached a decent, manageable size so far.
Weather & Resilience:
To be honest, with better and warmer weather, she probably would have grown a bit larger during the vegetative phase. However, I am super impressed by her resilience—she handled the chilly night temperatures like an absolute champ without any issues.
Next Steps:
Now that the first flowers are showing, I am very excited to see how the flowering stretch develops over the next couple of weeks. Time to watch her stack up! 🚀🌿
3 likes
1 comment
Share
4
Week 4. Flowering
1mo ago
30 cm
Height
18 hrs
Light Schedule
0 °C
Day Air Temp
Weak
Smell
0 °C
Solution Temp
0 °C
Night Air Temp
11 l
Pot Size
floristician DEUTSCH / ENGLISH
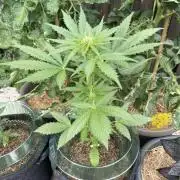
Schönes Grün & der Stretch läuft! 🚀
Die Pflanze entwickelt sich weiterhin richtig gut! Sie zeigt ein wunderschönes, gesundes Grün, ein super Zeichen dafür, dass das Bodenleben und die BioTabs genau das liefern, was sie braucht.
Aktueller Stand:
Der Stretch ist aktuell noch in vollem Gange, und sie legt jeden Tag ordentlich an Größe zu. Es macht einfach Spaß, ihr dabei zuzusehen, und ich freue mich riesig auf die weitere Reise! 🌿🌸
Beautiful Green & The Stretch is On! 🚀
The plant is developing beautifully! She is showing a gorgeous, healthy green color, which tells me the soil biology and the BioTabs are doing an amazing job.
Current Stage:
The flowering stretch is still in full swing right now, and she is putting on some great height every day. I am absolutely loving this process and am incredibly excited for the rest of this journey! 🌿🌸


 commentedweek 31mo ago