Vote Now 🏆 for the Grow Awards 2025!
Chat
Recommended

Northern Light, the First

Approved by Royal Queen Seeds
2
29
19
2222
5 years ago
Follow
Outdoor
Room Type
LST
weeks Technique
Defoliation
weeks Technique
Soil
Grow medium
11 L
Pot Size
1
Week 1. Vegetation
6 years ago
2 cm
18 hrs
10 °C
6.8
0 L
0 L
30 cm
This lady was supposed to be for a friend who finally didn't want it anymore.😒 So I started to take care of her myself. 😉 Unfortunately she was left somehow behind at the beginning, I've been just giving her water but leaving it longer in the small organic flower pot. REPORT The germination has been done in coco jiffy (Planted 4/29, first leaves 5/3) and left under LED with 18/6 light cycle. I lost all the oldest pictures unfortunately, here you can see her at day 6. No fertilizer whatsoever, tapped water PH 6.8
4 likes
2 comments
Share
2
Week 2. Vegetation
6 years ago
5 cm
18 hrs
10 °C
6.8
0 L
0 L
30 cm
During the second week I just gave her apped water (PH 6.8) The leaves are already bigger and the plant is growing just fine, even though I can notice a certain difference in speed compared to the Cheese XXL Auto.
3 likes
1 comment
Share
3
Week 3. Vegetation
6 years ago
8 cm
18 hrs
15 °C
6.8
7 °C
11 L
1 L
During this week I realized that I will have to take care of this plant, so I immediately moved her to a bigger container (11 litres plastic flower pot). For the first couple of days I still had to keep it inside for the night.
4 likes
6 comments
Share
4
Week 4. Vegetation
6 years ago
10 cm
18 hrs
27 °C
6.8
15 °C
11 L
1 L
She was looking forward to be moved in a bigger flower pot and she is showing all her gratitude 😄 I placed her on the balcony next to the Cheese, maybe too much "covered" by it and closed by the corner but it's a temporary solution, I will move it as soon as I can see stable growing as I hope she's gonna have. Day 24 I started to bend the main stem to the direction of the sunshine (Day 24.b), let's see if I can manage to let grow some brench from down down. Day 28 At the end of this week I provided her with the smallest amount of nutrients, the same ones used for her sister Cheese, hoping to help her growing faster and stronger 💪 I thisk she is getting better, probably I got her on time before she would stay little forever. I am afraid it could start showing some white pistils while still short so I will have to do some LST if the time will be on my side.
1 like
comments
Share
5
Week 5. Vegetation
6 years ago
14 cm
18 hrs
27 °C
6.8
15 °C
11 L
1 L
Nutrients 2
G.O. Thrive Grow - Terra Aquatica
G.O. Thrive Grow 0.1 mll
ATA Calmag - ATAMI
ATA Calmag 0.1 mll
Day 35 The plant is growing fine, especially the top leaves are bigger and they are covering the growing tips in the bottom, so I'm trying to bend them by hand to open it up and hopefully I will get soon some new branches to move on a side 😊
2 likes
6 comments
Share
6
Week 6. Vegetation
6 years ago
14 cm
18 hrs
27 °C
6.8
15 °C
11 L
1 L
Nutrients 2
G.O. Thrive Grow - Terra Aquatica
G.O. Thrive Grow 0.25 mll
ATA Calmag - ATAMI
ATA Calmag 0.2 mll
Things are getting interesting in our garden. 😁 When everything seemed to be going smoothly and maybe even boring, every single plant offered me some situation that I had to solve. 👊 This lady stayed smaller at the beginning, and I was wondering if it wasn't too late to get some benefits from LST because the time was passing and I was afraid the flowering signs might soon appear. So, she reacted well to the first bending and took her time to send out some branches from the bottom, but I can definitely say that during this week she has shown me what she can do 💪😎 It might be more visible if compared to the pics in Week 5, where it was clear that there was no brench still developed enough from the bottom, but I'm pleased with the result so far. The pics of Day 42 show how the right side of the fp has got its space more filled, and there's space to continue 😊 During this process, though, I had some accident with the top of the central stem, which got damaged by strong wind. This is an issue I previously had on my Cheese and I thought I was conscious of what and why that happened, but I wasn't really, until I saw this one. The problem was not with the thickness of the tie I used or how I secured it, but with the position of it and...a little toooo much pressure When I firstly secured the stem, everything looks and felt just fine, but the more I bent the new branches, the more I needed to make space around them, so following some kind of sense of simmetry, I bent more the central stem, just little by little, and here is the mistake. I guess I should have bent only ONE point of the main stem in the bottom and then keep bending going from that point upwards. In the way I did, I stressed a lot that part of the branch which started to get harder and slightly cutted under the tension of the twisty tie...to finally got damaged! I will update with the current situation on the next report. Until then, PLEASE LET ME KNOW any advice, tips or mistake you might notice and comment here below :) Enjoy your growing and good lock to all of you 🙏
2 likes
1 comment
Share
7
Week 7. Vegetation
6 years ago
20 cm
18 hrs
28 °C
6.5
15 °C
11 L
1 L
Nutrients 2
G.O. Thrive Grow - Terra Aquatica
G.O. Thrive Grow 0.4 mll
ATA Calmag - ATAMI
ATA Calmag 0.3 mll
DAY 44 As mentioned, this plant was pretty small and I started to bend it quiet late, but I noticed that the side branches were growing faster, so I wanted to keep her developing wider. There was only one thing to do: TO BEND!! Comparing the previous week to just a couple of days after (Day 44) it's already clear how the branches liked the LST. DAY 46 Rotated the plant 90° to give more access to air and sunlight to the newcoming branches. Nutrients levels raised a little to 0,4 (Grow) and 0,3 (CalMag). DAY 48 You can see how the plant is getting the right shape, it looks good to me, the leaves are green and it's healty overall. DAY 49 After one week, I'm very happy to see the results from LST and that was FAST! I think I really took her just on time to allow the right growth, also because I can see already some little white pistils coming out, so let's see how it will behave in the flowering stage (I'm wondering how the stretch will be). BROKEN BRANCH UPDATE: I thought the damage was too serious to be fixed, but once again the Nature and the mighty strenght of this plant were once again ready to surprise me. I put a small dose of homemade honey between the two sides of the cut during this week and it started to heal. At the beginning, a couple of leaves were ugly and shrinking, they got dark but I didn't remove them, then in a few days I saw that the branches looked ok, so I let everything grow without touching it (Pic EXP). 👆 I then applied a piece of tape to hold it together. It really looks like it's gonna keep growing! 👊
1 like
comments
Share
8
Week 8. Flowering
6 years ago
30 cm
17 hrs
28 °C
6.2
No Smell
18 °C
11 L
2 L
Nutrients 2
G.O. Thrive Bloom - Terra Aquatica
G.O. Thrive Bloom 0.2 mll
ATA Calmag - ATAMI
ATA Calmag 0.3 mll
Day 53 I am leaving for a holiday, so I tried to LST as much as I could to help the plant getting the right shape as I won't be taking care of her for some time. I prepared enough water with nutrients (against what I read online) to water every second day and I hope the caretaker will use it properly. I didn't add any Grow but switched to a 0.2 ml/l of Bloom since I found the first budlets forming and a 0.3 ml/l of CalMag. Let's see how I will find her when I'll be back 😏
2 likes
3 comments
Share
9
Week 9. Flowering
6 years ago
32 cm
17 hrs
30 °C
6.5
No Smell
18 °C
11 L
3 L
Nutrients 3
G.O. Thrive Bloom - Terra Aquatica
G.O. Thrive Bloom 0.3 mll
ATA Calmag - ATAMI
ATA Calmag 0.3 mll
ATA PK 13-14 - ATAMI
ATA PK 13-14 0.2 mll
DAY 57-63 I couldn't take care of this lady while I was on holiday, but I have to thank my Grandma for the help with watering because I found her like this 👆 when I came back 😁 The budlets have been forming constantly, I can't really say if that's fast or not but I liked to see them grown 😄 Green nice leaves, no signs of overfeeding, overwatering or deficiencies whatsoever, at least to my newbie eyes 😏 I found some aphids under the leaves and removed them by hands, it was a couple of them though, I just applied some Neem Oil to prevent it to spread all around. This update isthis short because I wasn't here during this week of course, but I'm already writing the new one so you'll see how is she doing right now, so stay tuned for more 😉 Thanks for passing by and enjoy your growing 🙏
2 likes
comments
Share
10
Week 10. Flowering
6 years ago
32 cm
17 hrs
27 °C
6.5
No Smell
10 °C
11 L
3 L
Nutrients 3
G.O. Thrive Bloom - Terra Aquatica
G.O. Thrive Bloom 0.6 mll
ATA Calmag - ATAMI
ATA Calmag 0.5 mll
ATA PK 13-14 - ATAMI
ATA PK 13-14 0.5 mll
DAY 64-70 What's going on growers? Hope you're alright! My little NL has been silently but effectively growing in these weeks, helped by some LST she managed to compose a pretty even and low canopy, with interesting buds coming up 😜 After I started to give more nutrients she kept reacting well to them, so I just kept increasing, still staying around 1/3 of the recommended dose. I will increased more gradually as done so far. Also, the broken branch healed (Pic. Day 64 - Broken Branch) 😃 As written, I just applied some homemade honey on the broken point and kept the two sides together with some tape. Every grow tip kept growing fine upon it and I even managed to bend the new branches down from it 💪 As always guys thank you so much for reading and please let me know if you notice anything weird or if you just feel to share your experience, all of your comments will be appreciated 🙏 Enjoy your growing 😎
2 likes
comments
Share
11
Week 11. Flowering
6 years ago
32 cm
17 hrs
27 °C
6.5
No Smell
10 °C
11 L
3 L
Nutrients 3
G.O. Thrive Bloom - Terra Aquatica
G.O. Thrive Bloom 0.8 mll
ATA Calmag - ATAMI
ATA Calmag 0.6 mll
ATA PK 13-14 - ATAMI
ATA PK 13-14 0.8 mll
DAY 71-77 This lady seems to mature slightly slower than the Cheese, maybe also because of the different conditions she had at the beginning. I increased again the levels of nutrients, I think she needs it, and I'm pretty excited to see the final result, especially knowing how little it was in the first few weeks (the magic of LST!😎) I'm still bending here and there, moving branches slightly to open space to other mire hidden. The leaves are nicely green. They show some spots somewhere, but I couldn't recognize any disease from it so I'm not worried. The next weeks will be interesting, I'm curious to see what this lady can reach 😁 Please guys let me know if you notice anything bad on the plant, or simply what do you think about it, I would be glad to hear from you!! 🙏 Have a nice one and enjoy your growing ✊
1 like
comments
Share
12
Week 12. Flowering
5 years ago
35 cm
17 hrs
27 °C
6.5
Strong
15 °C
11 L
3 L
Nutrients 3
G.O. Thrive Bloom - Terra Aquatica
G.O. Thrive Bloom 1 mll
ATA Calmag - ATAMI
ATA Calmag 0.6 mll
ATA PK 13-14 - ATAMI
ATA PK 13-14 1 mll
What's going on guys? Sorry for the long period of inactivity, I've been too busy to write here lately, however I did take care of my ladies all the same, actually that was the first reason why I didn't update the diaries in the first place. 😵 DAY 79-84 As I previously mentioned, this lady was somehow delayed during the veg stage, so I'm not expectig her to be ready right now, even though she's started to show that the time is coming. It's very bushy, all of those leaves upon each other suggest I should have probably defoliated a bit, or better, bended even more to leave more space to each growing tip but I couldn't host a so large plant on my small place. In fact, I'm keeping her on the balcony but moved her from the usual spot, basically replacing the Cheese which was standing on a higher structure. I increased the nuts levels to the final (I guess) amounts cause she always reacted well to them, never complaining. She has a very intense smell; I couldn't let the balcony door open for more than five minutes without having the kitchen smelling like her :D HEALTH: It's green and nice looking overall. I noticed a few leaves with mildew, immediately removed, checked all the buds carefully, only the little one where I found the mildew had some mold between the nodes, cut it off. I will monitorize daily. The main problem is with aphids. I found many of them under the leaves and I patiently removed them by hand, unfortunately I don't think that will be the solution to the problem. I read online that a few aphids never killed nobody, and that they're fine unless they don't colonize the buds. I would be sooo grateful to any of you who has experience with this problem to advice what to do 😊 Keep it green and enjoy your growing!! 🙏
1 like
comments
Share
12
Week 12. Harvest
5 years ago
Spent 85 days
Ger Veg Flo Har
50 g
Bud dry weight per plant
1
Plants
Normal
Difficulty
Positive effects
Happy, Relaxed
Positive effects
Negative effects
Dry mouth
Negative effects
Taste
Earthy, Pine, Sweet
Taste

Height
Day air temperature
PH
Light schedule
Night air temperature
Pot size
Lamp distance
HARVEST What a great day Harvest Day is!! I enjoyed all the steps that brought me to finally taste the fruit of a hard, daily work. Having no experience whatsoever on the matter, I had to struggle to put on practise the advises I read and got from you more experienced growers 😀 And yet, I don't know if I got it right!🙄 I wanted to learn something out of it, so I tried two different methods, starting from one basic decision: trimming the most of the leaves immediately (since I didn't do so for the other plant, the Cheese XXL). TRIMMING&DRYING I cut off (Day 96) and hanged the whole plant to take out all the sun leaves. Once done, I started to cut the branches and trimming them (pics Day 96 - Trimming). I'm happy about how these colas look like. They look much more dense than the others I trimmed last week (from the other plant). Another difference with the other strain I harvested is that I didn't wait before to touch the plant. Once trimmed, I immediately put half of the branches to dry (Day 96 - Unwashed buds) while I washed the rest of them with the three buckets method, basically selecting all the branches that were closet to the point where I found mildew, so they were "fresher" and the water passed better through all the buds. Once washed, I put them to dry. To my surprise, they didn't take much longer compared to the unwashed ones. I left the room ventilated with two small fans pointed in the proximity of the drying rack, humidity around 50-60%, temperature 25°C. After 3 days, I moved all the branches to the final drying closet. (Hum. 55% - 27°C) CURING Another couple of days and they looked ok to be put in the glass jars. I divided between washed and unwashed and I cannot really find a significant difference between each other, at least visually. After one week of burping twice a days for a few hours, I did it again but only three times a week for like half an hour and then the last two weeks only once per week for 15 minutes. I think that I can leave them like they are now. TASTING THIS is absolutely THE BEST part of it all :D I tried only a couple of small bud which felt earlier during the trimming and I loved the taste!! It's rich and intense, fruity and sweet but I cannot say precise what kind of fruit it reminds of 😅 I would definitely need a better vaping session to make a more exhaustive review 😀, and that will be tonight hopefully 😎🔥 So stay tuned, I will update this comment with a final review and a description of the strain 👍🌱 Thanks for reading guys 🙏 Keep it green and enjoy your growing 💚🌱🔥
4 likes
comments
Share

Login

19 comments
Sort by
popularity
popularity
newest
oldest
CoastGrower
CoastGrowercommentedweek 36 years ago
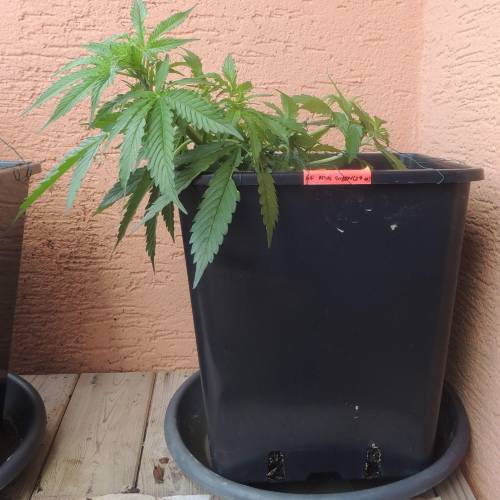
Did you already transplant her? A 11L pot is on the small side.. try to germinate your Autoflowers directly in the final pots because transplanting auto’s will keep them small because of the stress you give her. Good luck!👍
Fredsai
Fredsaicommented6 years ago
@CoastGrower, yes man I did 🙄 I had these 11L flower pots and thought were enough, I think I must have read it somewhere. Im planning to put down another auto very soon and I will definitely go for a bigger one and follow your advice.😉 thanks again and good luck with yours too 🙏
Fredsai
Fredsaicommentedweek 36 years ago
Thank dude!!! 👍
Puffer_Bill
Puffer_Billcommentedweek 36 years ago
Your plant looks quite strong. 💪🏼🌱 I'm growing NL autos and germinated in rock wool then put into final pots 11litre. The plants did slow down for a week. In future with autos I will be germinating in final pots from start.
Puffer_Bill
Puffer_Billcommented6 years ago
@Fredsai, You are welcome. Until I read that... I would have just thought bigger the better. Good you will do a comparison. Grow well 🌱
Fredsai
Fredsaicommented6 years ago
@Puffer_Bill, thanks for the link man, it was an interesting reading, I ever considered specifically the issues with a too big flower pot, I made my mind to go for coco jiffys for germination, organic pots for the first leaves level growing and then to just pick up a final decently dimensioned container according to the type of plant. However, I will check the roots once harvested and then have a try with a 25L one so to make a comparison ✌️
Puffer_Bill
Puffer_Billcommented6 years ago
@CoastGrower, https://www.rhs.org.uk/advice/profile?pid=864
Show More (3)
Germano
Germanocommentedweek 86 years ago
for how long are u going away, and how did u mange to water them ؟ hav fun in ur holiday bro
Germano
Germanocommented6 years ago
@Fredsai,good :D it is nice to hear they are doing ok
Fredsai
Fredsaicommented6 years ago
@Germano, I'm already back man, I was a couple of weeks behind with posting so I will show soon how I found this lady once back 😉 anyway I had my Grandma water the plants, she was hwre I guess 3 or 4 times in 10 days, so I think she watered once every second or third day, which even though it was like crazy hot was just enough, all the plants were just fine 🙂 however, I'm projecting a system to water remotely, but that's the next level and I will work on it just for the next season in case. Enjoy your growing ✌️
CoastGrower
CoastGrowercommentedweek 56 years ago
The sidebranches are going to pop now :). I would use a bit thicker strap.. the one you are using could cut in your plant if it’s windy.. there’s a diary on here were a guy lost the top of his plant. She’s looking good!
Fredsai
Fredsaicommented6 years ago
@CoastGrower, thanks buddy, I will :) it happened on my Cheese too, a storm damaged the top and I had to cut it off, and now it happened againg on this one (just by some strong wind, it will be in the next weekly update), so I will go for thicker ties to avoid repeating the same mistake!
CoastGrower
CoastGrowercommentedweek 66 years ago
The plant is still going to grow for a few more weeks. Mine stopped growing around week 9-10. Your plant is going to love LST. Just be a bit carefull :).
Puffer_Bill
Puffer_Billcommentedweek 16 years ago
🍀😎🤞🏼
Puffer_Bill
Puffer_Billcommentedweek 26 years ago
Getting her health back by the sounds of it. 🌱💚
CoastGrower
CoastGrowercommentedweek 16 years ago
Looking healthy.
the end.
Enjoying this diary? Follow for more updates!
FredsaiFredsai
Follow Author
OR
Prefer the old Diary view?
Go back to the old Diary view