Chat
RecommendedRecommended

Shade-grown 2020

4
13
13
342
4 years ago
Follow
4
Greenhouse
Room Type
Defoliation
weeks 3-4, 6, 10
Topping
weeks 6
Soil
Grow medium
8 l
Pot Size
Grow Conditions
Week 6
Vegetation
40
cm
inch
Height
14 hrs
Light Schedule
12+ conditions after
Login
Nutrients
ml/l
ml/gal
tsp/gal
3+ nutrients after
Login
Grow Technique Usage
Topping
Technique
Defoliation
Technique
Commented by
TC_Connoisseur TC_Connoisseur
4 years ago
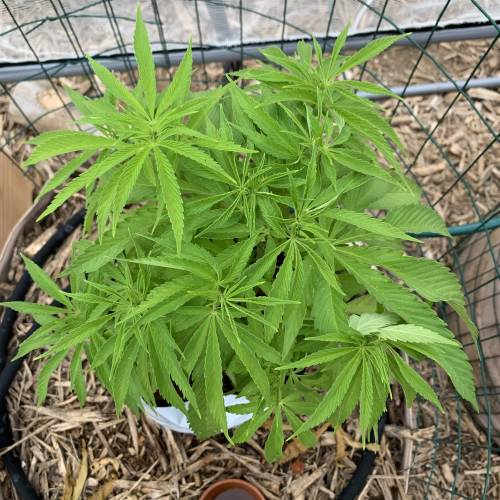
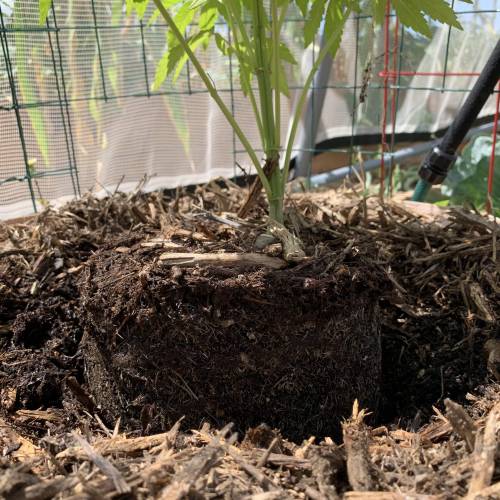
Week 6, the plants have been topped, transplanted, and are doing well. Once again a bit late on this update, I could actually be well into week 7 if I went back and checked my dates so if dates are a bit off then that is why. I have to admit this last week was a struggle, I entered it still with a decent nitrogen deficiency and subsequently increased my water with nutrients to 3x this week and used a watered down solution of nutrients the other 4 days, this helped quite a bit but I made an important observation that may help explain why I’m not having good results. These damn grow bags leak nutrient solution faster than it can get absorbed, it seems to me that what ever color solution I put in wether clear water, cloudy(fish fert), or brown Terp tea I get near instant run-off of the same color. This has led me to believe that something about the bags, likely it’s how non-rigid they are, allows my nutrient solution to leak out before fully absorbing or filtering through the media. I’m not sure if there is a fix for this but oh well, they are out of those bags anyways! ~Topping~ Yea I know, I said I wasn’t going to, I lied... But I couldn’t stand the thought of not topping them, they just get so much bushier and filled out so I topped them with 6-8 internodes left and today will cut some clones to go into my clone tent. I went with a Secret Jardin something-90, its the 3 compartment tent, but more details on that in an upcoming separate journal. ~De-Foliation~ De-foliation, here I have some specific ways that I work, first is at this stage I never defoliate a leaf that the plant is not already attempting to shed. This means I allow the lower fan leaves to yellow while the plant is re-absorbing any of the Mobile nutrients in the leaf. I help this process along by tucking the fan leaves behind the auxiliary branches, this tells the plant that that fan leaf isn’t getting enough light and it helps terminate them more rapidly while at the same time, growing my auxiliaries in direct light. Once the leaf is very pale green/yellow to yellow and maybe with red petiole I pull it. My belief is that this is the best way to keep that leaf at maximum production and feeding nutrients that would otherwise be lost to the plant while the plant refocuses attention(Growth Hormones) to the auxiliary branches I want for budding/cloning. I used to remove my fan leaves while green to achieve similar results but noticed a slight slow down for a week or two each time. ~Transplanting~ This was probably a week over due by the time I got to them as the plants were definitely in the early stages of being root-bound, I will have to hand it to the grow bags in this case though, although they were rootbound it felt looser than a rootbound pot would have been so a small improvement there. My transplant prep went something like this. I dug a hole, shorter but wider than my grow bags, shorter because I wanted to do something referred to as a “Volcano-Tech” by the Greenshock and Mendo Dope guys on YouTube, by the way if you’ve never heard of them now is a great time to get on YouTube and learn. But the “Volcano-Tech” method is simple you mound up to your plant so that water runs off to the lower areas and roots and does not hang out around the stem and thus avoids stem rot, also more of your roots surface is exposed to higher oxygen levels so that will probably also be a benefit. Now to the hole preparation, to the hole I added my Uprising Foundation and Bloom at 5ml each, 180ml of work castings, and 30ml of Nitro Guano, mixed and watered than put the plant in the ground. Once it was in the ground I used the excess soil from the hole to help shape the mound. Simple, easy, and done. ~Humic Acid Concentrate~ So here is the first “special project” I hinted at earlier in this journal. This was my way of making a stable Humic acid concentrate that can be put through a drip system. Now I know I can just buy this, but I need it in large amounts for my non-cannabis crops, this means it needs to be both high quality and cheap. For this I turned towards two of my favorite companies, BioAg and Ss Brewtech, BioAg having in my option some of the best Humic Acids on the market and also a dry soluble one that can be turned into concentrate; while Ss Brewtech has the perfect solution for a near medical grade cleanable and conical mixing tank that also has a full spout at the bottom for easy bottling. The addition of the Cold Brew Coffee Kit to the BrewBucket allowed me to both filter and mix at the same time. The process went like this, I filled my BrewBucket with 20L of RO water, which took a while. Meanwhile I got my air pump and air stone ready, I added (1) 1kg package of BioAg Ful-Humix to the coffee filters, also from Ss. I dropped the air stone into the bag with the ful-humix and zip tied it shut, then I took the bag and dropped it into the metal hopper in the lid of the cold brew coffee kit and turned the air pump on. It worked great, after 72 hours, although it probably didn’t need to take that long, I had a very concentrated dilution if Humic acid, I bottled it up, labeled it and put it on my racks. I now have 20L of liquid Humix acid for $38.
Similar Diaries
First grow: Cinderella auto
11 weeks
First grow: Cinderella auto Kaythestrangeone
Cinderella Auto
5 months ago · 2 comments
Jaffa Caked Blues
29 weeks
Jaffa Caked BluesRoyalflavours
Meanbeanz
10 days ago · 4 comments
SM420growoff2024 Sour Diesel Auto
16 weeks
SM420growoff2024 Sour Diesel AutoPrilyfe13
Sour Diesel Auto
4 months ago · 22 comments
Spider Farmer & RQS
19 weeks
Spider Farmer & RQSCryptoProphet
+3 strains
5 months ago · 35 comments
Auto Big Demon
11 weeks
Auto Big Demonjustsomedude420
Auto Big Demon
5 months ago · 94 comments
Comments
Login

Show by Week
Sort by
popularity
popularity
newest
oldest
TC_Connoisseur
TC_Connoisseurweek 6
@deFharo, Now I understand the question. To answer if mycorrhizae can grow in mulch I would say yes, it can grow in mulch in certain conditions. This is all anecdotal from my experience and at least one source, Chris Trump who seems to be very knowledgeable in Korean Natural Farming, KNF is where I took my ideas from and applied them to my projects. To start, Chris Trump’s way of collecting mycorrhizae or IMO from the forests included sifting through the top layer of natural leaf mulch around the base of mostly old growth trees, he would collect this and use it to boost his collection of Mycorrhizae. I took this idea to a mulch pile from last year when we ripped out lots of bushes and ground up roots, leaves, stems, trees, and basically all manor of plants; one possibly important note there is we literally ripped the plants from the ground so roots and all where mixed when the material was shredded. As this material composted I noticed a layer about 4”(10cm) into the mulch that extended some 4”-6” (10-15cm) into the pile that was rich in what appeared to be mycorrhizae. I grew this mycorrhizae into IMO 1 then IMO 2 I watered the IMO 2 in with seedling transplants and I noticed a significant amount of nice fuzzy roots and fuzzy mycorrhizae when I re-planted these. Although there was nothing scientific about the method I would say the Results were good and I would do it again. For the Spent Brewers grain this I nearly observed after using it as a mulch layer it was quickly taken over my fungus and made a good growth media for it, from there I did a larger batch with IMO 2 and was fairly happy with the growth on it. I believe Chris Trump uses Hazelnut shells in his video from his IMO 3
deFharo
deFharoweek 1
Buenas técnicas de cultivo, felicidades. ¿No necesitan las micorrizas raíces para prosperar? Yo hago semilleros de micorrizas con arroz o coco fresco, una vez que he conseguido el crecimiento del hongo en este medio, lo deshidrato y guardo para futuros cultivos.
deFharo
deFharo
@TC_Connoisseur, sí es posible lo que tu comentas. He conocido últimamente un método tradicional africano para la inoculación de micorrizas en el sustrato de la maceta o en pequeñas huertas. Y creo que tiene que ver con tu explicación, el concepto es dejar secar el material original (raíces y mantillo adyacente) con las micorrizas para que estas lancen sus esporas, las micorrizas permanecerán así hasta que la humedad y un sistema de raíces hagan revivir y prosperar a las micorrizas. Los africanos seleccionan una planta herbácea salvaje que destaque por su vigor, la arrancan del suelo con su sistema de raíces, envuelven en un paño o malla fina todo el cepellón de raíces, lo dejan secar completamente a la sombra, después como si se tratara de un salero, espolvorean a través del paño o malla encima del sustrato, por lo que dicen da muy buenos resultados. Intentaré probar este método en próximos cultivos. Saludos!!
TC_Connoisseur
TC_Connoisseur
@deFharo, Now I understand the question. To answer if mycorrhizae can grow in mulch I would say yes, it can grow in mulch in certain conditions. This is all anecdotal from my experience and at least one source, Chris Trump who seems to be very knowledgeable in Korean Natural Farming, KNF is where I took my ideas from and applied them to my projects. To start, Chris Trump’s way of collecting mycorrhizae or IMO from the forests included sifting through the top layer of natural leaf mulch around the base of mostly old growth trees, he would collect this and use it to boost his collection of Mycorrhizae. I took this idea to a mulch pile from last year when we ripped out lots of bushes and ground up roots, leaves, stems, trees, and basically all manor of plants; one possibly important note there is we literally ripped the plants from the ground so roots and all where mixed when the material was shredded. As this material composted I noticed a layer about 4”(10cm) into the mulch that extended some 4”-6” (10-15cm) into the pile that was rich in what appeared to be mycorrhizae. I grew this mycorrhizae into IMO 1 then IMO 2 I watered the IMO 2 in with seedling transplants and I noticed a significant amount of nice fuzzy roots and fuzzy mycorrhizae when I re-planted these. Although there was nothing scientific about the method I would say the Results were good and I would do it again. For the Spent Brewers grain this I nearly observed after using it as a mulch layer it was quickly taken over my fungus and made a good growth media for it, from there I did a larger batch with IMO 2 and was fairly happy with the growth on it. I believe Chris Trump uses Hazelnut shells in his video from his IMO 3
deFharo
deFharo
@TC_Connoisseur, sí, las técnicas de semillero de micorrizas con arroz y coco o la captura de MM, etc. vienen de Japón y Korea, su uso en agricultura orgánica es conocido hace tiempo. Mi pregunta iba dirigida a saber si en un compost la micorriza sobrevive, porque para la proliferación en los cultivos de este hongo, él necesita estar en contacto con las raíces de la planta. Lo cierto, es que tampoco tengo claro si el tiempo medio de un cultivo de cannabis en maceta es suficiente para el establecimiento del hongo. Yo lo aplico desde el primer trasplante, para dar tiempo al hongo a reproducirse, pero hasta ahora no he conseguido distinguir el hongo en mis sistemas radiculares, a diferencia de los Microorganismos de Montaña (MM) que si los veo proliferar y trabajar debajo del Mulch. Yo actualmente vivo en un apartamento y cultivo en macetas, con lo que estoy limitado en el uso de algunas técnicas para la multiplicación de las micorrizas, pero lo más interesante es crear un sistema de inoculación en plantas huésped y de esta manera tener un semillero vivo y constante del hongo micorriza. No he probado la multiplicación con restos de levadura de cerveza, la levadura inactiva de cerveza la uso en ocasiones para riego es una buena fuente de potasio, también la uso como materia seca para la elaboración de Bocashi.
Load more (1)
deFharo
deFharoweek 6
Para la extracción de ácido húmico, fulvico e himatomelanico, yo uso como materia prima leonardita, las extracciones las realizo por hidrólisis alcalina, también lo hago con bio fermentados. Un saco de 25kg de leonardita tiene un costo de aprox. de $25. y puedo sacar producto para nutrir 4 hectareas, para la fórmula básica sólo necesito: Un barril, Leonardita, Agua pura y KOH. Tengo varias formulaciones donde además de la leonardita como elemento principal, añado otros minerales y componentes orgánicos, el producto resultante es excelente, yo lo uso en diferentes fases de mis cultivos. Sigue mis diarios orgánicos, tengo tips sobre como hacer toda clase de preparados orgánicos. Saludos
deFharo
deFharo
@TC_Connoisseur, Hoy he hecho una actualización en mi diario 3M • Diesel donde muestro la creación de Humato potásico enriquecido con minerales. La semana que viene hablaré sobre la deshidratación y uso de este preparado. Saludos.
TC_Connoisseur
TC_Connoisseur
@deFharo, Very good information and after quickly looking at your diaries they are very detailed, I have some studying to do! Hope to see you around and I’ll be looking forward to reading your grows!
Mrs_Larimar
Mrs_Larimarweek 4
You have been putting in here some great Informations. Back to your Plants and Heat......Its the Roots who dont like it to get warm. So your goal is like cooling the Roots. That menas , diggin her into the garden, giving her bigass growpot. or you can take the pot you have and out it into another bigger pot around and put in here claypebbles that you water,,, The water that condensates from the claypebbles cools the growpot ( roots) I hope you understand my writings,,, because english is not my language. Weed can grow under nearly every condition... htat the fun fact. As long the roots are nicely cool and she gets enough water to transpirate your Plant will be fine Iam doing alot of Outdoors, with different growinpots or without. In summer iam watering them twice a day to make sure they are ok and toots stay cool In very hot Summers, Iam digging holes to put the pot into.. so the ground cools down my growingpot// the roots
TC_Connoisseur
TC_Connoisseur
@Mrs_Larimar, That is a very interesting point! I like the idea of burying them in the soil a lot. Right now they are only in the plastic pots(bags) because I am waiting on Male vs Female before planting, but no reason they can’t “beat the heat” semi while buried in their final home. I also use White pots for the reason of keeping the roots cool, black pots under my sun get very, very hot and would probably kill all of my beneficial bacteria/myco. I wish I could also water them during the day but my greenhouse is set up temporarily so that I can move it, hopefully this winter, to it’s final location. This means my water is all run in above ground hoses that get extremely hot and the water coming from the hose could have easily wilted a plant on-contact last week. Watering mornings and late nights was the best I could do to pump them full of water...speaking of that, time to water! And don’t worry about your English! I can’t even speak a second language so you have me beat there. Your input and experience is always valuable and appreciated!
Mrs_Larimar
Mrs_Larimarweek 2
Interesting... always good to see new mixes of substrate------ its not easy to change growmedias,,, and go with a new mix or a new one... crossing fingers it works
TC_Connoisseur
TC_Connoisseur
@Mrs_Larimar, Thanks you! I am curious as to how they will due, I have only ever strayed from Roots Organic or Nectar for the Gods twice before (an indoor grow and last years greenhouse) and the results were only ok. With any luck next year I’ll be back to my Roots and hopefully their Greenfields.
Mrs_Larimar
Mrs_Larimarweek 5
Nice to share your Thoughts about the Grow. I got to smile when you described the slugs on your soilbags^^.....happy growing