Chucky324 Hello. I run a 2 stage grow room. I try to keep my seedlings and clones small, until I can get them in the main grow room. These seeds were started April 28 . I have to flush in the grow room. I flush for 2 weeks, then harvest and clean the room and get my seedlings and clones in. It will be about 2 more weeks of grow and then I'll flower for 70 days.
So check back.
Chucky.
5 likes
comments
Share
Used techniques
LST
Technique
Topping
Technique
Defoliation
Technique
2
Week 2. Vegetation
6y ago
1/10
35.56 cm
Height
18 hrs
Light Schedule
26 °C
Day Air Temp
6.3
pH
Weak
Smell
900 PPM
TDS
60 %
Air Humidity
20 °C
Solution Temp
25 °C
Substrate Temp
20 °C
Night Air Temp
0.5 liters
Pot Size
0.5 liters
Watering Volume
10.16 cm
Lamp Distance
Nutrients 9
PI Nutrient Micro
2.25 mll
PI Nutrient Grow
2.25 mll
Karbo-Boost
0.7 mll
Chucky324 Hi all. A couple of these are getting a little long. I've found, that in my grow room, I can handle plants that can space up to 4 inches between leaves. Although I love Sativa's they can be to big for my grow room, Just sayin,. These plants are no where near that length. I start my 2nd week of flush in the main room. then, clean up , then I can get these in there. With usually 2 weeks veg, and 10 weeks bloom. I run hydroponics. A simple gravity system. 10 gallon reservoir. I'll show you in a couple of weeks. I will also show you a couple of pictures of this harvest in the grow room. I'll report more later. Have Fun and Chuckles.
Why can't Advanced Nutrients be ship into Canada? I went to the grow store yesterday to stock up. They said "Can't get it, not getting through the border". Anybody know why or when?
Приветствую, бро! Advanced Nutr. находятся в Голландии, через океан усложнились перевозки, многие компании просто не связываются с доставкой через океан. Слишком много требований должны соблюдать перевозчики и многие не выдерживают окончательную цену за доставку. Нужно подождать конца пандемии и перевозки возобновятся! Удачи, бро! Будь здоров! 👌😇👍
Chucky324 Hello. The plants are getting bigger : )
It' harvest time in my main grow room. You saw the pictures. That's about 18 hours work. I like to try to do it in 1 day. It makes my drying schedule easer.
Then in a few days I'll start the clean up; empty and wash the pots, sanitize the main room, table and reservoir all with a water and bleach mix, don't forget to rinse with water.
Next I'll mix my medium, I use 3 parts perlite to 1 of vermiculite. I like it because it's made here in Canada (coconut coir isn't) and is ph neutral, holds water but has lot of air spaces. It only needs a few hours to dry out enough to turn the lights off, unlike soil. That means an extra feeding to me.
Next I'll repot seedlings and clones.
Then start all over again.
I'll include pictures of the harvest as I go
Chuck.
6 likes
2 comments
Share
Used techniques
LST
Technique
HST
Technique
Topping
Technique
Defoliation
Technique
4
Week 4. Vegetation
6y ago
1/59
48.26 cm
Height
18 hrs
Light Schedule
26 °C
Day Air Temp
6.3
pH
Weak
Smell
900 PPM
TDS
60 %
Air Humidity
20 °C
Solution Temp
25 °C
Substrate Temp
20 °C
Night Air Temp
1 liters
Pot Size
0.5 liters
Watering Volume
10.16 cm
Lamp Distance
Nutrients 9
PI Nutrient Micro
2.25 mll
PI Nutrient Grow
2.25 mll
Karbo-Boost
0.7 mll
Chucky324 OK. I put some of "My picks" up. It's been harvest week.
Now It's clean up, dump and wash the pots are next. I'll post pics of how I reclaim a lot of medium. I just turn he pots on their sides and a lot of perlite mix (see last week) falls off the roots.
I'll show pics of how I transplanting my clones into the new pots and then into the grow room. I'll be busy. See ya Chuck.
>Reclaiming medium, (see pictures) I flush for 14 days, and 3 days of dark with no water. So the medium is well flushed and somewhat dry. I clean up and then spoon off the top 1 inch, to get rid of algae and salt buildup, then turn the pot on it's side and the medium will fall off the semi dried roots. Some pieces the roots will hold on to some medium but most fall of. Pull the root ball out and more will fall off the roots. I put some landscapers felt in the bottom of the pots and the roots love it (see pictures). The only thing that is thrown away is the plastic bag of landscapers cloth. The root balls are taken to the municipal composting and turned in to soil. I'll reuse half of the reclaimed medium with new medium for the next group of plants. The rest is dried and will be used in the greenhouse next year. When mixing new medium take care not to breath the dust. I use a large garbage bag to mix my medium. Put measured medium in the 1/2 full bag add some water to control the dust, gather the top of the bag, blow extra air into the bag then gather the top. I roll the bag over my shoulder while holding the bag closed with my hand. Repeat 10 times or so and the contents will be mixed and damp.
>I hang the wet trimmed stocks and the buds for 3 days with a small fan moving air about the room. And the way I dry them is in a paper bag. There is a gas that is released by the drying buds that will cancel the bitterness of the dried bud with an improved taste and smell of the finished product. The old hippies said " you need to put the buds in the middle of a bushel of straw, that catches the gas and holds it in place and the straw wicks the moisture away". A paper bag works just fine. It holds the gas in place and wicks the moisture away. The bags are hung for 1 week, No looking, or you'll let the good gas out. Don't put too much in the bag. I try not to go past the top of the triangle on the side of the bag. I try to shape the buds inside the bag into the shape of the closed bag. Hang the bags on the same line you used to hang the cut branches, with 2 clothes pins, with the small fan still blowing. Always label every thing as you go.
>The way to tell when the bag and buds have dried enough: is after hanging the bags, push up on the bottom of the bag with 1 finger. You should hear a soft crinkle or two but with all the moister in the bag it won't make a lot of sound. If you do that day to day you'll hear the bag make more noise. When the bag is quite crinkly and you hear the small sugar leaves scrape on the inside of the bag, it's time to look . After opening the bag you'll see some shrinkage,, pull the buds apart gently and look in the middle. It's up to you at this point, the buds may have to be hung for a few more days. When that's all done I put everything into mason jars.
>Repotting clones into the flowering pots. Preparing pots. See pictures. I attached tomato cages to the pots. It's awkward to wash the pots, but really helps the rest of the time. I line the bottom of the pots with landscapers felt (different than landscapers cloth). When the pump is on, the felt is filled with water. When the pump stops, the felt quickly drains of water but is still damp and doesn't dry out. the roots love that area (see pictures). With the water going on and off, it acts like a pump. Used air is pumped out and good air is pulled in after the water drains. I feed the plants 3 times a day, but leave a couple of hours of light, to dry the pots enough to turn out the lights (less mold problems that way).
>Repotting clones. See pictures. I fill the bottom of the pot, up to the top of the felt with reclaimed medium. Years ago I thought about my waste and thought I'd try to reduce it. With letting the plants dry in the dark period I found some medium poured off easily. I thought I'd try, and this is what works for me. There is already friendly fungus and microbes in the used medium, I don't have to try so hard to get new cultures going. Next get your plant ready. See pictures: If you take off any branches and bury the stock you will get roots out of that stock If its a tall plant dig down a bit, if its a smaller plant just place the root ball on the reclaimed medium. Fill up with new medium. Leave 2 inches at the top, that will be filled with reclaimed medium. Label everything.
>Back in the main grow room. Next week I'll show you my equipment in the grow room. Chuck.
6 likes
comments
Share
5
Week 5. Vegetation
5y ago
1/7
48.26 cm
Height
18 hrs
Light Schedule
26 °C
Day Air Temp
6.1
pH
Weak
Smell
1500 PPM
TDS
54 %
Air Humidity
20 °C
Solution Temp
25 °C
Substrate Temp
20 °C
Night Air Temp
3 liters
Pot Size
1 liters
Watering Volume
60.96 cm
Lamp Distance
Nutrients 10
Karbo-Boost
0.3 mll
Worm Juice
1 mll
Kelp - Liquid
1.5 mll
Chucky324 Hello. Got the plants into the main grow room.
There is 2 videos . In the first I just sit in the room quitly and turn the camera. you get a sense :) of what it's like in there. In the second I try to describe what's in the room, equipment and maybe a new technique. With the tomato cages I use, and needing the plant to slow down, I twist the stock into a large figure 8. Eventually I take off what is on the lower part of the 8, and just work the top of the 8.
About 2 weeks in veg in this room. Then I take clones of everything before I switch to flower.
>Carbon dioxide enhancement: I had to make that choice 20 years ago. I could, rent a tank and have my name on a list, at the gas store. Or make my own. They didn't have the small propane tanks like they do today for the blue flame you get when you burn it. I decided on a kerosene lamp burning down as low as it could be without going out. It makes a half blue and half yellow flame. I vent constantly so the small amount of carbon monoxide is not a problem. For the first week you can smell it a bit, but the smell disappears after that. I light the lamp in the morning and put it out at lights out (unless it's bed time). It needs to be put in a place in the room that cant get knocked over (pets, children, ?). I try to use extra attention whenever I use it. It can burn down the place. Be careful Please.
>About 17 years ago I thought I'd lower my table by knocking a hole in the cement and dropping my 10 gallon reservoir more. I was able to lower it by 16 inches. Still have to watch the height of some plants though, it worked out well. Watch the video.
> Air cleaner: The reason I got a big 8 inch exhaust fan was, I had a bout of powder mildew and needed better a exhaust system. When I plugged it in there was too much air moving. I phoned and asked and the salesman said that a dimmer switch wasn't a good idea. I put one on anyway. Works great. I have the fan barely on in the winter and about half way on in the middle of the summer. I haven't had any powdery mildew since. About 12 years ago I bought a good air cleaner. An ORECK, It has electrified plates that zap any organic particle or spore that come between the plates. Use to grow a Northern Lights that got 6 to 8 ounces per harvest, it grew big buds. Buds as big as my forearm. I had problems with gray mold attaching the buds. But none since I bought the air cleaner. Ya learn as you go.
6 likes
1 comment
Share
Used techniques
LST
Technique
HST
Technique
Topping
Technique
Defoliation
Technique
6
Week 6. Vegetation
5y ago
1/12
48.26 cm
Height
18 hrs
Light Schedule
26 °C
Day Air Temp
6.1
pH
Weak
Smell
1500 PPM
TDS
54 %
Air Humidity
20 °C
Solution Temp
25 °C
Substrate Temp
20 °C
Night Air Temp
3 liters
Pot Size
1 liters
Watering Volume
60.96 cm
Lamp Distance
Nutrients 10
Karbo-Boost
0.3 mll
Worm Juice
1 mll
Kelp - Liquid
1.5 mll
Chucky324 Hello. I change my hydro on Mondays, and I'll be turning the room over to flower next Monday. To do that I like to prune the plants at least 4 days before turning to flower. Plants will go into shock if you take more that about a third of the plant off. I want the plants to recover before going into flowering. At this point, I'll try to think ahead and see in my mind what they will look like after stretching and take only what I need to (it will be easier with more experience). I take off the bottom 1/3 of the plant but I set up clones at this point. I will take 2 clones each of the 5 featured plants. I'll probably won't keep all of them, but the best. I don' always keep the one with the biggest buds. I grow for myself, and the buzz/stone is most important to me. Taste and smell are next and appearance is last. It's nice when the biggest buds get you the most blasted, but it doesn't always happen. My next major trimming is in the 3rd week of flowering. I'll talk you through it then. We will take clones next time. Chuck.
7 likes
comments
Share
Used techniques
LST
Technique
HST
Technique
Topping
Technique
Defoliation
Technique
7
Week 7. Flowering
5y ago
1/30
48.26 cm
Height
18 hrs
Light Schedule
26 °C
Day Air Temp
6.1
pH
Weak
Smell
1500 PPM
TDS
54 %
Air Humidity
20 °C
Solution Temp
25 °C
Substrate Temp
20 °C
Night Air Temp
3 liters
Pot Size
1 liters
Watering Volume
60.96 cm
Lamp Distance
Nutrients 10
Karbo-Boost
0.3 mll
Kelp - Liquid
1.5 mll
Wollammo
0.5 mll
Chucky324 Hello. I have turned "The Room" over to flower and took clones and wanted to go over the cloning procedure for you.
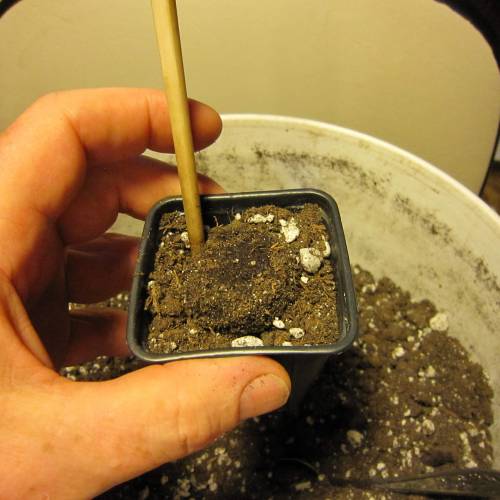
> I haven't liked the tray and dome that you normally make clones in, so I tried something different. The problem with the domes and trays is they don't keep in the humidity. You need 90% to95% humidity for the first week. It makes it easier for the plant to start roots when it's not struggling for humidity. The clone takes up some water through the stem but relies on the extra water from the spay bottle sprayed on the leaves.. I needed a tight fitting lid to keep in the moisture. I liked the opaque light the ice cream bucket let in and I found a thin but ridged clear plastic lid to let in more light. When I put the lid on and looked at it from the side there were small gaps, so I needed some weight to hold the lid down flat, I thought pennies would work. Now I needed small pots to fit inside the bucket. These small pots worked for me, I could 5 in each bucket. The clones start so much easer in the peat pellets with cloning gel on the stem (see pictures).
> If you look at last weeks diary, you'll see I set up clones on the plants. The bottom branches are best for taking clones. Being closer to the ground they carry more natural rooting hormone, so if damaged in nature and a small piece of plant fell to the ground and could start on its own. I remember the old hippies showed me how they took a few bottom branches, made clippings, dipped in rotting gel and put in the ground around the main plant. He had made plastic cups with a plastic straw in the side for some air transfer. He put a small rock on each so the wind wouldn't blow them away. Each day he would go look after the clones and in 2 weeks he would have a tall main plant with some smaller ones around the south side.
> So you got all your stuff together and they sort of look like the pictures. A opaque plastic bucket, pots filled with soil and a swollen peat pellet, a clear lid. Now you will need a pan half filled with water, a
safety razor blade(one side blunt), scissors, cloning gel and some paper towels or rags for the water on the fingers, scissors, and razor blade. I also like a waste bag or basket near by for waste plant pieces and leaves and you'll be touching the soil and will need a place to wipe your fingers to get back to work quickly.
> Go get the branches you'll be working with. Keep in mind the pictures. I gave you 4 examples of good clones clippings. Put the branch in the water. You'll only make cuts under water. The idea is to stop the air bubbles from forming in the stem after you make your cut. If the air bubble gets too big then the plant will die. The leaves you can cut out of the water but I cut them under water because I'm working in it.
> You need a leaf node in the rotting area. It's been showen that the roots start there first. It takes longer for the roots to form on the stem without the leaf node. So before you make a cut figure where you want that leaf node on the stem. Cut that leaf and small branch (that's just forming) off. Take the razor blade and cut a 45 degree angle cut. Hold the waste end of the stock when you make your cut. I've held the clipping end too hard an bruised the young stem, then it will be slower to take.
> You want about half the big leaves taken off. The idea is that the plant can not take up enough water to keep all the leaves going. But the clipping will trade some leaves to make the roots. So if after a week you see the lower leaves going brown, you know the little clipping is starting to make roots. Please see the pictures and notice what I've taken off. Try not to hurt the growing tips.
> O.K. You've made a good clipping. Now put in the rooting gel. You want about a inch on the lowest part. Please don't hurt the bottom of the clipping, that has to take up water. So put in the gel gently and into the peat pellet easily.
> You'll need to put your fingers into the pot and close the hole without hurting the stem. If you leave it and just water, you might wash the gel off. Wipe your fingers off at the waste bucket. You can put a bunch of cuttings in the peat holes before you close the holes. Saves time and you don't have to wipe your hands so much. But don't wait to long or the gel might run off.
> Gently water the soil until you get some run off. This will fill in all the finger holes. Let a bit of water sit in the bottom of the bucket, You might have to add more after 24 hours. Put the lids on with just the smallest hole (see pictures).
> Set the lights at 18 hours on and 6 off. The day time temp. is best from 22 to 27 degrees. Try not to let the temp go too low in the dark period,
> For the first 3 days nothing but water. Spray water twice a day at that time. After 3 days add a very small amount of food to the spray bottle for the foliar spray. Add to much food and the salt in the food will dry them up. After 3 days spray once a day. After a week you can take the small weights off and give them a bit more air transfer. Still straying once a day. Each time you spray, wave your hand over the bucket. the air movement will refresh the air in the bucket. The clipping is using up the air (oxygen and carbon dioxide) and it will also have waste air that needs venting. If your breath is nice and fresh Blow on your clippings, they can use the extra carbon dioxide (don't blow on them with stinky morning breath, they can smell too!)
> After 2 weeks you can take the lid off and lower and the lights a bit. Some times, after a few days you might notice 1 sorta wilting more, you might need to put it back in the bucket and put the lid back on. Some strains might need a little longer that 2 weeks to take roots. You can add your favorite Friendly Fungus and Microbes straight to the soil. Sprinkle lightly around the soil. If you have any questions please ask. Chuck.
5 likes
comments
Share
8
Week 8. Flowering
5y ago
1/11
48.26 cm
Height
18 hrs
Light Schedule
26 °C
Day Air Temp
6.2
pH
Normal
Smell
1400 PPM
TDS
54 %
Air Humidity
20 °C
Solution Temp
25 °C
Substrate Temp
20 °C
Night Air Temp
3 liters
Pot Size
1 liters
Watering Volume
60.96 cm
Lamp Distance
Nutrients 10
Karbo-Boost
0.3 mll
Kelp - Liquid
1.5 mll
Wollammo
0.5 mll
Chucky324 Hello. 2nd week of flowering.
>I've included some pictures of my hand mixer, little propeller on the end. That is a very well used piece of equipment I use it to mix all my water. It add loads of air to the water, which is what you want. The mixer can saturate a bucket of water with air, with in a minuet or two. If the water you use has been sitting for 24 hours or more than give it a blast of air before you water your plants. If you use city water, the mixer will dissipate the chlorine in the water (It's really the oxygen that does that) the more you mix it. The water will remain charged for about a hour , than slowly dissipate. After 24 hours there will hardly be any oxygen left in the water, so make sure you charge up the water for any plant in your care, please.
> I took off some fan leaves that were in the middle and not getting a lot of light. This is light stressing the plant. It's forcing the plant to get its light from the smaller leaves. Take only 4 to 8 big leaves off per week until the 3 week of flowering when I go in and do the last defoliation. You can also control your rh (relative humidity) in your room by removing some big leaves, just not too many at this time in your cycle. I look over my leaves for any bad signs, spots, bugs, right and wrong colors and deficiency's.
> The plant are looking good and healthy. Chuck.
6 likes
comments
Share
Used techniques
LST
Technique
9
Week 9. Flowering
5y ago
1/16
104.14 cm
Height
12 hrs
Light Schedule
26 °C
Day Air Temp
6.2
pH
Normal
Smell
1400 PPM
TDS
54 %
Air Humidity
20 °C
Solution Temp
25 °C
Substrate Temp
20 °C
Night Air Temp
3 liters
Pot Size
1 liters
Watering Volume
60.96 cm
Lamp Distance
Nutrients 7
Karbo-Boost
0.5 mll
Kelp - Liquid
1.5 mll
High Output Garden Grow
1 mll
Chucky324 Hello. Easy week. I going into my 3rd week of flowering. Next time I show how I defoliate and do my last trim and prune.
> I like to do it then because the plant has 3 phases in flowering. The transition to flowering, the flowering, and the bulking up and ripening of the flowers. I want my plants going into the 2nd phase fully before I send them into a final shock. It will take about 3 days to recover, then the plants go right into flowering. What you take off on the bottom you will get back on the top buds. It's up to you how much you want take off at this point. More on that next week. Other techniques like lolloping can be done at this point.
> The clones look good, only 2 look a little yellow (from different plants) As long as i get 1 from each plant I'm doing good. The taller clones on the right will be cut down if all the clones take (meaning: to root). I like things all the same height for a while, till my tall ones start growing.
> My plan. I used to grow for 7 weeks and it wasn't easy to find the fast flowering strains back then. Especially when the European seed sellers didn't count the first 2 weeks of flowering. We all do it the same now. Then, I started growing 8 weeks and that opened up a lot more strains I could grow. Now I like to grow 10 weeks with the last 2 weeks in flushing. Through that time I found it very helpful to write things down where I could see them at a glance. Make a plan. Stick to the plan. Be prepared to improvise in case something goes wrong.
> Picking the best plant: If you rub the stock and the stock of the fan leaves with your fingers, not enough to hurt the plant. If you purse your fingers together you can feel the resin content of the plant. There are 2 types of resin, sticky and smooth or slippery. Smooth and slippery are more from the sativa line and have more of a head stone, normally. At this point you can smell your fingers and you'll get the smell and taste of the finished product. No don't lick your fingers. :) When you smell, open and close you fingers a couple of times. Notice how long the smell lasts or how quickly it disappears. pick the plants that smell the best and have the most amount of resin (either stick or slippery). If I want to go through a lot of seedlings, the plants can be tested the same way, quickly. If you could wait till week 12 to do this, you get a lot better smell, but you can do this after week 8. To go through a lot at one time, I carry a small bottle of vodka and some small pieces of cloth or clean rag. I wipe my fingers, with alcohol on the cloth, between each plant I test. I also clean my pallet. No I don't drink it, :) I put the cloth under my nose and take a big inhale or two. There that will clear your head and nose and pallet. You can move through a lot of seedlings or a bunch of different clones with this test. If I see a new plant (to me) I can do a quick test.
> Applying this test to my new plants.
Plant #1 Smell is weak and resin is low to the touch. It needed to be topped, and is the meekest in growth rate.
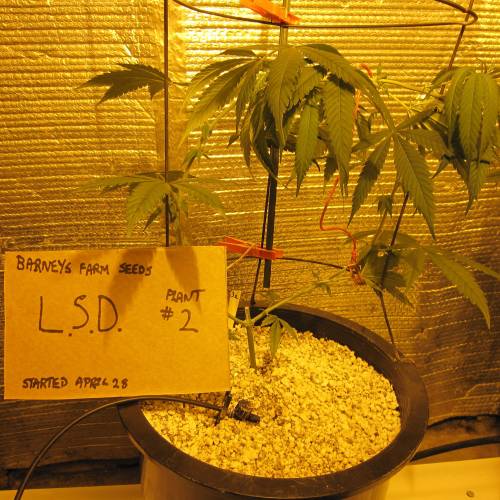
Plant #2 Smell is medium and resin content is medium. It is a fast grower. Needed to be topped young and still grew fast 2 to 3 inches between leaves. My figure 8 method was needed, to slow the plant. The bottom of the plant needs to be pulled into an O and tied on the top (see pictures). I left a tight string on too long and the stems fused. Oh well. If the plant is still growing strong, the top part can be pulled into an O shape and now the plant has its stock like a figure 8.
Plant #3 Smell is strong and lasts the longest. Resin content is good, between sticky and slippery. Needed to be topped a week before flowering. Strong branches and good growth pattern. This one is the one to watch.
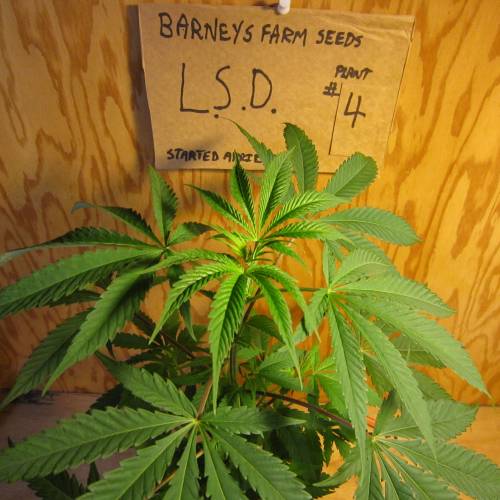
Plant #4 Smell is medium and a little different than the others, a little spicy. Resin is medium. This plant was topped a week before flowering and is now the tallest plant due to stretching the most.
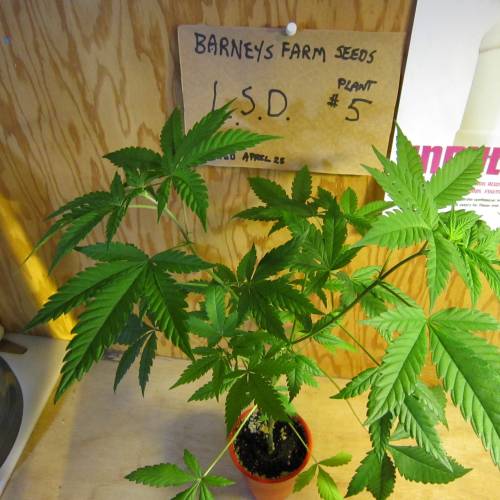
Plant #5 Smell is medium and the resin content is medium and more slippery. This plant was topped early. Applied the figure 8 method to slow it down.
See you next week. Chuck.
7 likes
4 comments
Share
Used techniques
LST
Technique
10
Week 10. Flowering
5y ago
1/11
129.54 cm
Height
12 hrs
Light Schedule
25 °C
Day Air Temp
6.2
pH
Normal
Smell
1600 PPM
TDS
56 %
Air Humidity
22 °C
Solution Temp
25 °C
Substrate Temp
20 °C
Night Air Temp
11.36 liters
Pot Size
3.79 liters
Watering Volume
50.8 cm
Lamp Distance
Nutrients 8
Karbo-Boost
0.5 mll
Kelp - Liquid
1.5 mll
High Output Garden Grow
1.5 mll
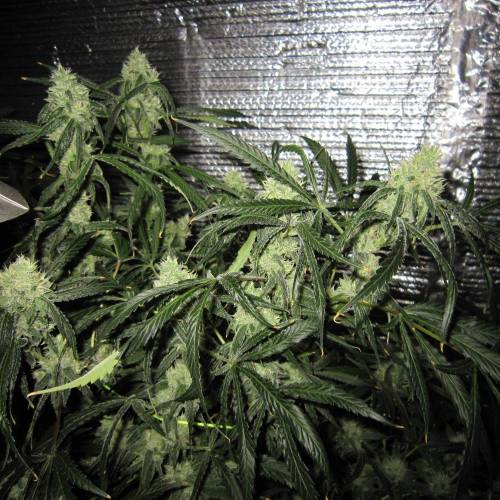
Chucky324 Hello. I've done a defoliation and added another 430 watt light
> I have a light mover that has a 430 watt light. It moves back and forth in a straight line. It pauses at the end for a minute then returns. I find this is good enough to grow in veg and the first 3 weeks of flower. The light mover has a chain which holds the light that I can move up as the plants grow. Then I hit the plants with double light. The bud sites are exposed by defoliation, and the more light the bud sites gets the bigger the buds gets.
> Defoliation- I have found that to lessen the stress I put on the plant at the, in flower, defoliation I take half of what I want 7 to 4 days before go to flowering. I let the plants heal for 3 weeks and then I do my last defoliation. Now I take all the branches off the lower 1/3 of the plant. I clear the middle of big fan leaves and small sucker branches. The longer branches will have been pushed up in the tomato cages and are coming out higher up. My light set up could be different than yours. I have 2 points of light I defoliate to, with a digital light your defoliation might be a bit different. I want you to take what you need from my diary and others and make you own style in the years to come :) Now I concentrate on exposing the bud sites from the leaves. Rule of thumb is: anything that is growing down gets cut off. Any leaves or small sucker leaves in the middle 1/3 that are growing down get cut off. we're going up from here, anything going down is wasting energy. I mostly leave the top 1/3 alone except for taking off leaves that are blocking light and tying back the top branches from the hot lights (there is a 3 foot burning area around the HPS lights. The more leaves you take off at this point the longer the shock will last. You need to find a balance of leaving enough leaves on for good photosynthesis to occur for the plant to make big buds and taking of enough leaves to allow enough light to the bud area. As the buds and small leaves of the flowering area grow the plant will increase photosynthesis over time till the ripening stage. Good enough for now. Chuck.
Hello. I've added a light to my indoor grow. I can't figure how to put it at the top of my diary where other diaries have them. Anybody know how to do it or do I have to contact G.D.?
Chucky324 Hello. Week 5, still 5 more to go. Replaced my air bubbler, noticed it wasn't working. Things like that is why I do a daily check.
> I've got cannabis sex going on in my smaller greenhouse. I picked a Dr. Atomic Northern Lights male, it was shorter and bushy and has smell and some stickiness, if you do the rub test. I didn't know that it had so many flowers. I've read that's a good thing. I had 3 females' under the male but my Burmberry and my Skunkberry came down with powdery mildew and I was tired of fighting it this year. So I got rid of them and just kept my Amnesia Lemon which was p.m. resistant and I'm hoping that the resistance is carried through to the seeds. We'll see :)
> Back to the grow room. I'm a little disappointed that 4 out the 5 of my LSD plants are so stretchy. I had to top all of them. 3, I topped were about 1.5 months old. The other 2, I topped a week before flowering. Don't top plants in flowering they don' do as well but sometimes you have no choice. Chuck.
5 likes
4 comments
Share
12
Week 12. Flowering
5y ago
1/16
129.54 cm
Height
12 hrs
Light Schedule
25 °C
Day Air Temp
6.2
pH
Normal
Smell
1600 PPM
TDS
56 %
Air Humidity
22 °C
Solution Temp
25 °C
Substrate Temp
20 °C
Night Air Temp
11.36 liters
Pot Size
3.79 liters
Watering Volume
50.8 cm
Lamp Distance
Nutrients 8
Karbo-Boost
0.5 mll
Kelp - Liquid
1.5 mll
High Output Garden Grow
1.5 mll
Chucky324 Hello. It's been a warm week around here for this time of year. Some of the tops grew too tall and were Super Cropped. It will take a few days for the plant to recover with scar tissue. Some times I might have to tie the branch's down because the plant will try to pick them up to were they were. Keep the branches at 90 degrees and all the buds along the branch will grow like the top bud. If the bent branch tip is lower that the now, top bud, then only the top bud will grow with top bud vigor. If the bent branch tip is higher than the bend, the plant will continue to grow the top bud.. That's Super Cropping, a valuable technique.
> One of the other growers pointed out, after reading my diary, that the reason the plants were stretching is that the Afghani-Mazar can grow up to 4 meters tall. Cross that with the Skunk #1, that is 75% sativa and you got a stretchy plant. I'm looking forward to trying the phychedelic buzz. Chuck.
6 likes
comments
Share
13
Week 13. Flowering
5y ago
1/16
129.54 cm
Height
12 hrs
Light Schedule
25 °C
Day Air Temp
6.2
pH
Normal
Smell
1600 PPM
TDS
56 %
Air Humidity
22 °C
Solution Temp
25 °C
Substrate Temp
20 °C
Night Air Temp
11.36 liters
Pot Size
3.79 liters
Watering Volume
50.8 cm
Lamp Distance
Nutrients 8
Karbo-Boost
0.7 mll
Kelp - Liquid
1.5 mll
High Output Garden Grow
1.5 mll
Chucky324 Hello. . I was given a couple of clones a while ago. A Pink Kush and a Tom Ford Pink Kush. The difference is, Death Star and Bubba Kush were crossed into the Tom Ford. These two will be my next diaries.
The week went well. I transplanted my next crop as you see in the picture the red cups are the next crop. Of the LSD two plants will be regrown, plants #3 and #4. Sorry a little busy around here. I write more later. Chuck.
5 likes
1 comment
Share
14
Week 14. Flowering
5y ago
1/7
129.54 cm
Height
12 hrs
Light Schedule
25 °C
Day Air Temp
6.2
pH
Normal
Smell
1400 PPM
TDS
56 %
Air Humidity
22 °C
Solution Temp
25 °C
Substrate Temp
20 °C
Night Air Temp
11.36 liters
Pot Size
3.79 liters
Watering Volume
50.8 cm
Lamp Distance
Nutrients 8
Karbo-Boost
0.7 mll
Kelp - Liquid
1.5 mll
High Output Garden Grow
1.5 mll
Chucky324 Hello. I can't seem to up load any pictures. I'm trying a new nutrient and it seems I may have mixed it a bit strong. I'm getting a bit more burnt leaves than I normally do. I went down to 1/2 strength for a day. I have a week left of nutrient uptake before flushing so I'll move my ppm down to 1400 instead of the 1600 that I have been running in the reservoir. Yes I like to feed the ladies lots of food, I call it stepping on them hard. But I expect them to preform well for me. I was dialed in with my last nutrient but they were having owner problems, and name changes and different n/p/k levels. I'm trying H.O.G. now. A Canadian company. H.O.G. is short for High Output Garden. I thought it better to explain flushing when I start my flushing next week.
> I play music for my plants because I think the plants have more awareness that the average person is aware of. A good amount of years ago I read a collage persons thesis where they played different music to bean plants. Hard rock, popular music and classical music were played for the 3 different groups of plants. They tried to do everything the same for each group of beans. The plants that were with the hard rock were short and stunted and had small curled bean pods. The ones with the classic music grew the best. twice as big as the hard rock ones. their bean pods were long and straight. Plants can feel vibrations, I don't know how they interpret the vibrations. I think everyone has heard of talking to your house plants to get them to do better. I later read that the same person also did studies of different plants to the same music types. The plant with the hard rock all bigger defensive pushes. The roses grew bigger thorns, the squash had a thicker rind. I play a poplar music station, 24 hours a day with some rock for, hopefully, more defensive THC crystals. A friend just showed up, I'll write more later. Chuck. O.K. back to the music. I read another plant study where they put electrodes on the plant leaves and measured the response to many things. As the study went on they could start to tell which meter level meant the plants liked it or they didn't like it. The plants liked: talking nicely, watering's and feedings, stroking the leaves nicely and classical music. The interesting thing about this study was, the plants knew when you went in to do them harm, even if you went in quitly and calmly, which sort of suggest to me plants can read your mind and grow to please you. So why not play music for the aware beings you have in the tent or in a room by themselves. I would like to try to make them happy, they make me happy.
> I've noticed a few fungus gnats in the room and respect their opinion. I notice which plants they are feeding on, they are always the strongest and best tasting. Plants #1,2 and 5 had a few bites. Plants #3 and 4 had a lot of bites. They bite on the edge of the leaves and it looks like over feeding burn. Chuck.
8 likes
4 comments
Share
15
Week 15. Flowering
5y ago
1/9
129.54 cm
Height
12 hrs
Light Schedule
25 °C
Day Air Temp
6.2
pH
Strong
Smell
250 PPM
TDS
56 %
Air Humidity
21 °C
Solution Temp
21 °C
Substrate Temp
20 °C
Night Air Temp
11.36 liters
Pot Size
3.79 liters
Watering Volume
50.8 cm
Lamp Distance
Nutrients 1
Flushing
1000 mll
Chucky324 Hello. It's been a good week. Watched a good tv show on Slime Mold on Nova from Public Broadcasting Systems. It was mostly about how a single cell organism can think and learn. It also told how plants have their brains very near the tip of the roots and that decides where the root goes. Question? Does air drying of the root tips from cloth pots help, or does it cause the plant brain damage.😀 The show also showed how enzymes could help in Quantum Tunneling, which I think would help in moving elements around the plant. If you can find it, watch it.
> Flushing. I'm starting flushing today. Here's is my take on flushing: 20 years ago I first heard this report on the radio then later saw the story on tv. It was reported on for several days. Farmers )mostly males) were dying of fertilizer poisonings. Not from drinking it, from breathing it and getting it on the skin and not washing it off. The nitrogen can be gotten rid of by the body except in higher doses. But it was the Phosphorus and Potassium that were quite deadly, with a build up over time in the body. Some people were more sensitive that others. I had already been growing for 5 years by then and thought how much have I already consumed or absorbed or smoked? Am I at risk of body damage from this and dying early like the report said? I loved smoking and growing so I decided to flush more and got better taste. To me it's not about growing right to the end. It's about still enjoying smoking and growing while reducing harmful elements.
> The Flushing Report/Study. - My main problem with this report is, The world is run on the mighty $ . So how does a small company make a big name for itself. Yes, by dispelling the flushing myth. So called myth. Well I think flushing helps and it is going to take more than a money driven study to get me to change my mind. and just over half reported that they can't tell the difference. Not a big enough number to change my mind about the report. Now being of a scientific mind I can't ignore the report. I read the numbers and I may in the future change from 14 days to 10 days flushing because the numbers were better. I find all I can do is respect the info while being faithful and hopeful that flushing works. I'm hoping that, in the future another study will be done by a institute or a medical lab more interested in the person than the mighty $.
> Osmosis. The scientific principal of chemical transfer through a membrane. P.H. will also correct over time, through a membrane. Cannabis has membranes on the root surfaces. I can't prove that it works but it was the best theory I could come up with. I'm waiting for the next report.
> Flushing Solution: I use municipal tap water and Hydrogen Peroxide. It is 1 ounce of 35% Hydrogen Peroxide to 5 gallons of water. I think the plant likes the extra oxygen. H.P. also doesn't like root rot fungus or bacterial growth. Happy future flushing's. Chuck.
6 likes
2 comments
Share
16
Week 16. Flowering
5y ago
1/13
129.54 cm
Height
12 hrs
Light Schedule
25 °C
Day Air Temp
6.2
pH
Strong
Smell
250 PPM
TDS
56 %
Air Humidity
21 °C
Solution Temp
21 °C
Substrate Temp
20 °C
Night Air Temp
11.36 liters
Pot Size
3.79 liters
Watering Volume
50.8 cm
Lamp Distance
Nutrients 1
Flushing
1000 mll
Chucky324 Hello. Fall is here. This will be my last week of flushing, then a couple days of dark, and then I'll harvest.
> I've already cut down some clones. I won't regrow #1 and #2 plants. #1 plant has a weak smell when I squeeze the buds and smell the fingers. When I push the fingers together and apart the resin disappears quickly. Plant #2 is a fast grower. It has a medium smell and slippery resin but I can't regrow it because of height and bud growth. The buds grow is single towers and are fluffy.
> I will regrow Plants #3 and #4. in the next stage of my 2 stage garden. Both have strong smell and good resin. Plant #5,I haven't made up my mind about it yet. I'm waiting for the tests (I mean smoking the dry buds) before I can tell.
> I'm seeing a few fungus gnats around. They must of got in, through the cracks in the doors and windows. They are just trying to stay alive in the colder weather. I'm normally really careful when I come in from the outside. I don't wear the outside shoes in the grow area. Spores and small insects can stay on them and come off when you are in there. If I've been gardening, I do a full pat down before I go in the room off the grow room for a toke. Most insects you can bring in (hitch hiking)can be killed with a good pat down. Don't forget your hair and around your ears. I find some place I can rub my back on like a door jam. I've been sitting at my desk having a toke for about a half a hour. I see a bug fly off my leg and into the desk lamp, even after I had given myself a good pat down. I find Hydrogen Peroxide mixed in the water keeps the fungus gnats in check. It kills most of the larva, some get through but they can be killed between stages, so you don't have any when you start the next stage. My mix is: 1 once of 35% H.P. to 5 gallons of water in my hydroponics system. That is also my flush mix. Good Luck. Chuck.
6 likes
2 comments
Share
17
Week 17. Flowering
5y ago
1/10
129.54 cm
Height
12 hrs
Light Schedule
25 °C
Day Air Temp
6.2
pH
Strong
Smell
250 PPM
TDS
56 %
Air Humidity
21 °C
Solution Temp
21 °C
Substrate Temp
20 °C
Night Air Temp
11.36 liters
Pot Size
3.79 liters
Watering Volume
50.8 cm
Lamp Distance
Nutrients 1
Flushing
1000 mll
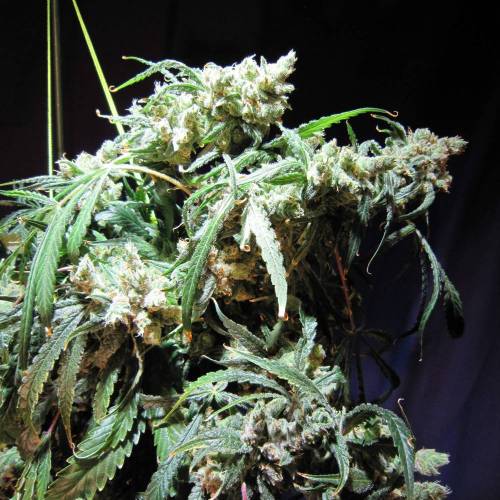
Chucky324 Hello. It's now 70 days since I started flowering.
That's 8 weeks of hard growing and a 2 week flush. You can see that a lot of the pistils are turning color.
The lights are going off tomorrow for a couple of days of dark, and then harvest on Thursday. I like to work right through and cut them all down on the same day. it makes my drying schedule easier (being a pothead I try not to make things to complicated).
I explain how "I harvest" in the 3rd or 4th week of this diary when I had the harvest before these seeds went into the grow room , Please read if you haven't already. When harvesting I always put a few buds aside to dry without curing. Yes it doesn't taste the best, but I get a good idea of taste and strength in about 4 or 5 days after harvest, before I can "fully test" the finished product.
I'll post pictures and a comment of the harvest, next week. And then come back and tell you the final report. I've been looking forward to trying this smoke since 2008, when I read that LSD had won the cup.
Best Wishes. Chuck.
Hello. This is my report on LSD-Feminized, 5 seeds to 5 plants to harvest. The plants were easy to grow and grew fast and tall. I wasn't quite prepared for the stretching. I have limited height indoors. All the plants had to be topped. Plants 1, 2 and 5 were topped at 10 weeks old and plants 3 and 4 were topped a week before flowering. The plants flowered fast and produced lots of flowers. Plants 1, 2 and 5 ended up having light fluffy buds, and plants 3 and 4 had dense buds. All the buds looked great and were crystal covered, as you can see by the pictures. Plants 1, 2 and 5 had nice and happy head buzzes about 15 or 16%. Plant 4 had a little stronger buzz at about 18%. Plant 3 was the strongest at about 22% but the buzz was confusion and hard to concentrate. I don't care for that type of buzz. The ad said powerful and trippy, this was not. I will regrow plant #4 again for my wife who doesn't like the strong stuff. Based on the 5 seeds I grew I would not recommend this strain to a friend. Chuck.
Show more
Translate
Spent 120 days
Ger Veg Flo Har
462.8 g
Bud wet weight per plant
91.9 g
Bud dry weight per plant
5
Plants
28 m²
Grow Room size
Normal
Difficulty
Happy, Relaxed
Positive effects
Paranoia
Negative effects
Earthy, Sweet, Woody
Taste
Height
Day air temperature
Air humidity
PPM
PH
Light schedule
Solution temperature
Night air temperature
Substrate temperature
Pot size
Lamp distance
1/103
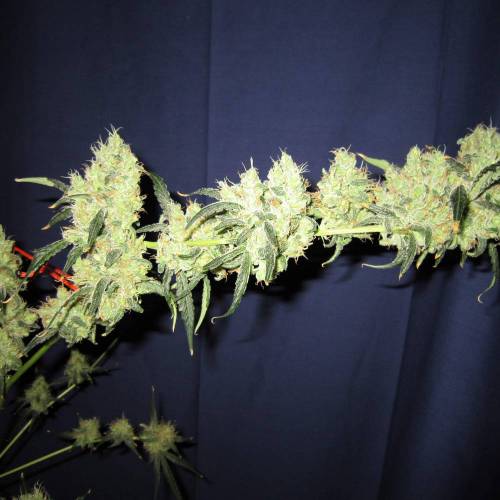
Chucky324 Hello. We've come to the end of this diary. I've had a good time in the growing and sharing of info, but I'm disappointed in the final product. 3 out of the 5 plants are (my best guess for my experience)16% or below. Plant # 4 is around 18% with a nice head buzz. There is one plant with some strength, # 3, but it had a very confusing and jiggly (felt better with my eyes closed) buzz. The ad said spacy and trippy, but this wasn't. I don't care for that kind of buzz. But some people might like it.
> The plants all grew well but training was necessary for height.
> The buds grew fast and looked full until harvest. Plants 1 and 5 had fluffy buds. But Plant # 2 had the most fluffiest buds (see the pictures) Plants 3 and 4 had the more dense buds. All were crystal covered and looked great.
> I have grown without any mold problems for years now so I can't comment on the disease resistance. Some fungus gnats got in and bit up one plant, # 3 . the rest hardly had any bits.
Final Figures
Plant #1 Wet Trim=318 gm
Dry Bud = 58 gm
Plant #2 Wet Trim=400 gm
Dry Bud =
79 gm
Plant #3 Wet Trim= 605 gm
Dry Bud = 113 gm
Plant #4 Wet Trim =720 gm
Dry Bud =157 gm
Plant #5 Wet Trim =271 gm
Dry Bud = 52 gm
Final Total of dry buds is = 495.5 gm for 5 plants (but there were 3 other plant that weren't included in the total, so my Final Outcome numbers won't be quite right, like me😊)
Thanks for following. Chuck.
@MrJones, Hello. Thank you for the kind words. Yes I've looked at your contest diary, that's some fine work you've done there. I'll check out your others. Good Luck and Have Fun. Chuck.
Those LSD strains are fire. I have grown the White LSD before and it was one of the strongest strains that I've ever grown, a full trippy head stone almost psychedelic, being Sativa dominant they do stretch a bit but nothing like the Jack Herer auto that I grew, that thing wouldn't stop growing it almost reached the roof of the tent I got half a pound off it (crazy).
@Ned_Grows, Hello. I've taken clones of all five LSD plants. Clones grow different than seeds so I'll be more prepared. This stain is Afghani and Skunk #1 so I wasn't expecting so such a Sativa stretch. I think Purple Paralysis by Cream of the Crop is next. Supposed to have a strong head buzz, my favorite. Chuck.
@Chucky324, Mmm.... Purple Paralysis, now that sounds good....
Yes that's right the origanal LSD strain is a Indica dominant hybrid but the Afghani genetics are from the Mazar-I-Sharif which can grow to hights of 4 meters, this is where the stretching would come from.
The White LSD is a Sativa dominant hybrid with the Sativa genetics coming from the White Widow Max, it is a very stretchy strain with big yields and a very potent high.
I'm keen on the Purple Paralysis if you choose that I will be following.
High Regards
Dan
Nice plants growmie..
We (in America) can't seem to get Gaia Green cuz Candians are greedy with their magic garden dust lol im jk.. We can.. But as Bloombooster said.. It costs like another $20 just to ship it here.. Not even worth it.
@Professor_Chaos,😄The ingredients for the magic dust are: Maple Tree Pollen, the dander from a Canadian Goose and the dried milk from a Polar Bear. I wouldn't want that last job!😁 Chuck.
Totally agree Chuck, I have had problems with Spider Mites in the past and I couldn't work out how they were getting into my grow room. They are really small and hard to see and can easily hitch a ride from outside, I also had a similar experience while I was sitting having a smoke I felt something crawling on my face and it was a bloody Spider Mite. I'm always in & out from my grow room to my outdoor garden so I have to do the same as you, I also have problems with Fungus Gnats getting through my window screens at night and finding there way into my grow tent but they are easily controled with sticky cards but not so easy is getting rid of the dreadful Spider Mites.
@Ned_Grows, Yea the pat down is a great habit to have. I've had friends come over and see me do the pat down and ask do you want me to do that too. Or they see me use the heavy mud brush that I stand on with one foot while I brush the other and ask if I want them to do that too. I find its better to be proactive than to run around later pulling on my hair.😊 Later. Chuck.
I have the same thoughts as you on this one buddy, I definitely think that flushing is the way to go especially when using non-organic nutes. I've harvested without flushing before and the weed when smoked always gives me a headache. I've always had a bit of consern about this and it's always been in mind because I know how harmful it is to have high levels of this stuff in your body and I smoke everyday that's why I now only smoke my home grown, also why wouldn't you flush when it makes your weed taste better.
@Ned_Grows,Hello Dan, Thanks for the insight, I knew I liked your spirt. Thanks for the likes too. the web site runs on them. I'll return the favor in a few days. Best grow wishes. Chuck.
Awesome grow. Really like how you give some detail on the flowering trimming portion and the troubleshooting page you found is really useful. I may have found your defoliation process a bit too late to fully implement into this grow but will definitely follow your steps for the lollipopping. Thanks Chuck
@WhyNotA2, Hello Brother. I'm glad I gave you something you can use. I love growing, and I'm into lineage of past strains. and how they were crossed to get what we have today. Started smoking at 14, my first grow was at 18 and I.ve been growing inside for the last 25 years. I'm over 60 now and still loven it. Have Fun. Chuck.
hey bro, frosty plant! im on the third re-vegg of a sister of yours =)....
btw, don't you think that she's too much green and with burned spots on the tips of the leaves? i think maybe you might be feeding her too much.. I would take it slow those last few weeks... just a thought!
congrats and happy growing!