


2 mutations, Super Fast Growth





VEG
Другое Light Emitting Diodes/100W
Другое
FLO
Другое Light Emitting Diodes/100W
Другое

Tent
Custom GrowBox
Custom GrowBox

Coco Coir
Custom

Vermiculite
Custom

Perlite
Custom


Indoor
Room Type
Topping
weeks 3
LST
weeks 3-5, 7
Defoliation
weeks 3, 8-9
6 liters
Pot Size
2 liters
Watering
Start at Harvest
G
Germination6y ago


Nutrients 6

Sensi Cal-Mag Xtra
2 mll

Tarantula
2 mll

Piranha
2 mll
Afterglow I'm starting to grow a new strain using my own method. I call it "Crown," although "Multiple Symmetric Lollipopping" is a more fitting name. It's something between Main Lining, Low Stress Training, and SoG. The essence is that we do Topping above the 4th node and then spread all 8 main branches outwards. Four lower branches diagonally, four upper ones crosswise. In the end, it creates a uniform circle of branches growing at the same height, as we can easily control the height of each branch. Technically, you can have 10 or 12 branches, but 8 is enough for me. It's best to have a wide pot to spread the branches out. I hope one day a new MSL method will emerge with my authorship.
So, I took two seeds, and the winner in growth will move to a bigger pot.
My grow box is homemade. Two HLG 100 lamps, but in reality, both work at 50 watts. It has two filters and two duct fans. One runs constantly, the other turns on automatically when the upper temperature threshold is exceeded. The doors have latches and are sealed to prevent light and smell from escaping. The internal dimensions from the lamp are 67x48x68 centimeters. It fits two bushes, but I prefer to grow only one.
How do I germinate seeds?
1. They are always stored in the fridge. When they get into a warm and humid environment, the seeds get the signal to grow and germinate the fastest, literally in 14-16 hours.
2. I take the needed seeds and place them in warm water (18-22 degrees Celsius) for 3-4 hours. This is to soften the shell, warm the seed, and provide enough moisture.
3. I gently crack the shell with manicure scissors. This is done specifically so that the root can start getting air as early as possible. The faster the shell opens, the quicker the root begins to sprout, reducing the risk of rot.
4. I plant it in a tablet or directly into the prepared substrate. Usually, I plant directly into the prepared substrate, but this time I decided to try a peat tablet to select the winner based on growth activity.
How do I prepare coconut substrate?
1. I never use old substrate. First, I apply mycorrhiza and many other fungi and bacteria that would be too concentrated for small seedlings and could harm them. Secondly, old coconut has a lot of old roots that will definitely rot. On one hand, this is good, but in reality, it leads to substrate rot and mold formation.
2. I take half a brick, dissolve it in water, rinse it in running water (alternating hot and cold) until all the sea salt is washed out, and then mix it with vermiculite and perlite.
3. I soak the resulting substrate for 15-20 minutes in Cal-Mag fertilizer (1000 PPM) so that the substrate absorbs calcium and magnesium cations; otherwise, for the first week, the coconut will draw these substances from the watering, and the plant will starve. If you measure the PPM of the water after adding Cal-Mag and after 20 minutes, you will see that the PPM drops to 600-700 units. This means the coconut has absorbed the salts.
4. I then water with fertilizer, in the case of a three-component Grow-Micro-Bloom in a ratio of 3-2-1, PPM 1000. I also leave it for 15-20 minutes. This is necessary so that the coconut now evenly absorbs other cations (iron, zinc, copper, potassium, and nitrogen compounds like urea and ammonium). In other words, we are deliberately washing out excess calcium and magnesium.
5. Then, I water with our fertilizer with PPM 600-700 to slightly reduce the concentration.
6. This buffered substrate is where the germinated seed will eventually go.
How do I water?
For the first three weeks, I water every other day. It doesn't matter if the substrate is dry or not. Coconut substrate allows for this. After that, I have to water every day because the developed root system dries out the entire substrate within a day. I never water with plain water - it only disrupts the pH within the substrate and causes plant stress. If the substrate needs to be flushed, several waterings with the needed fertilizer are prepared. Remember how PPM drops after flushing? The same happens with plain water: nutrients are washed out of the coconut, and when you start "feeding" the plant, it starves because the coconut takes everything to "share" later when it "fills up."
The pH during veg is always around 5.6-5.8, and during flowering, it's 5.8-6.1. I try to keep the PPM at 700. During flowering, it's 1200-1400. If you've read this far and saw the scary number of 700 PPM, there's actually nothing to worry about. If you take regular soil, dilute it with water, and measure the PPM, it will be much higher. In fact, a plant can survive even with a PPM of 5000 units. Watering a plant with PPM 300 is too weak a mix. Usually, all guides are oriented towards soil, and manufacturers play it safe by giving lower norms so that buyers don't accidentally burn their plants. But if you have pH and TDS measuring devices, you can confidently feed your plant generously, and it will respond with vigorous growth and dense buds.
I always follow the golden rule of checking drainage:
PPM rises, pH drops: the plant has indigestion and can't absorb something.
PPM drops, pH rises: the plant is starving, or the ion-cation balance is disrupted.
PPM stays the same, pH rises: everything is going well.
In each case, you need to understand what was done earlier and adjust actions accordingly.
So:
01/19/2021, at 12:00 I soaked the seeds in water
01/19/2021, at 16:00 I carefully cracked the seeds and planted them in a peat tablet
01/19/2021, at 23:00 one seed already started to emerge from the peat, even though I buried it. And only 7 hours have passed. I feel like the candidate for transplanting has already shown itself.
01/20/2021, at 16:00 this same seed has already grown a root and fully emerged from the peat.
01/21/2021, at 10:00 it popped out of the peat and is ready to spread its leaves. The second seed is still silent.
01/21/2021, at 17:00 the seedling is about to break the shell to release the first cotyledons. I moved it to the grow box under the lamp.
01/23/2021, at 10:00 it died... never seeing the light. But her younger sister unexpectedly emerged from the peat and stretched 2 centimeters overnight while the lamps were off. I had to manually remove the shell from her.
01/23/2021, at 15:00 the younger sister has already shown a little root tail on the other side of the peat tablet. Tomorrow I will need to transplant her into a normal pot.
01/24/2021, at 14:00 the girl moved to her new home. The first leaves are now the size of the cotyledons. Congratulations are accepted, we have germinated.
18 likes
9 comments
Share
Used method
Peat Pellet
Germination Method
1
Week 1. Vegetation6y ago


3 cm
Height
18 hrs
Light Schedule
24 °C
Day Air Temp
5.8
pH
No Smell
Smell
700 PPM
TDS
40 %
Air Humidity
21 °C
Solution Temp
22 °C
Substrate Temp
21 °C
Night Air Temp
6 liters
Pot Size
1 liters
Watering Volume
30 cm
Lamp Distance
700 PPM
CO₂ Level
Nutrients 6
Sensi Cal-Mag Xtra
2 mll
Tarantula
2 mll
Piranha
2 mll
Afterglow We're growing at a really good pace, I feel like by the 3rd week we’ll need to switch to flowering. By the end of the week, I added more coco and leveled the soil with the cotyledons. In the middle of the week, I turned on the humidifier and directed the fan for airflow. The first pair of leaves initially lifted up, and the plant looked like an eagle taking off, but then they started to twist. By the end of the week, we have a formed first layer and the beginning of the second layer. As usual, on the 4th-5th layer, we'll do some topping and I'll spread the branches out to the sides.
Watering at 700 PPM, drainage at 800 PPM. Water obtained through reverse osmosis. If we don't count the twisting of the very first leaves, everything seems to be going great and according to plan.
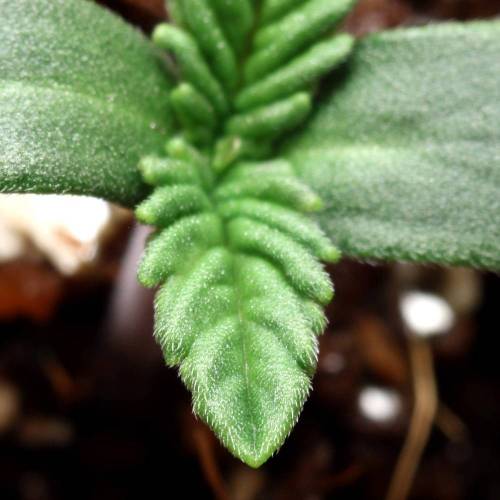
Even such a small seedling already has trichomes on the leaves.
Thanks for stopping by!
19 likes
9 comments
Share
2
Week 2. Vegetation6y ago


10 cm
Height
18 hrs
Light Schedule
25 °C
Day Air Temp
5.8
pH
Weak
Smell
700 PPM
TDS
40 %
Air Humidity
21 °C
Solution Temp
22 °C
Substrate Temp
21 °C
Night Air Temp
6 liters
Pot Size
2 liters
Watering Volume
30 cm
Lamp Distance
700 PPM
CO₂ Level
Nutrients 6
Sensi Cal-Mag Xtra
2 mll
Tarantula
2 mll
Piranha
2 mll
Afterglow Hello everyone! We're already quite big by the end of the second week, and it seems I'll be topping soon, and by the end of the third week, we can switch to flowering.
It might seem like I'm tricking you and that I've been growing for a while, taking pictures to make it look like the plant is growing so fast. But it's all honest! It's growing at a really fast pace. As I mentioned, properly buffered coco, daily watering, good humidity, and the results won't keep you waiting.
I specifically took photos daily at the same time, from the same angle, and with the same focal length.
It's the first time I've seen something start to grow where the cotyledons are; usually, by the third week, they dry up and fall off. What can I say, we have obesity here ))))
Oh, and for the first time at this stage, it started to smell... I was really surprised. The strain is half Skunk, so I anticipate that it will smell very, very strong during flowering. I specifically changed the carbon in both filters; I hope it helps.
The leaves on the first floor (the trifoliate ones), which are right after the cotyledons, are already 11 cm long. The main stem is already 6 mm thick. Four floors have formed, and the fifth is coming along.
As usual, I'll be cutting and shaping the crown from 8-10 stems on the fifth floor, as it turns out.
Thanks for stopping by, and good luck with your grow!
15 likes
4 comments
Share
3
Week 3. Vegetation5y ago




14 cm
Height
18 hrs
Light Schedule
25 °C
Day Air Temp
5.8
pH
Normal
Smell
700 PPM
TDS
40 %
Air Humidity
21 °C
Solution Temp
22 °C
Substrate Temp
21 °C
Night Air Temp
6 liters
Pot Size
2 liters
Watering Volume
30 cm
Lamp Distance
700 PPM
CO₂ Level
Nutrients 6
Sensi Cal-Mag Xtra
2 mll
Tarantula
2 mll
Piranha
2 mll
Afterglow Hey everyone.
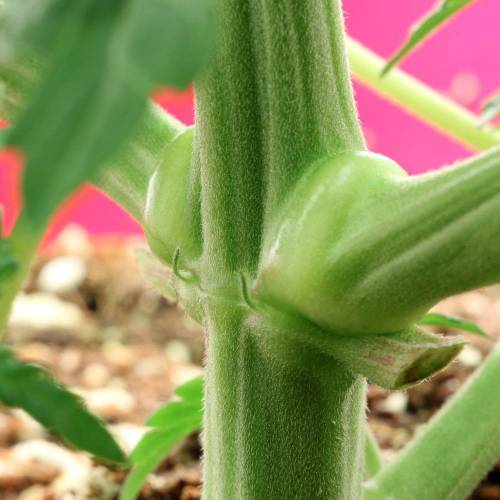
So, at the very beginning of the week, we trimmed the top to leave four levels. Of course, the plant experienced some stress for a couple of days, but it really started to spread its wings. The first five-finger leaves grew so much that their span reached 42 centimeters, which is THREE TIMES the height of the bush. I took a photo for comparison with a man's hand. The thickness of the stem is 6 mm, which is even thicker than some branches. But, unfortunately, we had to get rid of those leaves on the 6th day, as they completely covered the lower level, where the branches were breaking out. I slightly reduced the brightness of the lighting to avoid strong stress, as these two big leaves were processing a lot of water and were most involved in photosynthesis. The result didn't take long to show - the bush fluffed up with new leaves.
The branches have already developed "calluses" and the plant has transitioned from early veg to a slight stretching phase. The thickness of the stem is 1.2 cm. After 3 weeks, that's really, really good. I will definitely switch to flowering at the end of next week when the branches stretch out and can be controlled by height.
I spread the lower branches diagonally and the upper branches crisscross. We're forming our crown from 8 branches. One of the top branches slightly cracked and detached from the stem, but I think a good callus will grow there soon too.
Starting next week, I'll begin strict pH control and switch to a three-component fertilizer from GHE, as some deficiency or excess of certain substances is starting to show on the leaves.
It's starting to smell seriously, especially after the night, and this is despite the fact that the plant isn't even flowering yet. I had to connect the filter.
14 likes
4 comments
Share
Used techniques
LST
Technique
Topping
Technique
Defoliation
Technique
4
Week 4. Vegetation5y ago


16 cm
Height
18 hrs
Light Schedule
25 °C
Day Air Temp
5.8
pH
Normal
Smell
700 PPM
TDS
40 %
Air Humidity
21 °C
Solution Temp
22 °C
Substrate Temp
21 °C
Night Air Temp
6 liters
Pot Size
2 liters
Watering Volume
30 cm
Lamp Distance
700 PPM
CO₂ Level
Nutrients 6
Sensi Cal-Mag Xtra
2 mll
Tarantula
2 mll
Piranha
2 mll
Afterglow A week has passed as planned.
At the beginning of the week, I lowered the brightness of the lights on time, which stopped the old leaves from deteriorating due to excess magnesium and lack of calcium. On top of that, it reduced the rapid stretch and allowed me to bend the branches since they slowed down their thickening.
One of the branches on the 4th floor snapped off from the main stem, so I had to create a whole system of supports to both bend it and allow for a transport knot to form.
In height, it only gained 2 cm, which is because the main stem thickened even more and stretched a bit in length, while the other 8 branches are sadly bending and spreading out to the sides.
PPM is also 700 in both the feed and the drainage, meaning it's feeding excellently, no problems at all, the old leaves haven't progressed in forming rust and continue to live and smell. The new leaves are the right shape and without the "prednisolone" effect.
In the morning, it smells like a coniferous forest. Despite being only 30 days old, it smells quite strong, and this is even though it’s not flowering yet.
I'm leaning towards starting the transition to flowering, just in time for the branches to grow a bit, stretch out, and we'll have a nicely formed bush.
Thanks for stopping by. Without you, keeping a diary doesn't make sense. Good luck to everyone!
15 likes
comments
Share
Used techniques
LST
Technique
5
Week 5. Flowering5y ago


18 cm
Height
12 hrs
Light Schedule
25 °C
Day Air Temp
5.8
pH
Normal
Smell
700 PPM
TDS
35 %
Air Humidity
21 °C
Solution Temp
22 °C
Substrate Temp
21 °C
Night Air Temp
6 liters
Pot Size
2 liters
Watering Volume
30 cm
Lamp Distance
700 PPM
CO₂ Level
Nutrients 6
Sensi Cal-Mag Xtra
2 mll
Tarantula
2 mll
Piranha
2 mll
Afterglow Hey everyone.
I decided to switch to 12 hours at the beginning of the week, and it turned out to be just in time. It should grow another 15 centimeters by the peak of flowering, and the distance to the lamp will be just perfect.
Besides that, I removed a lot of branches from the lower levels so that everything goes into the main ones instead of the small shoots. It worked out, the plant started to actively thicken the main branches and has been growing wider.
The leaves are feeling really good, not a single hint of overdose or deficiency. There's a slight nitrogen surplus, but it's just a little bit. The old leaves, where necrosis started from excessive light, are doing great, the necrosis has stopped, and the leaves have turned green and are working at full 146%.
The leaves have started growing with 11 blades. It drinks about 2 liters of water a day, and the roots have developed very well. We're at 35 days, and soon we'll be even more beautiful and will delight with flower buds.
I've been feeding with 700PPM nutrients for veg all week. Next week, I'll be combining veg and flowering.
Thanks for stopping by. Wishing everyone great luck!
12 likes
5 comments
Share
Used techniques
LST
Technique
6
Week 6. Flowering5y ago



30 cm
Height
12 hrs
Light Schedule
25 °C
Day Air Temp
5.8
pH
Normal
Smell
750 PPM
TDS
30 %
Air Humidity
21 °C
Solution Temp
22 °C
Substrate Temp
22 °C
Night Air Temp
6 liters
Pot Size
2 liters
Watering Volume
20 cm
Lamp Distance
650 PPM
CO₂ Level
Nutrients 9
Tarantula
1 mll
Piranha
1 mll

CarboLoad
2 mll
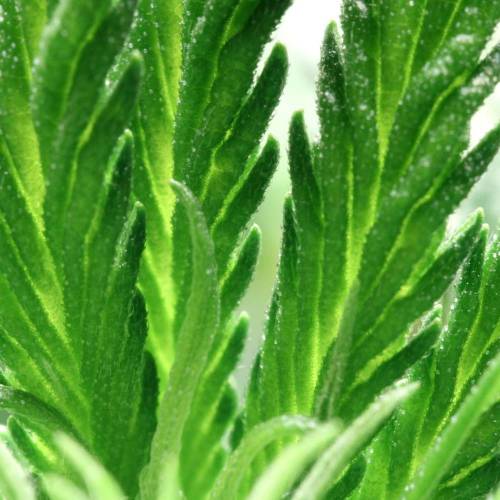
Afterglow My girl has grown 12 centimeters in a week and has started to flower, while also expanding sideways and filling up all the space in the box.
I'm worried that she's going to bump into the lights, and I still can't bring myself to bend the main branches a bit to the side, just to be safe. I love how she looks: beautiful, neat, and bending her would make her look like a freak.
We switched to pre-flowering nutrients at the beginning of the week. This time I decided not to use three-part fertilizers and continue using Advanced Nutrients, she really grows well on them.
I'm not watching the pH, just controlling the PPM, which is stable like a constant both in the feed and in the drainage. Plus, all the leaves are intact, no signs of disease, as I increased phosphorus and potassium, and removed Cal-Mag, there was a slight nitrogen surplus.
Thanks for stopping by.
13 likes
6 comments
Share
7
Week 7. Flowering5y ago


35 cm
Height
12 hrs
Light Schedule
25 °C
Day Air Temp
5.8
pH
Normal
Smell
850 PPM
TDS
30 %
Air Humidity
21 °C
Solution Temp
22 °C
Substrate Temp
22 °C
Night Air Temp
6 liters
Pot Size
2 liters
Watering Volume
15 cm
Lamp Distance
650 PPM
CO₂ Level
Nutrients 5
CarboLoad
2 mll

pH Perfect Sensi Coco Bloom A
2.5 mll

pH Perfect Sensi Coco Bloom B
2.5 mll
Afterglow At the beginning of the week, I had to bend 8 main colas to the side so they wouldn't shoot up too much. This led to the lower levels pushing ahead, and now I've got some huge fence of colas. Essentially, I've created a SoG without using a net, just with ties. Not only that, but the plant has started to bulk up and has taken over all the free space in the box. To be honest, I'm a bit in awe myself. I knew I was going to have a super-fast grow, but I never imagined it would be this massive. Plus, the buds have started growing right out of the leaves. 😂
We are absolutely healthy. I specifically took a photo of the tip of an old leaf. Not a single hint of deficiency or excess nutrients.
I increased the dose to 850 PPM, and the drainage is the same. I switched to pure Bloom nutrients with Bud Ignitor added. Honestly, I'm really happy with these fertilizers. The plant is growing excellently, and I'm not even checking the pH. One reason is laziness to go buy batteries. On the other hand, TDS shows a constant PPM, so I'm confident the pH is normal. And the leaves themselves say so.
When it gets warmer outside, I'll take the box out to the balcony because I feel that no filter will handle such a big harvest, even though I have two. Recently, the power went out, and literally within a couple of hours, the whole apartment filled with aroma.
That's how things are...
Thanks for stopping by!
9 likes
13 comments
Share
Used techniques
LST
Technique
8
Week 8. Flowering5y ago


40 cm
Height
12 hrs
Light Schedule
25 °C
Day Air Temp
6.0
pH
Normal
Smell
850 PPM
TDS
30 %
Air Humidity
21 °C
Solution Temp
22 °C
Substrate Temp
22 °C
Night Air Temp
6 liters
Pot Size
2 liters
Watering Volume
15 cm
Lamp Distance
650 PPM
CO₂ Level
Nutrients 6
CarboLoad
2 mll
pH Perfect Sensi Coco Bloom A
3 mll
pH Perfect Sensi Coco Bloom B
3 mll
Afterglow Hey everyone!
This week started with me having to remove about 20 fan leaves because the plant stopped fitting in the box. But by the end of the week, everything was back to normal.
We’ve completely switched to flowering nutrients.
On top of that, the leaves started getting sick. I haven't figured out what's going on yet, but I suspect a calcium and magnesium deficiency since I stopped giving them. Today I watered heavily with Cal-Mag, let's see if there will be any progress.
The stretch has slowed down, but it’s still ongoing. I’m giving 50,000 lux to the tops of the plant, which is about 90 watts.
That mutation I mentioned earlier, where the bud started growing right from the leaf's stomata - it's still pretty much the same, no progress. But I discovered another mutation - polyploidy.
One of the main branches, at the very beginning, was bent carelessly and got a slight break. This break triggered the polyploid mutation. I noticed before that the leaves and side branches were growing somewhat asymmetrically, but I didn’t pay much attention. The only thing I’ve noticed for a while is an interesting growth on one of the larger branches - it’s elongated and on top, rather than around the entire perimeter. And just yesterday I noticed that one of the buds is growing sideways instead of upwards.
I started closely examining the whole branch and realized that it’s somewhat asymmetrical: at the base of the branch, there are 3 leaves, and they’re positioned at different levels, the buds are also growing asymmetrically, the stem has a strange asymmetrical pattern, and at the top, there’s a double bud. It seems like the bud will continue to expand more and more.
In general, every grower sooner or later encounters some mutation. I’ve encountered two at once. It will be interesting to see what happens next.
Thanks for stopping by.
Wishing everyone lots of luck and good vibes!
10 likes
5 comments
Share
Used techniques
Defoliation
Technique
9
Week 9. Flowering5y ago


45 cm
Height
12 hrs
Light Schedule
25 °C
Day Air Temp
6.0
pH
Normal
Smell
1000 PPM
TDS
30 %
Air Humidity
21 °C
Solution Temp
22 °C
Substrate Temp
22 °C
Night Air Temp
6 liters
Pot Size
2 liters
Watering Volume
12 cm
Lamp Distance
650 PPM
CO₂ Level
Nutrients 6
CarboLoad
2 mll
pH Perfect Sensi Coco Bloom A
3 mll
pH Perfect Sensi Coco Bloom B
3 mll
Afterglow Hey everyone!
Last week I started having problems with the leaves. It looked a lot like a magnesium or calcium deficiency. But after carefully analyzing the locations of the issues, I concluded that it was light burn. First of all, the lamp was running at maximum output. Secondly, only the upper leaves were affected. Thirdly, the problems were only with those leaves that didn't have trichomes. Fourthly, usually both pairs of leaves are affected, but in our case, it was only those closer to the lamp. I had to reduce the power so that the leaves wouldn't suffer and the trichomes wouldn't evaporate unnecessarily. As a result, the progression of necrosis stopped. But I had to remove all the damaged leaves to monitor the current state and notice any future problems. Plus, I gave more light to the lower buds, and the plant itself remained just as bushy.
The very bottom leaves started to fall off, which were practically not getting any light. Since there was plenty of nitrogen during veg, they didn't turn yellow but became more gray and fell off on their own.
The polyploid bud started to grow sideways. And no new shoots were appearing from the leaf axils anymore. BUT!!! I initially didn't notice, but when I was removing leaves, I saw that where the buds grow leaves, all the large ones have these not small little buds growing, which is making the overall bud fat and thick. I flipped through other reports and found out that this is a common thing for this strain.
Interestingly, the smell has decreased. During veg, both filters were running at full power, and it still smelled like regular weed. Now we have about 20 colas, and there's no smell at all. Either the carbon filters are really filtering out terpenes well but not filtering the smell of freshly cut grass, or indeed, due to the light burn, the trichomes evaporated and that's why the smell decreased.
According to my calculations, we have about 4 weeks left, meaning we've passed exactly half of the flowering period.
Thanks for stopping by.
10 likes
comments
Share
Used techniques
Defoliation
Technique
10
Week 10. Flowering5y ago


45 cm
Height
12 hrs
Light Schedule
25 °C
Day Air Temp
6.0
pH
Normal
Smell
1000 PPM
TDS
30 %
Air Humidity
21 °C
Solution Temp
22 °C
Substrate Temp
22 °C
Night Air Temp
6 liters
Pot Size
2 liters
Watering Volume
12 cm
Lamp Distance
650 PPM
CO₂ Level
Nutrients 6
CarboLoad
2 mll
pH Perfect Sensi Coco Bloom A
3 mll
pH Perfect Sensi Coco Bloom B
3 mll
Afterglow Hey everyone.
Well, my suspicions about light burn were confirmed. I reduced the light, and the upper leaves stopped progressing into necrosis. Plus, the smell came back, which means the plant stopped burning the trichomes.
The stretch has completely stopped. The buds started to swell in width. The lower leaves began to fall off on their own since they aren't getting enough light.
Today I noticed that the first pistils (stigmas) started to dry up. Essentially, it's been 6 weeks since switching to 12/12, which means we have 4 weeks left. I'll keep it on nitrogen-deficient nutrients for another week, then give it pure Ripen for 2 weeks, and leave the last week for flushing.
My polyploid hasn't really developed much and has stayed with three buds "on board." But the leaves with the buds - yeah, they're all good, because of them the buds are bigger and thicker ))).
All the main leaves have 11 "fingers," which is surprising.
Overall, everything is smooth, without any major problems or disappointments. It's my first grow where I don't use a pH meter, just controlling PPM in and out.
And as usual, thanks for reading to this line.
9 likes
7 comments
Share
11
Week 11. Flowering5y ago


45 cm
Height
12 hrs
Light Schedule
25 °C
Day Air Temp
6.0
pH
Normal
Smell
1000 PPM
TDS
30 %
Air Humidity
21 °C
Solution Temp
22 °C
Substrate Temp
22 °C
Night Air Temp
6 liters
Pot Size
2 liters
Watering Volume
12 cm
Lamp Distance
650 PPM
CO₂ Level
Nutrients 5
CarboLoad
2 mll
pH Perfect Sensi Coco Bloom A
1.5 mll
pH Perfect Sensi Coco Bloom B
3 mll
Afterglow Well, another week has come to an end.
Today, it just so happened that half the city lost power, and my beauty stood in the dark for 4 hours. I decided to move the whole box to the balcony and switch to a schedule where 12 hours of light would fall during the night. It just got warm, around 20 degrees during the day, and about 10 at night. So, temperature-wise, I’ve set her up for a cool autumn.
About 5% of the stigmas have started to dry up, which means it’s time to switch to a different nutrient. Last week, I was giving her a nitrogen deficiency, and starting this week, I’m transitioning to pure Ripen from GHE. I’ll keep her on Ripen for 1.5-2 weeks, then I’ll flush and feed her with plain water to get rid of the magnesium taste. All depending on the circumstances.
My polyploid isn’t developing much; it only has three buds together, but the other buds have started to thicken on the lower levels, as buds are growing everywhere from the leaves.
Unfortunately, the light is positioned very close, and I can’t raise it, which is causing the leaves without trichomes to suffer from light burn. But after reducing the light, the plant started to smell intensely; the filters can’t keep up. And today, they also cut the power, so I had to rush to take it out to the balcony because the smell takes a long time to dissipate.
I miscalculated the height of the box this time; I should have switched to flowering about a week earlier. Next time, I’ll need to figure out how to reposition the filters, maybe lower them so the lights can be right up to the ceiling, or leave one filter on top and another on the bottom, then there will be room to raise the lamp. But that’s for next time.
As it stands, I have about 16 large colas and just as many small ones. It seems like the harvest is going to be the most abundant in my experience.
Thanks, everyone!
14 likes
2 comments
Share
12
Week 12. Flowering5y ago




45 cm
Height
12 hrs
Light Schedule
24 °C
Day Air Temp
6.0
pH
Strong
Smell
1000 PPM
TDS
30 %
Air Humidity
21 °C
Solution Temp
22 °C
Substrate Temp
22 °C
Night Air Temp
6 liters
Pot Size
2 liters
Watering Volume
25 cm
Lamp Distance
650 PPM
CO₂ Level
Nutrients 4
CarboLoad
2 mll
pH Perfect Sensi Coco Bloom B
3 mll

Bud Ignitor
1.5 mll
Afterglow Hey everyone!
Hallelujah, I finally raised my lights! Now they're 25 cm from the tops. Had to lower the filters to the floor, but now there's room for the lights. The upper leaves were really suffering from light burns. And it's starting to smell really strong.
I switched to combining nutrients with Ripen from GHE, removing nitrogen from everywhere. The leaves aren't yellowing yet, but they've become lighter. Starting next week, I'll switch to Ripen completely.
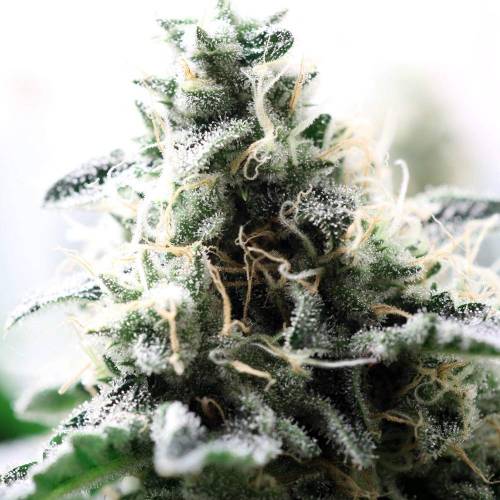
The trichomes are starting to cloud up, and in some spots, a few amber ones are appearing. The pistils are gradually starting to dry out, already about 20%. I'll keep them on pure Ripen with CarboLoad for another five days and then start flushing with plain water for about five days. By then, all the pistils will have dried up, and it'll be time to harvest.
All the main colas are about the height of my palm. And they're so meaty, dense, and twice as thick as anything I've ever grown. We're going to break our records!
Thanks for stopping by.
12 likes
2 comments
Share
13
Week 13. Flowering5y ago


45 cm
Height
12 hrs
Light Schedule
24 °C
Day Air Temp
6.0
pH
Strong
Smell
1000 PPM
TDS
35 %
Air Humidity
21 °C
Solution Temp
22 °C
Substrate Temp
22 °C
Night Air Temp
6 liters
Pot Size
2 liters
Watering Volume
25 cm
Lamp Distance
650 PPM
CO₂ Level
Nutrients 1

FinalPart
10 mll
Afterglow Well, autumn has arrived for us. Under the influence of ripening, the leaves started to yellow, which is a good sign that nitrates are being used up. I watered for 5 days. For the last 2 days, I started using Flawless Finish. I’ll probably hold on for another three days and then I’ll harvest. It’ll just about be 9.5 weeks as the breeder recommends.
The whole week has been really cold, with nighttime temperatures dropping to 15 degrees in the box, which led to increased humidity. I was worried that mold might develop, but it seems like everything is okay. To bring the conditions closer to real ones, I reduced the light intensity. I can't lower it too much, as photosynthesis stops working properly, and that would slow down the removal of remaining salts. But I also shouldn’t light it too much, as the trichomes will start to "burn."
The trichomes have become 50% cloudy, while the other 50% are still clear. There are very few amber ones, and only those closest to the "sun."
The buds have really thickened this week. I don’t know what that’s related to, as there are almost no new pistils, and the ones that were there are already drying out. Maybe the leaves have become a bit limp, and against this background, it seems like the buds have gotten thicker.
So, that’s how it is, my friends.
Thank you for not leaving me alone; I’m keeping this diary just for you.
Good luck to everyone, and thanks for stopping by!
19 likes
7 comments
Share
13
Week 13. Harvest5y ago
Happy Harvest Day!


10/10
Rated
Great strain! Grows quickly, indifferent to stress, often has many mutations genetically. It has a very strong smell by the end of flowering, resembling the scent of pure medical alcohol. The buds are dense, it flowers for a long time and abundantly, and the stigmas do not dry out for a long time.
Show more
Original
Spent 93 days
Ger Veg Flo Har
607 g
Bud wet weight per plant
135 g
Bud dry weight per plant
1
Plants
0.3 m²
Grow Room size
Easy
Difficulty

Giggly, Hungry, Relaxed
Positive effects

Dry eyes, Dry mouth
Negative effects

Diesel, Pungent, Woody
Taste
Height
Day air temperature
Air humidity
PPM
PH
CO2
Light schedule
Solution temperature
Night air temperature
Substrate temperature
Pot size
Lamp distance


Afterglow Well, our short journey of growing a sativa-dominant strain has come to an end. Unfortunately, the size of the box didn't allow me to fully turn on the light, as the plant stretched a lot and started getting light burns, plus there was also a calcium deficiency. Initially, I wanted 8 big, thick, and symmetrical colas, but I had to bend them more. In the photo, you can see that all the branches are twisted in a spiral - I was trying to solve the problem of very low lighting. I hadn't grown a sativa strain in a while and forgot how much the plant stretches at the beginning of flowering. As a result, due to LST during flowering, the lower levels also stretched, and instead of 8 colas, I ended up with three times more. I still prefer my method over ML, as it takes less time, less stress, and the result is the same.
I harvested 607 grams of big branches and about 100 grams of various small stuff.
I slightly overdried them. Otherwise, it would have been around 200 grams of pure buds. I'll have to moisten them a bit.
Overall, I'm very satisfied with myself and the result.
Thanks for stopping by and celebrating with me.
35 likes
34 comments
Share
Equipment Reviews







9 comments
Sort by
popularity
popularity
newest
oldest

Polaskis commented6y ago
Best of luck with the grow 🍻
likes 3

Afterglow commented6y ago
@Polaskis, thank you. Are you official account of just brand ambassador?
likes 2
Polaskis commented6y ago
@Afterglow, not official account.... Ambassador 🍻 anything you need help with just ask my friend 👊
likes 2

Masha_Bro commented6y ago
Girl Scout Cookies is one of my favorite strains. Wishing you a great harvest! Thank you for your advice. You're doing an awesome job!
likes 3
Afterglow commented6y ago
@Masha_Bro, thanks. With BB, it's not pure GSC, but a mix with Skunk. Despite Skunk being a very, very aromatic strain in bloom, it's the coolest strain I've tried. Let's see what happens.
likes 3

Bloombuster commented6y ago
beautiful! 😄👍 quickly developing! 👍 Good luck with the continuation! 😉👌
likes 2

bioaccessory commented6y ago
@Afterglow, bro, it's not from the cotyledons, apparently due to the excess light it's not stretching at all, and the distances between the internodes are minimal.
likes 2
Afterglow commented6y ago
@bioaccessory, no way... from the cotyledons... only the first pair of leaves is above, check the 10th photo.
like 1
bioaccessory commented6y ago
@Afterglow, yeah, something's popping up😕 I saw something like that in a report, but there the branch came out from below the cotyledon. By the way, the bush turned out super cool in the end 😇
likes 2
Show More (1)

the end.
Enjoying this diary? Follow for more updates!

Prefer the old Diary view?
Go back to the old Diary view