The Grow Awards 2026 🏆 


Likes
Comments
Share
@xbrico
Follow
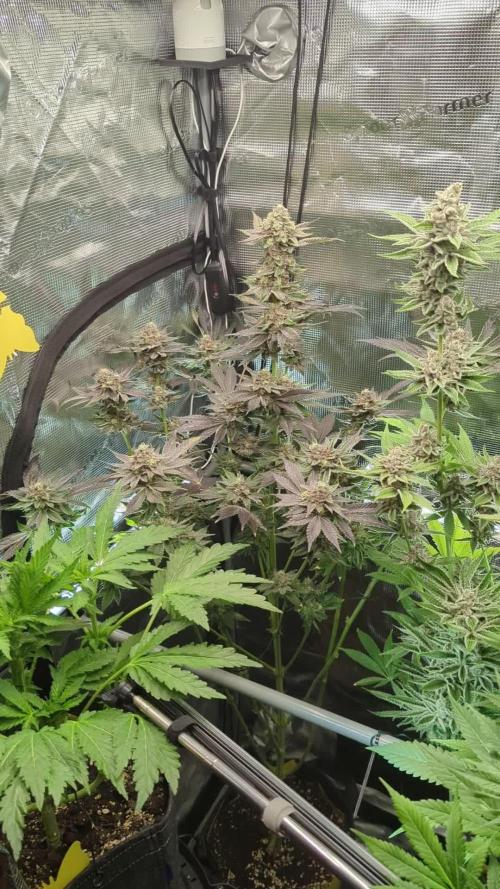
D85/FD57 - Should probably put this week down as a "Harvest Week" but hopefully some more to save, even though it will be smaller stuff - right now with the dead loss, everything counts! Really sad too as the plant was looking great!!! Some nice pink flowers in there, just a real pity about its mold resistance!!! :/ Would maybe consider this one more time for a grow when I get the new extraction in but yeah, disappointed is not the word! On the plus side, tent humidity has dropped a fair bit!!!
With the work last night culling the Cookies, I was lazy tonight, just did an add back (Didnt clean the Wilma out like I do every week). Put in at normal ratio's but as the base water was EC0.7 (Rather than 0.2), the same recipe took me up to 1.5 (I should have adjusted but seeing as I dont know whats out, i'd rather give enough of whats needed and just dilute through the week (even if daily!!!). Expecting water consumption to drop now with the cookies halved in size and now just waiting on the rest ripening! Lets hope this is the last pain til I get this tent emptied out and cleaned down for a winter run!!!
Anyway, happy growing all!!! 💪

Likes
15
Share
@Theia
Follow
A really explosive week of growth. I pushed PPFD up to 310umols. Dimmers are at 60% which is drawing 224w plus 18w of DRRB. I have alos started Emerson effect ... Another The Emerson effect is triggered by the simultaneous exposure of plants to light in the deep red and far-red spectra Deep Red 660 nm /Far-Red 700 nm .
A bit of boring science that explains why you need both far red and deep red in order to trigger Emerson.
The effect occurs because photosynthesis is driven by two distinct pigment systems working in series:Photosystem II (PSII): Absorbs energy most efficiently at shorter wavelengths (higher frequencies), like 680 nm (441 THz).
Photosystem I (PSI): Absorbs energy most efficiently at longer wavelengths (lower frequencies), specifically 700 nm (428 THz).
When you provide only the higher frequency (deep red), PSI becomes a bottleneck. When you provide only the lower frequency (far-red), PSII is not sufficiently excited to provide electrons. Providing both frequencies simultaneously allows both systems to work at peak efficiency, resulting in a rate of photosynthesis that is greater than the sum of the two lights used individually.
To understand the Emerson Effect, think of photosynthesis not as a single engine, but as a two-stage assembly line.
What is the Emerson Effect?
Discovered by Robert Emerson in 1957, this phenomenon shows that plants perform photosynthesis much more efficiently when they are hit by two specific types of light at the same time: Deep Red (660 nm) and Far-Red (700+ nm).
If you give a plant only Far-Red light, photosynthesis is very slow. If you give it only Deep Red, it's better but still limited. However, when you give it both at once, the total rate of photosynthesis is significantly higher than if you just added the two results together (1+1=3).
What is Happening? (The "Assembly Line")
Inside the plant's chloroplasts, there are two "workstations" called Photosystem II (PSII) and Photosystem I (PSI). They work in series, meaning the first one must pass "parts" to the second one.
PSII (The First Station): This station is tuned to catch Deep Red light (660 nm). It harvests electrons from water.
PSI (The Second Station): This station is tuned to catch Far-Red light (700 nm). It takes the electrons from the first station and uses them to create energy (ATP and NADPH).
The Problem: If you only provide Deep Red light, the first station works fast, but the second station can't keep up because it isn't being "powered" efficiently by that specific frequency. This creates a traffic jam of electrons. The Solution: By adding Far-Red light, you power up the second station. It now "pulls" the electrons from the first station much faster, clearing the traffic jam and making the whole assembly line run at full speed.
The Benefits for The Grow..
Because i am using the Biotabs water-only method, my plants already have a steady supply of organic nutrients. Implementing the Emerson Effect offers several distinct advantages:
Increased Biomass: Because the "engine" is running faster, the plant produces more sugars and carbohydrates, leading to heavier fruits or flowers.
Faster Finishing: Plants often reach maturity sooner because they have more surplus energy to complete their life cycle.
Better Light Penetration: Far-Red light is very good at passing through the upper leaves. This "wakes up" the lower parts of the plant that would otherwise be shaded, allowing the whole plant to contribute to growth.
Enhanced Secondary Metabolites: In many crops, this synergistic light can stimulate the production of terpenes and antioxidants, improving the "quality" (smell, taste, and potency) of the final harvest.
The "Sunrise/Sunset" Trick
I am using 4x Invisible sun Far red/Deep red bars,they use high-quality Samsung LH351H (660nm Deep Red) and specific Far-Red (730nm) diodes for 10–15 minutes at the start or end of the light cycle. This mimics the natural shift in light at sunrise and sunset, "waking up" the photosystems or signaling the plant to go into "sleep mode" faster, which can further optimize the flowering cycle.
Enviromentally i am chasing a VPD of about 1,1kpa. My room seem to sit nicely at lights on at 24c with no real drama and a little help from a 220W greenhouse bar radiator. Its using abot 4kw/h a day atm because my room is attached to the side of my house and its been -5c.. I have had to add some humidity as its also very dry atm. Im aiming for RH of 65% with my 24c but it is more around the 62s.. VPD is crucial and is the focus for this grow for me. The autopots and Biotabs make it so easy ican really just focus on perfect enviroment. A VPD of 1.0–1.2 kPa provides enough "atmospheric pull" to move calcium and magnesium up from the roots, which is critical for the rapid cell division happening now..
Plants will be flipped on Saturday which is their week 5 as im a bit behind..
As this happens i will push PPFD upto 4-500umols. by week 2 of flower. Thats the plan anyway..


Likes
19
Share
@GoldenWeedGrower
Follow
Legend
Timestamp: 📅
EC - pH: ⚗️
Temp - Hum: 🌡️
Water: 🌊
Food: 🍗
pH Correction: 💧
Actions: 💼
Thoughts: 🧠
Events: 🚀
Media: 🎬
D: DAY, G: GERMINATION, V: VEGETATIVE, B: BLOOMING, R: RIPENING, D: DRYING, C: CURING
________________________________
📅 D77/B15 - 31/01/24
⚗️ EC: 1.2 pH: 6
🌡️ T: 19-22 °C H: 40-60% (Min-Max values taken from the app.)
🌊 2L
🍗 CalMag - Bloom A-B - Bud Candy - Big Bud - B52
💧
💼 Thanks to the TM+ Pro app and the use of the Humidifier now the T-H of the enviroment is correct and i got quite good VPD (Vapor Pressure Deficit) rate
🧠
🚀
🎬 Added Timelapse video
________________________________
📅 D78/B16 - 01/02/24
⚗️ EC: 1 pH: 5.9
🌡️ T: 19-25 °C H: 45-70 %
🌊 2L
🍗
💧
💼
🧠 Quite time to change res
🚀
🎬 Added Timelapse video, 3 pics and "TM+ Pro" App screenshots of T-H values daily graph, and quite perfect VPD daily rate
________________________________
📅 D79/B17 - 02/02/24
⚗️ EC: 1 pH: 6.2
🌡️ T: 19-25 °C H: 40-60%
🌊
🍗
💧 Added few drops of pH-
💼
🧠 The res was for many time on the upper side of pH range, so now I would like it to goes down to a more acidic solution. I'll do it on the next res change, maybe tomorrow
🚀
🎬 Added Timelapse video but today it was trunked because of a problem on the camera, but I posted it anyway
________________________________
📅 D80/B18 - 03/02/24
⚗️ EC: 0.15 pH: 6.6
🌡️ T: 19-25 °C H: 40-60%
🌊 RES Changed 💦💦💦. Flushing until tomorrow
🍗
💧
💼
🧠
🚀
🎬 Added Timelapse video and VPD, T-H graphs screenshots
________________________________
📅 D81/B19 - 04/02/24
⚗️ EC: 1 pH: 5.7
🌡️ T: 19-25 °C H: 45-65 %
🌊 15L
🍗 CalMag - Grow A-B - Bud candy - B52 - Big Bud
💧
💼 Some defolation and sistemation of buds
🧠
🚀
🎬 Added Timelapse video and VPD, T-H graphs screenshots
________________________________
📅 D82/B20 - 05/02/24
⚗️ EC: 1 pH: 5.4
🌡️ T: 20-25 °C H: 52-84 %
🌊
🍗
💧
💼 Little defolation and raised up the lamp
🧠
🚀 I forgot the humidifier on manual mode, so H increased until 80%and VPD went out of control
🎬 Added 4 pics, one is from timelapse set. Added Timelapse video and screenshots
________________________________
📅 D83/B21 - 06/02/24
⚗️ EC: 1 pH: 5.0
🌡️ T: 19-25 °C H: 45-70%
🌊
🍗
💧
💼
🧠 pH decreased a lot and it's a good thing it stay on the acidic side for a while
🚀
🎬 Added Tmelapse video and screenshots of VPD and T-H

Likes
23
Share
@adam_pawloski87
Follow
This week went real great , one has been getting flushed and the rest we will start flush Tomorrow! These ladies are doin so amazing! Hope you all enjoy !! Stay tuned for next week! Cheers an happy holidays!
Likes
10
Share
@Todzilla
Follow
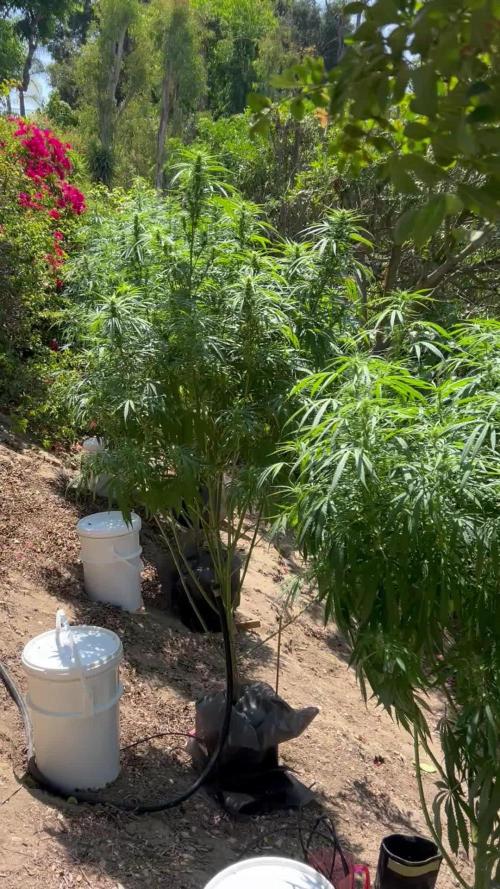
This week we moved the plants to a more secluded location, which was easier with small autopots. Leveling and terracing the equipment was a pain. I put individual 6 gallon reservoirs for each plant. This allows me about three days before filling up the reservoirs.
The biggest problem again was the plants falling over because of wind.
They have hit the ground over 20 times, maybe thirty. Each time this dumps the reservoir, so I had to make a ton of water this week. But they keep chugging along.
I staked and wired them down and so far so good for three days.
The plants are big, with my biggest being 7 1/2 to 8 feet tall. They have mostly recovered from falling over so many times. The branches have hardened so I can’t really stretch out the branches anymore. They’re tighter than I planned….
Flowering has started and should start stacking up on one or two of the plants next week. I’m just running Jack’s RO for weeks 4 to 8. I may start with some fulvic and humic acid soon.
Best of luck on your grow.
Likes
5
Share
@BombBuds
Follow
Erntezeit!
Getrocknet wurde 9 Tage bei ~55% Luftfeuchtigkeit und 20 grad.
Trocken getrimmt.
Alle Popcorn nugs und Verschnitt zu Hash weiterverarbeitet.
Likes
5
Share
@PapaTerps
Follow
Black Cherry Gushers - Barney's Farm
Day 102 - watered with 3L of RO tap water with nutrients, mixed individually, in order and then pH'd to 6.3. She has finished bulking her flower and is now maturing, her leaves and part of her flower have started to take on a dark purple colour indicating that she coming close to the end of her lifecycle. I have started to reduce the amount of nutrients I've been giving her, as I prepare her for harvest. I will continue to do this untill her final week, when she will be given just plain RO tap water; this is known as the flushing process.
Day 104 - she's about eight to ten days from harvest; about 60% of her pistils have turned amber and her trichomes are mostly milky - so today she'll be getting her first flush! 🤘🏻 I watered her with 5L of RO tap water with just a half measure of Bio Bloom and Top Max nutrients, and then pH'd to 6.3. Her next watering, the nutrients will be halved again, and from then on, she'll only receive water.
Likes
16
Share
@Herbie
Follow
Couldn't get much slower really could we? Haha
I'm not complaining just mentioning is all.
She's a beautiful girl, with top heavy buds I'm surprised she's still holding herself up.
Gonna make her look like a Christmas tree then harvest her.
Time stands still for no plant and I simply need the room for more plants.
Likes
9
Share
@DerEkstaseHase
Follow
Foxtailing - temp. 26-27°C
Due to some watering issues last week we got some salt buildup.
Drain Ph has risen to 6.6 and Ec peaked at 2.9 mS/cm
This week I gave the plants more water and checked drain frequently. It went back down to 1.8 and Ph came down to 6.3.
Likes
4
Share
@Big0zGrower420
Follow
Day 49!
Starting to give her just plain water for 2 weeks of flushing. Getting really excited to harvest and then get going on another grow.
See you next week.

Likes
121
Share
@ctm_dzagi
Follow
Very strongly cut off, I prepare to the beginning of flowering,
he released a call that for some reason had a pair of leaves, because of which it turned out to be a little more torn off than it cost, I will give her a couple of days and we will begin the translation into flowering,
also revealed a call which has 3 points of growth on each floor. Changed lighting: 37 watts white 55 watts blue, 38.5 watts red,
Today I fully watched the side lighting and the electrics,
controlled from a smartphone similar to the top lamp

Likes
29
Share
@GrownwithLED
Follow
In week 7 the 12 plants have filled out the space inside the HOMEBOX grow-tent very nicely and therefore its time to switch to flowering. I change the timer, which I put infront of the supply of my SANlight EVO4-120 LEDs, to 12/12 hours of light/darkness. This will induce the flowering of my babies and they can start to develop buds. The BIO NOVA nutrients work very well, which can be seen in the nice healthy green color of the plants. I follow the SOIL-CULTIVATION chart from the BIO NOVA website, but use only half the recommended dose, because my tap-water already has a very high EC-value of 0,8 when it comes out of the faucet. Since I have used REGULAR seeds for THE PURPS from BC-BUD-DEPOT, I have to check for males on a regular basis. Two plants show clear male pollen-sacks already now (see above in video) and have to be culled right away. I cut the plants off at the main stem right above the soil and take away the plants and throw them into the trash right away. This way I make sure NO pollen can mature inside the male pollen-sacks and be released later and inseminate my babies on accident. In the places of the male PURPS plants, I put a MAC and KK-plant into the AUTOPOT-system, so all 12 placed are filled again. Now its time to wait until the first flowers start to appear. 👍😎


Likes
15
Share
@Jan1512
Follow
Ich habe mich mal mit LST probiert. Habe es einfach mal aus dem Bauch heraus gemacht. Ist bestimmt nicht optimal aber es gibt ja immer Luft nach oben ;)
Likes
8
Share
@Skinnytalls420
Follow
Very happy with the outcome just as good as the first time I grown this strain!!!!
Likes
36
Share
@Hempface86
Follow
Ladies and gentlemen today's day 43 and as you can see this girl is happy and healthy.. thanks to the good people at Zamnesia Seeds for making this grow possible.. more from them in the future for sure.. now back to the plant she has been a breeze from the beginning up until now.. first three four weeks she fed off The Roots organic soil then I top dressed with terp tea bloom and swap from silica to recharge every other watering..PH is around 6.3 .. at first I was upset about switching to organic but now I'm thinking it's a good thing because I'm able to fit four different plants in my tent versus one really big plant using synthetics.. I like variety in my life so I am happy... I typically grow one photo at a time so I might stick with synthetics for that but for my autos this seems to be working.. I hope all is well I will leave a link at the bottom for you to go check out Zamnesia Seeds I highly recommend them they have an awesome array of things from seeds to head shop to all your mushroom needs. Hope everybody's doing well God bless and happy growing ✌️
used code: zammygrow2024
https://www.zamnesia.com/us/authentication?SubmitCreate=1&ref=j1up85x0


Likes
20
Share
@DrGanj
Follow
This strain has smelled dank from the moment her first crystals arrived, just like having a few oz GSC laying around. She's currently drying and there has been no grassy hay smell to cure off like usual. My dry room just stinks like Girl Scout Cookies

Likes
43
Share
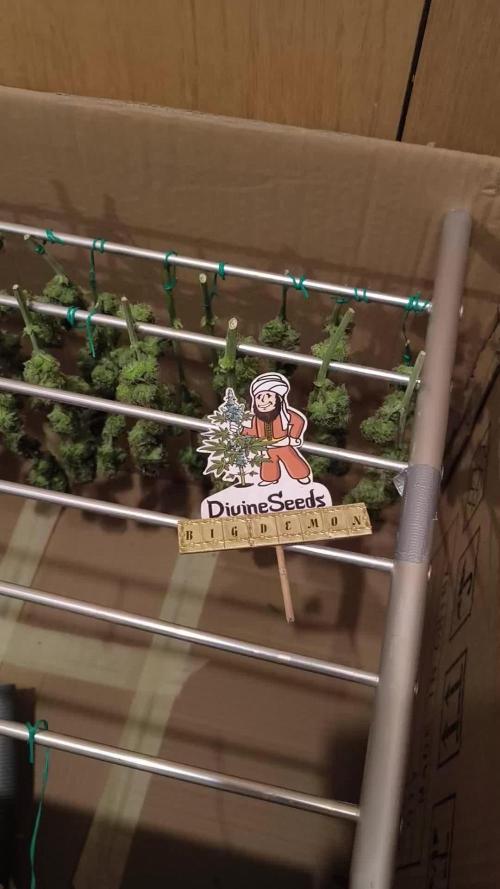
@DevelGrow
Follow
Hallo Freunde 👋 es wurde Zeit und Big Demon wurde der Schere zum Opfer! Dieses Mal wurden die buds am Ast getrimmt und ab in die Kiste! Mal schauen was rauskommt!

Processing
Likes
5
Share
@CecilioJardinero
Follow
Entrando ya en tierra derecha 😑😑😑😑
Modo zen en este proceso, ser paciente estar atento al engorde y esperar. 🤯🤯🤯
Así va el mix fem en sus últimas 3 semana 4 semanas para el corte 🌲🌲
Una de las #critical47 de @positronicschileoficial es la que estará primero y ya podemos ver que lograremos plantas sanas y limpias al final.
Las de mayor producción son las #fatbanana y la #greenpunch. La deaoyr resina hasta el mentó es una de las #critical47 y las #Toxic.
Durante todo el proceso y desde hace ya 5 años confiamos el cultivo a los fertilizantes de @topcrop. 🍒🌽🍍🌼💐💮

