The Grow Awards 2026 🏆 


Likes
17
Share
@Rangaku
Follow
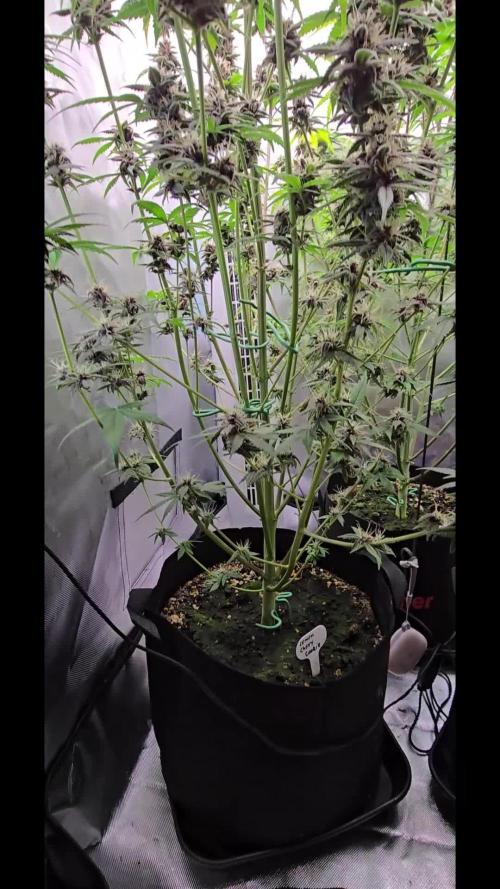
Big phatty is healthy as and ready to flip into flower, defoliating on the reg and spreading her out some more . Here comes the stretch

Likes
2
Share
@GoodTimesOrganics
Follow
Welcome Back!💚
Die erste Blütewoche ist vorbei und die Pflanze entwickelt sich weiterhin prächtig.
Die Blütenansätze sind schön erkennbar und die Pistilen bilden sich allmählich aus.
Überraschenderweise wirken die Blätter sehr Sativa lästig, wobei genetisch eine Indica Dominanz vorherrschen müsste.
Außerdem ist ihr Wuchsverhalten eher Indica dominiert.
Heute war es auch Zeit den Green House Feeding Dünger einzubringen.
Bin sehr gespannt, was am Ende raus kommt.
Die Werte im Zelt sind optimal auf die Blüte eingestellt.
———————
🌞 Temp: 24°C
🌚 Temp: 20 °C
💨 RH: 56%
VPD: 0,97 kPa
😎PPFD: 830 mqm
———————
Stay Tuned! 💚

Likes
16
Share
@CDNCannaCole
Follow
Easy week just gave the girls lots of water and did a leaf trimming up too to let it breathe and get a little more light deeper! They are looking amazing😍

Processing
Likes
2
Share
@wavycannabis
Follow
Just trimmed up the girls one last time before the flip, took about twelve clones off of them all in total because I need to select a blueberry x zamal mom from them. really hoping they stretch quickly in the first couple weeks to give me some extra room to work with in the canopy.
Likes
189
Share
@Legendaryseedthumb
Follow
They could be in pot for 1 more week but I really need my weed right now 😂 100% cloudy but no amber

Likes
14
Share
@Wenz004
Follow
my first coco grow...2 plants
1. northern light auto untopped in spider farmer tent 150x150 cm (5×5) with Aptus nutrients...this one goes out of control...let see if I can repeat this crazyness
2. northern light auto topped in spider farmer tent 70x70 cm and mainly TA nutrients
Nutrients mentioned above are for NL topped (2.) in smaller tent (pictures follow)
NL untopped (F-MILF) got this week the following:
Aptus Topbooster 6 drops/l
Aptus P-boost 12 drops/l
Aptus K-boost 6 drops/l (this week added new)
Aptus regulator 3 drops/l
Aptus All in one 0.6 ml/l
Aptus CaMg 0.6 ml/l
TA Silicate 0.4g/l
End of week 10 installed some self-watering (3 days off)...with coco problematic let see...final two weeks will be completely without any manual influence (2 weeks off)...hopefully staying alive
Likes
98
Share
@SlowpokeFuegobud
Follow
Welcome to the spectacular world of the Fastbuds photoperiodics!! 😎 They're like us!
🌱 🌱
Preflowering on day 35!! 🌺 Switch 12/12 was on day 25..
Week 3 you can see what happens when I don't adjust my pH.. 😇 From now on RO Conditioner and also pH minus! 💧
I popped the two remaining seeds, after I effed up one in the last grow. 😅
@Fast_Buds here we goooooo!! 😘 🚀
_______________________________________________________________________________________________________________
Setup:
140x70x200 cm Spiderfarmer tent
2x Monkey 16W fans (not oscillating)
1x Secret Jardin 30W
1x box fan 50W oscillating (on lowest level)
LED
Full Spectrum 320W AGLEX AGL-320W-MA
5,6 kg
foldable, dimmable
864 pieces Samsung LH301H
864umol/s
2,7umol/J
full spectrum white + RED 660nm + IR 740nm
wavelength range 380-780nm
covering 3x4ft
Green Buzz Nutrients https://greenbuzzliquids.com/
❗ Use code GD42025 for generous 25% discount (for orders of minimum 75€)
Biobizz Lightmix
Carbon Active Granulate Filter 125/360 cm³/h
PrimaKlima exhaust EC 125-400/240 cm³/h

Likes
9
Share
@Xabii
Follow
Values are average of the day.
DATE - °C - RH% (Tent Temp/RH)
20240627 27.6 52.4
20240628 24.2 50.6
20240629 26.0 47.1
20240630 25.7 55.9
20240701 23.8 54.4
20240702 22.1 58.0
20240703 21.7 57.4
DATE - PH
20240627 #
20240628 5.55
20240629 5.40
20240630 6.27
20240701 5.82
20240702 5.91
20240703 6.19
DATE - EC(us/cm)
20240627 #
20240628 633
20240629 663
20240630 1095
20240701 1033
20240702 997
20240703 950
DATE - °C (Reservoir)
20240627 #
20240628 23.7
20240629 23.3
20240630 24.1
20240701 22.2
20240702 20.5
20240703 20.1
Likes
22
Share
@Elendil
Follow
Harvested 3 plants of Strawberry Cheesecake and 2 of Amnesia. This is the last one from 1st grow. I planted it 2weeks later as the original plant didn’t survive.
Avoided some basic mistakes and the buds on this one are huge.
All plant is covered in crazy amount of sugarlefs.
Now in flush...some time next week chopping it down and moving on to next grow.

Likes
2
Share
@Kirsten
Follow
19.1.25:
I have watered all plants with 300ml of dechlorinated water PH'd to 6.3, with 1/3 jar of black strap molasses with Ecothrive Biosys-1g.
I am looking to increase the sugars for microbial life and plant processes.
It'll also add some extra Calcium, Magnesium and trace elements.
I also, watered all plants with Bloom nutrients.
Using dechlorinated water PH'd to 6.3 with the following nutrients: (ml/l) ;-
♡ 2ml Cal-Mag
♡ 2ml Ecothrive Flourish
♡ 2ml Xpert Nutrients Bloom Booster
♡ 2ml Biobizz Bloom
♡ 2ml Biobizz Top Max
♡ 1g of Ecothrive Biosys
I watered around 1-3 litres per plant. Depending on size and requirements.
I'm still spilling water containing the nutrient solution. 🙄
I am using this to rub into the leaves. I think a nice foliar massage won't do any harm, make the most of the situation.
The plants have become very hungry and thirsty. Increased the water by double.
I ran out of my TNC cal-mag. I decided to order the Xpert Nutrients brand, as I like their products. It isn't organic as far as I can tell, but I don't think it matters too much to me, to be honest.
I also want to top dress this week, so I bought some Green Leaf PK bud Booster dry amendment from Amazon, too.
I'll mix it with canna coco, perlite, worm castings, and Ecothrive Life Cycle.
24.1.25:
I went ahead and top dressed all the plants with 4.5 gallons of my supersoil custom mix.
This consists of the following substrate and dry amendments:
♡ 60% Canna coco
♡ 20% Worm castings
♡ 15 % Perlite
The remaining 5% consists of the following dry amendments;-
♡ 10g Ecothrive Biosys
♡ 1 Tsp RHS Mycorrhizal Fungi granules
♡ 3 Tsp Vitalink Bat guano
♡ 4 Tsp Diatomaceous earth
♡ 8 Tsp Ground Cinnamon
♡ 10g Green Leaf Bud Booster PK booster.
♡ 3 Tsp Ecothrive Life Cycle.
•Worm castings for some all round nutrition.
•Cinnamon for mildew and bug repellent.
•Canna coco base substrate.
•Perlite for adding oxygen to the root and soil system.
•Green Leaf Bud Booster PK Booster for blooming. Building strong big buds.
•Vitalink bat guano again for Bloom.
•RHS Mycorrhizal Fungi granules, to boost beneficial microbes.
•Ecothrive Life Cycle for lots of great benefits.
•Diatomaceous earth for Silica.
•Ecothrive Biosys, for an extra microbial
Thanks for checking out my diary 🍃 ✌️
Likes
47
Share
@DonPeyote
Follow
Requiere mantener bastante baja la humedad en las últimas semanas ya que lo grueso de las colas las hace propensas a la botrytis, ojo ahí.
La planta en si es resistente pero es el grosor de sus flores, lo denso de las colas lo que te obliga a tener muy controlada la humedad en etapas avanzadas, creo que es más para tirarla programando la flora para el verano

Likes
12
Share
@Aceboogie441
Follow
Sorry been away for so long. Been super busy at home and at work. Had turned my favorite pheno of the zkittz berry ade and turned into mother

Likes
34
Share
@Ashbash
Follow
I believe #2 is ready to pull now. Gonna do that on Monday. #1 still has a while to go but is flowering faster than the true photoperiod plants. Maybe auto genetics speeds it up even though I had to flip to 12-12. Smells sweet and is very sticky to the touch.
Any advice for keeping its smell during drying and curing? Last few have always lost their smell before it's ready :(
Likes
14
Share
@xxsinabitxx
Follow
Week six of flower I went in to the tent today an lots of new purple on the buds, couldn't believe how nice they look💚🤩, man does she look stunning, I'm in awe with these beautiful flowers👌🏻

Likes
74
Share
@AsNoriu
Follow
Day 88. Girl down ;)
Think she will be in 70-80 g area, with about 50W light per plant - not bad ;)))
Presume all girls left will brake that plank ;)
Happy Growing !!!


Likes
36
Share
@MadeInGermany
Follow
Hey everyone .
This week she was left in her 1 L pot, and will not be in the 11 L pot until next week :-).
She was topped again and accepted it super 😃.
By the time she is repotted next week and given Green House Powder Feeding for the first time, she will have received a small portion of Canna Vega :-).
Otherwise it grows very quickly and vigorously, and they look beautiful 😍👌.
I wish you all a lot of fun with the new update, stay healthy and let it grow 🙏🏻👍
You can buy this Strain at :
https://sweetseeds.es/de/sweet-skunk-f1-fast-version/
Type:
Sweet Skunk F1 Fast Version
☝️🏼
Genetics:
Sweet Skunk Auto (SWS34)
X
Early Skunk
👍
Vega lamp:
2 x Todogrow Led
Quantum Board 100 W
💡
Bloom Lamp :
2 x Todogrow Led
Cxb 3590 COB 3500 K 205W
💡💡☝️🏼
Soil :
Canna Coco Professional +
☝️🏼
Fertilizer:
Green House Powder Feeding
☝️🏼🌱
Water:
Osmosis water mixed with normal water (24 hours stale that the chlorine evaporates) to 0.2 EC. Add Cal / Mag to 0.4 Ec Ph with Organic Ph - to 5.5 - 5.8 .

Likes
7
Share
@NSABND
Follow
Day 57 😁👌all the queens are ok 🙏
Day 58 the queens got some fertilizer 💪😃👍
Day 59 what should i say... everything seems to fine 😃🙏👍
Day 60 the queens got some fertilizer 💪😃👍
Day 61 all queens are in good shape 😃🙏
Day 62 everything seems to be ok 🙏👌
Likes
67
Share
@AsNoriu
Follow
Day 43. One Blackberry is going for the roof. Both late ones are small and have 33 days to flower .... Ridiculous ...
That run shouldn't happen.
But I have at least 5 okeish plants and hope to push them with Mars SP3000 as extras, plus first wavers will be starting to fall , so more space and light ....
Day 44. Two smallest girls should go and are going.
I will create second proper grower this year already ! I gave to this guy 5 Alaskan Diesel seeds for this year to try to grow, but only because of time - I can't finish smallest two - so I will give them for my friend as well. One turn out not so bad from those 3 lategoers , so I hope 30 days of flower will be enough for her ...
One Strawberry Banana looks like a magazine cover girl !
Day 46. Yesterday I kicked them out and it was frosty night, both went down , some branches froze ... It will be interesting ... Friend said all 5 girls pop out and he has enough, so I had to find quick space for them ...
The rest was rearranged in main grow room.
Happy Growing !!!
Likes
7
Share
@BonesJones123
Follow
Germ Week1 (Day 1 Feb24)
Stilton and Tropical Berry done directly into a riot cube sat in a bed of biobizz light mix in a solo cup
2 fruity widow seeds sat into a wet paper towel in a ziploc bag
Feb 27 - no real move from the widow's in the bag, so i moved one of them into a riot cube
Mar 1 - action from stilton, but the others not really doing much.
Mar 2 -widow 2 is dead. went to the shop and got myself a barney's farm critical kush, into a paper towel
What's the plan here?
Hoping for 4 different strains to give me 4 different reactions to the same conditions and maybe I'll find something that likes the space i've set up
I've never done direct to substrate before, but seems to work fine. Doing the kush in a bowl just because it feels more comfortable to me, but likely not a big deal
What are we doing different this time?
Try to watch and maintain temp and humidity as well as possible.
In seedling I'll look to mist the riot cube once per day, in the morning, with a tiny bit of water
As soon as the first set of leaves touches the edge of the cup i'll transfer to final pot and hopefully have some micro-r to help the transition
Looking to maintain as little LED headroom as possible, to try and get the nodes really close
Aiming to top at node 3 once I see node 6 just start to pop out
Feed once per week and water once per week.


