
Likes
Comments
Share


Likes
Comments
Share

@Ryker
Follow
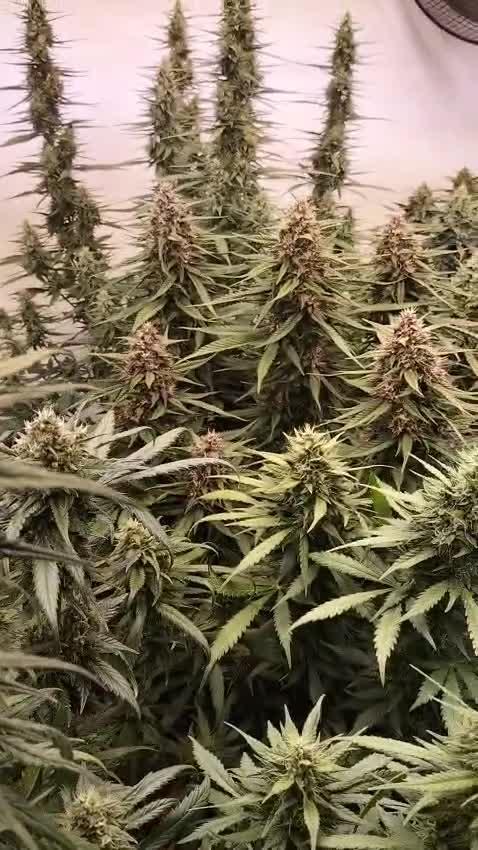
Ein Tag vor der Ernte. Wir freuen uns mega. Unser bester Grow bisher. Jetzt noch sicher über die Ziellinie kommen und einen schönen sanfte Trocknungsprozess hinbekommen!

Likes
17
Share


@Ashbash
Follow
Zkittlez is growing very nicely think its about to start flowering. Lemon AK is slower but still looking nice considering its about 10 days older. Topped the zkittles and its responding well, got 2 tops where there was only 1. Tied it down as vertical space is very limited for me. Can't get too tall.
Likes
12
Share

@JolliGrowz27
Follow
Terps are here, I definitely made a good choice by replacing my old carbon filter. This strain is very gassy and skunky. No fruit, candy, or citrus. Pheno 2 is finally maturing now, seems she is slower to flower. She is bulking up now pheno 2. Pheno 3 is doing well, probably going to be the first to harvest. Pheno 1 is locked out and no real progress after I burned her. I'm thinking of chucking Pheno 1 or putting it outside to finish. I have clones of all the plants, ready to flip and grow flower again. I also have started 3 different strains in baggies. 6 seeds in all. 3 regular seeds and 3 fem seeds. I have No Training Wheels by TERP Fiend x3, Ocifer by Brother's Grimm x2, and Destination Wedding by Dirty Bird Genetics x1. I hope all get to sprout. If not I have back up seeds of No Training Wheels and other strains from Lit Farms.


Processing
Likes
24
Share


@Tonino
Follow
Had to give them a treatment for white flys this week so she a bit sad but she will be alright


Likes
24
Share


@SkunkyDog
Follow
Hallo zusammen 🤙.
So das war es für sie.
Wir sehen uns in 3 Wochen mit dem Erntebericht wieder.
Bis dann
Rabattcode für den BIOTABS-Webshop https://biotabs.nl/en/shop/ GDBT420, damit erhalten Sie 15 Prozent


Likes
9
Share


@Mr_nugs_lover_David
Follow
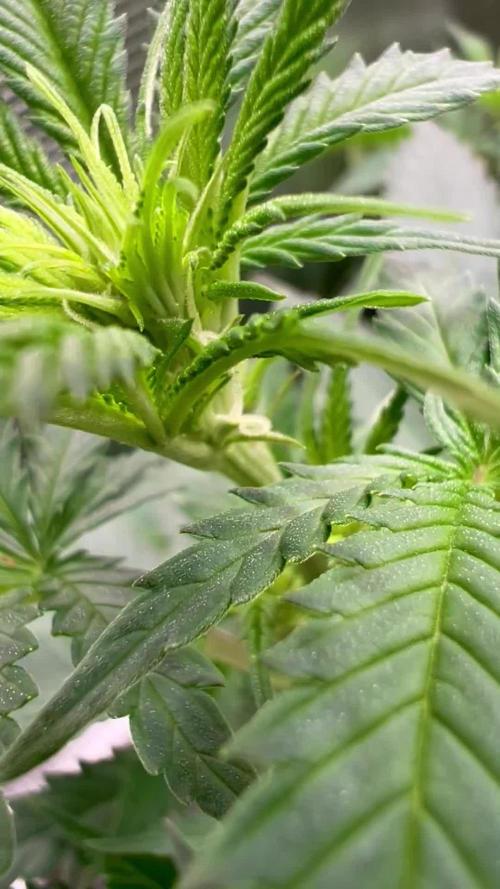
She's developing pretty fast and looking very strong snd healthy, although she's having to deal with fungus gnats which are making her grow a little slow however I'm about to start treating her with nematode steinernema feltiae. Let's see how she keeps developing! Thank you so much for your attention and hope you enjoy my diaries guys! 💚❤️


Likes
21
Share


@NSABND
Follow
Today start of week 10 (Day 70) 😎😵😏 with Trailer Park Mod 😂😂😂😂
i had old fans around here and a ice box, so i startet to build the 7 watts Trailer Park Fans Mod 😁😁😁
It´s Monday Day 71 and "Hilde" got another fertilizer shot today
from Day 72 to Day 75 i was on a Road Trip... 😳😎😳
Back from Road Trip and "Hilde" got another fertilizer shot today 😎👍😏
Likes
4
Share


@Brentb2607
Follow
10 days of darkness during the flush begins. Had great results with Wanda and her genetics. Blessed for a first grow. Cut Wanda down at the end of the week. She’s now drying. I will be giving a thorough review for my harvest diary. Excited to share what I’ve experienced and learned from this grow.

Likes
3
Share

@CalGonJim
Follow
7/7 2AM MONDAY Awesome week last week, AMINOS are working better then I cold have imagined!!!! I got a new AC Infinity Germination Propagation system, lights and all. Now I can have a mobile one for the kitchen and veggies..... I never thought I would become a gardener. now I understand how cells work, how it all works... and most information is outdated and inaccurate!!! I should be able to find a mix of human aminos I can use in these plants to overcome heat and salinity AND lower wattage because of increased photosynthesis from application of AMINOS with healthy diet of AN as a base!!!!
725am setting up the new AC Infiniti germination kit or Sith Lord propagation system 145pm BANANA PURPLE PUNCH....JUST SMOKED SOME CUT OFF BOTTOM BRANCH. WAS NOT HARSH..RIGHT OFF THE PLANT AND NOT HARSH. BONG, WATER FILTER BUT NOT TOO BAD. SHE SMELLS SO STRONG AND FRUITY AND FRESH, NOT BAD, SMALL SIZE MAKES NO DIFFERENCE IN TASET OR EFFECT. THE AMINOS MUST BE DOING SOMETHING. ALL STALKS ACROSS ALL PLANTS AND 3 DIFFERENT GROWS ARE MUCH STRONGER!!! SMALL 1 GALLON GROWS CAN MAKE STALKS THIN HOWEVER THIS WILL COMPENSATE FOR THAT WITH AMINO, M BLUE, SILICA, FULL STRENTH AN CON 4ML PER L.
7/8 1am THIN STALKS / PROBLEM/RESOLUTION - 1 gallon veg will lead to thinner stalks than tall plants can self support. RESOLUTION: REIFORCMENTS THROUGH AMINOS AND MBLUE. MB & AMINO /NUTRIENTS COMBINATION REACTS WITH NITROGEN DURING VEGETATIVE PERIOD GIVING EXTRA PLASTICITY & STRENGTH TO LEAF SURFACE. ALMOST RUBBER LIKE IN SHINE AND FEEL. STALKS / MAIN AND OFFSHOOTS ARE SIMILAR, THE VERY SMALL AMOUNTS OF SILICA DELIVERED WITH MB/AMINOS/NUTES. WORK TO MASSIVELY INCREASE STRENGTH!!!!! 4X AT LEAST WITH SAME THICKNESS!!!!!!👨🔬. AND LST WORKING TO ALSO INCREASE BRANCH THICKNESS AND FULLNESS xylem/phloem just awesome ....AROMAS ARE HEAVY AFTER FEEDINGS....I CANT BURN THE LEAF TIPS WITH THIS COMBO. I HAVE TO BUY ALL 18 AMINOS AND DO MILLIGRAM DOSES...I DONT KNOW HOW TO DO THAT YET. YET!!
copy and paste title so I can find this again!!!!!!!
Amino Acid Transporters in Plants: Identification and Function
.....https://www.mdpi.com/2223-7747/9/8/972.....
FUNICULUS....FOR HOME SYSTEM THEY NEVER TALK ABOUT PRACTICALITY OR SMELL OR STORAGE....AMINOS AND ORGANICS STINK....FOLAR AMINO SPRAYS WOULD STINK UP THE TENT, THE HOUSE, I DONT SEE HOW A SPRAY WOULD BE A CLEAN SOLUTION. SO AMINOS WILL NOT BE SPRAYED IN A SMALL HOME ENVIRONMENT, TOO DIRTY.
230AM SOLUTION IS TO AMINO THE ROOTBALL. DIFF. CONCENTRATION OF N WILL BURN THO....HMMMM. NOT A PHD..ADVANCED HOBBY. DONT NEED ALL THIS...SO AMINOS ARE ROOT DELIVERED WITH MBLUE 1 DROP PER L. WHICH ONES AND WHEN NEXT.
THIS SYSTEM IS FOR FUCKED UP PEOPLE TIRED AND NOT VERY MOBILE....SO EVERYTHING MUST BE PRESTENED EASY TO USE. 305AM....I SMOKED BBP LASNIGHT FULLY GROWN WITH MB AND I DIDNT WAKE UP ANY MORE RETARED THAN USUAL SO ITS GOOD. 545am """A critical review of citrulline malate supplementation and exercise performance...https://pmc.ncbi.nlm.nih.gov/articles/PMC8571142/"""". 🍉"to achieve an intake of 10 g of L-citrulline, ingestion of around 3–5 kg of fresh watermelon (highest concentration of all foods) would be required and this is not only impractical for athletes (Davis et al. 2011), but would also not contain a sufficient dose of the malate component."😂
in 2L 💦: 2 drops Methylene Blue 5 percent, 5 drops Quick Sorb Amino Acid, 1 pill Nitric Boost, 0.5ml Rhino Silica, 8mL Con. Bloom A+B, 3ml Big Bud by AN. AND Bud Factor X 4ml.... that might be too much!!!!
10AM.....RESULTS ARE BLOWING MY FUCKING MIND.!!!!!! 2BBB AND 2 GOATS NO BURNS...HOW IS THAT POSSIBLE?????? FULL NUTE LOAD!!!!!! I ADDED BUD FACTOR X, I SHOULD SEE BURNS AND CURLS...AND IM NOT!!!!!!
TIP WATER QUICKLY THE TOP TO ALART THE PLANT OF INCOMING WATER FROM BOTTOM, THIS PULLS WATER UP FIRST, THEN BOTTOM FEED TO KEEP FLOW UPWARD AND CONSISTENT, SLOW POURS WORK. 1020am goat by Royal Queen seeds might be one of the best plants I’ve ever seen in my life and all of the plants from fast buds to seedsman bubbles blueberry F4 all with the treatment I’m using are growing and expanding faster than I’ve ever seen stronger stocks than I’ve ever seen in no burns. I may have locked in the system that prevents burns and grows in very difficult environments I have not done any flushing, so there is an excessive nutrient and salt buildup in the fertilizer in the soil and we’re still having fantastic results.👍👍👍👍👍👍💥💥💥💥💥💥🚨🚨🚨

Likes
10
Share


@RFarm21
Follow
Semana 23 junho - 29 Junho
Dia 23 - alimentada
Dia 25 - alimentada:
Calmag 1ml; bio bloom 2,25ml; topmax 1.5ml; bio heaven 2ml; alg a mic 2ml; bio grow 1ml
Dia 29 - alimentada
Dia 27 - alimentada
Likes
10
Share


@mingokoon
Follow
Week 9, nov 9.
the flush on the middle plant didn't seem to do much - the trichomes are barely starting.
Most all the plants have shown calmag deficiency. they are getting worse even though I have added calmag throughout the grow. I believe it could be stale pro mix.

Processing
Likes
35
Share


@BarrieGrower
Follow
Plants seem to be growing ok, seeing some fade on the leaves. Not sure if this is a bit nutrient deficiency or not.
Plants are drying out faster than usual, probably the temperature. Struggling to get it lower anlong with the humidity. May need a dehumidifier and to crank the a/c.

Likes
21
Share


@TheGanjaFarmer
Follow
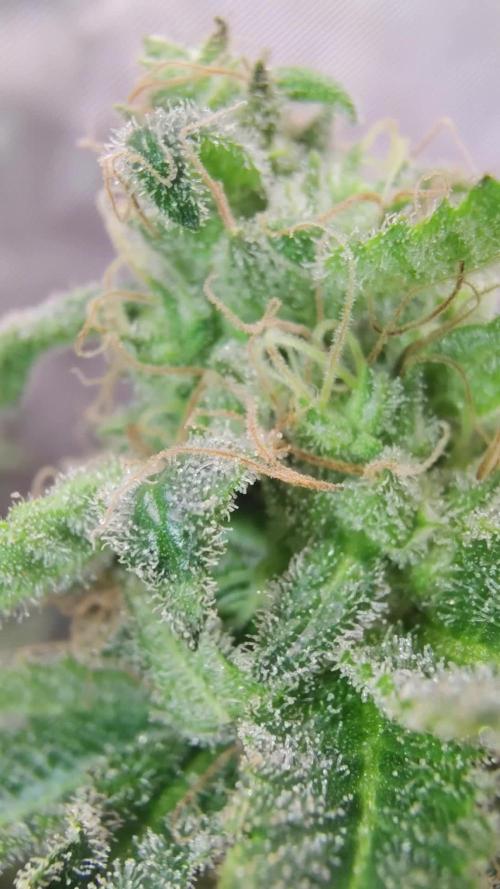
The buds are starting to get really dense now, very strong smell of diesel, some amazing colours coming off this beauty looks so good 🤤🤤🤤 hopefully only a few more days
Likes
23
Share


@Mosquito_Haarlem
Follow
Week 6 is begonnen en ze laat al tekenen van bloei zien.
Ze is flink de lucht in geschoten afgelopen week.
Ze is meer dan 10 centimeter gegroeid.
Laten we kijken hoe ze zich deze week ontwikkeld.
Ze krijgt nu ook de all-in-one liquid van aptus meegevoed.
Ik zal gedurende de week nog verse foto's updaten.
👌🏽


Likes
8
Share


@BuddyHolly
Follow
2 plants made it to harvest. Small nugs, about an ounce per plant dry. A lot of frosty trim and small nugs I’ll be using for hash later. I had rooting issue when I flipped to flower that definitely negatively effected nutrient uptake. Small yield but quality is good. Smells almost like a sugary jelly bakery. Cured for a week, tastes sweet almost.
