Likes
24
Share


@SmallBatchNugz
Follow
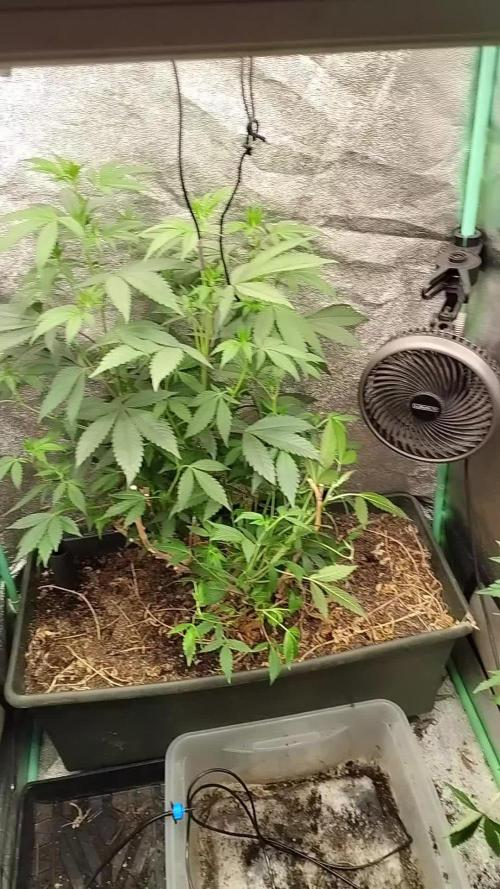
GO ETHOS, GO ETHOS GO!!!!!
this may be the absolute 8th wonder of the world, look at those ladies!!! Oooo la laaa... just started week 5 and added some Purpinator to the mix.. see how she goes.
And you notice that little fancy C02 rockin in style in the corner 😎

Likes
13
Share

@AestheticGenetix
Follow
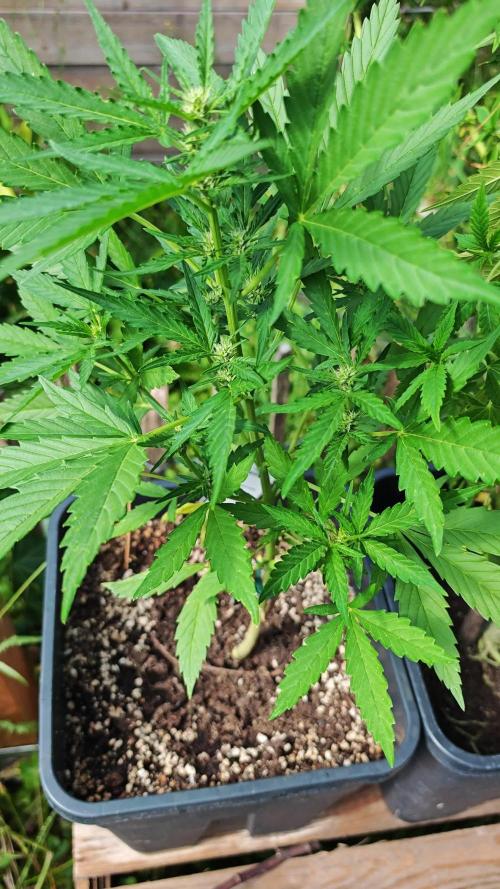
The gelato is looking great. Trying to figure out which male I want. I'm realizing I want to make s1 seeds so I need to get some clones from her to pollinate her
Likes
2
Share


@51sGarden
Follow
Posting this as I’m on the last few days of the 3rd week from germination
Great progress, a lot of roots for such a short period but not too much plant growth, will start watering daily instead of watering every 2-3 days
Topped the girls today (Day 18 from germ) and starting to do mainline on all the Bubba kush.

Likes
Comments
Share


@TheButcher
Follow
needded some iron and calmegg revive did a great jobb tiramisu is a big eaterrrrof microo nutess

Likes
8
Share

@Webacca
Follow
Sie wächst. Sehr schön.
Wetter hat sich von ultra heiß zu moderat gewandelt (soll aber wieder zurück schwenken) und die Ladies kommen damit besser klar.
So is dat fein
Stelle grade fest, dass sich Zeichen von Blütenphase zeigen.
Hmmmm... Ist was klein dafür, finde ich.
Aber bei dem Wetter zuletzt lief einfach nicht viel.
Erneute Kontrolle, Ergebnis:
Deutliche Blütenansätze, ab Sa dann off. Blütenphase

Likes
73
Share


@Burmese
Follow
Hi everyone, here's the update for this week.Please enjoy the video... ✌️🇲🇲


Likes
3
Share


Likes
5
Share


@Xipsiomega1
Follow
End of 6th week (day 42) in bloom. Plants have stopped growing in height. Colas are filling fast so i put some big sticks to stabilize them and avoid crushing down from weight. One of nine plants is about 10 days back in bloom as it started to show signs of sex in day 20 after i changed the light circle! No nutrients this week and generally i don;t feed much. I do some light feeding mostly weeks 1-4 in bloom. I mix some bio nutrients in the soil (light mix) before transplant. These strains are 100% sativas and need low N and moderate P/K


Likes
2
Share


@gr3g4l
Follow
Iniciamos la semana con 36 dias de vida con una segunda poda de bajos, el segundo nudo.
41 dias fueron más que suficientes, las plantas tenian un buen aspecto y cubrían suficientemente el espacio. Que corra un poco el aire que en pocos dias eso estará bien cubierto.
quité fuera el humidificador y cambié el fotoperiodo a 12/12h.
Likes
18
Share


@Wrongholn519
Follow
At this point I'm checking the plant for signs telling me it's time to harvest. I think I'm getting pretty close at this point.
She is putting out a strong smell and has a sativa structure with tall and dense flowers.
I fed a really heavy compost extract this week with calmag and Golden Tree.
Process/ Environment changes:
- turned off one Ts1000 yesterday when I cut down the blackberry auto
- humidty set to 45-50 % RH
I'm on auto pilot at this point and I'm looking forward towards the dry and cure phase. I have purchased 1 gallon glass jars to cure the flower in. I have also purchased 2 way humidity pack to help keep my cure on the right track. I will go in to detail about my process when the time has come to dry the flower.
Likes
183
Share


@OrganicNature420
Follow
And so it starts ..... 🌱
Germination date 🌱 12/07/2021
Day 1 15/07/2021
Strain 🍁 Ethos Genetics Banana Hammock R1
(Mandarin Sunset x Grape god)
THC% • 22-25%
💡 Mars Hydro FC4800
• Power draw 480W + 5%
• Max coverage 5 x 5
• LED 2070pcsSamsungLM30B1&Osram660nm
• Max Yield 2.5g / watt
• Noise level 0 DB
• Removable Driver +2m cable
• Daisy chain (multiple lights)
https://marshydroled.co.uk/products/mars-hydro-fc-4800-led-grow-light-samsunglm301b-commercial-greenhouse-medical-indoor-kit 🇬🇧
https://www.mars-hydro.com/buy-fc-4800-480w-4x4-energy-saving-full-spectrum-commercial-led-grow-light-mars-hydro-for-sale 🇺🇸
PROMO CODE • (ORG420) DISCOUNT 👍🏻
marshydroled.com
⛺ Mars Hydro 120 x 120 x 200cm
📤📥 AC infinity 6inch
💧 10lt dehumidifier
❄️ 3.1kw air con system
💉 Nutrients GreenBuzzLiquids
Organic Grow Liquid • 1-4ml until 2wk flower
Organic Bloom Liquid • 2-4ml flower stage
Organic More PK • 2-4ml +wk3 of flower
Organic Calmag • 1-2ml/lt whole grow
Fast Plants Spray • first 3days at night lights off
More Roots • 2-5ml veg +2wks flower
Fast Buds • 5ml +wk2 of veg until 1wk flower
Humic Acid Plus • 2-5ml whole grow
Growzyme • 2-5ml whole grow
Big Fruits • 2-5ml flower stage
Clean Fruits • 5ml flush 1wk
Ph powder
Root Gel
Living Organics
https://greenbuzzliquids.com/
🥥 Growing Media • Coco Coir
Notes 📝
Light was set at 35% but raised it to 50% as I needed another degree of heat. Removable driver is a god send. I have it on bricks outside the tent to help consume some heat from the driver. I will wait until these girls are adult veg until I start upping the light %
New Nutrients have started well 🌱 fast plant Spray seems to of worked nicely and love the Organic farm smell they all give off
Happy growing fam ❤️🌱🍁👍🏻
Likes
42
Share


@Only4passion
Follow
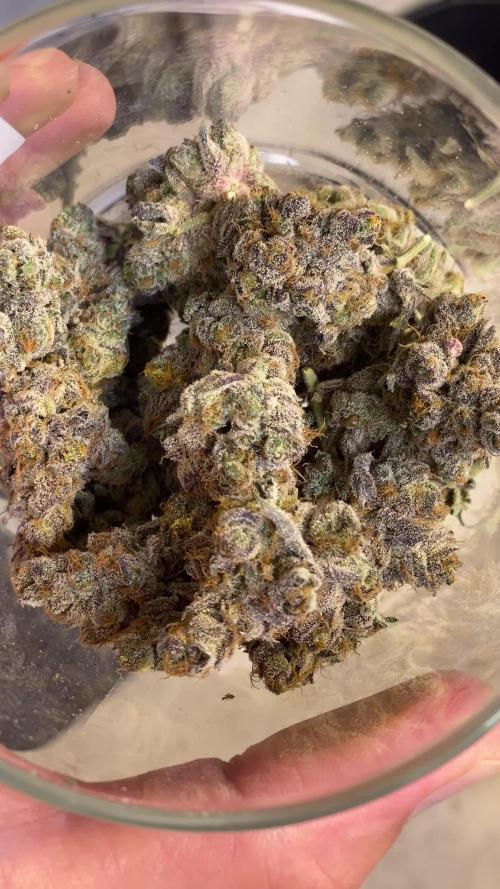
Harvest time I decide two hang the entire plant for a slow drying !!
I finally removed the plant to much humidity it was around 80%😥 it’s raining hard those days anyway I checked every buds and no mold so I switched to my old method .
📦 humidity now it’s 55% 👌
5 days of drying I try to keep humidity around 60 and 17 degrees to keep all terpenes n flavour, terpene don’t like low humidity ,heat ,and of course lightning ,see y’a next update 💪💪💪
I had 34g of nice frosty trim ,for the first time I’ve made some nice bubble hash amazing I love it!!!
I watch all of he’s videos he was the marster of hash RIP French cannoli 🙏🙏🙏

Likes
16
Share


@Tipton
Follow
They're getting going good! They love their new homes... Love the 1000w mh in my 5x5

Likes
11
Share


@Teezkiee
Follow
Fastest Flowering I have ever seen, some magic, quickly moved to Ripening

Likes
154
Share


@Tropicannibis_Todd
Follow
💩Holy Crap Growmies We Are Back💩
Code Name FBT2311
Well growmies we are at 14 days in and everything is going great 👌
👉 Started to do some low stress training👈 We all ready got , some Pre-flower showing already 👌
Lights being readjusted and chart updated .........👍rain water to be used entire growth👈
👉I used NutriNPK for nutrients for my grows and welcome anyone to give them a try .👈
👉 www.nutrinpk.com 👈
NutriNPK Cal MAG 14-0-14
NutriNPK Grow 28-14-14
NutriNPK Bloom 8-20-30
NutriNPK Bloom Booster 0-52-34
I GOT MULTIPLE DIARIES ON THE GO 😱 please check them out 😎
👉THANKS FOR TAKING THE TIME TO GO OVER MY DIARIES 👈
Likes
6
Share


@Creatorknbsland
Follow
Semana de crescimento em alta! Seguindo so com.agua nessa semana que passou e entrei com fert hj 02/03 para obter os resultados nessa semana q começam hj !troquei elas de armario que improvisei com uma geladeira velha!mais uma semana e ja estão prontas para flora!obrigado mister soma por essa particularidade que sao suas genéticas!acredito que nao sao todas somango que ha possibilidades de ter outra cepa,ja que as semente vieram d presente de um amigo !

Likes
224
Share


@Ju_Bps
Follow
Hello growmies 👩🌾👨🌾🌲🌲,
👋 Flowers continue maturation,
End is approaching, one more week with nutes, and flush for the next/last week.
💧Give water each 2 or 3 days
1,5l Water + Nutri NPK Bloom + Sugar Royal
1,5l Water + Nutri NPK Bloom
PH @6
- Nutri NPK
Bloom
1/2 tsp for 1 gal.
💡Mars Hydro - SP 3000
100% 43 cm.
🔥 Thanks community for follow, likes, comments, always a pleasure 👩🌾👨🌾💚🌲.
Mars Hydro - SP 3000 💡💡
https://www.mars-hydro.com/sp-3000-samsung-lm301b-greenhouse-led-grow-light
NUTRI NPK 💥🔥
https://www.nutrinpk.com/product/npk-mix-pak-for-4-to-5-plants-cannabis-fertilizer/
Pure Instinto - Strawberry Shortcake Auto🌲🌲
https://pureinstinto.com/product/strawberry-shortcake-autoflower/