The Grow Awards 2026 🏆 


Likes
4
Share
@Ctsbestsmoke
Follow
So I’m making my nurturers then diluting down to my desired ppm be careful using these nutrients at full strength with autos! Test and tried will burn and tox your plant! I transplanted into one gallon pots the last day of week two May 6th,2023. They seem to have taken very well to the transplant. 🤞🤞🤞


Likes
34
Share
@Basementganja
Follow
Plucked a few leaves that were looking at me funny ;) Not much to do!
Very strong lemony smell!!
Watered with 2.5 gallons of the above listed nutrients, every 5-6 days. (when the soil becomes 95% dry)
10% of the solution watered runs out the bottom of the pot, and is removed with a wet-vacuum.
Likes
29
Share
@Cheeba_Inu
Follow
As of day 57 the grow is going well! I am more confident that the leaf yellowing is regular end of life changes at this point. The buds are putting on decent weight and the trichomes have mostly clouded over. It is entering the harvest window in my opinion, but I am going to wait another week or so before harvest and give it some time to ripen more.
I have switched my feeding to a mild does of GO biothrive bloom which will finish the grow with primarily organic nutes through the last couple weeks. i will continue to fade down the nutrients as the plant is hitting the end of its life.
Thanks for reading!

Likes
7
Share
@OG_NordGrow
Follow
Neue Woche Leute
3.5
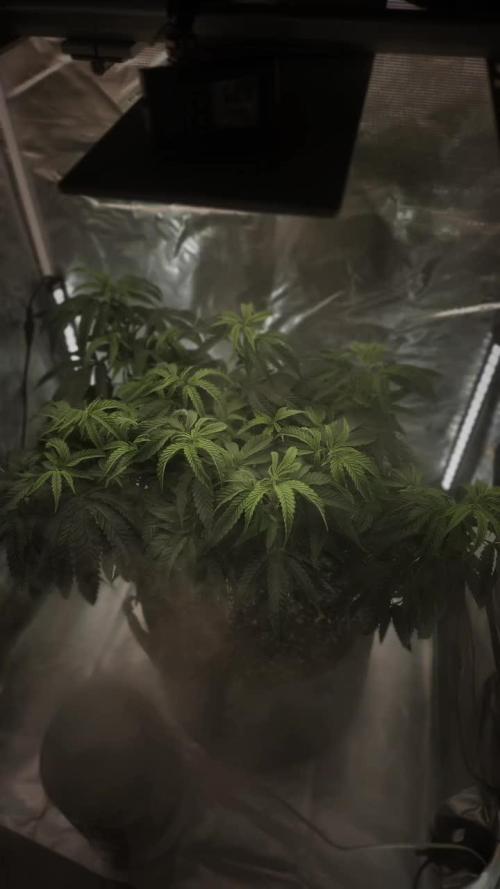
Luftfeuchtigkeit heute leider zu hoch gegangen wegen außen Einflüsse (Fenster auf). Abluft Anlage angeschmissen und alles geregelt. Auf den Fotos sieht man leicht ein gewölbte Blätter. Mache mir da aber keine Sorgen.

Likes
5
Share
@Growfornow
Follow
Week 11 harvest
Chop chop down she goes
What an easy and rewarding plant, she done great for my mistakes also and every person NEEDS a sweet forgiving women Amen
Nice sweet spunky smell
I would grow again for sure

Processing
Likes
13
Share
@Canadian
Follow
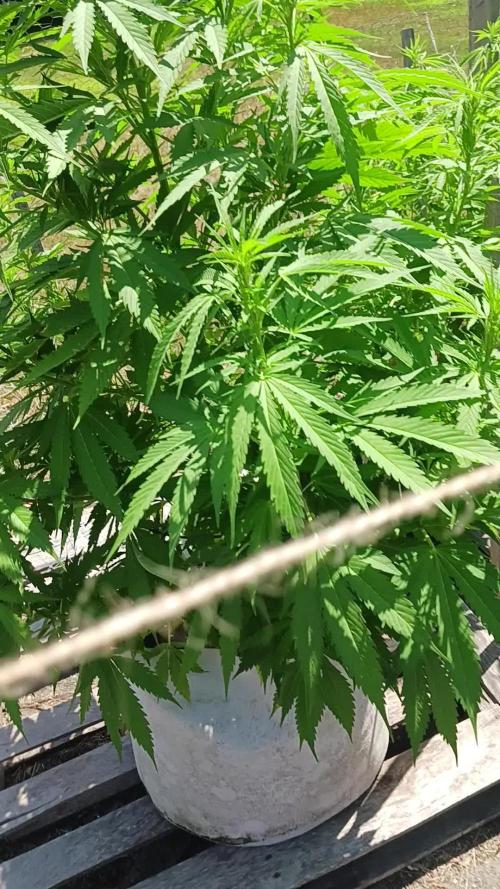
Everything seems to go very good with this plant it's growing very fast is a monster in growth looks like it is on steroids fantastic genetics.
The smell is very powerful now definitely give you a preview of things to come thank you for reading I will continue to update a happy grow

Processing
Likes
9
Share
@LittleBigTrees
Follow
Still not given any food. It will be a few weeks until she needs food as I've just put her into a 4 ltr pot 👍


Likes
6
Share
@RandomStreetMerchant
Follow
So sadly we lost the first seed to some unforeseen catastrophe. So we popped another one and it has taken the place of its sister wonderfully.
Sorry for the time taken without update but from here on out should be smooth sailing.
Can’t wait to see this girl grow!!!
Until next time take it easy everyone and best of luck growers!

Likes
7
Share
@GREENPHOENIX6262
Follow
01/26 - (Clone mother) - She got a little funky last week and was in recovery mode for about 2 days - She has since then recovered (24hrs) and is performing amazingly - Running high temps High humidity - 2 part feed (Clean/Nute) on micro-dose program.

Likes
15
Share
@Mrs_Larimar
Follow
2022-08-20
Cindarella Jack is Budding up, Plant still looks quite happy and well feeded
she drinks around 1l per Day ( its still quite hot in the Daytime)
Breeder Information
Auto Cinderella Jack is a cross of Cinderella 99 ,Jack Herer and Magnum, giving the strain a high THC level, almost 26%. Also, such genetics give high yields of 400-500 g/m2. The variety has very powerful long-lasting effects. The plant grows in any growing environment,and harvesting occurs in 70-77 days. This strain has a compact structure and an average size. It is easy to trim. The buds are abundantly covered with snow-white trichomes. Auto Cinderella Jack is easy to grow, but you should take care of the humidity level.
Aroma and taste this is a mix of pine and herbal flavors, with notes of fruit and citrus. Because of its powerful effect, the strain is recommended for experienced smokers. It gives a body stone and uplifting effects.
There is so much information on the website to this Strain
https://dutch-passion.com/en/cannabis-seeds/auto-cinderella-jack
Genetic (Cinderella 99 X Jack Herer) X Magnum
Harvest 400 - 500 g/m²
Floweringtime70 - 77days

Likes
2
Share
@Northstar_cannabis
Follow
She is building buds. I think it needed more space to reach its full potential, we'll see when I run it again. Given it's size, it's doing really well. Plenty of buds.
Likes
8
Share
@J_N_Z
Follow
This is now the one before the last week of my grow. Since it's my first grow, I'm not sure when to harvest, I wanted to wait another week and then harvest what do you think ?!
Likes
10
Share
@RFarm21
Follow
1 september - 7 september
1 september -Last feed
5 september - only water - 1.7L


Likes
13
Share
@masterofsmeagol
Follow
7/13 It's maine-ing out. Overcast and misting. I guess it rained last night but not much. Today is my watering day although I think they could've made it until tomorrow. These drastic temp changes makes it hard to get a STEADY routine in place. I watered everything in the 20's a gallon the 10's 1/2 gallon. The 10th planet in the front was still heavy so I didn't water it. I'll keep an eye on it. Temps are much milder. I noticed a few more septoria leaves on the 10th planet which I promptly defoliated. This pheno is flowering. I could've put this week as flowering as several plants have started. I also saw ONE leaf on my chem dog that had septoria on it. ONE f-ing leaf! I was planning on treating this early anyway so I mixed one gallon of plant doctor 3 tsp gallon/gallon which was the recommendation. I'll monitor this plant and continue treating it the next two weeks. I may do foliar too but the mixture is different. It's a systemic so I don't think that matters as much. Considering getting mulch to protect from spores on the soil. My plants look GORGEOUS. I Hate to use such a nice plant as a guennie pig but I'm not going to sit here and watch it progress. I'm lucky it's really not that bad and that it's on a reveg. There's so many leaves that I would be forced to prune anyway. I'm seeing two MAYBE three leaves a morning but I want to get this under control. Last year u let a plant with septoria go and it finished but went to extracts. I've got a pretty good feeling about this plant doctor. I've used it before with good results. Only time will tell though.🤞
EDIT: WENT OVER AT ABOUT 1PM. ITS 2 NOW AND BLUE SKIES AND SUNNY. IM SUPER GLAD I WATERED AND EVEN MORE SO THAT I APPLIED THE PLANT DOCTOR HOW I DID. THE GIRLS ALL LOOKED AMAZING. THE TENTH PLANET I TREATED WITH PLANT DOCTOR LOOKS THE BEST IVE EVER SEEN IT. I FOUND ON LEAVE DEEP ON THE INTERIOR WITJ A SMALL SPOT BUT ITS SOMETHING IM SURE I MISSED THIS MORNING. IF THIS WORKS THIS GOOD ILL BE APPLYING IT TO EVERYTHING EVEN IF ITS JUST PREVENTATIVE.
7/14 Rained last night andcwas still sprinkling when I went over. Amazingly the 10th planet that I treated with the plant doctorcmix had ZERO visible signs of septoria. I did find one leaf on Mt chem dog and two on my mk ultra with the big leaves. It could've been calcium deficiency but I really doubt it because I think I saw THAT as well. I'm going to wait a day or two and if there are still no negative results and the plant is still looking good I'm going to treat AT LEAST the two others that MAY be infected. It's a systemic and can be used proactively and supposably breaks down into p and k after stimulating immune response. I'll monitor a little longer but as it stands I think I'm going to treat the other two just in case. I also need to start feeding. I've watered a lot more than I normally do so obviously the soil won't last as long. This has been some tricky weather but I'm happy with how things are progressing. I probably should've changed this to the first week of flower as several plants are popping pistols everywhere.
EDIT: WENT OVER AROUND NOON AND MIXED UP TEO GALLONS OF PLANT DOCTOR PLANNING TO TREAT THE TWO PLANTS BESIDE THE 10TH PLANET. EVERYTHING LOOKED SO PERFECT AND TOMORROW IS MY WATER DAY SO I DECIDED TO HOLD OFF AND APPLY IT WHEN IT NEEDS WATER ANYWAY. I DID NOTICE THAT PLANTS SEEM TO BE FLOWERING MORE AGGREWWIVELY THAN BEFORE. THINGS ARE GETTING INTERESTING.
7/15 It was water day. The girls looked great this morning. I watered everything at least a gallon and 1.5 for the thirstier plants. I treated my big fan leaf mk ultra and my chem dog #4 with the same Plant Doctor mix as i did tge 10th planet beside it. I havent seen ANY septoria on that plant since application and it looks better than ever. I watered them with a half gallon of phed water before doing a soul drench with the gallon of Plant Doctor @ 3tsp/gal. I'm not seeing much septoria but plants are starting flower and I want to nip it in the bud. This product can be used preventatively and I went by the guidelines for medical marijuana. It was 70 earlier this morning. I'll update as I go forward.
EDIT: WENT BACK OVER AT 3 AS THE TENPS WERE PIST 90 AND HAD BEEN ALL DAY. I POSTED A SHORT VIDEO BUT EVERYTHING IS LOOKING GREAT. THE PLANT DOCTOR SEEMS TO HAVE HELPED SUBSTANTIALLY. DIDNT FIND ONE SEPTORIA LEAF. STILL IT WILL TAKE A WHILE TO WORK FULLY BUT IM GLAD I DIDNT CHICKEN OUT AND I APPLIED THE RIGHT AMOUNT. IM GOING TO KEEP AN EYE ON THINGS BUT I MIGHT JUST TREAT EVERYTHING PREVENTATIVELY WHICH IS JUST HALF A TSP A GALLON I THINK. IT DEF TRIGGERS A RESPONSE IN THE PLANT. I LOVE IT WHEN SHIT JUST WORKS OYT AND YOU END UP PLEASANTLY SURPRISED. NEXT WATERING ILL PROBABLY DO NUTES. IM DEBATING WHETBER TO TRELLUS OR JUST USE STAKES AND STRINGS ACROSS THE CAGE AS NEEDED. OH WELL. OVER 90 IS TO MUCH FOR ME TO BE OUTSIDE FOR TOO LONG.
7/16 Plant Doctor is doimg its job. I saw a couple septoria leaves on chem dog but it was interior amd I could've missed it. It takes a little bit to get going. I think I'm going to treat the rest of the garden with at least the preventative dose of 1tsp per gallon. I'll wait and see if this keeps it from popping back up. It almost got to 100 yesterday. It was 80 early this morning. I mixed up two gallons of water and gave the thistiest/lightest a half gallon. I'm hoping that will hold everything over until tomorrow which is water day. I'll have to check but I think it might be time to feed too. I def should make sure to treat tjis septoria before focusing on nutes. It says you can mix it with nutes but I'm leary of doing so. I'd rather apply them at seperate times. I'll watch the garden and of I NEED to water I will. I'm hoping what I did will be enough.
EDIT: WENT OVER AROUND ONE. IT WAS 93° WITH SUPER HIGH HUMIDITY. IM GLAD I SPLIT THAT TWO GALLONS WITH THOSE FOUR PLANTS THATS FOR SURE! THEY'D PROBABLY BE DROOPED IF I DIDNT. EVERYTHING WAD PRAYING TO THE SUN GODS. WELL, EVERYTHING EXCEPT THE MK ULTRA IN THE 30 AND THE 10TH PLANET. THEY ARENT DROOPING THEY JUST LOOK NORMAL. THEY ARENT "PRAYING" LIKE THE OTHERS. THEY ARE DEFINATELY A LITTLE LIGHT AND ARE LOOKING FORWARD TO THEIR WATERING. AND THEIR FEEDING. THATS FOR SURE. I WAS SUPER HAPPY WITH WHAT I SAW GOING OVER AND THE GIRLS WILL BE ABLE TO HOLD OUT UNTIL THE MORNING. ONE IN SPECIAL KUSH (WHICH GROW AMAZING AND LARGE HERE) IS IN A 10 AND I EVEN GAVE IT A LITTLE WATER THIS MORNING BUT ITS DROOPY. I COULD STILL FEEL A LITTLE BIT OF MOUSTURE EVEN THOUGH IT WAS LIGHT. IT CAN WAIT UNTIL THE MORNING WITH THE REST. IF IT WAS DROOPING BAD I WOULDA WATERED IT. I DONT GET WHY IM HAVING PROBLEMS FINISHING PLANTS IN 10GAL SMART POTS. YEARS AGO I COULD FINISH SOMETHING IN A 5GAL BUCKET! BUT NOW ITS LIKE THE PLANTS I GROW GET FAR TO BIG TO FINISH FLOWERING ON THESE TINY BAGS. ILL MONITER. HOPFULLY IT WILL BE FINE. IF I HAVE TO I SUPPOSE I COULD CUT THE BOTTOM OFF AND PUT THEM IN THE GROUND OR MORE SUBSTRATE BUT THATS NOT SOMETHING I REALLY WANT TO DO. I CANT WAIT TO SEE YOU THESE GIRLS TURN OUT.
7/17 I'm glad I gave those few plants that extra water. It hit 100 yesterday. Plants made it through it OK. It's 80 at 9am. I watered the garden even though it's supposed to rain with a chance of thunderstorms. Everything got at least a gallon. The mk ultra reveg in the 30 got 2gals as did the thirsty special kush on the end. I've figured out which plants use more water and I try to give them a little more. I also fed today. I was hesitant to feed the plants I treated with plant doctor, but I did anyway. 1tsp grow big 2tsp big bloom .5 tsp calmag. I've noticed pistles coming together on a few plants and forming buds. Next week will definitely be labeled flower. The plants treated with plant doctor LOOK great! I've found a few septoria leaves on a couple other plants. No big deal. I was going to treat the rest of the garden preventatively but if a couple more are infected I'll just add them to the rotation. I just need to make sure I follow-up with the next few treatments. Can't say enough good about this plant doctor.
7/18 Well this fucking sucks. It's 35mph wind gusts and windy as hell. It might've rained last night but if it didn't rain much. I spent the morning "trying" to put up little strong or rope supports to help the girls. I ran a rope across the front of the three on tje back to suppirt them. That one works good. I have one going the other way the entire length which helps support some. Then I took string and ran it around each side of a row for supports. So far no observable damage abd the plants all looked awesome. They've been through a lot and are big tough hardy plants. They'll make it through tjis no problem. I'd be more worried if they had big wet flowers on them but by then I'll have the proper supports and maybe a trellis up. I feel for them this morning and I hope that wind doesn't dry out my bags!
EDIT: SPIDY SENSE STARTED TINGLING AROUND ONE SO I WENT AND CHECKED. I GUESS WILL POWER ALONE WONT MAKE IT SO THE PLANTS MAKE IT TO WATERING DAY. WIND GUSTS HAVE BEEN HIGHER THAN 35MPH AND IVE SEEN REPORTS OF 25MPH SUSTAINED WIND. I DONT KNOW WHAT IT IS HERE BUT IT DRIED OUT SOME BAGS AND WAS TURNINGVPLANTS SIDEWAYS. BOTH 10TH PLANETS (THEY DRINK ALOT OF WATER) AND THE MK ULTRA REVEG WERE BADLY DROOPING. THE REST "MIGHT" HAVE MADE IT UNTIL MORNING BUT WHATS THE POINT? I ALSO HAVE TO LEAVE EARLY TOMORROW TO TAKE THE WIFE TO THE DOCTORS. WHAT I DECIDED ON WAS TO WATER THE PLANTS THAT DRINK THE MOST 2 GALS AND GIVE THE OTHERS TGATXWERENT DROOPING AND LIGHT 1.5. I GAVE THE TWO IN THE TENS A HALF GALLON EACH. THERE ATE TWO PLANTS AT THE BACK (SPECIAL KUSH AND PINK KUSH) THAT I DECIDED TO HOLD OFF AND WATER TOMORROW. I NOTICED SOME LEAVES WITH THE COMMON "IF THE BROWN SURROUNDS YOUR PLANT IS DROWNED" SO IF THE PLANTS HAVE A LITTLE WEIGHT, LOOK GOOD AND HAVE PRAYING LEAVES THEN I SHOULD PROBABLY WAIT TO WATER. THEY ARE ALL GETTING BEATEN TO SHIT BY THIS WIND STORM. IM SURPRISED THERE IS NO DAMAGE. THESE PLANTS ARE VERY STRONG. RESILIENT. I DIDNT WATER THE 50 EITHER AND IM UP IN THE AIR ABOUT WATERING IT TOMORROW.
Edit 2 I went over around six once the wind died down a little. All the plants I didn't water look great. It's jist the reveges that took it the worst and has some fading leaves. I fixed it with nutes but it doesn't fix the leaves already pale. The reverse mostly are the ones seeing any stress from this storm. The large special kush in the front has buds like an inch long now. Soon it will be time to treat with plant doctor again.
7/19 Well that was a ridiculous windstorm that lasted all day. It was 54 when I was there this morning. I watered the two kush's in the back with a gallon and the 60 with a gallon. Now it's 9 and 70 but it's not supposed to be as hot. This weather is crazy. I defoliated some leaves from the 10th planet that I treated first with plant doctor. Tomorrow it's due for its second treatment. The other plants are only a couple days different and are doing good. Next watering I think I may treat everything. It's a small enclosure. That would be the smart move. I'm having some leaves yellow up on two of the plants that reveged. It sucks because I know I've overwatered a little on occasion but that's because it's 100° with strong wind running through my bags and drying them out. I give them their 10% so its not that I'm not giving enough at a time. I've also noticed some random pest damage. I'm considering using citric acid as I have it on hand and it supposably also helps with septoria. If I do it it will be a diy of Dr. Zymes. The way I look at it is these are outdoor plants. This isn't a sterile environment and shit like this is going tp happen. I saw a leaf that was almost totally eaten. Probably jpn beetle or grasshopper/cricket but they certainly got a good meal! I need to spend more time in the garden.
EDIT: WENT over around noon to check things out. Windy and 77°. It LOOKS like the two 10th planet's and the mk ultra reveg are picking up a little. I think they suffered not only wind stress but over watering do to these 100° that can drop to 60° in a day. Those super hot days I even left them until they drooped before I watered but still wasn't good enough. They're in transition though so they use the most water. Plus those 3 are the ones that revegged. It's getting to be close to the one week mark where I do the second treatment of plant doctor. I may hold off a day to get everything on the same page. I'm thinking about treating everything. If some were good I'd guess they wouldn't be after that horrible wind storm. Plants LOOK good though. I defoliated a couple septoria leaves and a few overwatered or yellow leaves.


