The Grow Awards 2026 🏆 


Likes
5
Share
@asdfghjkl404
Follow
semana 4
dia 22
dia 23 st a la sour diesel pequeña
dia 24 riego con 500ml y sus fertilizantes estoy esperando que el sustrato se seque sobre todo en la diesel auto mas pequena
dia 25 no tengo luz full expectrum y estan con clf unos dias.
dia 26. se le ven los pistilos de prefloracion
dia 27: riego con 500ml con sus fertilizantes
dia 28:

Likes
6
Share
@KarmaBAB
Follow
Good germination left me with a strong seedling! Will start adding Xtra Roots after the first pair of true leaves develop. on the plant. I am very satisfied for now! 😀
Likes
28
Share
@Heregrowsnothing
Follow
So this week I have had to split the plants, one is really some way behind so I've managed to sweet talk the wife into letting me get another tent 😉 this plant may be behind but it's fucking massive compared to the others, plenty of decent bud sites so now she has all the space she needs. I have to feed her by hand now rather than the wilma but that's no real problem. Can't wait to see what next week brings already. If your running something similar or even if your not give me a follow and I'll follow you back ✌️🏻

Likes
1
Share
@gamberro
Follow
This week has been all about maturation. I’ve been watering only with plain water, starting the flush to clean the roots before harvest. The buds are looking dense and compact, covered in a nice layer of trichomes that keep getting frostier day by day.
The lower leaves are yellowing, which is normal at this stage since the plant is using up the remaining nutrients stored in the foliage. Trichomes are mostly clear with some turning milky, so I think she will be ready for harvest in about a week.
Overall, the plant looks healthy and stable, with tight bud formation and a great aroma coming out. Even though she stayed quite small, she’s packing some nice, solid flowers.
Watering: only water (about 600 ml)Environment: stable and controlled
Stage: late flowering / flushing phase
Next: monitor trichomes daily and prepare for harvest


Likes
3
Share
@Willy_Balls
Follow
23.08
Girls are stretching and creating budsites. Never had 16 of them in 5x5 and it is a bit too much. I have trouble controlling humidity.
It’s already apparent they are taking their time and that it is more than 8 week strain. Officially it should be done in around 10 weeks.

Likes
4
Share
@KaliWeeD
Follow
Alguna ya esta ready para meter las ✂️ y las demas .. será cosa de días 🙊🙊🙊

Likes
57
Share
@Silverback_Guerilla
Follow
2/26:
Harvested both Black Jacks and both Gorilla Girls tonight. They got a rough live trim, then chopped, washed, and hung to drip dry.
Big, heavy, frosty buds on all 4 of them!👍
3/2:
Still drying in the closet...amazing aromas!

Likes
18
Share
@TheGreenLeopard
Follow
Starting to take shape and smell😂 was able to take a fastbuds down this week to help the ramp into harvest. 😂😂 gréât strains - spring is here - on Twitter now @greenleopard420 - all good. Variation if feeding in the tent. Those little fleas still there , nematodes didn’t work so disappointed there.
Likes
31
Share
@Kirsten
Follow
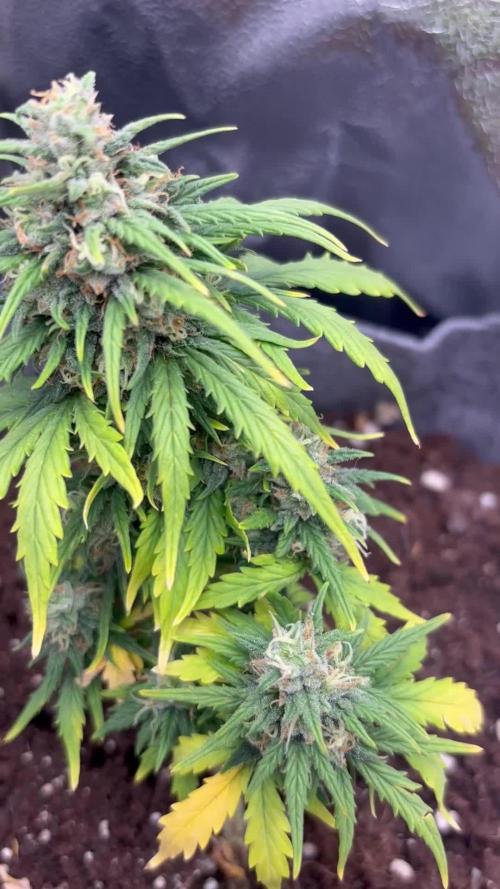
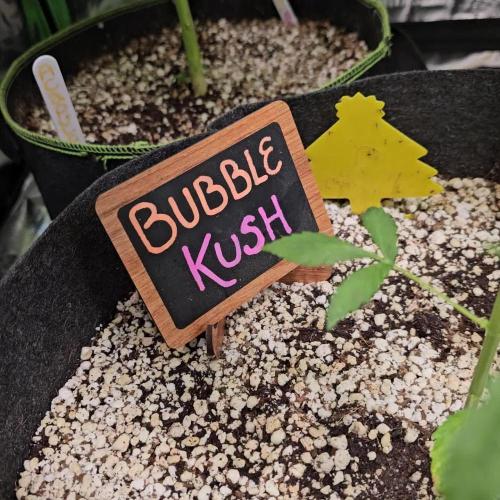
BUBBLE KUSH has just been top dressed, I am seeing signs of excess Nitrogen in the top leaves, they gave gone shiny and darker in colour.
I top dressed on the 27.8.25. It consisted of the following;
Top dress:
🧡 1/2L Canna Coco
🧡 1/3L Perlite
Amendments:
💚 1/4 Cup Diatomaceous Earth
💚 1/4 Cup Ground Cinnamon
💚 1 TBSP Ecothrive Grow
💚 .5 TSP Ecothrive Bloom
💚 2 TBSP Ecothrive Life Cycle
💚 1 TBSP Ecothrive Charge
Top dressed 27.8.25.
28.8.25:
I watered with 3L of dechlorinated water PH'd to 6.5 with;
💜 1 TSP Sea Kelp
PH: 6.5
PPM: 418
Thank you for checking out my diary this week 😁💚✌️🍃


Likes
16
Share
@Mrg7667
Follow
Day 74 and there getting chopped today! I thought the harvest was going to be broken into two separate weeks considering the times on the Choco was listed about 7-10 days sooner then the DD (wich was listed at 70 days for flowering)
However looking at the tricombs on the Chocolate Marshmallow most pheno didnt start getting amber untill the DDs did as well! A couple DD pheno could have maybe gone a couple more days but we will see!
Going for reveg on all the pheno, since i didnt get to take any clones. We will see how it goes!

Processing
Likes
7
Share
@Bills1995
Follow
Actual veg period is 3 weeks my grow is from seedling. Plants seem to look healthy. The 1000 watt hps puts out some heavy heat, so airflow and humidity have been my struggles . looking to add ac ventilation in the next week to maintain below 80. Added trellis(It’s my first lol) and topped two plants will top more as they grow.


Likes
20
Share
@eldruida_lamota
Follow
Que pasa familia, vamos a añadir la tercera semana de vida de estas Apple Fritter de RoyalQueenSeeds, empezamos con la temperatura que la tenemos entre los 21/24 grados, la humedad está entorno al 60%, el ph está en 6.2 , el foco actualmente lo tengo encendido 18 horas y la potencia es al 50% de lo que da el foco.
También añado la gama de nutrientes de Agrobeta, que no falla, sin duda de la mejor alimentación que hay para tus plantas.
Trasplantamos a macetas definitivas, 7 litros en este caso, se ven algo amarillas las hojas más antiguas pero es porque pedían ya un trasplante en nada recuperan.
Mars hydro:
Code discount: EL420
https://www.mars-hydro.com/
Agrobeta:
https://www.agrobeta.com/agrobetatiendaonline/36-abonos-canamo
Hasta aquí todo, Buenos humos 💨💨💨
Likes
2
Share
@IceGenetics
Follow
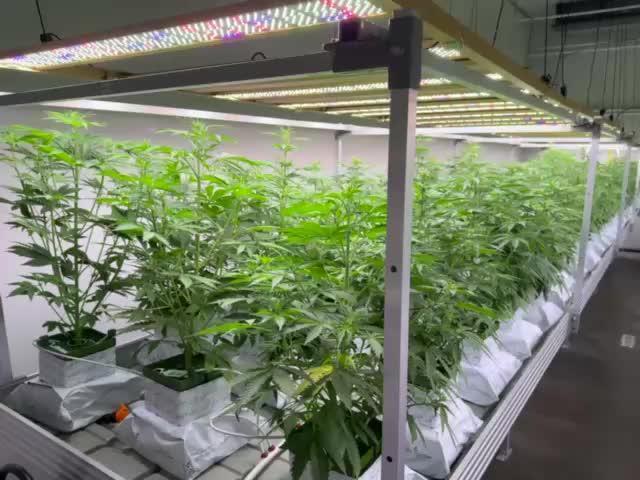
Today, on day 36, the plants have noticeably grown, with heights now ranging from approximately 45–55 cm.
We increased the nutrient concentration to 650 ppm, maintaining daytime room temperature at 26°C and nighttime at 22°C, CO2 concentration at around 600 ppm, and humidity at 65%. The light schedule is 18 hours of light and 6 hours of darkness, with a PPFD of 600.
We raised the nutrient concentration by 100 ppm, increased the light intensity by 100 PPFD, and lowered the humidity to 65%.
The plants have grown significantly, primarily stretching upward with their main colas and side branches.
Visually, there are no signs of nutrient deficiencies or toxicities; the plants are absorbing their 650 ppm well, with no salt buildup or burn.


Likes
2
Share
@Ninjabuds
Follow
I have got a whole crew of four Bubble OG plants, and they're all doing really well. These plants are like quadruplets – they all look super similar, with the same strong smell that's kinda like a putrid skunk. They're all uniform in height and have the same spacing between their branches. It's like they're all following the same blueprint.
Happy late turkey day grow diaries world!!!! It's now day 24 from seed for all the seedlings I have going. The past few days the plants have really started to take off. There roots have really started to dig in. Every other water I am still giving 2ml per gal of fox farm grow big. I keep having to tell myself not to add any more nutes other than that. I don't want to fry my plants but I also want they to start jumping. I'm quite excited for the coming week, I think the next 7 days or so is when the plant really starts to transform and look more like a pot plant than just some random little green thing.
A few days ago I decided to move the plants from under my 55w cheep amazon light to under my spider farmer 100w newer version light with the good leds in it. The plants will hopefully be ready to up pot them here soon and get them in the large tent.
Sometimes when growing multiple different strains it can be really hard to balance giving to much or to little light. You don't want the faster growing plants to get to stretched out waiting on the slower plants to catch up
I spend Thanksgiving day morning transplanting the plants into 2gal pots. I am useing spme promix potting soil it's my 1st time tring this soil. It is actually doing really well the roots were all white and nice looking. I think next time I'm going to add some worm casting, kelp, granular mycos, and a little bit extra perlite. I just didn't have the money with christmas coming to splurge for all the extra stuff. I got rid of 2 plants 1 of the bubble og and 1 skunk apple runtz. There is only room for 10 pots in the 2x4 tent. I will peob only bring 8 of them to flower, always good to have back ups. Yesterday I also stuck the plants back under the 500w medicgrow mini sun 2 in my 2x4 tent. They did great under it the 2nd half the day I was happy they didn't get stressed. I had put them under that light a little early about 10 days ago or so. I am expecting in a week these plants will ge going crazy with growth
Processing
Likes
96
Share
@The_Projexx
Follow
Not much to say about whats going on Obi#2 kicking in overdrive as we had to say RIP to OBI#1 for being hermie life is life and we are rocking and rolling anyways !
I like to to thank all the people that come down and check out the diary you guys KICKASS much love and respect for you folks
-Happy Growing!

Likes
216
Share
@Ju_Bps
Follow
Hello my friends 👨🌾👩🌾,
The last week of flowering, trichromes look ready.
Buds are so frosty ❄️❄️
Nothing special this week, plant on the ending.
💦I've given this week 3x 2l/plant
- Water + cannazym
- Water + cannazym
- Water + cannazym
PH@6
Lamp 75%
Harvest this week end🌲✂️.
See you soon for the harvest ✂️✂️, and have a good week end my friends 🔥👨🌾👩🌾
Thank to Mars Hydro and @marshydrococo2 for sponsoring the FC3000 ❤️❤️, as well as @Fast_Buds for sponsoring the Seeds ❤️❤️
If you want a litle discount on your Mars Hydro order, add this coupon to your cart,
Ju_Bps
Thanks community for follow, likes, comments, always a pleasure 👩🌾👨🌾❤️🌲
Mars Hydro - FC3000
https://www.mars-hydro.com/fc-3000-samsung-lm301b-led-grow-light
42 Fast Buds - CHERRY COLA 🍒🌲
https://2fast4buds.com/seeds/cherry-cola-auto