
Likes
Comments
Share


@CanadianFillmore
Follow
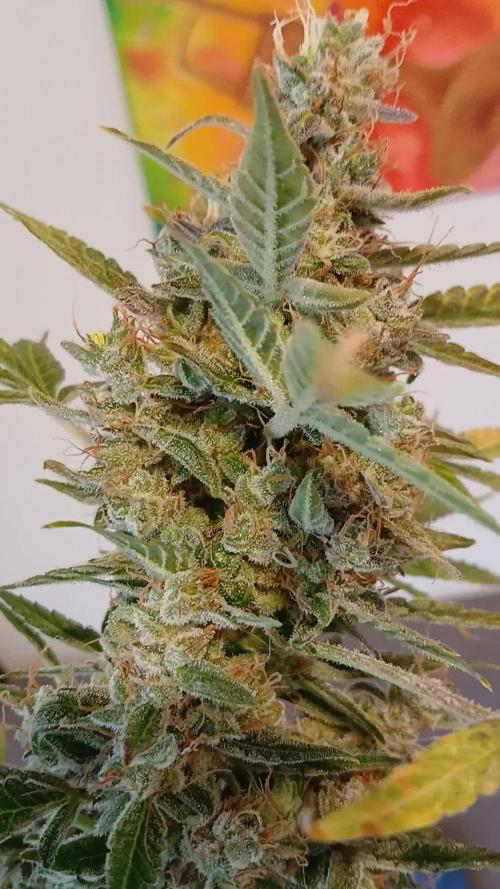
Week 8 begins! Grandaddy Bruce is doing great, nice buds super frosty, sticky, heavy and dense. I continue to be impressed by this light and how this plant has grown under it.


Likes
5
Share

@kdifiori_
Follow
And another adventure has come to an end!
This one in particular had its share of challenges. From using EC levels that were too high to broken grow light. But we pulled through in the end. It’s an extraordinary strain, especially for old-school terpene lovers like me. I highly recommend it! Now we’re ready for the next one! Stay tuned!

Processing
Likes
9
Share


@MG2009
Follow
03/20/2020
Week3 flower did light defoiliating and watering(plain water). I did notice some sweet citrus aroma just slightly orange but not to much, (tangie) is too citrusy to me, hope more blue berry hazy flavor comes out but I'm sure it will be great
03/22/2020
Top 1/2 inch soil is drying out quicker she be getting thirsty! Should see some nice changes this week.watered till 5% run off 2lt.plain water. Uploading video enjoy.🙏 She is stacking up
Likes
7
Share


@Cultivatorcarlos
Follow
The first couple weeks up to veg were great. She grew incredibly fast. gave her nothing but water. still too small to train as she didnt reach the pot yet and i usually do lst.

Likes
64
Share


@Roberts
Follow
Baked bomb auto is doing good this week. She has not shown any pistils yet. I imagine they are not far off. She looks like she is starting a stretching stage. She loves extra cal mag as well. She got a decent defoliation to open her up. She is ready for another week. Thank you Bomb seeds. 🤜🏻🤛🏻🌱🌱🌱
Thank you grow diaries community for the 👇likes👇, follows, comments, and subscriptions on my YouTube channel👇. ❄️🌱🍻
Happy Growing 🌱🌱🌱
https://youtube.com/channel/UCAhN7yRzWLpcaRHhMIQ7X4g


Likes
96
Share


@gottagrowsometime
Follow
Welcome to my MilkyWay F1 Topped/Untopped Diary sponsored by RQS.
Topped/Untopped Phenos 1/2
Pre Flower Days 12-15, Flower Days 1-4 Days 57-64.
Plants are quick. Didn't put on much height during pre flower. 43 cm for the Topped (pheno 2), and 41 for untopped (pheno 1). The pistils surprisingly are 50/50 amber/white. They're in the fattening stage only a few days. I've added co2 for 12hrs and then they are going under my P1000 for 6hrs. Hoping to see some big buds. They are moving quickly. So, let's see. I've added a 13-14 PK booster from plagron with a few of their other products. With the 12hrs of extra heat and co2, they'll be needing a lot more nutrition.
Diet/Defoliation/Temperature
Was on a Full Plagron natural line and a few of their other products, and I've added a 13/14 PK booster, with fish force and a few others. I done a 10-15% defoliation removing many fan leafs, focusing on the middle to allow better airflow was done after pre flower. And more will be done coming into her next week "10" and light lollipoppoing at the end to clear any possible larf areas was done this wk. So, what's therenow will be brought to harvest, a lot is very far away, so I need to get a blue HID I think to control tight Inter nodes in veg, I'll do this as I gain more experience. 28-29c is maintained for the co2 addition and under the P1000 the temp is brought back down to 26c with no additional co2. And ppfd is lowered to 850 ppfd but its a deep penetrative led light I'll give it that. Actually it carries the highest ppfd into your canopy than any 100w out there, and this is the 2021 version. They've an upgrade. Much respect to Vipar, this light and the Spiderfarmer have been my veg lights the past Yr, and this yr I've used these both and they've produced some quality bud. The cbg is done fully under them and the plant is amazing.
Diet,
Shes on the Full Plagron Natural line, soil and all. "Pro mix" with mega worms to add later. With PK, green sensation, fish force, power roots, vita race, "dummies sent me 2x of these instead of Start" Silic Rock, Pure Zym Sugar Royal. And Terpinator. "Power Roots has been pult, its time recommended by plagron. The roots are plenty and they drink close to 1L of fluids a day. Normally I don't like given so much stuff. But all are different, (expect Terpinator and SR they've the same purpose but its only 1 feed of the Terpinator a wk, by itself 370ppm 6.1ph 15.5c temp..
Co2
Co2 is maintained at 1000-1300ppm for 12hrs. And then when they go back under my p1000 they get ambient co2 levels 675ppm. The co2 is been ate at 350ppm every hr. Mind you most of these girls aren't hitting a high ppfd that's needed to convert into sugars. I've shuffled my 3 fans. 2 fans 1 on the top left blowing above canopy and 1 on the other side. A small one is at the bottom that keeps the heavy co2 off the ground. And my moving my fans, the co2 went from 1000 to 1300 shows, right air-flow is paramount. Thankfully I've a sensor that reads every second and is so sensitive it allows you to move your fans and shows how much longer co2 lasts if kept at an level with the foliage..
WARNING: Co2, is no joke. You can die from inproper use. I fully advise if anything you get a top sensor at least to known your levels and then you can jerry rig whatever. If not using a full kit. I highly urge to have it only in use while you're there to monitor it. No way should it be left on. As co2 is heavy it'll flow down your stairs and your beloved pets will be the 1st to suffer. It doesn't take a lot of gas even from a 1L bottle to fill a 12x12M room to 500ppm.. mine does 3x1L bursts every hr at 0.00001L a burst.
Thanks to my rep James's for the seeds & merch. The rolling tray is constant use. My bird sings its praises. The grinder, possibly the best out for grinding. Goes through wet bud like dry. It grinds it that well. When I'm trying the get a small of her tetpine profile.
COUPONS
Spider-Farmer "ggst" EU (for now) 3%
Mars-Hydro "ggs" WW 3%
Zamneisa "GROWITGD" 20%
Likes
6
Share


@GoldenWeedGrower
Follow
Legend
Timestamp: 📅
EC - pH: ⚗️
Temp - Hum: 🌡️
Water: 🌊
Food: 🍗
pH Correction: 💧
Actions: 💼
Thoughts: 🧠
Events: 🚀
Media: 🎬
D: DAY, G: GERMINATION, V: VEGETATIVE, B: BLOOMING, R: RIPENING, D: DRYING, C: CURING
______________
📅 D29/V25 - 14/05/24
⚗️ EC: 1.0 pH: 5.2
🌡️ T: 20°C H: 50%
🌊
🍗
💧
💼
🧠
🚀 Back Home
🎬
______________
📅 D30/V26 - 15/05/24
⚗️ EC: 1.0 pH: 5.0
🌡️ T: 20°C H: 50%
🌊
🍗
💧
💼
🧠
🚀
🎬 1 TL video
______________
📅 D31/V27 - 16/05/24
⚗️ EC: 1.2 pH: 5.0
🌡️ T: 20°C H: 60%
🌊
🍗
💧
💼
🧠
🚀
🎬 1 TL video very short + 1 TL video of LST
______________
📅 D32/V28 - 17/05/24
⚗️ EC: 1.2 pH: 5.0
🌡️ T: 20°C H: 60%
🌊
🍗
💧
💼
🧠
🚀
🎬 1 TL video
______________
📅 D33/V29 - 18/05/24
⚗️ EC: 1.2 pH: 5.0
🌡️ T: 20°C H: 60%
🌊
🍗
💧
💼
🧠
🚀
🎬 1 TL video
______________
📅 D34/V30 - 19/05/24
⚗️ EC: 1.0 pH: 5.0
🌡️ T: 20°C H: 60%
🌊
🍗
💧
💼 Big work to prepare her new home
🧠
🚀
🎬
______________
📅 D35/V31 - 20/05/24
⚗️ EC: 1.0 pH: 6.0
🌡️ T: 20°C H: 70%
🌊 16 L
🍗 CalMag - Grow A-B, B-52, Bud Candy, Rhino Skin, Hydroguard
💧
💼
🧠
🚀 The new home for Rey in now ready
🎬

Likes
10
Share


@Certifyed252
Follow
My GG is safe to say that she is frankensteins bride...this past week has been the most stressful for both of us...from breaking the second main that grew from the first topping resulting in me topping it again, to thinking i was getting early stages of WPM so i milk solutioned both plants, pots, the tent..to realizing that the TG def had a copper deficiency which i solved with a flush with nutes and grow big foliar spray and is now showing great healthy growth...def a learning experience...dont let anyone tell u its easy haha...and if ur finicky and have adhd, just let the plant be, hardest part yet 🤦♂️ also did a pretty heavy defol and screen comes up within a week.

Likes
16
Share


@Rungood
Follow
Floraison +10 tout va bien ! Rajout d'un deuxième filet pour mieux guider les têtes vers la lumière
Likes
4
Share


@eldruida_lamota
Follow
Que hay familia, vamos con la cuarta semana de crecimiento de estas Runtz de Zamnesia.
Se germinaron las 5 semillas de Runtz y en 48 horas 100% ratio , 7 días en tierra.
Por supuesto vamos a utilizar la tierra de plagron lightmix que siempre utilizo, y como este proyecto es para concurso voy a ceñirme a los productos de plagron. controlando siempre el Ph, que ahora mismo lo dejamos en 6.
Seleccioné de las 5 plantas, 3 , que creo que son los mejores ejemplares que por el momento están creciendo bien y tener tienen un buen color, se ven bien sanas.
Aplique Tetra 9 vía foliar.
Vamos viendo cómo progresan. Hasta aquí todo, buenos humos 💨💨💨.

Likes
14
Share


@BLAZED
Follow
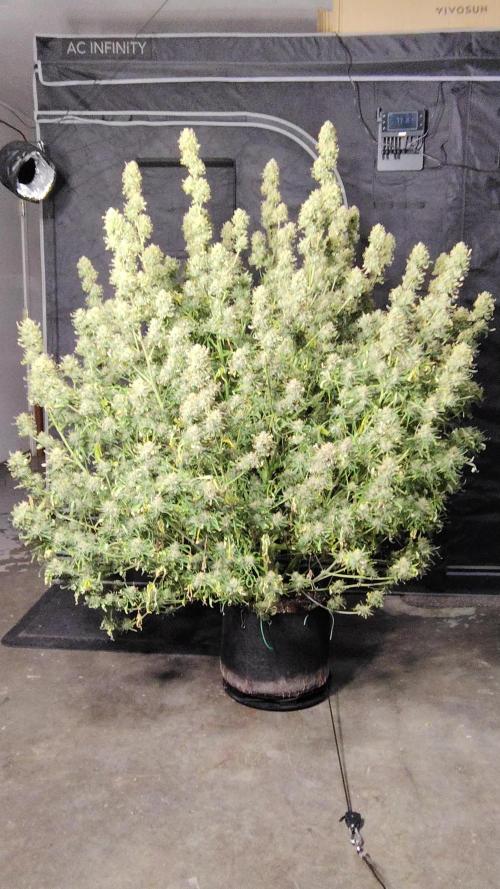
Week 21 (30-11 to ?????)
30-11
Today i harvested her! I removed all the fan leaves and left the buds on the branches to dry.
1-12
Temperature: 16°c to 19.5°c
Humidity: 50% to 56%
2-12
Temperature: 14.7°c to 18.5°c
Humidity: 54% to 57%
3-12
Temperature: 16.1°c to 18.9°c
Humidity: 54% to 59%
4-12
Temperature: 15.5°c to 17.5°c
Humidity: 57% to 62%
5-12
Temperature: 15.2°c to 17.7°c
Humidity: 60% to 71%
6-12
Temperature: 16.5°c to 17.8°c
Humidity: 60% to 66%
7-12
Temperature: 16.4°c to 17.9°c
Humidity: 57% to 63%
8-12
Temperature: 16.6°c to 18.5°c
Humidity: 56% to 60%
9-12
Temperature: 16.9°c to 19°c
Humidity: 57% to 62%
10-12
Temperature: 17.4°c to 19.5°c
Humidity: 60% to 64%
12-12
Temperature: 17.9°c to 20.1°c
Humidity: 61% to 76%
14-12
The buds felt dry enough and ready to get their final trim before they go into the jar for curing!
Trimjail it is!
16-12
Today i finished trimming everything.
This is the end result:
Dried bud: 116 grams.
Dried trim: 23 grams.
Thats over 1 gram per watt, and i am very happy with that!!
In the curing jar they go!
Let me know if you liked my diary and see you all in the next one!


Processing
Likes
41
Share


@MadeInGermany
Follow
Welcome to the Sweet Seeds Cup 🏆
Hey everyone :-).
This week she started to put her full power into the flower production :-).
Since then she has received Canna Bio Flores and Canna Bio Boost 🤗. It is barely one meter high and looks beautiful 😍.
In addition, it starts to smell very delicious 👍. I water it about every 3 days with about 1 l - 1.5 l.
It is very stable genetically and I'm glad I took cuttings 😅 .
I am very curious to see how it will develop next week.
I wish you all a good start into the new week, stay healthy 🙏🏻 and let it grow 🌱
Sweet Seeds Cup 🏆
Type:
San Fernando Lemon Kush
☝️🏼
Genetics:
OG Kush x Kosher Kush
👍
Vega lamp: 2 x Todogrow Led
Quantum Board 100 W
💡
Bloom Lamp : 2 x Todogrow Led
Cxb 3590 COB 3500 K 205W
💡💡☝️🏼
Earth: Canna Bio
☝️🏼
Fertilizer: Canna Bio
☝️🏼🌱
Water: Osmosis water mixed with normal water (24 hours stale that the chlorine evaporates) to 0.2 EC. Add Cal / Mag to 0.4 Ec Ph with Organic Ph - to 6.0 - 6.3
💦💧


Likes
19
Share


@Tazard
Follow
She supposed to take 8 to 9 weeks but I was playing with my microscope and just decided to look at her trikes and OMG is she ripe. I started a ro water flush as quick as I could. I let her flush out for three or four days and then harvested her.

Likes
12
Share


@MicroHidroGrow
Follow
Ya estamos en proceso de formación de la flor. Se ven algunas más grandes que otras. Pero a grandes rasgos estan muy parejas. Me preocupa un poco la cercanía a la luz, dado que estoy en 15cm y cualquier estirón extra, sería una complicación. Vamos a ir viendo como se dan las cosas, pero al momento, no me puedo quejar. Las plantas se ven bien y saludables.
Día 24. Se empieza a notar el engorde. Esperando a que aparezcan las hojas de azúcar, que ya se empiezan a visibilizar las primeras. Voy a ver si puedo conseguir overdrive de advanced para cuando se terminen de formar las flores. Entre tanto solamente tuve un inconveniente de pérdida de agua por una manguera que moví al atar las plantas, pero ya repuse la solución perdida y todo va encaminado. No sé si van a tardar las 6 semanas que dice el catálogo, pero cuanto mucho serán 8. Seguiré actualizando.
Día 26. Las flores empiezan a yomar su forma voluminosa. Estoy en duda sobre si agregar PK la semana próxima o la otra. Quizá empiece a usarlo en el próximo depósito. No quiero tampoco sobrepasarlas y agregar el producto antes porque tengo entendido que puede ser contraproducente. De todos modos me quedan dos días para el cambio de solución, así que voy a ver cuando termine la semana. Entre tanto, ya empiezan las emociones.
Día 28. Hice ina poda de hojas bien fuerte. Ya de esa forma dejo expuesto a la luz todo lo que tiene que terminar de engordar y de paso me esquivo posibles problemas de humedad. Al final voy a usar el PK de greenhouse que tengo, pero voy a subir la dosis. Mañana se viene el cambio de solución, para lo que sería la ante última semana en teoría. Vamos a ver como evoluciona, porque los cambios son muy abruptos de una semana a la otra. Y llegado el momento miraré los tricomas, como para ir haciéndome a la idea.


Likes
7
Share

@AKGorillaGrow
Follow
Well now that my first cycle of plants are done from 420 fastbuds onto the next batch from 420 fastbuds of my banana purple punch RF threes. I can't wait to give you guys the final weight.

