
Strawberry Banana (Green Nuggets Seeds)
")
Strawberry Banana
Green Nuggets Seeds (wietzadenshop.nl)


Filt
Canlite 600
CanLite

Contr
Maxicontroller
Dimlux

Drip
Blumat
DripSystems

Coco Coir
Custom
Indoor
Room Type
Transplantation
weeks 1
Topping
weeks 3-4
FIMing
weeks 3-4
LST
weeks 4
HST
weeks 4-6
ScrOG
weeks 4-6
Defoliation
weeks 6
35 l
Pot Size
Start at Harvest
G
Germination2y ago


Nutrients 1

Startboost
1 mll
Appoldro420 Sit Back, Relax, and Watch the Magic Happen 🌱💨
Yo growers, what’s good? Buckle up because this diary is gonna hit differently. Instead of bombarding you with daily updates, I’ll keep it clean and simple—weekly highlights, straight to the point. Less scrolling, more growing. Let’s get into it!
Seeds Are Here!
Big news: the seeds have officially landed! Massive shout-out to wietzadenshop.nl for the lightning-fast delivery. I snagged 20 seeds for €54.95 (hella bargain!) and got two bonus seeds thrown in. That’s less than €3 per seed—zero complaints here.
For this grow, I’m germinating 15 seeds and will pick the 12 strongest ladies to carry the torch. Let’s manifest some A+ germination vibes. ✨
Germination Setup 🌊🌡️
Here’s the plan: these little beauties are soaking in a mix of water, CalMag, and Startbooster.
EC: 1.1 (Oops, a smidge high, but it’ll be fine.)
pH: 6.5 (right in the sweet spot!)
Water Temp: 23°C (perfect for that germ magic).
I’ve set them up in a cool 19°C space, but to keep things cozy, I’ve got lights running 18/6 at 240W, 60 cm above. Let’s face it—lights are way cheaper than cranking up the heat. 😅
Quick Progress Report:
18-11 @ 10:15 AM: 4 out of 15 seeds are already cracking open! That 18/6 light cycle is doing its thing.
19-11 @ 10:16 AM: 7 seedlings have emerged, and those cute little cotyledons are starting to unfurl. I’ll wait until 12 are up before moving them to bigger pots.
The Plan for This Grow 🌿✨
Lighting:
Seedling Stage: 1x Meijiu LED (240W) at 18/6.
Veg Stage: All 4 LEDs at 240W each, still 18/6.
Flowering Stage: Same LEDs, switched to 12/12.
Nutrients & Irrigation:
I’m rolling with Plagron Cocos A&B, CalMag, and Startbooster. Once the first 10 days are done, Blumats will take over irrigation, pulling from a 270L reservoir held steady at ~18°C to avoid overheating drama like last time. Oh, and I’m reusing coco coir for the first time—curious to see how that goes!
CO2 Experiment:
Switching things up with CO2 this round:
Starting at 1200 PPM during veg and the first two weeks of flower.
Gradually dialing it down after week 2 and cutting it completely by week 3 when the exhaust kicks in.
Why? I’ve noticed CO2 works better in early stages, and it avoids heat issues later on. Efficiency is the name of the game.
What’s Next:
Monitor how the nutrient reservoir holds up at 18°C.
Transplant the strongest seedlings into bigger pots.
Dial in the Blumats for consistent watering.
That’s the game plan for this week. Now, it’s time to kick back, spark one, and let the plants do what they do best. 🌬️💨 Drop your tips or thoughts in the comments—especially if you’ve got experience with reused coco coir or CO2 setups. ✌️
likes
comments
Share
Used method
Peat Pellet
Germination Method
1
Week 1. Vegetation2y ago


8 cm
Height
16 hrs
Light Schedule
29 °C
Day Air Temp
6.5
pH
No Smell
Smell
600 PPM
TDS
50 %
Air Humidity
18 °C
Solution Temp
22 °C
Substrate Temp
21 °C
Night Air Temp
35 l
Pot Size
0.02 l
Watering Volume
60 cm
Lamp Distance
600 PPM
CO₂ Level
Nutrients 4

Generator
0.2 mll

Cocos A
1 mll

Cocos B
1 mll
Appoldro420 Stepping It Up: Transplants, Tweaks, and Some Challenges 🌱✨
Last night:
The ladies got their first big move—I transplanted them into their pots and flipped the lights on. I went with a 16/8 light schedule since the light intensity is still a little strong. To ease them into their new digs, I hung the lamps a solid 80 cm above. To keep things comfy, I gave all the plants a light misting to stop them from drying out. Oh, and I boosted the CO2 to 600 PPM to help them settle in, with plans to nudge it up to 900 PPM by the week’s end.
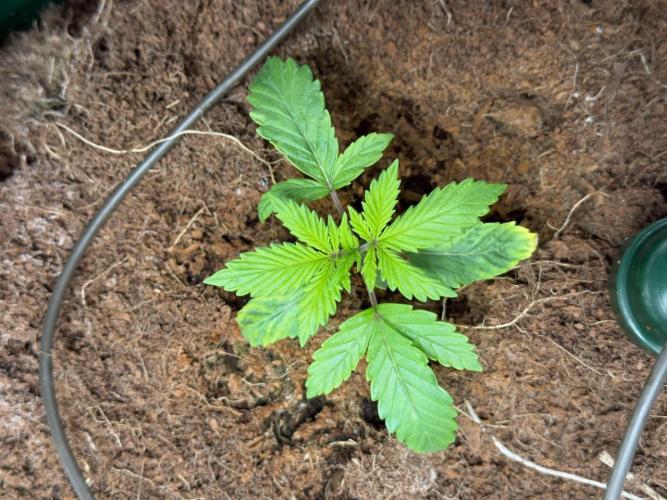
23/11 @ 11:50 AM:
11 out of 12 ladies are crushing it! Number 12? Not so much. 😕 Temps hit a spicy 36°C, and humidity dropped to a desert-like 18%. To fix it, I rigged up a bucket of water with a towel in the tent. (Quick, easy, and no fancy gear required!) I could dim the lights to chill the tent, but hey—pushing limits is half the fun, right?
Leaf temps are at 33°C, and while the air is borderline, the roots are racing. I even raised one plant a little higher to keep a closer eye on her.
Here’s something interesting: I’ve noticed that when roots have free reign, the plants tend to grow slower above ground. Anyone else experienced this?
Because of the heat and low humidity, I’ve been watering the ladies lightly every 8 hours—just a few drops to keep them happy. Bonus: some of them are already showing their second set of serrated leaves. We’re getting there!
26/11 @ 1:00 PM:
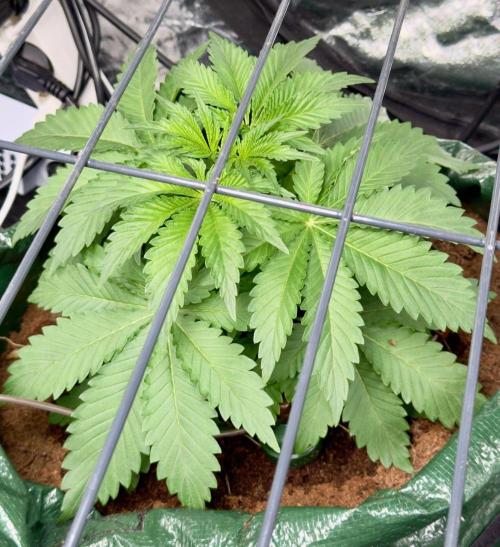
Today was all about playing it safe. I decided to install the netting above the plants earlier than planned. It wasn’t as bad as I thought, thanks to my trusty dehumidifier—it worked as a temporary stand while I sorted everything. Crisis averted!
Plant #12 has a faint green tip popping up, but honestly? I’m not holding my breath. Still, hope dies last, right? The rest of the squad is thriving, and I’m pretty sure the roots are locking into the coco now because leaf growth is finally picking up.
Weird observation: I’m seeing some heat stress on one plant—same spot as last round. Coincidence? Maybe not. The rest are handling things like champs, though.
Side note: energy usage is wild—1000W running 18 hours a day! 🤑 Good thing I only plan to veg for 10 days. I’m calling today Day 1 since all the plants are rocking beautifully serrated leaves now.
Lights Out Update:
Tonight, I skipped misting for the first time—figured I’d experiment and see how they handle it.
The ladies are stretching a bit, even with nearly 1000W blazing overhead. What’s up with that? Is it the CO2 levels (950 PPM)? The heat? Something else entirely? I measured light at leaf level: over 900 µmol. Either way, I’m ready for another wild ride full of surprises.
P.S. Check out today’s second photo. After snapping the pic, I carefully removed the seed husk from one of the plants. Always satisfying to help a little where I can!
likes
comments
Share
Used techniques
Transplantation
Technique
2
Week 2. Vegetation2y ago


12 cm
Height
16 hrs
Light Schedule
29 °C
Day Air Temp
5.8
pH
No Smell
Smell
650 PPM
TDS
50 %
Air Humidity
18 °C
Solution Temp
22 °C
Substrate Temp
21 °C
Night Air Temp
35 l
Pot Size
0.02 l
Watering Volume
60 cm
Lamp Distance
600 PPM
CO₂ Level
Nutrients 4
Generator
0.2 mll
Cocos A
3 mll
Cocos B
3 mll
Appoldro420 30/11: A New Week, Same Excitement 🌿
The second week of veg is here, and I’m already wondering if these ladies will bulk up enough by Saturday when I plan to flip them to flower. So far, compared to my usual 12/12 start, I haven’t noticed any major size differences.
Why? Probably because I’ve dialed down the wattage and even turned off one of the lamps. When I think about it, the total energy usage is nearly the same as a full-on 12/12 run. Makes me think… maybe starting straight with a 12/12 schedule is the way to go in the future. Feels more efficient, doesn’t it?
02/12: Blumat Wins and a Comeback Kid 🌱
Another fascinating day in the grow room! I decided to skip manual watering today because one of the Blumats started doing its thing on its own. That’s what I like to see—automation kicking in.
But here’s the wild part: that struggling seedling I had written off? It’s still alive! She’s clinging to life with just one serrated leaf. I’ve never seen anything like it. Nature finds a way, huh?
On the flip side, another plant is acting up—its leaves look all funky and deformed. Pretty sure it’s from a bit of overwatering. No biggie, though—I’ll keep an eye on her and see if she pulls through.
What’s Next:
Big plans ahead!
Topping or FIM: I’m thinking about doing this on Friday to help shape the canopy.
Flipping to 12/12: Yep, Sunday’s the day! I know it’s early, but honestly, I’ve become a fan of a 12-hour light schedule. It just feels like a smoother, more efficient rhythm overall.
Oh, and about that SCROG net? This round, it’s getting a makeover. Instead of the traditional SCROG setup, I’ll use it to boost light penetration. Gotta keep those ladies soaking up all the photons they can get!
Thoughts and Future Experiments 💡
Things are looking solid overall, but I can’t help feeling like the plants look smaller than usual. It’s probably just an optical illusion from the big pots. Speaking of pots, I’ve been brainstorming a new experiment for the next run: instead of 12 large pots, what if I go with 6 large pots and 12 smaller ones? My theory: smaller pots might push the plants into flowering earlier.
But that’s for later. For now, it’s all about dialing in this grow and making it a success. Onward to a beautiful canopy and a healthy harvest!
03/12: Steady Progress and Optimistic Vibes 🌱
Not much to report today, but I did notice something interesting—our little one-leaf wonder is still growing! That lone leaf is getting bigger, and I can’t help but wonder what kind of root system is supporting it down below. Nature, you never fail to amaze me.
Even better, the plant that was struggling earlier seems to be bouncing back nicely. Its recovery is a small win, and overall, I’m happy with the vibrant color of the plants. They’re looking healthy and lush, and I’m starting to think it might be time to nudge the EC a little higher. Since the flip to 12/12 is happening on Saturday or Sunday, a slight boost won’t hurt—if anything, it might give them a bit more fuel to prep for flowering.
Stretch Goals and Canopy Plans
I’m expecting these ladies to need about two weeks to start showing those beautiful buds after the flip. Fingers crossed, they stretch nicely during that time so I can train them through the net for maximum light distribution. One plant in particular is already pushing the boundaries of its pot, and—no surprise—it’s the same one already thriving on the Blumats. Gotta love that automated care.
All in all, the grow room is on track, and I can’t wait to see how this next phase unfolds. Here's to strong roots, healthy stretches, and a canopy that soaks up every bit of light! 🌞
07/12: RQS Seeds Are In, Experiment Time 🌱
The seeds from Royal Queen Seeds arrived right on schedule, and I’ve decided to include the Quick One for this round. Tonight, I’ll prep the pots and see if these autos really finish around the same time as the photoperiod plants.
Honestly, I have no idea what to expect from autoflowers on a 12-hour light schedule. My main hope is that they’ll grow at all! Why experiment with this? Well, I read that ruderalis plants naturally thrive in regions with short days and high light intensity. Most grow journals I’ve followed run autoflowers on 24-hour or 18-hour light schedules, but I haven’t seen many examples of them on 12/12.
Sure, it might seem like a waste to test autos under 12 hours when electricity costs are a factor, but in this case, the lights are already on, and there’s extra space in the tent—so why not? I’ll post an update later tonight about how everything else is doing. I was just a bit late today because the light schedule was adjusted overnight.
Looking forward to seeing how this little side experiment turns out! 🌿
likes
1 comment
Share
3
Week 3. Vegetation2y ago


20 cm
Height
12 hrs
Light Schedule
31 °C
Day Air Temp
5.8
pH
No Smell
Smell
800 PPM
TDS
40 %
Air Humidity
20 °C
Solution Temp
22 °C
Substrate Temp
24 °C
Night Air Temp
35 l
Pot Size
0.02 l
Watering Volume
50 cm
Lamp Distance
600 PPM
CO₂ Level
Nutrients 4
Generator
0.2 mll
Cocos A
3 mll
Cocos B
3 mll
Appoldro420 08/12: Week 3 marks a significant milestone in the grow cycle as we transition from a 16/8 light schedule to a 12/12 light schedule, initiating the flowering phase. While a few plants are still on the smaller side, I anticipate they will catch up as the cycle progresses.
I’m fully aware that conventional advice is to wait longer before switching to the 12/12 light cycle. However, based on my past experiences, I’ve decided to proceed with the transition at this stage.
Additionally, I’ve started germinating three Quick One seeds from Royal Queen Seeds (RQS). These autoflowering seeds have been carefully placed in coco coir to encourage sprouting. Once germinated, they will also be integrated into the grow under the 12/12 light schedule alongside the rest of the crop.
Let’s embrace this exciting phase as the plants gear up for rapid growth and early signs of flowering!
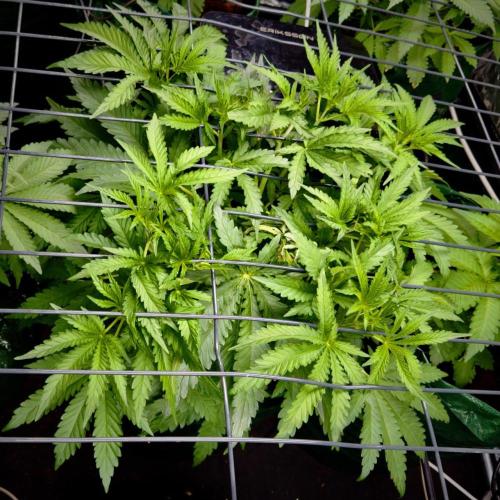
11/12: So, despite having the Blumats, I still ended up giving them too little water. Oh well, this works too! Growth is very inconsistent at the moment. I’ve noticed that a more humid environment really helps the plants thrive. Some of the ladies are already developing into serious plants for their age—really exciting to see how this round will turn out.
The "miniature" plant is still hanging in there as well!
I topped a few more plants today, leaving three untopped so I can observe the differences in growth later on.
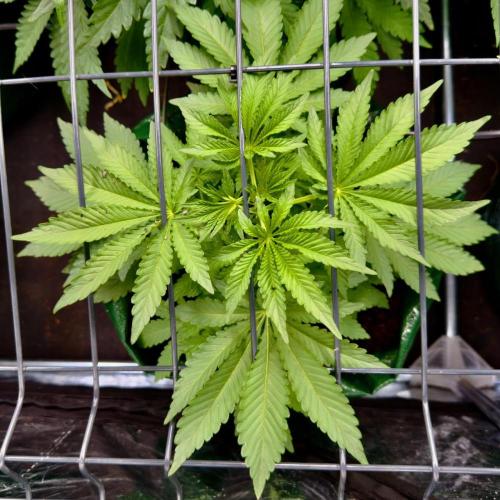
13/12: Everything is going incredibly smoothly! The first ladies are starting to poke through the net, and I suspect I've hit the sweet spot for flipping to flower. I’m learning that I need to dose higher with the Blumats, as each plant is now consuming about a liter of water every two days.
I’m confident the nutrient solution is spot on, as I’m literally scooping it straight from the reservoir. Here are the current stats:
Temperature: 21°C
EC: 2.0 (gross value, so the net is around 1.2)
pH: 6.0
By the end of next week, I might increase the EC slightly. Right now, I’m using 3 ml/L of Cocos A and B and 1 ml/L of CalMag Pro, with no pH adjustments. Since a higher EC tends to lower the pH naturally, I expect that to shift a bit. The maximum recommended dose is 4 ml/L (Cocos A and B), so I still have some room to fine-tune.
It’s starting to look like a bit of a SCROG after all, as the plants are growing quite wide, clearly showing their predominantly Indica genetics.
This is shaping up to be a very promising grow! 🌱
likes
comments
Share
Used techniques
Topping
Technique
FIMing
Technique
4
Week 4. Flowering2y ago


55 cm
Height
12 hrs
Light Schedule
30 °C
Day Air Temp
6.1
pH
Weak
Smell
950 PPM
TDS
40 %
Air Humidity
21 °C
Solution Temp
22 °C
Substrate Temp
22 °C
Night Air Temp
35 l
Pot Size
0.6 l
Watering Volume
40 cm
Lamp Distance
400 PPM
CO₂ Level
Nutrients 4
Generator
0.2 mll
Cocos A
3 mll
Cocos B
3 mll
Appoldro420 15/12: 🌱 Adjustments Under the Net + Feeding Update 🌱
Today, I decided to bend a few branches back under the net, even though I wasn’t planning on doing a SCROG setup. The branches are quite stiff and prone to snapping, so I had to be extra cautious. On the bright side, the plants haven’t been under 12/12 for long, so this might actually work to my advantage. After all, it’s cannabis—we’re always discovering something new and surprising!
I also gave each plant an extra liter of nutrient water. They seem to handle the occasional boost just fine, which makes me very happy with their progress so far.
Nutrient Reservoir Update
The reservoir is topped up again! The pH is still slightly high at 6.1, but I always wait 24 hours before adjusting.
Finally, I uploaded today’s photos—this time, I made sure they’re properly edited instead of raw uploads. Hope you enjoy the cleaner look!
Happy growing! 🌿
15/12: Few to no noteworthy updates to report; what's striking is the significant variation between the plants. I can't really think of a specific reason for it, so yesterday I gave all the ladies a bit of extra water (they seem to appreciate this every few days) and deliberately overwatered two of them to compare.
20/12: The plants that I deliberately overfed seem to appreciate it. They've had a significant growth spurt, and in two days I’ll do the same, but with all of them. Humidity has risen to nearly 70% because of this, but that’s not a problem at all during this stage. I expect to see the first signs of flowering early next week.
The net will likely still fill up nicely, but hopefully, with enough space for proper light penetration this time. Training these ladies is extremely difficult—they break at the slightest touch. However, they recover very quickly, so it’s not a huge problem. I just need to stop training as soon as they enter full bloom.
21/12: Still growing strong but snapped a main branch. Curious how she will recover. Gave them a bit extra water and they do seem to like it. Any suggestions to prevent the ladies from snapping are welcome (besides massaging the stems). First pistils are showing so I will be counting next week as week 1 real flower. About 9 weeks left before I can finally put a Sativa dominant strain from RQS
likes
comments
Share
Used techniques
ScrOG
Technique
Topping
Technique
FIMing
Technique
HST
Technique
LST
Technique
5
Week 5. Flowering2y ago


60 cm
Height
12 hrs
Light Schedule
28 °C
Day Air Temp
6.1
pH
Normal
Smell
950 PPM
TDS
55 %
Air Humidity
21 °C
Solution Temp
22 °C
Substrate Temp
22 °C
Night Air Temp
35 l
Pot Size
0.6 l
Watering Volume
40 cm
Lamp Distance
400 PPM
CO₂ Level
Nutrients 4
Generator
0.2 mll
Cocos A
3 mll
Cocos B
3 mll
Appoldro420 Today, I spent some time tying down branches under the net again. It’s still a tricky task as the branches are quite brittle and break easily. Fortunately, the plants recover quickly, and so far, I’ve mainly noticed new growth sprouting from where the branches broke.
Watering Experiment: Too Much or Just Right?
Two days ago, I decided to give each plant an additional 2 liters of water to test the effects of what felt like overwatering. The results were interesting:
High Humidity: The relative humidity spiked to 74%, which I consider a minor downside.
Lower Temperature: Dropped to 29°C.
Explosive Growth: The plants responded with vigorous growth!
Given the humidity increase, I’ve decided to water the plants heavily only once a week. This approach should give them time to rest and prevent the growth of more mushrooms in the soil—yes, I’ve spotted a few popping up from the pot’s surface.
Monitoring pH and Nutrient Reservoir
I’ve also noticed that the pH has crept up to 6.2, indicating that the nutrient water hardness is decreasing. This suggests it might be time for a full reservoir refresh. Tonight, I plan to inspect the reservoir and clean it out. Thankfully, my hydro pump makes draining it a quick and easy process.
Observations & Next Steps
Continue training and monitoring branch recovery.
Stick to the adjusted watering schedule.
Refresh the nutrient reservoir and recalibrate the pH if needed.
The grow is progressing nicely, and the plants seem happy despite some of the challenges. Let’s keep it going! 🌱
Cheers
30/11: Added some pictures, not to much to say because I didn't look at them the last 2 days and they just went crazy..
01/01/25:
Happy New year!!
Leaving them alone is not an option... If they keep growing like this, I'll take it! This weekend, I'll do some heavy pruning. For now, I’ve snapped a few stems and tied some others to see which method gives better results. I’ve done about half so far, but I need to head to bed because of work. Tomorrow evening, I’ll tackle the other half. Also, I’ll look for some more subtle zip ties.
1 like
comments
Share
Used techniques
ScrOG
Technique
HST
Technique
6
Week 6. Flowering1y ago


70 cm
Height
12 hrs
Light Schedule
28 °C
Day Air Temp
6.1
pH
Normal
Smell
950 PPM
TDS
55 %
Air Humidity
21 °C
Solution Temp
22 °C
Substrate Temp
22 °C
Night Air Temp
35 l
Pot Size
1.5 l
Watering Volume
40 cm
Lamp Distance
400 PPM
CO₂ Level
Nutrients 4
Generator
0.2 mll
Cocos A
3 mll
Cocos B
3 mll
Appoldro420 03/01 Wow, I’m honestly blown away by how this grow is progressing! In the last 24 hours alone, they’ve guzzled an incredible 45 liters of water. 😲 I mean, seriously, that’s insane! The stretch is probably just about wrapping up, so I’m keeping busy tying them down for now. Once the stretch is over, I’ll be going in for some selective pruning—there are just so many new shoots popping up. I’ve got to say, I’ve never seen growth like this before.
It’s exhausting, though, and I’ve already run out of zip ties again! 😂 So, tomorrow’s mission: stock up on more.
I’ve noticed a few slightly discolored leaf tips here and there, but it’s really minimal. That’s exactly what I’m aiming for—pushing them right to the edge without overfeeding. 🎯 Also, I just realized it’s been over a week since I added any CO2. Maybe that’s why I’m seeing these tiny signs? 🤔 Something to experiment with moving forward.
Honestly, I’m so curious to see where this grow takes me—there’s so much potential in these plants! Stay tuned, folks. 🌿💪
06/01: Last night, I started defoliating, and I really went at it with a ruthless approach. I didn’t worry about branches snapping while scrogging—my philosophy is simple: the strongest will survive, and the weakest will wither away. Survival of the fittest in action!
I also noticed that one plant seems to be either too wet or too dry. I’ll need to keep an eye on this one because there’s quite a bit of dying foliage at the bottom. My gut tells me it’s slightly overwatered, although that shouldn’t really be an issue with coco. Still, better safe than sorry! 🌱💪
likes
comments
Share
Used techniques
ScrOG
Technique
HST
Technique
Defoliation
Technique
7
Week 7. Flowering1y ago


70 cm
Height
12 hrs
Light Schedule
28 °C
Day Air Temp
6.1
pH
Normal
Smell
950 PPM
TDS
55 %
Air Humidity
21 °C
Solution Temp
22 °C
Substrate Temp
22 °C
Night Air Temp
35 l
Pot Size
1.5 l
Watering Volume
40 cm
Lamp Distance
400 PPM
CO₂ Level
Nutrients 4
Generator
0.2 mll
Cocos A
3 mll
Cocos B
3 mll
Appoldro420 Stretching, Training, and Defoliation Madness!
Hey growers! We’re officially 14 days into flower, and the garden is looking absolutely stellar. After flipping to a 12/12 light cycle, the plants are really starting to stretch, and we’ve been busy making adjustments to keep everything on track. Here’s what went down this week:
Environment Details:
Maintaining the right environment has been a top priority, and things are dialed in pretty well:
Daytime Temps: Holding steady at 27˚C (80.6˚F), which is perfect for photosynthesis and keeping those plants thriving during the stretch.
Humidity: Sitting at 55%, which keeps the plants happy while avoiding excessive moisture that could lead to mold or mildew.
Lights: Running full power on the LEDs, keeping about 40-50 cm (16-20 inches) of distance from the canopy.
Training Update – SCROG in Full Effect:
I’ve been putting in some work this week! With the stretch in full swing, I’ve been tying down branches like a mad scientist to fill out the SCROG net and ensure all the bud sites get equal exposure to light. The horizontal growth is coming along beautifully—those secondary branches are shooting up to catch the light, which means some serious bud stacking is on the horizon.
The SCROG is working wonders for evening out the canopy and maximizing light efficiency. So far, the plant response has been excellent—almost no signs of stress from the training.
Defoliation – Bye Bye Leaves:
This was also the week for some heavy defoliation. I cleared out two full bags of leaves from the lower canopy! Why? To improve airflow, reduce humidity pockets, and redirect the plant’s energy toward the upper bud sites where the magic happens.
Flower Development:
At 14 days, the plants are transitioning beautifully into flower:
Pistils: White hairs are popping out all over the nodes, forming the first flower clusters.
Trichomes: A frosty layer is starting to develop on the sugar leaves—early signs that resin production is kicking into gear.
Stretch: The plants have gained a solid 10-15 cm (4-6 inches) in height this week, typical for this stage of flowering.
What’s Next?
For Week 3, I’ll be focusing on:
Continuing SCROG adjustments to obtain an even canopy.
Monitoring trichome and pistil development as the buds start stacking.
Keeping the environment steady—holding 27˚C and 50-55% humidity to avoid any hiccups.
Final Thoughts:
This grow is shaping up to be something special! The plants are responding great to training, the SCROG net is filling in nicely, and the flowers are starting to take shape. Clearing out those leaves has the tent looking clean and ready for serious bud production.
Can’t wait to see what Week 3 brings—drop a comment if you’ve got tips or questions. Let’s keep this grow rolling! 🌱✨
likes
comments
Share
8
Week 8. Flowering1y ago


70 cm
Height
12 hrs
Light Schedule
28 °C
Day Air Temp
5.8
pH
Normal
Smell
950 PPM
TDS
55 %
Air Humidity
21 °C
Solution Temp
22 °C
Substrate Temp
22 °C
Night Air Temp
35 l
Pot Size
1.5 l
Watering Volume
40 cm
Lamp Distance
400 PPM
CO₂ Level
Nutrients 4
Generator
0.2 mll
Cocos A
3 mll
Cocos B
3 mll
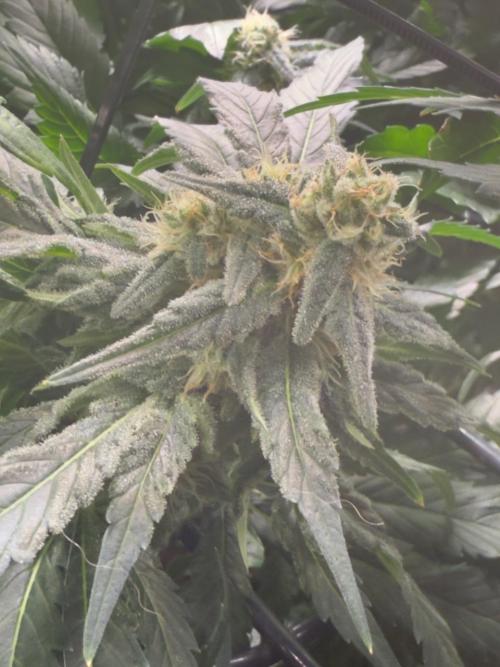
Appoldro420 EC: 1.9 | pH: 5.8 | Nutrient Water Temp: 19°C
The ladies are looking great as they hit week 5 of flower! Buds are stacking nicely, and trichomes are starting to sparkle under the lights. The canopy is filling out beautifully, and the scent is starting to get that irresistible sweet and skunky kick.
One plant had a bit of a hiccup earlier this week due to a brief water shortage, which caused some temporary stress and slowed her down compared to the others. Thankfully, after a quick fix and some TLC, she’s back on track and looking healthy again.
Photo 1 shows the overall canopy, while photo 2 zooms in on one of the frosty colas developing. Excited to see how they finish over the coming weeks!
Let me know what you think!
21/04: The ladies are still looking happy overall, but I suspect one of them might be a bit overwatered. Unfortunately, it's not easy to get to her spot, so I’m going to keep an eye on her and might just leave her as is. On a brighter note, the one that dried out too much earlier has bounced back pretty nicely. Recovery is definitely slower at this stage, though, and it’s left a noticeable gap in the canopy. Interestingly, her neighbor seems to be compensating for it—she’s shot up by another 40 cm, which kind of messes with the whole idea of keeping an even canopy.
We’ve got about 20–27 days to go until harvest, so I’m thinking it’s time to start making space in the tent for the dehumidifier. Right now, it’s sitting outside the tent and keeping the room at a nice 50% RH (relative humidity), but the tent itself is hovering around 60%, which feels a little high for my liking.
This week, I’m planning to do a heavy defoliation since the canopy is getting super dense. The ladies seem to appreciate the extra airflow, though, because bud development is looking absolutely on point. Honestly, it’s been a while since I’ve had a round this promising—every time I touch the plants, my hands come away sticky as hell. Always a good sign.
Looking back, I do regret adding the autoflowers into the mix. They’ve grown way taller than expected and definitely won’t yield much. On top of that, I’ve had to raise the light higher than I’d prefer, just to accommodate them. That said, the timing with the rest of the plants is surprisingly synced, so as an experiment, it wasn’t a total bust.
As for the overall yield, I’m not sure what to expect yet. The buds are medium-sized—there’s a ton of them, but they’re smaller than what I’m used to. I’ll have a clearer idea after the defoliation. Will I hit the 1-kilo mark? Honestly, I can’t say yet.
Looking ahead to the next run, I’m planning to grow Chocolate Haze from RQS. I’ll start germinating the seeds at the end of next week. This time, they’ll go straight into 12/12 lighting. I’m leaning toward fresh coco for this round; the current coco needs flushing and root removal, which feels like more effort than it’s worth.
likes
comments
Share
10
Week 10. Flowering1y ago


70 cm
Height
12 hrs
Light Schedule
28 °C
Day Air Temp
5.8
pH
Normal
Smell
950 PPM
TDS
55 %
Air Humidity
21 °C
Solution Temp
22 °C
Substrate Temp
22 °C
Night Air Temp
35 l
Pot Size
1.5 l
Watering Volume
40 cm
Lamp Distance
400 PPM
CO₂ Level
Nutrients 4
Generator
0.2 mll
Cocos A
3 mll
Cocos B
3 mll
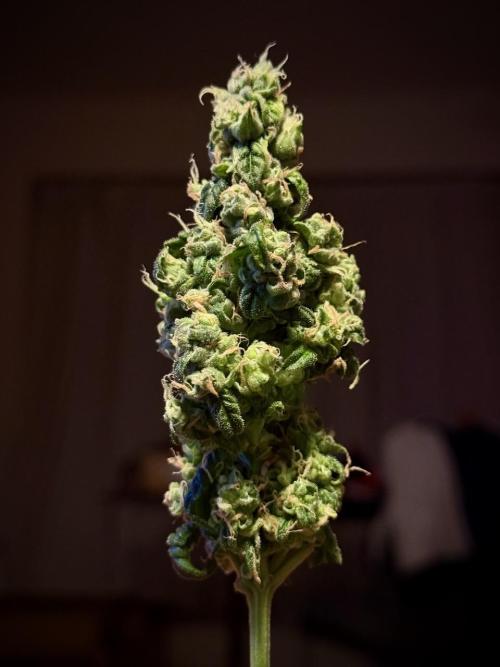
Appoldro420 77 days old... starting to countdown now.. 13-23 days left.. Most are looking ready to harvest (they are not) and still swelling daily. Nice plant so far but the most uneven canopy of an single strain I ever had..
📅 February 3 – Almost Harvest Time!
We’re getting close, folks! The ladies are nearing the finish line, with most trichomes now milky, but barely any amber ones in sight. Based on today's photos, I estimate about 10 more days before harvest, meaning this round will finish a bit earlier than expected. I usually chop at around 5% amber trichomes, so we’re in the final stretch.
🌿 Strain Review – Strawberry Banana (Green Nugget Seeds)
Overall, this strain has been a solid experience, especially considering the price. However, I wouldn't grow them again due to their inconsistency in growth and structure. Some phenos stretched like crazy, while others stayed squat and bushy, making canopy management tricky. For my next run, I'm going for something more stable from a well-known breeder.
🔜 Next Round – Chocolate Haze (RQS) 🍫🌿
I’m already preparing for my next cycle! My drying tent is being set up, and once these ladies are chopped, the new Royal Queen Seeds genetics will be germinated. I’m looking forward to seeing how Chocolate Haze performs!
🚰 Final Flush & System Prep
I've transitioned to flushing by emptying the nutrient tank and refilling it with pH-adjusted tap water (pH 5.8). To prep my system for the next grow, I’ve also added silver-stabilized hydrogen peroxide (50%) at 1ml/L to keep the irrigation lines clean and ready for the next run.
🔥 Looking forward to harvest! Stay tuned for the chop & dry report! 🔥
💬 Drop your thoughts below! Anyone here with experience growing Chocolate Haze? 👇
09/02 starting to loose her colors cause the flush.. Also the lack of nutrients cause them to drain so much that the blunts can't keep up.. So leaves are getting curly..
1 like
6 comments
Share
11
Week 11. Harvest1y ago
Happy Harvest Day!

7/10
Rated
This strain was a beast. Big, chunky buds, a strong classic weed aroma, and definitely one to handle with care when trimming unless you enjoy marinating in terps. Can’t wait to see how the cure affects the smell and flavor—hopefully, it smooths out a bit!
Show more
Translate
Spent 65 days
Ger Veg Flo Har
371.5 g
Bud wet weight per plant
12
Plants
2.88 m²
Grow Room size
Normal
Difficulty
Height
Day air temperature
Air humidity
PPM
PH
CO2
Light schedule
Solution temperature
Night air temperature
Substrate temperature
Pot size
Lamp distance


Appoldro420 🍓🍌 Strawberry Banana – Harvest Report 🍓🍌
And that’s a wrap! After a solid run, the 12 Strawberry Banana ladies have been chopped, trimmed, and are now on their way to curing. It was a big harvest—literally.
Harvest Stats:
🌿 Total Wet Weight: 4,458g
️ Density: High – These buds came out rock solid. Anything smaller than a ping-pong ball went through the tumble trimmer, while the bigger ones? Hand-trimmed. A lot of work, but totally worth it.
👃 Smell: Extreme—but not the sweet, fruity kind. This was pure, raw, weedy funk—like fresh-cut herb, but twice as strong. Smelled amazing for a few seconds… then slowly turned into a headache-inducing wall of dank after hours of trimming. 🌫️💀
⭐ Overall Rating: 4/5 – The yield, density, and potency all seem on point, but man, that trim job was no joke.
Final Thoughts:
This strain was a beast. Big, chunky buds, a strong classic weed aroma, and definitely one to handle with care when trimming unless you enjoy marinating in terps. Can’t wait to see how the cure affects the smell and flavor—hopefully, it smooths out a bit!
On to the dry and cure—stay tuned! 🚀💨
3 likes
1 comment
Share
Equipment Reviews


8 comments
Sort by
popularity
popularity
newest
oldest

AsNoriu commentedweek 101y ago
Some show signs of reveging, double check for light leaks and your lights
like 1

BLAZED commented1y ago
Hey! Yes i think he is talking about picture 8,9,10
It indeed looks like there is a bit of reveging going on.
The rest looks very good! Nice garden :)
likes 2
AsNoriu commented1y ago
Platform is f@cked, when you replay, it dont offer @userName by default, so no notification.
https://ilgmforum.com/t/accidental-reveg-question/70744
Plants start to have those single leaves in colas, yours definitely exhibit same pattern. I had few times my own mistakes, i remember that grow pattern very well. Wanted just to warn you.
like 1

Appoldro420 commented1y ago
Well I am grateful for that, it is one of the reasons I keep a diary. But I am sure this one is odd from the very beginning
likes
Show More (1)

Ninjabuds commentedweek 111y ago
Fire keep it up
likes
Appoldro420 commentedweek 22y ago
Follow My Strawberry Banana Grow: A High-Tech Cultivation Journey!
Welcome to my Strawberry Banana grow diary, where I take you on an adventure full of innovation and top-tier cannabis cultivation! This delightful Indica-dominant hybrid (70% Indica / 30% Sativa) is renowned for its sweet, fruity aroma of banana and strawberry and its deeply relaxing effects, with an impressive THC content of 24%. What truly sets this grow apart, though, is the advanced technology and meticulous care driving every step of the process.
What Makes This Grow Unique?
This grow is powered by a state-of-the-art setup designed to maximize yield and quality:
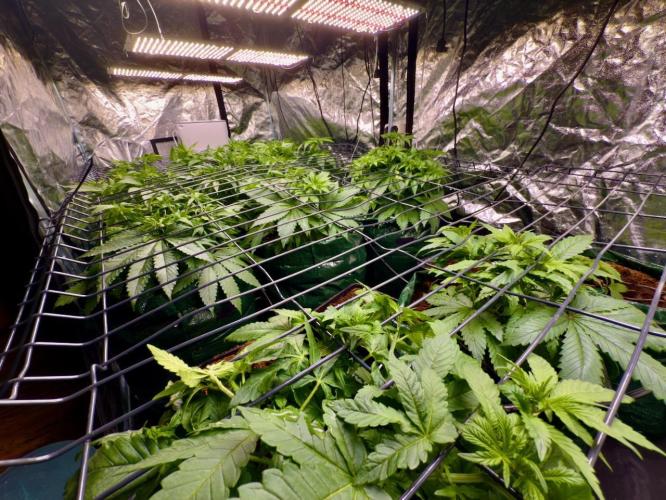
Grow Tent: Secret Jardin DR240W, offering a stable and controlled environment.
Lighting: Four Meijiu LED panels (240W LM301H) for optimal light penetration and energy efficiency.
Irrigation: Blumat drip irrigation system for precise, consistent water and nutrient delivery.
Medium & Nutrients: Cocos substrate with Plagron Cocos Premium A&B and Hy-Pro Generator to nourish plants to their fullest potential.
Climate Control: A Dimlux controller with PT camera for precise CO2 management, fueled by a 10kg CO2 cylinder, and constant monitoring of humidity and temperature.
Why Follow This Diary?
Using cutting-edge techniques, I aim to achieve an unparalleled harvest of premium Strawberry Banana buds. This grow diary offers a behind-the-scenes look at how high-tech cultivation methods can elevate results, with practical tips on CO2 enrichment, LED lighting, and growing in coco medium. Whether you're a beginner or an experienced cultivator, my updates will provide valuable insights to take your grow to the next level.
What to Expect
In-depth updates on every stage of the grow, from seedling to harvest.
Detailed explanations of how I utilize advanced equipment for peak performance.
Plenty of photos and videos to showcase the progress and results.
Curious to see how this beautiful plant thrives in a professional, tech-driven environment? Follow my grow and witness the magic of Strawberry Banana unfold!
Hashtags
#StrawberryBanana #CannabisGrow #GrowDiary #HighTechCultivation #CannabisCommunity #LEDGrowLights #CocoMedium #BlumatIrrigation #DimluxController #CO2Enrichment #HomeGrower #CannabisLovers #GrowTentSetup #PremiumCannabis #IndicaDominant
likes

the end.
Enjoying this diary? Follow for more updates!


Prefer the old Diary view?
Go back to the old Diary view