
Likes
Comments
Share


@3lementa1
Follow
I did some defoliation and pruning of lower branches at the start of the week and this plant hasn't recovered as much foliage as the CBD Blue Shark, even though this one was bigger until recently. I think the plants have a preference for being on the left, right underneath the filament part of the light bulb. I also still need to finish the right wall and put white mylar on it. Maybe I will switch the plants for a bit.

Likes
14
Share


@GreenCasual
Follow
Couldn’t manage the stretching anymore ... heartbreaking but this is the end for this G14.

Likes
5
Share

@Chubbs
Follow
What up Fam, weekly updates on these lovely ladies. This week it's been warm and such a bad time for my AC to go out but overall temps been in the mid it's inside the tent and the plants seem to not mind at all. They're still getting fed 16oz daily. I'd say from the looks, maybe 2-3 more weeks until harvest. Happy Growing
Likes
7
Share


@Organic473
Follow
My first time growing this strain. One new seed hack for glass of water method “leave seed floating on top for longer tap root in record time”. Use warm water for best results.

Likes
2
Share


@eldruida_lamota
Follow
Que pasa familia, vamos con la cosecha de estas Gorilla Cookies Fast Flowering, de FastBuds.
Por dónde empezar, las flores son bien compactas , y van repletas de resina, tienen tonos por dentro muy bonitos, y tiene un aroma a galleta.
Es muy sencilla de cultivar, es de ciclo corto mdio aunque también si le dais una semana más no pasa nada agradecer se agradece al final.
Mars hydro:
Code discount: EL420
https://www.mars-hydro.com/
Agrobeta:
https://www.agrobeta.com/agrobetatiendaonline/36-abonos-canamo
Hasta aquí todo, Buenos humos 💨💨💨
Likes
3
Share


@OldskoolHed
Follow
Doing well, flipped to flower, looking forward to watching her fill up the 3x3. She's a heavy feeder so I'll need to stay ahead of that.
Likes
2
Share


@xTaps
Follow
Just checking the trichome heads daily to harvest them at the for me perfect moment.

Likes
17
Share


@Frostynugz420
Follow
My #1 plant is huge and doing amazing. Looks like loose soil is the way to go, not ever using root riots again- all the small plants were planted in root riots, but they’re catching up!

Likes
5
Share


@MariBomba
Follow
Kitchen sink 1 had to be put outside cause of nanners. Probably from the stressed caused by that envious bitch that cut up my tops. Smh doesnt matter run still gonna be fye. Cant get the temp lower than 28c. It is what it is

Likes
17
Share

@squalino
Follow
🌿 Journal de Culture : Cherry Cola (Auto)
Date aujourd'hui
20/02
Date de sortie de terre : 22/01/2026
Âge : 29 jours (Semaine 5 - Fin de phase végétative / Début de stretch)
📊 Paramètres de Culture
Température : 23.3°C (Idéal pour cette étape)
Humidité : 55% (Parfait pour éviter les moisissures tout en gardant une bonne croissance)
Éclairage : Lumatek remis à 75%
Technique : LST (Low Stress Training) visible avec les attaches rouges pour ouvrir la canopée.
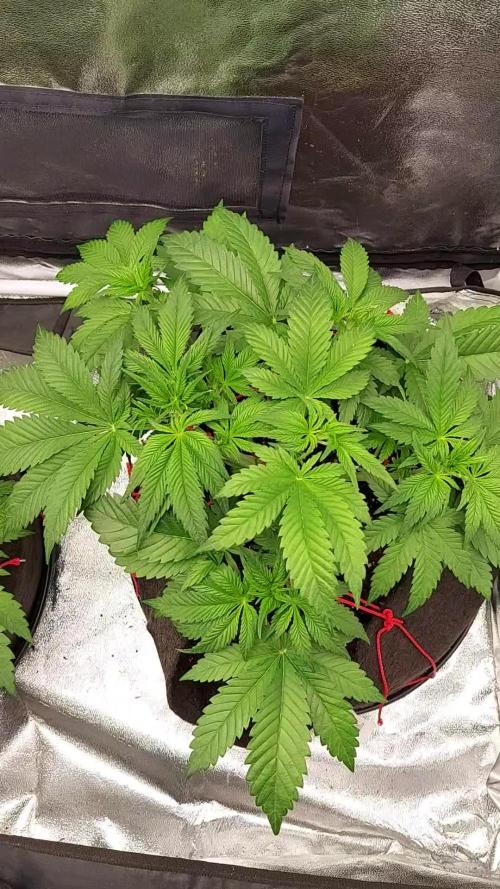
📏 Suivi des Plantes
Plante #1 (La Grande)
Taille : 26 cm
Observations : Elle présente une structure très robuste. Les entre-nœuds sont serrés, ce qui annonce une plante compacte mais productive. Le palissage (LST) semble bien fonctionner, la lumière pénètre bien jusqu'au centre de la plante. Les feuilles sont larges, typiques d'une dominance Indica.
Plante #2 (La Petite)
Taille : 16 cm
Observations : Bien qu'elle soit plus courte de 10 cm, elle est extrêmement dense. Elle a un aspect très "buissonnant". Elle semble prendre un peu plus de temps pour s'étirer, mais sa santé est excellente. Les nouvelles pousses au centre sont d'un vert clair bien vif, signe d'une croissance active.
Likes
4
Share


@HydroHerb420
Follow
Another straightforward week. Increased pk 13/14 and they’re starting to fatten up nicely and smell good to. Bit annoying the left plant has a few branches that have stretched out as I’d of liked to have got the light down a bit closer to the ones below.
Likes
72
Share


@Nebula420
Follow
Crystal Candy Have a huge potential, My goal was not to get a great harvest, If you use 6 gallon pot, and a good fertilizer u wiil get a huge harvest.

Likes
65
Share


@Mrs_Larimar
Follow
May, 29th
If I open the Tent ist apure Peasure to see and smell them
The Girls are very Thirsty like @FC_Cultivars said.
Easy strain to grow......
They are sitting in 2 Different Growspaces, 2 are into my HAZELBOX,
and one sits in the Big Floweringtent
Watering every Day, Feeding nearly every other day

Processing
Likes
3
Share


@Dico29
Follow
Day 120
Smells good buds are fatter and looking better then I thought last week, I flushed but I think I may have caused nutrient burn or nitrogen since my stems have turned purple also along the buds and tips or ideas of what I should try thanks
Day 127 photos at the bottom

Likes
21
Share


@Dunk_Junk
Follow
Wow look at her this week. Buds really filling out.
Beautiful.
I think she has 2 weeks left referencing my previous AutoGlueberry.

Processing
Likes
14
Share


@Master_weeda
Follow
Bonjour à tous les padawans et maîtres jedis
Je tien a remercier chaleureusement ghostfarmseeds qui me fais l'honneur de vous présenter ses meilleures génétiques à autofloraisons. Je ne vous cache pas être très fier et impatient de cultiver cette souche
J'aimerais aussi remercier @greenhousefeeding de me permettre de faire cette culture en m'offrant l'engrais nécessaire à ce run.
Cette souche sera ma première autofloraison made in Italy
Aujourd'hui nous y sommes enfin...
Je rappelle que je cultive par passion et que le rendement n'est pas ma priorité et que je n'utilise que le strict minimum du matériel nécessaire à une culture correcte au prix le plus bas possible
MATÉRIEL CONFIGURATION
Box 80×80×160
Lampe led greenception GC4 250 watts
Ventilateur à pince 15 watts
Xiaomi Deerma humidificateurs 5L
Hygrometre thermomètre
Extracteur PROFAN 107 m3/h - 100
Prise programmable électronique ×2
Pot 11 litres
Greenhouse feeding enhancer
Cellmac nutriments
Greenhouse feeding biobloom
Greenhouse feeding biogrow
Substrat cellmax bio ligthmix
Fil de fer et pince coupante
Microscope
Petite balance de précision
CULTURE ÉTAPE PAR ÉTAPE
J'ai tout dabord fais tremper ma graine dans un petit verre d'eau pendant 12 heures dans le noir et je l'ai ensuite placé dans un Tupperware hermétiquement fermé entre de bouts de sopalin bien humidifié dans un endroit noir à environ 27 degrés celcus.
Une fois la graine germé et d'une taille de 1 ou 2 centimètres je la prend délicatement et la dans son pot définitif de 2,5 litres
Jour 1 léger arrosage (20 centilitres) avec eau ph6.3 à laquelle j'ajoute 4ml de rootboster cellmax et 3ml de cellmax bio 8-2-2 par litre d'eau
Jour 3 arrosage avec un litre d'eau ph6.3 à laquelle j'ajoute 0.9 gramme de feeding enhancer de greenhouse

Likes
21
Share


@MG2009
Follow
12/24/2021
So far only one male has been identified. Glad I just reviewed my video I didn't even notice how light green #3 is, guess I mix her nutes up separately and see if she just hungry? Or naturally lighter than others. All other plants are using coast of Maine mixed into soil
(her too) so I'll give her a little mirimichi 901C this week and see what happens.
12/30/2021
Noticing that there is two distinct differences between these girls, color light green and dark green.#1,#3,#8 are light green and #2,#4,#5,#6,#7 Other than that there very much similar growth and node spacing, little differences but very happy with uniformity.Both light green and dark green maintained their magenta petiols, gonna make notes on stem rub notes next week and see how they will compare.
Likes
9
Share


@EllysGrow
Follow
Schön zu sehen, was die Ladys in die Höhe gehen, die Häarchen werden auch immer mehr, ich habe deshalb jetzt auf Blüte umgestellt. Wann stellt ihr hier gd auf Blüte um???
Likes
45
Share


@chapadux420r
Follow
Hello guys!
So it’s the end of week 2 of flowering and all is going well. Been watering every 2 days and, as you can see, we have white pistils and small buds in every plant
Not much to say, the ladys are green, stretching and growing buds as it should
Yesterday i’ve defoliated one of the critical + 2.0 clone and next week I’m going to defoliate the rest of the plants. Just wanted to test when it is better to do the defoliation so it’s kind of an experiment
Tell me what do you think of how this is going


Likes
147
Share


@MrJones
Follow
MrJones Black Berry OG
🔹🔹🔹🔹🔹🔹GOALS🔹🔹🔹🔹🔹🔹
🌞Flowering Environment - 75/80℉ and 50% Humidity
💧 Feeding - Advanced Nutrients Bloom Regiment - Great APP!
🍃Training / Letting ladies stretch then heavy defoliation under the trellis and cleaning above to open up the airflow.
🕷️ IPM - Will be using Green Cleaner" 1 OZ per Gallon, and CannControl from Mammoth alternating between product each month for Integrated Pest Management.
💡Mars Hydro LED / Veg TS-1000 / Flower 480W FC 4800, this light is just performing very well!
🔹🔹🔹🔹🔹🔹🔹🔹🔹🔹🔹🔹🔹🔹🔹🔹🔹🔹
📜 Rambling - With week 10 here, the ladies are about 2.5 weeks into flower, they continue to stretch nicely, and starting to stack on some buds!
🔹🔹🔹🔹🔹🔹🔹🔹🔹🔹🔹🔹🔹🔹🔹🔹🔹🔹
▶️ Friday - 03.12.21 / Just feeding and admiring, not too much left now but the waiting!
▶️ Saturday - 03.13.21 / The ladies like their 40 ounces every day, they continue to stack up, the internode spacing should make for some rather lush buds.
▶️ Sunday - 03.14.21 / Fed the ladies tonight, I hope the stretch stops soon, these ladies are just getting so tall!
▶️ Monday - 03.15.21 / Continuing to feed 40 ounces per day - the girls are just lusty drinkers!
▶️ Tuesday - 03.16.21 / The internode stacking is unreal, the leaf production is so fast, thinking I may have to do another deep defoliating!
▶️ Wednesday - 03.17.21 / Cant help to stare at these ladies, they grow so fast think I can see it!
▶️ Thursday - 03.18.21 / Last day of week 10, 3.5 weeks into flower, next week we should see fat stacks!
🔹🔹🔹🔹🔹🔹🔹🔹🔹🔹🔹🔹🔹🔹🔹🔹🔹🔹
📜 Cultivar Information - We have created this strain by crossing the best Black Domina available with Very Berry and our own Lost Coast OG Kush, this plant produces large colas with a super intense sweet berry flavor with a sweet-smelling aroma that varies from fruit and berries to sweet candy. This lady offers tight internal stacking giving a perfect structure for those super heavy colas, which is perfect for growth both indoors and out, if grown outside she is fairly resistant to mold and powdery mildew which is a real bonus with such large colas.
🔹🔹🔹🔹🔹🔹🔹🔹🔹🔹🔹🔹🔹🔹🔹🔹🔹🔹

Likes
11
Share


@MadeInGermany
Follow
Info:
Unfortunately, I had to find out that my account is used for fake pages in social media.
I am only active here on growdiaries.
I am not on facebook instagram twitter etc All accounts except this one are fake.
Have fun with the update.
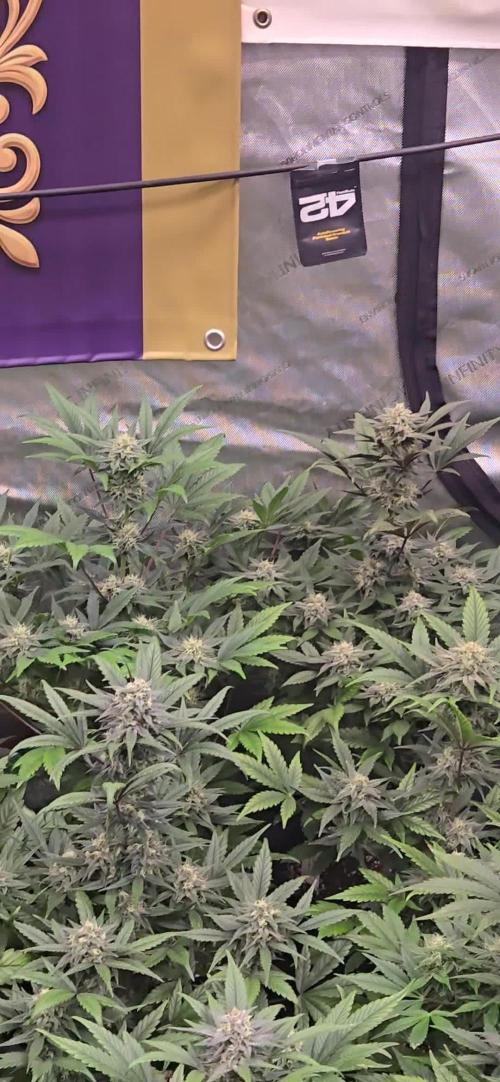
Flowering day 61
since time change
to 12/12 h.
Hey everyone ☺️.
Today the time has finally come and the last week of flowering has begun 😍.
She looks beautiful and her buds smell very tasty 👍.
The trichomes are 70% milky and 30% amber.
The lady comes in complete darkness for 48 hours before the harvest.
Of course, as always, there will be a small interim update of the harvest before the last major update.
Until then, I wish you all a lot of fun and stay healthy 👍🙏🏻
You can buy This Strain at :
www.Zamnesia.com
☝️🏼☝️🏼☝️🏼☝️🏼☝️🏼☝️🏼
Strain
Gelato clone from mother (Zamnesia )
☝️
Genetics: Wedding Cake x Gelato x Gelato 33
Vega lamp:
2 x Todogrow Led
Quantum Board 100 W
💡
Bloom Lamp :
2 x Todogrow Led
Cxb 3590 COB 3500 K 205W
💡💡☝️🏼
Soil :
Canna Coco Professional +
☝️🏼
Fertilizer:
Green House Powder Feeding
☝️🏼🌱
Water:
Osmosis water mixed with normal water (24 hours stale that the chlorine evaporates) to 0.2 EC. Add Cal / Mag to 0.4 Ec Ph with Organic Ph - to 5.5 - 5.8 .