
Likes
Comments
Share


@Professor_Chaos
Follow
Beginning of week..
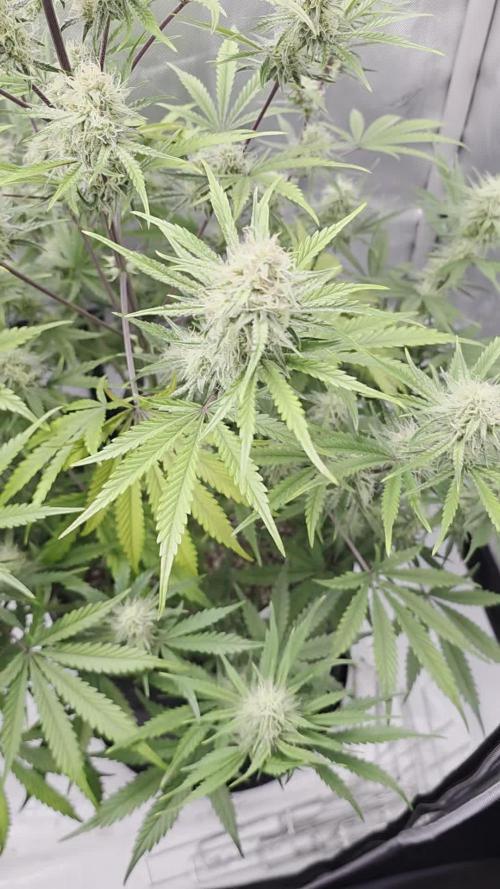
So I went ahead and did a late defoliation.. humidity is sitting too high in the tent.. its been around 50 - 55 % RH but it does sometimes get up to 60% RH.. removing some of these leaves should help lower the RH AND lower the chances of getting mold.. these are gonna be some fat colas.. and those are the ones mold can creep up on.. doing my best.. dehumidifier just cant keep up.. but I also dont run it inside the tent due to the heat that thing and it's transformer give off when it runs for over 24 hours or so.. but she shouldn't mold.. I've got 3 fans inside just moving air.. but of course, sometimes that isn't enough.. but we will see how this goes.. may even add another fan.. keep it on the floor of the tent an point it up.. we shall see! But damn she smells so amazing.. i can smell alot of similarities from the Mandarin Cookies in here.. which also has Mandarin Sunset as a mother.. just as this one does.. but you can smell the skunk along with it.. but not as powerful as the citrus.. aw man the citrus.. love that shit.. I even chewed on a trichome covered fan leaf.. very delicious! So glad I have 9 more of this strain and a few others from ETHOS.. next run may be some Aura Genetix.. I've gotta see what fast versions are all about.. I bougt some of the Peach Bellini.. should be pretty epic.. keep an eye out for that diary after this one!
Mid week..
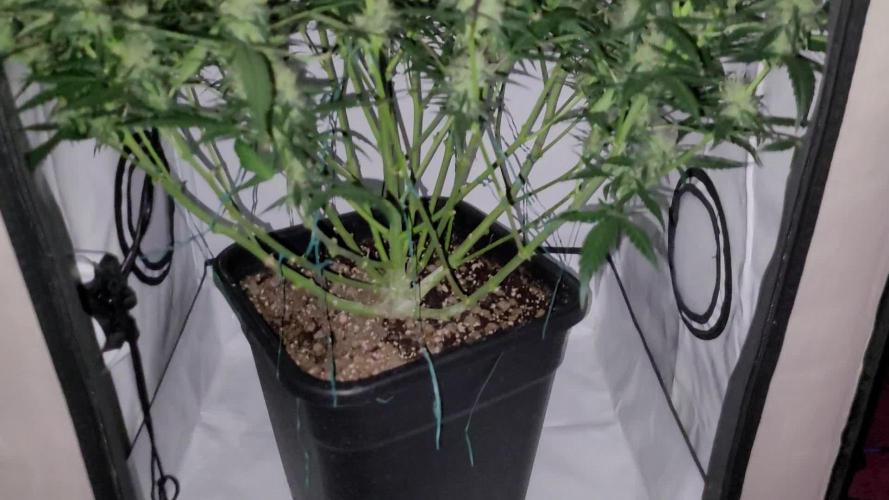
Lower branches are getting plenty of light after the defoliation. The smell is getting intense. My carbon filter has began to smell like shit lol. Not literally.. but it stinks.. maybe like rotten skunk or something.. I've ordered a new one but I took that smelly one off for now.. so the whole block smells like member berries right now till the new filter comes in.. tomorrow. I couldn't figure out what the smell was untill i accidentally got my face into the exhaust fan wind.. smelled like rotten skunky shit.. lol. I guess I forgot things need to be changed out every so often.. just figured "air" running thru it wouldn't make it crap out so fast. Been maybe 8 - 12 months.. something like that. Never used one before this.. but running some ETHOS, it is a must! So citrusy! Purples are slowly coming in. She really reminds me of the Mandarin Cookies I grew.. but I also think the Mandarin Cookies was heavier on the Mandarin Sunset phenotype side.. and this one is pretty similar. Scent, growth, stretch.. but I know I cant say for sure that's what it is.. this is just what I believe is going on. But wow.. such a beautiful plant.. I've had to run a a few twist ties to other branches in order to keep them from flopping over, leaning on eachother and the sides of the tent.. should have scrogged I guess lol.. live and learn tho.. but so far its not too bad.. but this early on shows me what I might have to be dealing with in the next couple of weeks cuz they are beginning to get STACKED! I've said it before, and I'll say it again... ETHOS for the win 🏆
Later that day...
Wow.. going back in again and now she smells just like the Early Lemon Berry! Wth! How is that even possible?! She is doing amazing things! Some calyxes are beginning to turn purple. Some of the top leaves are as well. Tried to get some decent pics of it.. but I guess I cant figure the new phone out.. as you can see, some pics are a little blurry. And sometims the capture is delayed behind the flash and I still get a dark pic as if it didnt even flash.. but whatever.. I can't wait to see what she has to offer! Such a gorgeous girlie! So happy and excited for this one!
End of week..
Nothing left to do now but feed/water for about 1 more week and she will be ready for the 2 week flush!.. I normally like to just water as normal (without nutes, duh) for the entire 2 weeks and still keep checking runoff.. maybe FloraKleen once a week and then just water till harvest! So far, I am starting to see some milky! Still mostly clear, but that means she is getting closer! So excited! This girl really smells just like the Early Lemon Berry I grew! But still with a bit of sweetness to it too! Aw man I can't wait! Anyways... on to the next week!...

Likes
1
Share


@Flowers_labs_extracs
Follow
En esta semana ya cambiamos el periodo lumínico para que empiece la estimulación de floración, con ayuda de nuestro Terra boom de plagron. Acompañado de puré zym, al realizar la mezcla, es fundamental que tengáis el PH plu de plagron para regulador ya que el Terra boom lo baja, y hay que regularlo. A 5.9 en este cambio de periodo del estado de la planta. Y una ec (ms) 1.6

Likes
3
Share

@EchoEcho77
Follow
Ok, week 11, here we go! These girls are getting stinky! Upward growth has completely stopped, no change since last week, the main stem from about half way up has turned completely purple, it's now pushing to the leaves. Buds are starting to fatten, and nutrients have been consistent. Older fan leaves have faded in favor of bud production I suppose. I'm guessing about 2 more weeks to chop.
Likes
16
Share


@DreamIT
Follow
Sponsored by:
💫PARADISE SEEDS💫-💡VIPARSPECTRA💡-💐GREEN BUZZ LIQUIDS💐-🛠️WEDRYER🛠️
4/9 I'm back with updates. we have entered the third of flowering and it is progressing very well. being predominantly indica, it has not stretched much, but it is nice chubby. today water and fertilizer
__________________________________________
Personal advertising (contains affiliate links)
__________________________________________
🦄 winners and holders of the most prestigious awards, since 1994 they offer genetics of the highest quality! Anonymous shipping!
✅https: //bit.ly/Paradiseseeds_
__________________________________________
Did you know that Green Buzz Liquids fertilizers are 100% vegan? A complete line of products ready to give the best to each of your plants! Visit the site and see my journals to see how they work 🦄
🤯 And with the code "dreami t" you will immediately receive a 15% discount on your purchases
✅https: //bit.ly/GreenBuzzLiquidsPro
__________________________________________
👀 Are you looking for a good lamp to start with? 👀
🌞Viparspectra has something more than the others, take a look at their site.
⏩ Use "GDVIP" for an extra discount or "DREMIT3" for an extra 5 %% discount
👀 Search for it on Amazon
✅Amazon USA: https://amzn.to/30xSTVq
✅Amazon Canada: https://amzn.to/38udUVe
✅Viparspectra UE: bit.ly/ViparspectraUE
✅Viparspectra USA: bit.ly/ViparspectraUS
______________________________________________
🌈 Tired of blowing on your weed hoping it dries quickly? Check out the Wedryer website! You will find a well-made accessory that will help your weed dry in just 8-10 days without the annoying risk of finding mold or other annoyances! (no affiliate links)
✅https: //bit.ly/Wedryer_
______________________________________________
📷🥇Follow the best photos on Instagram 🥇📷
https://www.instagram.com/dreamit420/
Backup
https://www.instagram.com/dreamit4200/
🔻🔻Leave a comment with your opinion if you pass by here🔻🔻
🤟🦄💚 Thank you and good growth 💚🦄🤟

Processing
Likes
11
Share


@Chimney_Chief
Follow
Plant has shown slow but healthy growth since its arrival, LST continues and I've managed to keep the plant at the same height it was last week but now at a horizontal angle.
I did up the nutes for one feed to a slightly under recommended dose but in the days following I noticed the plant looking a little 'droopy' and since she has been with me she hasnt been drinking very well so I opted to flush her for a feed, since then she has seemed very happy :) whilst drinking much better (possible nute lock was imminent). Now back down to half doseages with the exception of CalMg (to help after flush) but will be increasing them in the following days.
As of next week I will be transferring her and another plant my partner is nurturing into single bucket DWC set ups. Fingers crossed I will see some hearty results for making the crossover to hydro.

Likes
34
Share


@420DeepGrow
Follow
Día 22: 🔹Riego según la tabla de nutrientes BioBizz con una EC de 900 y un pH de 6.2.
🔹Pulverización con Rootbastic a 0.15ml/l.
✳️Nota: creo que finalmente el Sabado las pasaré a floración, 12/12.Leevarán ahora entre 3/4 semanas con unos 5 días de diferencia ( hay cañamones que puse más tarde.
Día 23: 🔹Pulverización con Rootbastic a 0,1ml/l
🔹Tengo que volver a regar, aplique poca agua ( 250ml x maceta) y le aplico 370ml x maceta ya que no dispongo de más agua sin cloro. La próxima vez las regare con 1/2 litro a cada una . Riego según lo tabla Biobizz con una EC baja 900-1000ppm

Likes
94
Share


@Nebula420
Follow
I really liked Barney's Farm genetics.It’s a pleasure to grow Ayahuasca Purple
Thanks Barney's Farm, Growdiaries team, and thank to everyone who follow my grow report, love u all, Peace!😘
Likes
5
Share


@TrickzGrowz
Follow
Servus Moin!
Die schwierige Zeit ist überstanden. Die Sun of a Peach wächst prima vor sich hin.

Likes
11
Share

@StonedSteve
Follow
Zdravim všechny✋
4. týden květu pryč.
Dnes 8.6. startuju 5. týden květu.
Major ještě povylezl na 74cm, ale to už bude asi jeho maximum, už tak je to slušný.
Veškerou energii začal posílat do formování a vývoje palic, krásně voní a mě nedělá nic jinýho než radost😜
Jak už jsem psal minulý týden, zálivku tak nějak kombinuju pokaždý něco jinýho podle feelingu, jediný co jsem u ní změnil je, že jsem musel jít na 8L, ten parchant je dost hladovej, ale nemám mu to za zlý, Mephisto to na stránkách jasně píše že je hladovější.😏
Přikládám pár fotek a videjko z dnešního dne.
Všem přeju good luck a za týden zase čau✋
Likes
32
Share


@Roberts
Follow
Critical x Animal Cookies is doing well now under the Hortibloom Solux 350. She did have 2 neem oil treatments this week when the neighbor plant showed mites. I think I found a way to treat them without damaging the leaves a lot. She got some training today, and hopefully a lot of growth to follow. She has some catching up to do. Thank you Hortibloom, and Ripper Seeds. 🤜🏻🤛🏻🌱🌱🌱
Thank you grow diaries community for the 👇likes👇, follows, comments, and subscriptions on my YouTube channel👇. ❄️🌱🍻
Happy Growing 🌱🌱🌱
https://youtube.com/channel/UCAhN7yRzWLpcaRHhMIQ7X4g


Likes
12
Share


@mowsgrows
Follow
Sweet, Sour, Gassy.. now we talking
Der Geruch erinnert mich nun an Vitamin C Bonbons und die Buds legen immer mehr zu.
Ich bin zufrieden mit dem Gesamtbild und freue mich über immer mehr frost.
Manche Blätter drehen sich vor lauter Trichomen zwischen den Zacken. Überall sieht man Zuckerkristalle bis auf die grossen Fächerbätter hinaus.
Es hat sich hier deutlich abgekühlt und für die letzten Wochen finde ich es sogar gut um ein klein wenig Herbst zu imitieren :)
Basis Dünger werden nur bei jedem zweiten Giessen verwendet, Booster bei jedem Mal. Ich gebe nun bis zum Schluss Alfa Boost mit hinzu, während ich bei den Mengen von Growzyme und Huminsäure Plus variiere
Das Thermometer habe ich nun mal auf Höhe der Blüten gehängt, im Endeffekt waren die Werte bisher alle von der Höhe der Töpfe
Edit 5.Sept. : Habe gestern an einer Pflanze Bananen in den Buds entdeckt. Habe Sie gespült, mit Skalpell die Sichtbaren Bananenteile entfernt und wieder etwas niedriger ins Zelt gestellt. Die anderen Beiden bekamen heute nochmal nutrients und werden mit der nächsten Tour auch gespült.
Ich brauche die Zwitter Pflanze mindestens zur weiterverarbeitung.
:(

Likes
20
Share


@CzAlmighty
Follow
Amazing flower time 💚💚💚
Buds is strong ...verry strong . smell AMAZING 💚💚
Unbelievably fragrant plant. The flowers are beautiful and slowly begin to ripen. My guess is to wait another two weeks and it will be harvested.💚. Thank you watch

Likes
3
Share


@Krautis_IndoorFarm
Follow
Tag 58 (Blütetag 18)! Licht und Schatten im Living Soil Dschungel 🌿✨
Drei Wochen nach der Umstellung am 19. Dezember zeigt sich im 90x90 Zelt ein faszinierendes Bild. Während einige Mädels bereits voll im Modus sind, lassen sich andere noch etwas Zeit. Das ist die Realität am Berg, jede Genetik hat ihren eigenen Kopf! 🏔️💨
📈 Statusbericht vom Feld:
• Die Überflieger: Die Zapplez 2.0 in der Mitte dominiert das Zentrum mit einer wunderschönen dunklen Färbung.
• Z-Vally Power! Die beiden Z-Vallys (vorne links und hinten rechts) zeigen bereits richtig schöne Blütenansätze und geben ordentlich Gas.
• Die Sorgenkinder!Die beiden OreoZ Milkshakes (hinten links und vorne rechts) zieren sich noch ein wenig und wollen noch nicht so recht in die volle Blüte übergehen.
• Living Soil Resilienz: Trotz des ausgefallenen PH-Messgeräts stehen alle Pflanzen in sattem Grün da – die Pufferwirkung des Substrats von @panova25.de und @living_roots_pro pro rettet uns hier den Arsch!
🌸 Geduld ist eine Tugend
Wir beobachten genau, ob die OreoZ-Damen nur „Spätzünder“ sind oder ob wir noch einmal feinjustieren müssen. Der Komposttee vom letzten Dienstag hat zumindest für eine vitale Grundstimmung gesorgt.
🌱 Die Crew & 🤝 Das Ökosystem
• Genetik: Zapplez 2.0 (@conscious__genetics ),
Z-Vally & OreoZ Milkshake (@positronicsseedsgermany )
@cannacommunity.deutschland


Likes
9
Share


@floodinghideout
Follow
(3.8.22) Day 21 of flower. Watered each plant 2.5L of nutrient mix.
POST NUTE FEED RUNOFF LEVELS:
Plant 1: 1605ppm, 6.2ph
Plant 2: 1367, 6.6ph
Apprehensive/not sure how to go about further defoliation. I’ve removed everything from below the net, and taken away every fan leaf that looks like it’s not directly connected to a bud site. Everything that remains appears to be connected to a bud site.
Do I need to remove more? On one hand, I’m afraid that I’ll end up stressing out the plant this far into flower. On the other, I’m afraid of possibly running into PM at some point. RH is increasing with the warmer weather (between 45-55, 65 on a rainy day). Lots of little leaves laying on each other. Thinking about getting a small dehumidifier to put into the tent.
Also, just going forward with future grows, should I have removed every branch that grew out of one of my mains? If you look at the photo below the net, I’ve got my main branches and all those little stems that branched out seem to be what’s really causing the crowding. I thought the point of LST was to have it do exactly that, but looking at everyone else’s grow it looks like they just limit themselves to the big main branches and clean up everything else.
(VIDEO) I've got two 6" fans. One at the bottom right under the net blowing up, one at the back left above the plant (but slowly being taken over) blowing down. Everything in between seems to be dancing around with air. It being my first grow, I'm not sure if I'm not doing enough or overdoing it lol
(post script): For plant 1, the scrog net is only 8 inches above the soil. With plant 2, it's only 5 inches above the soil. I was so concerned about the plant "possibly doubling or tripling in flower" that I really LST'd my plant early on and did my best to level her out. As a result, I was able to fill out the perimeter of my tent easily, but there was not much vertical growth to speak of. This meant that when I put my scrog up, it was barely above the rim of each pot. Next time/grow, I may experiment with letting the plant get a little more height before leveling her out? Idk/not sure. Also, my light placement was close enough that my node spacing was VERY tight. I've read that this is a good "problem" to have, but I can't help but thinking if my plants had a bit more verticality to them they'd be easier to work with.
(3.10.22) Watered both plants with 2.5L of ph'd water.
Was a bit lower than I would have liked at approx 6.2ph, ppm was 83
Post water runoff:
Plant 1 - 6.2ph/1248ppm
Plant 2 - 6.3ph/776ppm

Likes
19
Share


@MrWolfe
Follow
This round is going great, I didn't top them the extra time and they have just absolutely loved it. Supercropping has to be the better option. Last round did hit my highest numbers but I feel this is just going to make that feel like amateur hour. These girls are huge and thick, I can't wait to see how some of these Hunts turn out.
Likes
8
Share


@Chubbs
Follow
Weekly update on these little beautiful girls. They're maturing great, I'd give them only another couple weeks and they'll be finished. They have a pungent fruity smell and are starting be frosty. All in all Happy


Likes
33
Share


@DesDeGrower
Follow
Ladies and gentlemen...welcome in Week 3 of Flower 🙌
Omg....The stretching is real.....girls almost tripled in size.
Few days ago we went through every plant, removing tones of lower shoots and leafs. Girls recovered straight away, increasing in size. They all look very happy without exemptions and I’m just hoping I will manage to accommodate space they need.
We can already see those nice small buds starting to form. Really can’t wait to see them in full beauty 😍
EC 1.9 - 2.0 as aim this week
pH 5.8
2 litres every 24h
Stay tuned with updates 🙌
Processing
Likes
29
Share


@Reaper
Follow
if u wanna skip details just read the CAP LETTERS
day 29 - januari 2
waterleaves from under the stems got cut off, also trimmed the lowest branches because the leaves were getting too big
the soil plant has gotten no trim or cuts at all
day 31
the ph of the res was 5.3 i changed water , roots look brown, not rotten or slimy just brown.
day 32
the hydro plant gets healthy growth after the water change. ph is still too low (5.5) im waiting for my *PH up*
i ordered online. never tought i would need it lol. she goes well on 5.5 but not enough calmag is absorbed like it does on 6.2
The pictures of day 32 display the difference is very big in the stems, the soil plant only got topped while the hydro plant had already a litle trim on the lowest branches and the branches above (in the midle of the bush where i topped them) so she got more stress and still is bigger then the soil.
day 33
i got no ph up (for now yikes)
sooooo i took 8 liters out of the res and replaced it with pure rainwater and 170 ppm calmag in it without nutrients to keep the acid level a bit higher.
it worked as u can see in the final pictures the plant gets new growth a bit faster.
ph up should be here by end of the week.
day 35:
plant start to stretch finnally, while i was doing LST later in the evening one of the top stems just snapped off completely OOOPS 😆.
theres still a lot of branching going on and a nice bush she will recover very fast from this loss as i summoned the Cannabis Gods into my room as the planets lined up and perfected my PH up to 6 by adding the purest rainwater from the universe the roots cleaned themselves back to pearlwhite and started absorbing the nutes faster then ever. in all silence i knew this was my destiny and the stems grew so fast i could hear them grow. the whole experience was too much as i collapsed to the ground and stood up left the room and knew... i would never see these ph and calmag problems ever again and went down the stairs with my new powers
THE PLANTS BOTH GOT GERMINATED ON SAME DATE. BOTH GOT TOPPED ON SAME NODE. I WAS FORCED TO TRIM 4 BRANCHES OF THE HYDROPLANT BECAUS IS WAS BLOCKING TOO MUCH LIGHT I ALSO CUT OFF THE 4 BIGGEST WATERLEAVES ON THE MAIN STEM.
THE SOILPLANT DID NOT NEED ANY TRIMS AS SHE IS NOT GROWING AT AN INSANE SPEED, HOWEVER THE SOIL PLANT LOOKS HEALTHIER AND BIGGER BECAUSE THE FANLEAVES ARE STILL THERE. IF U WATCH THE STEMS IN THE PICTURES OF DAY 32 U CAN CLEARLY SEE THE HYDRO IS WAY BIGGER. I NEED TO CORRECT MY PH SO SHE ABSORBS MORE CALCIUM MAGNESIUM FOR EXPLOSIVE GROWTH.
Likes
3
Share

@Oyziphar
Follow
🌿
Once again, we had very sunny days this week 🌞🌞🌞and another heat wave is coming 😍😍😍
Plants are ready to harvest and they are very smelly 🌷🌷🌷
Some leaves went yellow. I defoliated these leaves 🍂
Only 3 plants on the photos 😲 Last week I noticed a little bit of budrot in plant #3 😱 I harvested the plant to prevent the mold to spread 👹
