


Likes
15
Share


@AllieO
Follow
1/12: impatiently waiting for lemon auto to finish up. Still not sure what the northern lights is trying to do, but..the little buds are slowly growing. S l o w l y...
1/14: things are getting out of hand in here. Northern lights is bushy AF again but the budlets appear to be increasing in size. Lemon is getting closer every day. Looks like I've got milky trichomes and the pistils are darkening. Still a bit early, but I'd be lying if I wasn't anxious for the space..
1/15: I've accepted that I have at least a week ish left on Lemon auto,but she's getting there! I did some rather risky defoliation on northern lights and holy shit, she's got potential. I'm hoping she's just a slow grower and those buds will really fatten up! Perhaps lemon is just a really fast growing plant? I've also decided that since space is limited, my best bet is to probably rotate the plants every other day to allow all bid sites an opportunity for direct light. I'm reigning myself in. Once lemon auto is harvested I need to NOT immediately plant another. I've got some mephosito seeds I want to get going, but I've learned my lesson. This tent fits two 5 gallon mature plants... Uncomfortably. Three is too many 😂
1/17: wondering if northern lights has is it her to fatten up. Gave her a good flush &feed. Popcorn buds or not, I'm invested (#forscience). Lemon auto is still finishing up. Can't get good enough pics with phone to see trichomes. Clearly, I have a minimum of a week left, but I got a digital microscope so I can keep track! Should be here for next update.


Likes
30
Share


@DrewbieDoobieNoobie
Follow
Flower time is here. Transition Feeding as above 3/7/19 I will still irrigate during the week with PH 6.0 water with 1 mil CAL MAG and 1 mil SILLICA /gal I'll be using DJ Short's 11 on 13 off light shedule as I was using a 6/2 x 3 veg schedule I might a well keep it exotic. I have been reading that it will help bring out the flavor, smell and appearance of the buds at the cost of a small sacrifice in yield. Because this is my medicine I will have plenty off the 6 plants, and I'm looking for quality over quantity. As far as I can tell I have not seen any detrimental effects of the 6/2 light shedule it is the same amount of light as 18/6 I just broke it up in 3 parts. It did help keep the heat down. I found I did not have to water as often as well. Would the plants have been bigger had they had and 18/6 I don't have the data to confirm or deny that. All I know is that the plants are doing their thing and they look healthy to me so maybe for the home grower in a hot area this method might work for you. I wanted to try it and I'm just sharing my results with this amazing community of growers. As always I will be uploading more images and Time-lapse at the end of the week. Cheers to all yall😇

Likes
23
Share


@SmokingBrownAndTalkingBrown
Follow
I'm just giving them water until finish now.
Not long left, I am checking the trichomes daily!

Likes
4
Share


@Naujas
Follow
42 days for my project - "Girl on the balcony on the north side" :) it looks really good, knowing what conditions she has to endure, this week there was not much sun, there was a lot of wind and rain, I used a little LST for the girl, the girl drinks = every other day 1.5 liters of water 6.3 ph, every 3rd watering I give biobizz nutrients :) good luck to everyone :).

Likes
5
Share


@Chucklebrother1
Follow
This strain has been easy to grow from the start and very quickly packed the weight on during flower, for a free seed I'm more than happy with the outcome, if you're gonna grow it give it a good 13 to 14 weeks It's quite an uplifting smoke a nice head stone


Likes
5
Share


@Rizza78
Follow
Smooth few days after the defoliations. They seem to be happy. Malted Milk can be very temperamental but I have been catching on to her ways. Still wary with my feedings tho. Want to give all these different nutes and unknown what the results will be? Installed ac units in each room to ensure good temperatures and RH outside the tents. Hoping for another good week!

Likes
20
Share


@CzAlmighty
Follow
Best flower 🔝
Strong flower. I love qualitty of HSO.
everyone recommend This strain. 💚
Thank for watch. ✌️🏼🔝🔝🔝

Likes
2
Share


@DaisyNabis
Follow
hidrate por 6 horas mis semillas, luego las pase a un taper hermetico en 6 dias tenia mis plantulas de 4 a 5 cm para pasar a sustarto directo.
Likes
26
Share


@BigBadLion
Follow
Week 4!
We're getting close to flower and so far everything looks well!
This is what happened in this week:
- I did some LST! 😁
- I increased the amount of nutrients and it seems the girls like it!
- The plant on the front is growing more than the one on the back, even when both might look about the same in the timelapse.
I also think they need more water. It feels (I could be wrong here) the roots are not reaching the bottom of the pot and I fear they might get root-bound because of that.
So next week I'll saturate the pot with water and I'll probably try to tuck some of the fan leaves, the lower branches need some more light. 👌
Thanks for reading and see you all next week! 😃
Likes
4
Share


@cwgrows
Follow
Been battling bud rot that's slowly growing. Setting up the tarp before every rain storm is a lot of work but I think it has prevented a lot of loss. It was definitely the little green worms that got to these gals. Chopping a little sooner than I'd like but having to be away for school and worsening weather leaves me little choice.


Likes
41
Share


@DOOBS_N_BREWS
Follow
Third week of flowering and she's still showing great progress. Starting to show pistols now.
Day 64- NFTG mid flower feed
Day 65- No watering. Bloom Khaos Foliar spray
Day 66- Flush
Day 67- no watering. Bloom Khaos Foliar spray
Day 68- Mammoth P/Recharge/ Cal-mag feed
Day 69-70 No water

Likes
9
Share


@leliantu
Follow
Ultima semana de fertilización, a partir de hoy solo riegos con enzimas o con flush, creo que voy a dejarla unas dos semanas con este régimen. Me sorprendió esta auto, de gran aroma, se desarrollo muy bien y muy rápido, lastima que no sepa que variedad es.
Likes
1
Share


@Hydroponicfarm7
Follow
Subimos la temperatura de la sala y vaya si se noto, las plantas crecieron más en 2 semanas que en un mes, una pena no haber podido aclimatar antes la sala
Likes
20
Share


@DrGanj
Follow
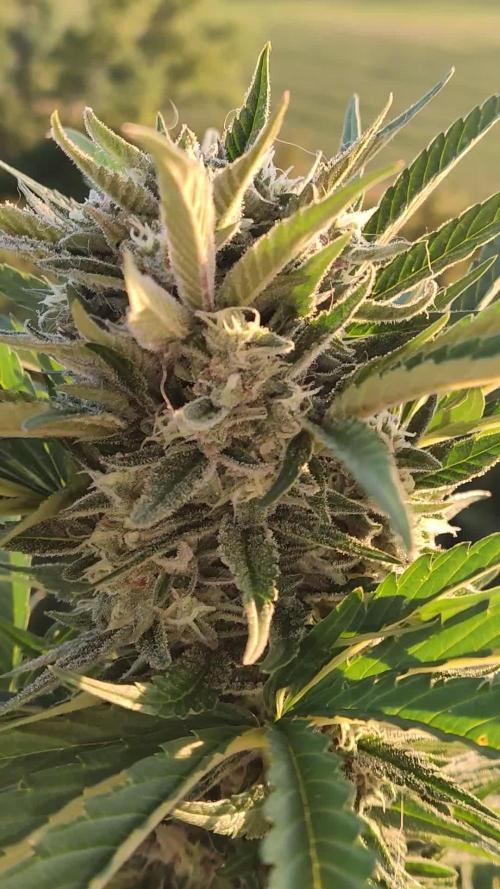
Standard week. starting to swell. No issues really.
Wish this girl smelled more. My Bakers delight grow has set the bar high and I think this will be just an average pheno. Probably grow this strain from seed again next run unless she gets her dank on.
Defoliating heavy around the tops to keep main canopy below strip level. Aim is for even light on every single bud site, or as much as possible

Likes
18
Share


@BudXs
Follow
Hot damn this is a pretty plant. Enormous fan leaves, tight nodes, and LOTS of em. This plant continues to impress, however, some of her daughters are blowing past her in height, surprisingly.
Room is on point, mother is happy and healthy. 55 days or so till harvest:)
