
Likes
Comments
Share


@GirlGoneWeed
Follow
Nothing like a stress free transplant, where the plant don’t need time to recover!!
Bokashi Pro-Gro, my home made KNF input Fish Amino Acids (FAA) and rain water that’s all this plant is getting. Organic grow is cost efficient and you’re producing flowers that won’t bring any chemical sh!t into your body.
Follow my Instagram @GirlGoneWeed click the link in bio to have access to all my discount codes!
Happy growing !


Likes
18
Share

@Sebb_growt
Follow
Was soll ich sagen… die Dame steht immer noch und wenn ich mir die Trichome angucke dann sieht sie leider immer noch nicht ansatzweise reif aus 🤯
Maximal 2 Wochen gebe ich ihr noch, dann kommt sie raus egal ob fertig oder nicht.
Aber sie riecht unfassbar lecker und ich bin sehr auf den Geschmack gespannt 🤤
Seit ein paar Tagen steht das Zelt auch auf 12/12

Likes
9
Share


Likes
31
Share


@valiotoro
Follow
Beautiful buds super sticky✂️
Delicious smell something new to me!
Cant Wait the curing to taste this beauty
Likes
7
Share

@Chubbs
Follow
What up Fam, I apologize for the late update. Been away for 2 weeks from the ladies and my son who was watching them did amazing, as I came back to an absolute forest. The plants almost doubled in size which is crazy the growth they had while I was gone. I started adding bloom nutes and did a defoliation and lollipop this week. I'd normally start my training around week 3 but over all they're happy and healthy as can be. Let's Go Happy Growing.
Likes
12
Share


@StonedandSteady
Follow
AutoBlueberry 10th w/ 5th W/ Flower breed by #DivineSeeds #DivineSeedsSquad #DivineSeedsBreedingCompany
3rd feed of #NukeHeads Nutrients #PlutoniumBloom and a look at my #Opium by #DivineSeeds at her 4th day of Dry! Can't Wait to Blaze!!! This AB is Flowering out and her Smells are Super Strong of Gasy and Candied Blueberries! I recently Trained down her branches to expose more Bud sites and Removed the Biggest fan leaves to expose the Bud site's to this Glorious #OsreeQB1000w Full Spectrum Grow Light! I've also Super Cropped, Topped um, Defoliated, Leaf tucked, and Implement the 3D's method like my Broski #TigerfishOrganics to remove the Dead, Dying and Diseased leaves!
Origin:Afghani/Thai
Type:50% Indica/ 40% Sativa/ 10% Ruderalis
Flowering:56 days
THC:22%
Harvest:400-550 g/m2
Height:110-150 cm
They were Growing under the #Growatt600w and in my #TopoLite 24×24×48 Grow Tent but I've Upgraded and Updated it to my #OsreeQB100W I'm also using #TNBNaturals #TheEnhancer Co2 Despersal Canister and using thier Ph⬆️⬇️ for my Decolinated Tap Water!
Green and Growing Up Great! She's Growing into her 5th week of Flower! She's Growing in my special blend of ProMix potting mix, a 1/2 bag of Earthworm castings and 2 light handfuls of Diatomaceous Earth mixed Up well for before transplanted! Diatomaceous Earth: Diatomaceous earth is made from the fossilized remains of tiny, aquatic organisms called diatoms. Their skeletons are made of a natural substance called silica. WHAT IS DIATOMACEOUS EARTH?
In a nutshell, DE comes from the fossilised remains of small marine organisms called diatoms. Over a 30 million year period, these hard-shelled algae collected on the bottom of bodies of water, eventually forming into a type of sedimentary rock. Fast forwarding, it wasn’t until around 1836 that a German peasant Peter Kasten discovered the ivory-coloured, powdery substance while drilling a well in northern Germany. Ever since, the usefulness of DE for multiple purposes, including industrial and horticultural applications, has been well-reported. Just sprinkle some diatomaceous earth on top of your soil and watch mother nature's secret weapon work its magic.CONDITIONS THE SOIL
When it comes to growing cannabis, everyone strives to provide the best soil to grow the best plants—but there’s always a way to make it even better. Making the soil a better medium is called soil conditioning, which is exactly what diatomaceous earth does. It works by improving the retention of moisture in your potting soil, holding a large amount of fluid and drying at a rate that’s much slower. This natural soil additive also helps to retain nutrients and allows for better oxygenation of the substrate. NATURALLY CONTROLS PESTS
DE is an all-natural, safe-to-use substance that doesn’t harm the cannabis plant with toxic chemicals. The nature of diatomaceous earth makes it useful against most types of insect infestation you might be experiencing; and unlike chemical insecticides, insects can’t develop a resistance to the effects of DE. So once they’re gone, they’re gone for good. DE is an abrasive. and when used as an insecticide, it gradually scrapes away an insect’s exoskeleton, absorbs the fluids, and dehydrates insects and other critters to eventual death. IMPROVES PLANT STABILITY
When using DE in your soil, it can be especially beneficial as it frees up nutrients so that they are made available to the plants as needed. This works via the silica content of DE being absorbed into the plant tissue, which helps improve the plant’s ability to respond and receive more nutrients as DE activates. This in turn results in greater yields and better stability under small pH fluctuations!
https://divineseeds.net/
https://instagram.com/divine.seeds?igshid=osxe2v7en33v https://divineseeds.net/
Thanks Again to All my Friends, Family's, Teams, Sponsors, Followers and Subscribers!!! Your Genetics are Merry Magnificent, Mega Marvelous and Mighty Medical! Love um!!! I really Can't stress enough how Thankful and Grateful I am of All of you and what you've Shared with Us! Means the World!!! It's definitely a Pleasure being able to Grow with these Phenomenal Grow Lights! Please Enjoy! BudBrothers4-Life! Cheers Famz!!! Much Props and Much Topz!💯🔥 #Osree #GrowStarStore #Growatt #TNBNaturals #TNBTeam #GrowYourOwn #Bliss
https://instagram.com/osree.light?utm_medium=copy_link
https://instagram.com/as420.ca?igshid=1f116alw054wp
The Grow Bags: https://www.as420
https://instagram.com/tigerfish_organics?utm_medium=copy_link
https://www.facebook.com/Tigerfishorganic/
#TigerfishOrganics YouTube Channel Link: https://youtube.com/channel/UC6OSXTda1JYaVNoCxdcYqIg

Processing
Likes
4
Share


@ganjaman24
Follow
I flipped them to flower earlier this week so I can make space for some new stuff and I think they’re doing pretty well...no buds yet will try to stay more consistent with entries. Thanks for tuning in!! Happy growing! XD

Likes
41
Share


@BullWeedDog
Follow
la verdad esperaba mucho de esta sepa pero aun me toca probarla vamos a ver que tal, esta sepa la tuve en un mismo armario con otras 3 variedades de la misma marca y solo con esta tuve digamos un retraso notable a su crecimiento según mi percepción es sensible a podas, es una planta bastante baja y solo esta de las 6 planta que tuve le salieron semillas en las flores de la parte mas baja, eran pura hoja y también crecieron de manera muy extraña ya que eran solo hojas como enrolladas y con un color a limón muy claro que era donde tenia mas semillas, pero lo de su parte superior crecieron bien. no se si fue un error de mi parte o no supe cuidar esta planta pero tendré que volver a intentarlo.

Likes
Comments
Share

@RooftopFarmer
Follow
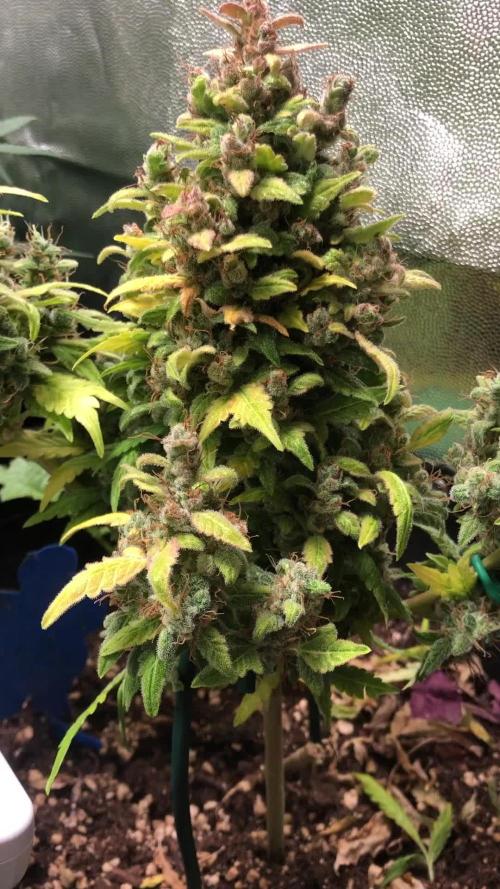
Guava Sundae – Week 4 (Fast Buds Outdoor 2026)
The weather has been fantastic again this week, so Guava Sundae is now 100% outdoors, day and night. She’s getting maximum sunlight and really seems to enjoy the full outdoor life.
As you can see in the pictures, she grew a bit crooked. I hope she straightens out soon. I used some simple sticks for support, but I’m still looking for a better long-term solution. She’s now around 7 cm tall with a beautiful vibrant green color.
I also gave her a light feeding of BioBizz Fish-Mix and BioBizz Calmag. I had deficiency issues last season, so I’m being proactive this time to keep her healthy. Any tips on how to straighten her out are very welcome!


Processing
Likes
8
Share


@JaGrowzAuto
Follow
Still having an issue with watering. They don't seem to be drinking as much as I thought... Sometimes it's 36-48 hours between waters, and yes I am watering til a little runoff dribble out.


Likes
41
Share


@Growing88
Follow
Sono felicissimo,abituato alle hps e cmh e non riuscivo ad ottenere grandi risultati, con una hps 600 watt massimo 450 grammi,con un led 730 ho fatto 1500 grammi,waooo😍😍😍

Likes
8
Share


@Ananas_Comosus
Follow
Sunday, May 29, 2022
Plant #3 is stretching away by a foot over Plant #2. Both Plants looking well but displaying different leaf behaviour (particularly of the upper growth). When well watered, in full sun, Plant # 2 has perky, praying leaves that go down somewhat at night. In the same conditions, Plant #3 has droopy leaves that get even more tucked in at night. It was only from feeling the strong turgidity of the Plant #3 leaves when under good water and comparing them to Plant #2 that I accepted that it was ok and that's just how it wears its' clothes. The red and white pistils are filling out from top to bottom on all stems on Plant #2. Even though it's not as tall as its' neighbour, the six main stems on plant #2 seem proportional to, hopefully, support nice thick colas. Plant #3 is furring out much slower and though I am happy for the height, I am concerned the stems aren't thick enough to support much weight.
Likes
9
Share


@Ieiogrow94
Follow
Eccoci di nuovo qui!!!
Super eccitato per questa nuova collab con Seedsman, team davvero al top, che mi ha dato l’opportunità di testare questa nuova genetica e di condividere i progressi con tutti voi!!!
Come sempre partiamo nei bicchieri per poi travasare.. Questa volta verrà svolto tutto sotto la Lumatek Zeus 465 ProC, mi aspetto molto da questo ciclo!!
WOOOOOOOW, odori e colori davvero incredibili... MANCA POCO!!!
Grazie a tutti per il supporto ❤️🍀🔥


Likes
327
Share


@FoTwenny
Follow
9/1 Update:
Welcome back to my garden! Thanks for following me on this 16 strain photoperiod SOG grow adventure!
If you're just joining us. We have 18 photoperiod seedlings in the tent. 16 of them will go into 12"X12" square pots in a 4x4 sea of green. I plan to top once just above the third node. I will also allow the 2 shoots from the second node to grow with the top two to form 4 main colas.
The Gorilla x Cookies sprouted 8/26! STILL nothing from Jenny Kush.
Weak-sauce!
The garden is happy and healthy! I am going to transplant this upcoming weekend into 6" x 6" square pots so they have room to stretch their legs and build a nice foundation before going into bloom. With Jenny seemingly out if the running, we have 17 seedlings and 2 of them are regular seeds. Hopefully at least one of the two will be female. I am going to say both will be little ladies! If we have an extra female she will veg a bit longer to go on the other side of the 4'x8' bloom tent. That's all I have to report today!
Thanks for stopping by my garden!
Please check out my other diaries & give me a follow!
Happy growing my friends! ☺️🌱
Peace, ☮️
Love, 💚
and Frosty Nugs! ❄️🌲
- Fo' Twenny


Likes
10
Share


@Mr_Ewell
Follow
The strain was easy to grow. The autos were topped and suppercropped. Along with lst. Amazing yeild for my first grow. Almost a pound with 300w led. Trichomes were hard to read and took forever to turn. Went for 17 weeks from sprout. Didnt flush as long as a wanted so curing is my focus rn.

Likes
21
Share


@Whitebelt
Follow
Day 49 update (Sunday 7/14/19):
Almost time to chop! I think my humidity is finally going to be manageable for the drying- the second dehumidifier helped enough it seems.
I cut out the base nutes (which for a few days were at quarter strength). I decided to stop with sugaree. No more cal/mag - I guess I should have cut that out weeks ago even in coco? So many different trains of thought. So I’ve now been flushing for a couple days using only water and canna boost and cannazyme along with mammoth p and hydroguard (ppm is at 200). I’m not PH correcting the reservoir tank and it’s up to 6.9/7.0 ph (I actually added a tiny bit of ph down before I decided to not worry about it) - I’m not sure if I like this strategy (seems to be an unsettled debate about ph correcting during final flush) I’ll switch to FloraKleen and water only (and still not ph corrected) for the last few days (in a few days or so - maybe a bit longer) THOUGHTS ANYONE??
I went to bed last night looking at pictures of bud rot and when I woke up I was convinced I had some. I actually chopped my first bud off the plants! one of my possible mold suspects (and one of the largest).
Manhandled it - dug around - (I did use gloves and I did sorta try to be careful but...) I probably lost and damaged a bazillion trichomes - but.... it’s fine! No mold/bud rot at all. Beautiful actually. Some of the little fan leaves just turned prematurely yellow awhile ago and some extra areas of red hairs that concerned me but It’s great! Super stinky. Super nice. Dense. Pretty. I’m hanging that one nice big bud in the flower tent above the lights and in the corner away from a direct fan breeze (this is not at all ideal - the main harvest will be done in darkness; with no other humid plants in the tent; with proper air flow; lower temps; and they’ll have had a full flush unlike this nice cola I chopped with its “partial”
flush only (see above) . It’ll be nice to experiment with taste before and after a flush since there seems to be so much debate about this. But I suppose my dry will differ too so not a very controlled test. This bud seems to be plenty mature and ripened - some amber trichomes - so I think this one bud chop may turn out to be a nice experiment caused by my neurosis about non existent bud rot)
Woot.