
Likes
Comments
Share


@ZombieKushAddicted
Follow
only 2 phenos have been cut so far ... 2 other girls are finishing

Likes
34
Share


@BOMbolenath
Follow
This week the weather is better. the buds are getting fat and it is developing well.
Its smell like citric mango.


Likes
68
Share


@deFharo
Follow
Bienvenidos cultivadores de marihuana clandestinos, y también, a los que tienen la fortuna de no serlo!🖐️👨🌾
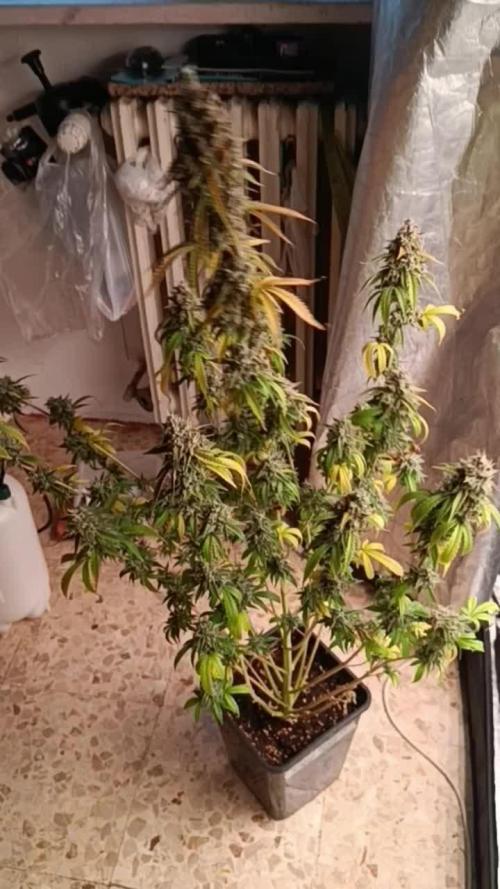
20 semanas de vida de esta sativa africana pura, diez semanas desde el cambio a horario de floración 12/12h 🌲🧡
Los cogollos crecen teñidos de oscuro y con gran densidad, la planta bebe y come en abundancia, poco a poco las hojas van cayendo definiendo mejor la forma de las múltiples colas.
Esta y las otras plantas de la temporada, aunque hermosas todavía, no ocultan el paso del tiempo, son plantas veteranas que se resisten a envejecer por la espera desesperada a ser polinizadas un día.
- Para no morir de aburrimiento, he hecho un video donde hablo sobre las tareas que hago diariamente relacionadas con el modelado de las plantas en mi carpa de cultivo (60x120x178cm) con extra de luces laterales, espero que todo el mundo entienda, con esta técnica "democrática" de movimiento de macetas, doy las mismas oportunidades a todos los lados de las plantas en todos los lados de la carpa de cultivo, consiguiendo de este modo una morfología y crecimiento más equilibrados... todo por la causa!
Hasta la próxima...
SALUDOS Y SALUD A TODOS!!
================================
Info de la cepa Malawi Gold: https://anesiaseeds.com/es/product/malawi-gold-landraces/
"Malawi Gold procede de Malawi, un país del sudeste de África, y es una de las plantas más psicoactivas del mundo." Anesia Seeds
- Genética: Landrace africana
- Sativa pura: 100%
- Tiempo de Floración - 10-13 Semanas
- Rendimiento en interior: 600/650 g/m²
- THC Alto 20%
- Sabores: Floral y Limón
================================

Likes
66
Share


@Hashy
Follow
Week 10 6th week of flower.
Light settings
12/12 on at 9.00am off 9.00pm
Light power= 75% 184w
Radiator settings
LIghts on
Turn on if temp drops below 22.5c
Turn off if temp goes above 22.5c
Lights off
Turn on if temp drops below 18.5c
Turn off if temp goes above 18.5c
Extractor settings
temperature 23c with 1c steps
Humidity 50% with 0% steps
Max speed 10
Min speed 4
VPD aim 0.8-1.2
DLI aim 30
Wednesday 29/3/23 Day 64 (Day 36 flower)
Nothing
Thursday 30/3/23 Day 65 (Day 37 flower)
Nothing
Friday 31/3/23 Day 66 (Day 38 flower)
Autofeed 5 15 minute runs
Normal pump
4 drops ph d
Feed 10L Ec=1.58 Ph=6.4
3L left
Roughly 3.3L each.
#1 Height= 49CM Dist= 44CM DLI=26
Went away and left on autopilot
Saturday 1/4/23 Day 67 (Day 39 flower)
Away
Sunday 2/4/23 Day 68 (Day 40 flower)
Away
Monday 3/4/23 Day 69 (Day 41 flower)
Away
Autofeed 4 15 minute runs
Normal pump
5 drops ph d
Water 30L Ec=0.22 Ph=6.3
Est. 24L left
Roughly 2L each.
Tuesday 4/4/23 Day 70 (Day 42 flower)
Away
I was only around for the 1st part of this weeks grow and most of that the tent was just running on autopilot.
#1 Wedding Cheesecake FF was still developing at a decent rate when I went away, hopefully she may stretch a bit more while I'm away.
Power used for week
Light
(2.22+2.22+2.21+2.22+2.22+2.22+2.31)=15.62Kw
Extractor
(0.58+0.58+0.57+0.58+0.58+0.58+0.67)=4.14Kw
Fans
(0.97+0.96+0.98+0.98+0.97+0.99+1.01)=6.86Kw
Dehumidifier
(++++++)=Kw
Radiator
(1.41+0.67+0.92+3.24+2.08+2.71+2.69)=13.72Kw
Water pump.
(0+0+0.01+0+0+0.01+0)=0.02Kw
Total for the week=40.36Kw
Back in a week.
Thanks for stopping by.


Likes
2
Share


@Comfrey
Follow
Die Blüten werden fetter und riechen sehr lecker. Bis auf Wasser gießen und ein bisschen Ackerschachtelhalm Tee füttern musste ich nicht viel machen.


Likes
15
Share


@Kayotic
Follow
NOT the best week....
-Day 47 since sprouting
- Day 12, week 2 of flower ? ??
Possibly?? Honestly, no idea
Inside
- Last time watered was Sunday
- Tiger Bloom
- Grew tall QUICK , got too close to the light- Broke off the top few inches of the main cola while raising the light and taking fan and filter down on Tuesday
- Very high humidity in tent, started too many at once, didn't expect them to be so big! Got it under control , but too crowded. Now sharing with Zkittles Auto, I believe.
Outside
- Watered Tuesday ( didn't ph water)
- Weather has been very inconsistent- tornado, high winds, rainy, humid, cool, hot
- Seems happy, been having to move her around a lot, hoping today is the LAST time.
They both smell amazing! Not going to lie. I will be disappointed if I mess them both up. One of my favorite strains to use and grow. Next time will be topping and keeping inside, lesson learned. No bugs!
-

Likes
35
Share


@Arcadium
Follow
Well, sadly had to harvest a week early due to some bud rot. Gave everything a good wash with baking soda, lemon juice and double rinsed. Hang dried for 10 days, paper bag to sweat for 2 days, then straight to grove bags. Full weight dried, just over 1lb. I fimmed so much in anticipation of rot, so while the buds were smaller there was a LOT. Test smoke was amazing, shocked how smooth it was with zero cure, packed a punch to! I expect the humidity to rise a bit in the grove bags over a few days, hoping 60% range. I mostly make FECO for gummies with everclear extraction, so excuse the less then tight trim, trichomes are trichomes! Ended up snipping the second haul 10 days after first, still going strong, but very wet, dont expect it to last much longer.
Never going back to synthetic nutes, sticking with organic living soil from this point on! Got Gorilla Cookies Fast Flower on order for next year, plan on doing a 16 cola manifold with some LST.
Will cut the trunk and let the root mass decay over winter, will mulch leaves and compost over it all until next years plant is ready to go in around April. Another year down! Happy growing everyone!

Likes
6
Share


@pzwags420
Follow
On day 3 -4 of 5 seeds have germinated!
On day 4 all 4 seedlings were fed 500 ppm veg nutes.
On day 5 seedlings were transplanted into 4" nursery pots with myco. I watered them in with 600 ppm of feed. Ppfd 450-500.

Likes
75
Share


@DogDoctorOfficial
Follow
Hello, everyone !!!
I'm thrilled to share a comprehensive germination report for my Panty Punch Auto journey, courtesy of the amazing Seedstockers, the genetic architects behind this green marvel. Massive shout-out and heartfelt thanks to Seedstockers for crafting the seeds that initiated this incredible botanical voyage.
The germination process was nothing short of magic. In a mere 24 hours of soaking, my Panty Punch Auto seed sprang to life, showing a vigorous and eager tail. Seedstockers, your genetics are pure wizardry!
A special acknowledgment to my main sponsor and the nutritional powerhouse behind my plant's success – Aptus Holland. Their unwavering support and top-notch products have been the secret sauce behind the health and vitality of my green companion.
As I navigate this green adventure, I'm documenting every milestone on Grow Diaries, my trusted platform for sharing the highs and lows of cultivation. Thanks to Grow Diaries for providing a space to connect with fellow cultivators and for the invaluable insights into optimizing plant growth.
To the cherished community and all my followers, your encouragement fuels this journey. Each like, comment, and share adds to the collective green love, and I'm immensely grateful for your ongoing support. 🙏💚
Here's to the thriving Panty Punch Auto, to Seedstockers, Aptus Holland, Grow Diaries, and to all of you who make this green community flourish. Let's continue this botanical adventure together!
Genetics - Panty Punch Auto - https://seedstockers.com/
Plant nutrition - Aptus Holland - https://aptus-holland.com
LED Photons - Lumatek - https://lumatek-lighting.com
Controls - Trol Master - https://www.trolmaster.eu/
Watering - myself
Love and attention - Me, myself and i
As always thank you all for stopping by, for the love and for it all , this journey of mine wold just not be the same without you guys, the love and support is very much appreciated and i fell honored and blessed with you all in my life, With true love comes happiness. Always believe in your self and always do things expecting nothing and with an open heart , be a giver and the universe will give back to you in ways you could not even imagine so
More info, the ocasional give-away and exclusive updates from all my adventures can be found - links in the profile description
Friendly reminder all you see here is pure research and for educational purposes only
Growers Love To you All 💚 💚 💚

Likes
28
Share


@GanjaGecko
Follow
Der erste Outdoor Run wird mit dem Frühling eingeläutet💪🏻
Hoffentlich spielt das Wetter mit und lässt die Ladys gut wachsen.
3 von 4 Samen sind gekeimt. Der zweite StrawberryBanana der nicht gekeimt ist, wurde jetzt nochmal in ein Glas mit Wasser. Wenn der Samen nach 24h immernoch nicht keimt, kommt er weg. Aber diese Chance soll er noch bekommen💪🏻🍀.
Die GorillaAuto ist auch noch nicht ganz übern Berg, ich bin aber guter Dinge.
Als Ersatz für die StrawberryBanana wurde eine LemonCherryCookies nachgelegt. Drücken wir ihr die Daumen.
Die wird dann ein eigene Story
bekommen.
Die Ladys werden die ersten ca 2 Wochen in relativ kontrollierter Umgebung angezogen. Wenn es in die Endtöpfe geht, geht es für die Ladys nach draußen. Erst etwas im Sonne/Schatten Mix und wenn sie sich dann an die Sonne gewöhnt haben, sollen sie möglichst viel Sonne bekommen und werden minimal verstellt.
Zwischen 3 und 4 Tagen nach dem Setzen der Samen haben die Ladys das Licht der Welt erblickt.
Möge die erste Woche beginnen🍀💪🏻
Likes
7
Share

@BeautyBudsVio
Follow
Opium grows and grows and just didn’t stop 😂
144cm now lol
He should stop with that and bring the energy into the buds

Likes
19
Share


@Deepgrow
Follow
Primera semana de floracion, 7 dias, ciclo de luz 1212 y ya veo los primeros pelitos.
Empiezo a agregar pastillas easy to bloom, de Royal Queen a 2/3 de la dosis indicada por el fabricante, al bajar el PH con las pastillas agregro PH + y Ata Clean para mantener limpio el autopot, aunque se lo hecho en el riego a todas las plantas y les va bien.
Las he ido doblando las colas mas largas para equilibrarlas en altura, aunque no hizo mucha falta, quite un par de hojas muy grandes y le aplique el ultimo tratamiento de prevencion con jabon fosforico e insecticida natural de aceite de Neem, por cierto, ha venido muy bien, 0 bichos.
Quiza le aplique en un par de semanas cola de caballo para prevenir hongos.
Likes
4
Share


@billycardine0420king
Follow
Did some defoliation now that they are solid into flower, to keep air flow to cut down on chances of mold and to expose lower bud sites to sunlight. I also fertilized again with about 2 buckets of 14 total gallons of water with above nutes minus flora gro, at 1300 ppms aprox.


Likes
162
Share


@Lukush
Follow
1 day of week 4 in flower
She is huge and looking really good..
Cant wait to smoke this wunder.. and se hear beautifol buds coming out.
The Frost is coming out As you can se hope yall enjoy have a good one 😎
Likes
59
Share


@GrimbolTheDruid
Follow
So, sad day friends. I got spider mites and had to throw all my plants out. This is what I think happened:
About 2-3 weeks ago I noticed some freckling on the lower leaves. I looked at it and thought it might be a cal/mag issue so I added cal/mag that week and went about my business. I saw it about a week later and it wasn''t getting any better so I added more cal/mag. This continued for about 2-3 weeks until I finally took off a leaf and examined it under my microscope. I saw little bugs crawling everywhere and my stomach just dropped. My fiance did some quick research while I was panic ripping leaves off (see pictures) and she correctly diagnosed it as spider mites.
I debated with myself and my close friend and ultimately I decided to throw all the plants in my tent away. I know that there are a lot of people who will say that there are things I could have done to make it to harvest but what it came down to is the people I take care of and personal pride. I consider myself a caregiver and I give away product for free that I am not going to use to my family and close friends. I thought to myself "Would you smoke this?" and when my answer was "ehhh, I don''t know", I thought about how it would feel giving it away and immediately made the decision to destroy them. I take an immense amount of pride in my product and this hobby and if I am not going to stand behind it I would rather just start over. I grow from my heart (shout out to the Grow From Your Heart Podcast!) to help people and make sure my family is not getting unsafe product from sketchy people. To spray pesticides in flower that may hurt people and have little bug carcasses in there just goes against that in every way and is just wrong in my opinion if you are giving it away to others. If you are the only one smoking it then it is one thing to take that risk but not with your patients. I want my medicine to help people, not create or exacerbate health issues.
It is also important to note that the mites had moved from my flower tent into my veg space and took over my auto berry as well. Damn things are crafty and fast.
So that is why I made the decision to destroy them all after 3 months of res changes, pruning, and manifolding on a slow vegging strain. Feel free to chime in with your opinion but I do not and will not regret my decision. I threw out my new clones, mother plant, and auto berry I had on my veg side as well. Shout out to all the other growers out there that do the right thing by their patients. Caregivers > Cash croppers.
For anyone curious, I removed everything from my tent and scrubbed it all with a 20% bleach/water solution. All equipment has been wiped down and stored in the garage away from any organic materials. I will give them until tomorrow (2 days) to air out and dry and then I will wipe it down again with bleach and wait another 2 days. Hopefully that will make sure everything is dead and will not come back next grow. That next grow should start in about a week.
It sucks but sometimes it happens and you gotta be ready for it. Lesson learned. Never bring outdoor plants into your indoor garden even if it is after just a day or two. A bunch of people on here and Reddit warned me and I did not listen. Now I have learned the hard way and it feels like when your parents "told you so" haha.
Thanks to everyone who stopped by along the way. Stay tuned for a new grow coming soon. It is going to be some cool new limited edition Mephisto Illuminautos. I am pretty excited.
Good luck out there and always grow from your heart folks.
-Grim
