
Likes
Comments
Share


Likes
9
Share


@SubliminalSociety
Follow
I’m super excited to grow Purple Haze. It’s been on my wishlist a long time.

Likes
5
Share


@JanPabloDrugi
Follow
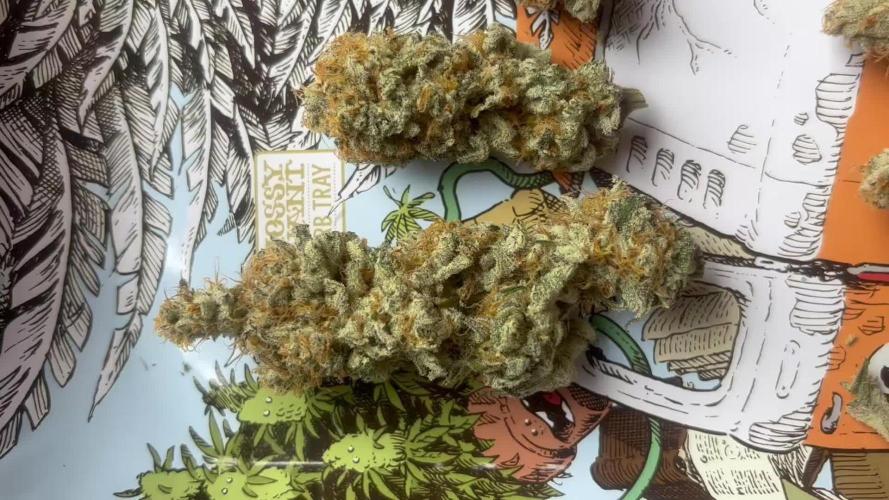
Zebrałem 98g sprawdzane po curring 4tyg. Smak mocno owocowy ale na końcu jest dość ciężki. Dobrze klepliwa indica. Uwielbiam. Dzięki Barneys Farm za świetną pestkę. Jest to. Moja pierwsza uprawa w życiu. Pozdrawiam Essa

Likes
28
Share


@TheHighentist
Follow
Welcome to week 7! Maybe the last week before harvest, i will keep an eye out for the trichomes in the end of the week
👽👉 21/11 Water day*
They got the same dose as last week, and flush might come soon.
👽👉 22/11 Lower humidity 40-45
👽👉 23/11 I got a cheap Scrog net to support the heavy tops and correct the canopy spread.
👽👉 24/11 Water day* Start of flush
Moved the light a little bit closer
👽👉 25/11 The Frost, The Smell and The Trichomes are telling me, we are getting close to harvest
👽👉 26/11 Changed the humidity to be extra low the last days of their cycle.
👽👉 27/11 Water day* Flushing
Likes
13
Share


@HeartStrong_Garden
Follow
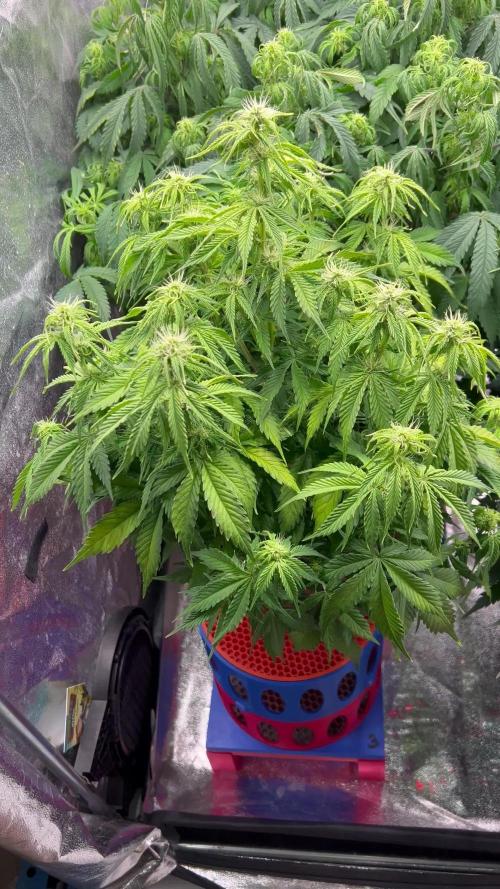
She is so huge. I had to top her after the photos because i can't raise my light anymore. Hopefully it will still help with the lower buds since she is still just starting flowering


Likes
94
Share


@Master_weeda
Follow
Last straight before flushing this run was very pleasant and relatively easy
I feasted on this session
On these different tests I learned a lot about cars
Among other things that the LST is essential and that the different apical or other sizes are to be avoided because their predefined life cycles do not allow them and this generates a loss in performance
To return to my five damsels
The northen light auto at @RQS was the fastest the first amber trichomes appeared at day 56 I did not expect taken from court I start rinsing
The bubblegum from 00seeds still has not bloomed I plunged into the dark 20h ....
The blueberry auto # 1 of pevseeds is simply gorgeous rugged and will surely give me a nice harvest it has suffered pinch of Apex and LST
The gorilla glue from @fast_buds is not left smaller than the bonsai style but very well trimmed she suffered LST Apex pinch and size of the main apex ...
Et en français
Dernière ligne droite avant le rinçage ce run à étais très plaisant et relativement facile
Je me suis régalé sur cette session
Sur ces différents test j'ai beaucoup appris sur les autos
Entre autre que le LST est primordial et que les différentes tailles apicale ou autre sont à proscrire car leur cycles de vie prédéfinie ne leur permettent pas et cela génère une perte au niveau du rendement
Pour revenir à mes 5 demoiselles
La northen light auto de chez @RQS à étais la plus rapide les premiers trichomes ambrés sont apparus au jour 56 je ne m'y attendais pas pris de cour je commence son rinçage
La bubblegum de chez 00seeds n'a toujours pas fleuri je l'ai plongé dans le noir 20h ....
La blueberry auto#1 de pevseeds est tout simplement magnifique robuste et va surrement m'offrir une belle récolte elle a subis pincage d'Apex et LST
La gorilla glue de chez @fast_buds est pas en reste plus petite du style bonsaï mais très bien garnie elle a subis LST pincage d'Apex et taille de l'apex principal
La blueberry auto#2 de @pevseeds
Est pas mal mais on voit nettement que le main lining subis la stréssée et par l'occasion perdre de sons rendement final je souligne la robustesse de cette variété
Merci à tous d'être passé pas ici
Que la force soit avec vous !


Likes
6
Share


@Farmerbry71
Follow
Day 21 and the flowering tent went kaboom big buds spliff strawberry are taking off .still no smell at least I haven't smelled anything but the carbon is running full blast heavy humidity here in Canada this week lots of rain

Likes
17
Share


Likes
10
Share


@iLoveGoodWeed
Follow
Um suprise how fat does this buds getting. Some of the buds are start getting some frost. Will be done great CBD/THC oil.
Likes
12
Share


@Growing_Skills
Follow
Chinazes) The nuts have all sprouted, Easy to grow, 70 days have passed from the beginning of the first week to harvest, Incredible, sweet, delicious smell, once you smell this aroma, you can enjoy this smell for hours)) I recommend it to everyone!!)) I will put this variety in the top.


Likes
10
Share


@Cannabot
Follow
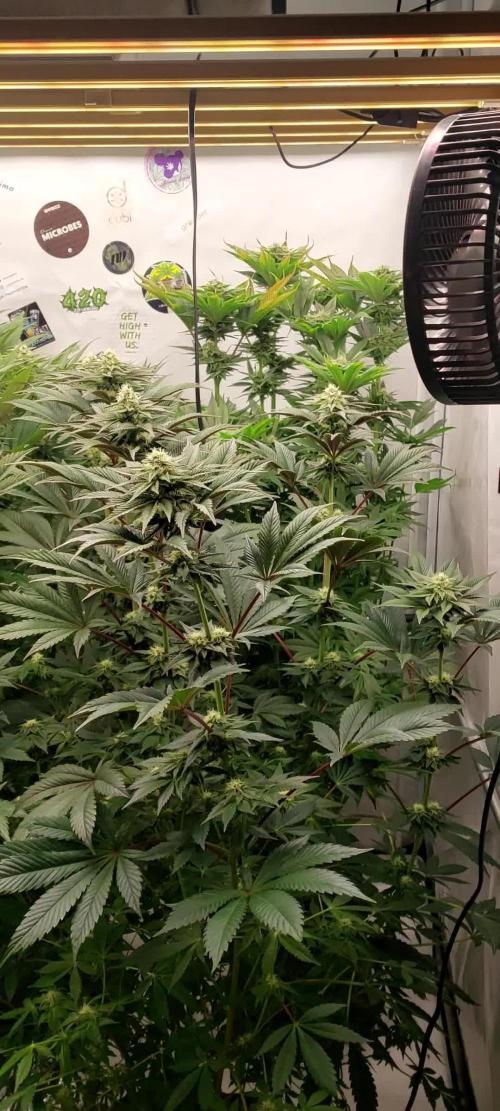
1 week flowering,side branching seems to be minimal on this strain,hope I'm wrong.Very uniform in growth compared to each other.Signs of good Gene's.Will be feeding a fully saturated to run off in the next few days
Likes
27
Share


@Jens_420
Follow
Jetzt 10 Wochen alt, die Zeit vergeht echt krass.
Blüten entwickeln sich schön, vor allem der Hauptbud. Finde es sehr schön, das die Blüten teilweise so einen Lila Stich bekommen, finde ich sehr sehr schön, liegt aber wahrscheinlich einen niedrigen Temperaturen teilweise schon so 10°.
Die Terpene entwickeln sich auch sehr schön, man kann wirklich so eine beerige Note wahrnehmen, was natürlich von der Blueberry kommt.
Mal sehen wie sie sich hält bis nächste Woche. Mir wurde empfohlen, ich solle sie mal etwas lollipopen, bin mir da aber etwas unsicher, ob ich das mache aber ihr könnt mir gerne mal eure Meinung sagen.
Also bis dann, ich wünsche allen die das lesen einen erfolgreichen Grow.
Likes
5
Share

@GrowWithFlow
Follow
So far so good 👍 in front permanent Marker x Tropicana Cookies, back left - Mental Rainbow F1 Fast Flowering, back right - Hindu Z Valley.
Permanent Marker x Tropicana Cookies starts to stacking up and she starts to purpz.
Mental Rainbow is a absolutely beast 💪 , for end of flower week 5 she have huge colas . She starts to purple to . The craziest thing on her is the smell . Wow she smells pure like mango . And yes she is super super fast . Need her again .
The Hindu Z Valley is stacking up to but she have a bit problems. But I the same problems with this pheno before. And I don't know how to handle her . Shit happens....
All in all I'm happy and let's see how they will perform the last week's.
Big Bigger Aptus @aptusholland 🌱💚🤝
Likes
200
Share


@Ferenc
Follow
Day 65, 14th of November 2020:
Amazing week....
RQS Wedding Gelato does not strech a lot and pistils coming out nicely....
Original Sensible Seeds has amazing gentics they are so strechy except Black Ghost OG, rest of them crazyyyyyyy..... I also broke two of the sides from Gelato Original Sensible Seeds but fixed with tape and now all good lol 🤣🤣🤣
Pre flowers out and I really hope they stop growing lol.
I also noticed that the Original Sensible Seeds strains have nice purple colours of the fan leave's stem.
All the same fertilization happens every 2nd day with the mix above and ratio.
One more thing:
I set the lamp 15 minutes shorter to switch off earlier so they receive 11:45 of darkness. I would like to imitate the nature when longer nights come with time till the 4th week (when they will receive 13 hours darkness a day 15 minutes minus 4 times = 1hour) so every week 15 min longer darkness for 4 weeks and then back to 12/12 to have bigger buds from the 4th week....

Likes
8
Share


@Appoldro420
Follow
Today, I spent some time tying down branches under the net again. It’s still a tricky task as the branches are quite brittle and break easily. Fortunately, the plants recover quickly, and so far, I’ve mainly noticed new growth sprouting from where the branches broke.
Watering Experiment: Too Much or Just Right?
Two days ago, I decided to give each plant an additional 2 liters of water to test the effects of what felt like overwatering. The results were interesting:
High Humidity: The relative humidity spiked to 74%, which I consider a minor downside.
Lower Temperature: Dropped to 29°C.
Explosive Growth: The plants responded with vigorous growth!
Given the humidity increase, I’ve decided to water the plants heavily only once a week. This approach should give them time to rest and prevent the growth of more mushrooms in the soil—yes, I’ve spotted a few popping up from the pot’s surface.
Monitoring pH and Nutrient Reservoir
I’ve also noticed that the pH has crept up to 6.2, indicating that the nutrient water hardness is decreasing. This suggests it might be time for a full reservoir refresh. Tonight, I plan to inspect the reservoir and clean it out. Thankfully, my hydro pump makes draining it a quick and easy process.
Observations & Next Steps
Continue training and monitoring branch recovery.
Stick to the adjusted watering schedule.
Refresh the nutrient reservoir and recalibrate the pH if needed.
The grow is progressing nicely, and the plants seem happy despite some of the challenges. Let’s keep it going! 🌱
Cheers
30/11: Added some pictures, not to much to say because I didn't look at them the last 2 days and they just went crazy..
01/01/25:
Happy New year!!
Leaving them alone is not an option... If they keep growing like this, I'll take it! This weekend, I'll do some heavy pruning. For now, I’ve snapped a few stems and tied some others to see which method gives better results. I’ve done about half so far, but I need to head to bed because of work. Tomorrow evening, I’ll tackle the other half. Also, I’ll look for some more subtle zip ties.
Likes
93
Share


@Roberts
Follow
Aito Opium looks to have finished stretching. She looks to be going into bulking now. She is starting to form some frost already. She has been growing great so far. Everything is looking good. Nothing else to report at the moment. Thank you Medic Grow, and Divine Seeds. 🤜🏻🤛🏻🌱
Thank you grow diaries community for the 👇likes👇, follows, comments, and subscriptions on my YouTube channel👇.
❄️🌱🍻 Happy Growing 🌱🌱🌱
https://youtube.com/channel/UCAhN7yRzWLpcaRHhMIQ7X4g

Likes
74
Share


@Mr_Maes
Follow
We are officially in full bloom. The have been enjoying 6-7 hours of sun light per day for about 4 days now, then brought back in under the cobs. The girls are all exploding with growth and stacking what I expect to be huge buds.


Likes
5
Share

@Skipi007
Follow
This week the plants started to show some stress, each one something different, today I rinsed them thoroughly and watered them again, hopefully they will recover and I caught it in time. But they are still growing and blooming. They need to be pruned again But I can't now until they look better.