


Likes
8
Share


@Fa5Venom
Follow
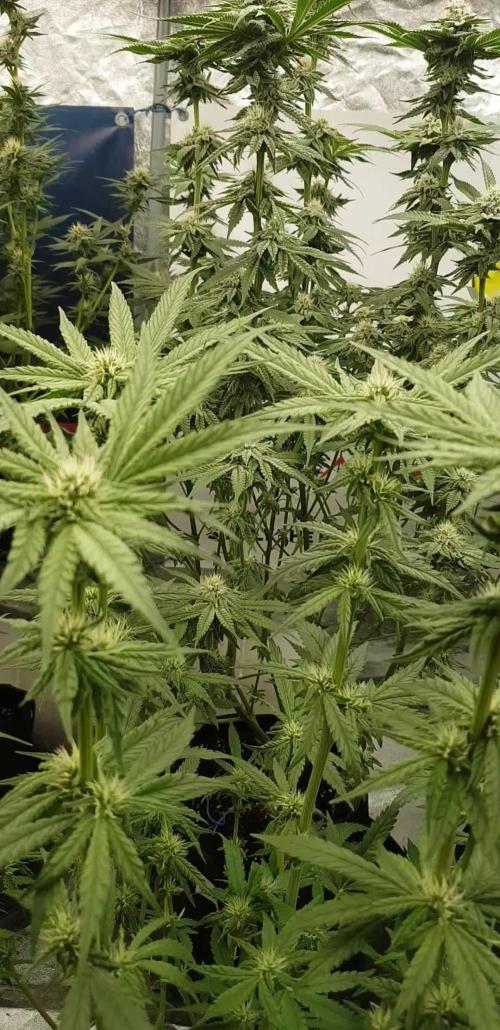
Good growth on them little bit of nutrients burn on the northern lights. Won’t get much out that small one but I just couldn’t let it go

Likes
23
Share


@RazzleMatazzle
Follow
This week, I started using Plagron Green Sensation. Independently of that, the plant began to show slight deficiency symptoms in its foliage. The leaves became increasingly pale, and the tips started to discolor. As far as I understand, one of the components of Green Sensation is potassium. Since then, the plants have been doing significantly better. Growth has also increased considerably. However, the pre-flowering phase is still progressing slowly.Runtz has been an amazing genetic so far. The leaves look absolutely fantastic—healthy and large.Currently, the plant has reached a height of 75 cm, which is quite a lot by my standards, despite the high PPFD values of 600-700 µmol.

Likes
41
Share


@Fatnastyz
Follow
Week 2 of flower
12-5
She is growing nicely. She got a good dose of microbes yesterday.
2k ml she got cal/mag 5ml per gal, Drops 1ml, dusting of yucca, Kelp 1/16th tsp, EM 1 1 ounce per gallon and 1/2 tsp recharge.
Top dress is soon. She will only get water x2 waterings.
12-7
2.5 liters plain water ph 6.2 removed any leaf pointing inwards. Fully watered love it. Doing great.
Hope not to touch a leaf for a week. Fat chance, but heres for hoping 🤞
12-10
Removed some leafs
12-11
Looks like water tomorrow.

Likes
7
Share

@GERGrowDesigns
Follow
Welcome to Flower Week 3 of Fast Buds Papaya Sherbet
I'm excited to share my grow journey with you from my
FastBuds Project . It's going to be an incredible ride, full of learning, growing, and connecting with fellow growers from all around the world!
For this Project , I’ve chosen the Feminized Photo strain Papaya Sherbet :
Here’s what I’m working with:
• 🌱 Tent: 120x60x80
• 🧑🌾 Breeder Company: Fast buds
• 💧 Humidity Range: 50
• ⏳ Flowering Time: 58 Days
• Strain Info: 30%THC
• 🌡️ Temperature: 26
• 🍵 Pot Size: 16l
• Nutrient Brand: Narcos
• ⚡ Lights : 600W x 2
A huge thank you to Fast Buds for allowing me to try my Best with this amazing collection from Automatic and Photo Strains they managed to Sponsore . Big thanks for supporting the grower community worldwide! Your genetics and passion speak for themselves!
I would truly appreciate every bit of feedback, help, questions, or discussions – and of course, your likes and interactions mean the world to me as I try to stand out in this exciting competition!
Let’s grow together – and don’t forget to stop by again to see the latest updates!
Happy growing!
Stay lifted and stay curious!
Peace & Buds!

Likes
58
Share


@brownbae420
Follow
Day 95
— Currently waiting for Milk to turn Amber
— Vibe: 💪
Day 97
— Trying not to view these endlessly
— I'm ready to chop the plan on the right, She's not ready to be chopped yet...
— Vibe: 😴💤
Weekly Avg Readings
— Lights 12/12 - Level 10
— Temp: 70 (ideal) | 72.8 (avg)
— Humidity: 60% | 62.0%
— VPD: 1.2 | 1.02 kPa
"They hear the hunger in my voice, shit I went broke twice. 4,000 lights at a real low price." —Berner415


Likes
17
Share


@CanadianFillmore
Follow
Harvest time for Mandarin dreams round 2. Both phenos did amazing during round 2 under the Mars-Hydro TSW2000 light. The buds are incredible and the way these ladies grew was very impressive. Hopefully they are heavy buds, will know in 7-10 days if they have the dry weight to back up their awesome appearance.
April 16 update - MD2 - 70 grams, MD1 - 73 grams. Again results are close to round 1. The TSW2000 light delivers!


Likes
15
Share


@Ronin716
Follow
So at the start of week 3 I began to LST CM#3 to just experiment basically and topped CM#2 I believe. Again, just to experiment. This is my first grow and I was stunned with the reactions to both! The new growth after topping was about 1/4” in about 12hrs.. Crazy to me and the lst is proving to expose these bud sites and encourage amazing growth QUICK!! I’ll continue to train daily. One of the videos show the topped CM just yesterday. In 4 days, it’s grown soo much! Also, a video mentions the gender reveal but since then, all 4 have officially revealed themselves as female at the 22 day mark.

Likes
6
Share


@IamCy
Follow
She's starting to fatten up nicely! Terps still off the meter,and the roots are ridiculous. Definitely one of the best plants I've ever grown.
Likes
9
Share


@VIPgrower
Follow
Week 8 four days in flushed the girls big time got tds too 255 for final 7 to 10 days the look great except 1st flush water I used clear and two plants some got rusty spots on leaves and yellow and die but did not affair bad i learned a lot about a proper flush from my neighbors thank god I took his advice on flushing took tons of ph water but should have flushed all unwanted nutrients and salts away and drink nothing but water for its last 7 two 10 days tricombes are almost all cloudy a few Amber and a few not quite cloudy I watch daily now on those I use to wait for hairs to turn 75 percent but that’s not good way to do it invest in microscope or jewellers loop

Likes
66
Share


@DevilsBud
Follow
New week for the Chocobang
🎶🎶Look at chocolate salted buds stick in your bong and smoke it 🎶🎶
I think the Chocobang needs couple days more then the rest but it's going great there at a size that adding extra nutrients is waste and only making flushing take longer so starting to lower all nutrients and preparing for last week exited times
Happy growings Growmies 🤜🏻 🤛🏻
visit www.marshydro.eu
for your best gear and use the PROMO CODE: DEVILSBUD
Some info about the Marshydro FC-4800
Superb Quality LED Chips: The whole light is composed of 1206 pcs Samsung lm301b and Osram 660nm chips. More than two times as many LEDs are used to drive the grow lights at low currents and to avoid overdrive. Quality is guaranteed and efficiency is up to 2.8 μmol/j.
Even PAR Distribution and High PPFD Output: The multi-light bar design and the densely distributed light chips enable the LED grow lights to achieve the optimum PPFD required for plant growth over the entire effective coverage area.
Specifically Designed Spectrum: To ensure even plant growth, blue and red light are enhanced on the basis of a full spectrum combination. Not only does this accelerate plant growth, but it also improves the yield and quality of the plants at the same time.
Dimming Daisy Chain Function: The dimming function saves on electricity costs and enables brightness from 10% to 100% for the different stages of plant growth. A single master light can connect up to 30 lights in a daisy-chain system.
Business LED Grow Light: The light's wavy heat sink dissipates heat quickly and the IP65 waterproof allows the light to operate in humid conditions. 180° collapsible feature for easier installation. All these features provide favorable assistance for commercial cultivation.
And some tent info
●【Lock All Light Insid】MARS HYDRO Grow Tent Interior is made of diamond mylar. Non-toxic to the environment, no harm to plants. High-quality 1680D canvas being double stitched, (ALL OTHERS BRAND grow tent is 601D canvas) which is tear-proof for perfect light locking, No light leaks or rips at all.
●【Durability Grow Tent】Stable Metal corner adapters and poles are the trustful supporters of the tent. No rusting nor paint-falling. Quick easy tool-free installation. Carries strong heavy-duty SBS zippers, double layer lining to create a light-proof seal.
●【Easy Observation of your Plants】Special peeks window made by double layers of cloths. Observe the growing conditions of your plants without opening the tent and avoid disturbing plants. The peek window also serves to dissipate heat and ventilate air.
●【Removable Tray Keep Clean】The package includes a removable waterproof floor tray to hold soil and fallen leaves. The tray can be taken out easily to wash. Removable and water-proof makes cleaning easy.
●【Good Ventilation&Fast Assembly】 Circular double-sleeved vent holes with adjustable nylon strap for air circulation by exhaust fan, ducting, carbon filter, or reflector. Better allows proper light, heat, and airflow. Quick tool-free installation. Reinforced by a sturdy metal frame to ensure security and stability, supports up to 140lb. Perfectly safeguard your plants to thrive even in winter

Likes
23
Share


@Firepharmer
Follow
In to week 7 now starting to flush!!
Very impressed with this run 💚🌱💚🌱
I’m now running the Futur vert 30 W uv led for 5 hours of the 12/12 with the Futur vert flora max series

Processing
Likes
5
Share


@Ensign420
Follow
Week 02 Introduction
This week has been a bit of a struggle. Had my first experience dealing with slime and brown algae. But I think adding enzymes and increasing the beneficial bacteria helped to fix the issue. Also experienced nutrient burn for the first time. My nutrient solution strength got as high as 671 PPMs. So backed it down to about 430 PPMs during the end-of-week reservoir change. Also cut Hydroguard (expired?), CaliMagic, and Superthrive from this grow. Now she's still stunted, but is starting to recover. Hopefully...
[START OF WEEK 02]
Day 01 - Monday - 08/10/20 - Total Days: 008
-----------------------------------
- [0830]: Still looks a bit yellow. But getting larger!
--- Solution strength was at 248 PPMs.
--- Just topped off with a bit of distilled water
--- PH went up to 6.1 so PH'd down to 5.8
--- Ran the top feed for a bit to wet the hydroton.
- [2130]: She's looking even more yellow now.
--- Even the new leaves are really yellow.
--- Decided to add more base nutes.
--- Added 4ml of Sensi A
--- Added 4ml of Sensi B
--- Now at about
--- Solution Strength went up to 304 PPM.
--- PH was at 6,
--- Also raised the water level a bit more.
--- I really hope it's a nutrient deficiency and not an over-watering issue.
--- Please live!
Day 02 - Tuesday - 08/11/20 - Total Days: 009
-----------------------------------
- [0830]: Looking less droopy. But still yellow.
--- Decided to do a reservoir change.
--- 4.5gal of distilled water
--- 8ml of Sensi Grow A
--- 8ml of Sensi Grow B
--- 8ml of Voodoo Juice
--- 4ml of B-52
--- 4ml of CaliMagic
--- 4ml of Hydroguard
--- 4 drops of Superthrive
--- PH'd down to 5.8
--- Solution strength: 302 PPM
--- Since I didn't want to risk over-watering the rockwool, I did not to do a top feed, may do one tonight after the sleep cycle (lights are still set to go off at 10am and back on at 4pm).
--- As I was doing a reservoir change, I noticed that the tubes and bucket were a bit slimy. Didn't really stink or anything. Is this normal? Maybe due to the Hydroguard and Voodoo Juice?
--- I hope she gets better soon!
- [2215]: Getting larger! But still yellow.
--- Also can see a root growing through the net pot! Tiny little thing but it's there! Will have to start dropping water once more appear.
--- After looking over a few DWC diaries using AN nutes, seems like my solution strength is still too low. Most around this stage average around 500 PPMs with about 4ml per gallon.
--- Top fed for a minute to wet the top of the hydroton.
--- Solution strength went down to 263 PPM.
--- Added 8ml more of Sensi A
--- Added 8ml more of Sensi B
--- Now base nutes are at 16ml for 4.5 gal of water.
--- PPMs went up to 411.
--- Still lower than 500 PPMs, but that's okay.
--- PH was at 6. Not sure if I should adjust PH using AN nutes. So going to not ajdust unless PH goes above 6.1.
Day 03 - Wednesday - 08/12/20 - Total Days: 010
-----------------------------------
- [0830]: Looks like more root growth!
--- She still looks yellow. But leaves are perky.
--- PH was at 6.2 so lowered down to 5.8.
--- Solution strength was at 394 PPMs
--- Since roots are still growing, I decide to lower the water level a bit. Now water level is a bit below the net pot.
- [2200]: Root is getting longer!
--- Slime is returning. Not sure why.
--- Solution strength: 357 PPMs
--- PH: 6.1
--- Decided to add an enzyme along with more beneficial bacteria to hopefully cure the slime.
--- Added 16ml of Sensizym
--- Added 5ml of Hydroguard
--- Added 8ml of Voodoo Juice
--- New solution strength: 430 PPMs
--- New PH: 6.1
--- Top fed for a minute.
--- This slimy residue is really freaking me out! I hope the added enzymes will help eliminate the slime.
--- Going to do a full reservoir sterilization/nutrient change over the weekend. Please survive until then girl!
Day 04 - Thursday - 08/13/20 - Total Days: 011
-----------------------------------
- [0930]: I think the enzymes worked! There is little to no slime now!
--- Although I think the root was also dissolved in the process. It's now just a little stub sticking just below the net pot. The enzyme is also suppose to dissolved dead roots too but guess that root was too weak? Not sure what happened there. But I think the slime is cured!
--- Solution strength went down to 395 PPMs. Decided to add more base nutrients.
--- Added 8ml of Sensi A
--- Added 8ml of Sensi B
--- Added 4ml of B-52
--- Solution strength went up to 598 PPMs.
--- PH was at 6.1
--- As long as the PH is between 5.5 and 6.3, I'm not going to use PH Up or Down. But still will monitor PH levels.
- [1715]: Checked up on her after her nap and shes looking alive but stunted. But no slime!
--- Decided to add some sugars to help maintain the enzymes and beneficial bacteria.
--- Solution strength was at 587 PPMs.
--- PH was at 6.2
--- Added 8ml of Bud Candy
--- Solution strength went up to 671 PPMs.
--- PH also went up to 6.3
--- Lowered water level a bit to hopefully promote more root growth.
--- Top fed for a minute.
--- She is getting bigger, but still looks yellow.
Day 05 - Friday - 08/14/20 - Total Days: 012
-----------------------------------
- [0915]: Leaves look a little burnt on the tips. Still no slime.
--- Going to back off on the PPMs to hopefully fix the nutrient toxicity.
--- Solution strength was at 632 PPMs
--- PH was at 6.3
--- Added/Removed water until PPMs were at 536.
--- PH was still at 6.3
--- Raised water up a bit, then top fed for a minute.
- [2200]: Looking better. Still yellow though.
--- Solution strength: 514 PPMs
--- PH: 6.5
--- Added PH down.
--- New solution strength: 518 PPMs
--- New PH: 5.2
--- PH was kind of high. So decided to PH down. Had to use quite a bit to bring it down. But eventually got it to drop down to 5.3. A little low, but so far, the PH has always gone up so wanted to start it really low.
--- Ran the top feed for a minute to re-saturate the top of the hydroton.
Day 06 - Saturday - 08/15/20 - Total Days: 013
-----------------------------------
- [0830]: She looks stunted. leaves are still yellow.
--- Solution strength: 514 PPMs
--- PH: 5.6
--- Top fed for a minute.
--- Not sure what to do at this point. Going to do another reservoir change soon. Hoping she lives until then.
- [2145]: Looking pretty much the same.
--- A bit of slime has returned. Since I've been diluting the nutrient solution, the enzyme ratio has dropped. So I guess this is expected.
--- Also noticed that slime build up was on the air-stones. Never really checked the stones so not sure how long that has been there. Looks brown too, which can't be good.
--- Going to do an H202 sterilization of the system (minus the net pot) tomorrow so did not add anything.
--- Lowered the water level to below the net pot.
--- Then top fed for a minute.
Day 07 - Sunday - 08/16/20 - Total Days: 014
-----------------------------------
- [0900]: STERILIZATION DAY!
--- Decided to skip today's night cycle for a deep clean.
--- I'm hoping that skipping a night cycle won't be too stressful.
--- Temporarily moved her to a new bucket.
--- Used about a half of gallon of straight distilled water to flush out the net pot.
--- Drained the system and wiped up all the brown sludge. Also removed the air stones and cleaned up all the goo.
--- Filled the system with 2 gallons of distilled water and at least 30ml of food grade hydrogen peroxide (35% strength).
--- Yea its a lot, but since I'm not going to sterilize the system overnight, I went with a really high doseage. Basically I kept adding until I started to see little bubbles start to form.
--- Then I ran the water pump.
- [0915]: Boiled the air stones in tap water for about 10 min. Then reconnected them to the airlines.
--- I let the air stones and hose soak in the sterilization solution for about 5 minutes so the peroxide can absorb into the stones. Then ran the air stone to help mix and agitate the solution.
--- Occasionally, I'd repeat the process of turning the air pump off for a few minutes to let the stones soak.
- [1000]: Covered the top two row of holes of the net pot with some aluminum tape. Hopefully this solves the light leaking in through the hydroton.
- [1200]: Used an old toothbrush and scrubbed the pump clean. Then drained the system.
--- Refilled with more distilled water and peroxide. Again added a lot.
--- Ran system again to sterilize even more.
- [1530]: Drained the system and refilled with distilled water to rinse.
--- Ran the system for a few minutes, then drained and rinsed again.
--- Did this a few more times over about an hour.
- [1630]: Added 4 gallons of fresh distilled water.
--- Added 15ml Sensi Grow A
--- Added 15ml Sensi Grow B
--- Added 12ml of B-52
--- Added 16ml of Voodoo Juice
--- Added 16ml Sensizym
--- Solution strength was at 430 PPMs
--- PH was at 5.6
--- I was going to add Hydroguard, but I think the bottle is expired. Since 2017 or 2018!? I think Hydroguard is good for up to 2 years from the date on the bottle or 6 months after opening. So not going to use from now on. I wonder if this could have contributed to the slime build up.
--- Also removed the CaliMagic and Superthrive too. Going to only use AN products to eliminate the chance of incompatible nutrients.
--- Placed her back in the bucket and top fed for a minute.
--- Here's hoping for the best. Going to let it ride until morning! Please feel better!
[END OF WEEK 02]

Likes
21
Share


@JeyGanesha
Follow
Eccoci arrivati alla 5°settimana di fioritura..le cime sono belle dure. Sono compatte e dure come una pietra... Spero che in queste ultime 2 settimane alimentino di volume. Non che siano piccole ma sé vengono un poco più grandi serei più contento. Come chiunque penso😂🤣😂🤣😂👍💪


Likes
9
Share


@my420experiment
Follow
Day 29 - Second day of light defoliation only at the base. LST continues along with regular tucking
Day 30 - flowering is kicking in for two of the girls and they are starting to get some stretch going on. They are not very tall but sure seem happy.
Day 35? - Final pics posted for end of week 5 and week 1 of flower is killing it. Got the light dialed in after researching the par output on my light and watching some reviews. It’s now at 18 inches running 100%.
335 watt draw at the outlet. They seem to be loving it.
Day 32 - finally finished the watering system. I can travel now if I have to.

Likes
12
Share


@Jackweed77
Follow
La ragazza è cresciuta XXL quando è arrivato il momento di allungare i rami lei ha fatto i straordinari anche in termini di ramificazioni secondarie ora è un fottuto albero di natale speriamo scenda tanta neve...
Likes
11
Share


@Paflucy
Follow
The end of the fifth week of flowering and there is nothing to talk about...
There are still problems with SSH. I thought it was a calcium deficiency so I gave her an extra dose but it's hard to say if it helped much. I read that calmag from biobizza is not very strong. I don't want to give too much because too much calcium will block phosphorus. PK got quite a lot and I'm wondering if I should give her more or maybe she is sensitive and I should give her a rest from fertilization?
It certainly doesn't help that they are dry all the time...


Likes
11
Share


@tripa_grower
Follow
Hey mates, I'm happy with my first grow. I'm learning so much.
Day 29: I'm looking like a hypochondriac, but for the plants, all I see I think it's a disease. Now I'm seem the older leaves getting yellowing, and gotting some brown/dark spots and saw little flies walking at the soil, I've googled it and can be fungus gnats, what I'm supposed to do?
About the pH: I never measured the pH cause I'm using the pH Perfect products of Advanced Nutrients and they say you dont know care about this. But I've started to use mineral water, to see if have some difference. Obvious the mineral water is more puriest and clear than the tap water. Lets see.
Day 30: I've did the defoliation on all seeds, but on Seed 2 and 3 I've just removed dead or yellow/brown leaves, and at the Seed 1 I've removed the most of fan leaves, leaving two or three at max.
Day 34: I'm happy with these girls, Seed 3 I've did not LST and she have 49cm, Seed 2 I've did a soft LST and she have 45cm and 3 main colas, Seed 3 I've did a more little harder LST and she has only 33cm and I think has 4 or 5 main colas, I really dont know the exact number cause one of them is a little lower than the 4 others.

