
Likes
Comments
Share


@Lomba610
Follow
is getting bigger and bigger, I made some toppings and continued with lst, out of curiosity I measured it, it occupies a space of 60x60cm impressive how fast it grows, this week I raised the ec to 2000, I think next week the I move 80x80cm to another box and make it bloom 🤩💪🏼
Likes
12
Share


@taikonaut
Follow
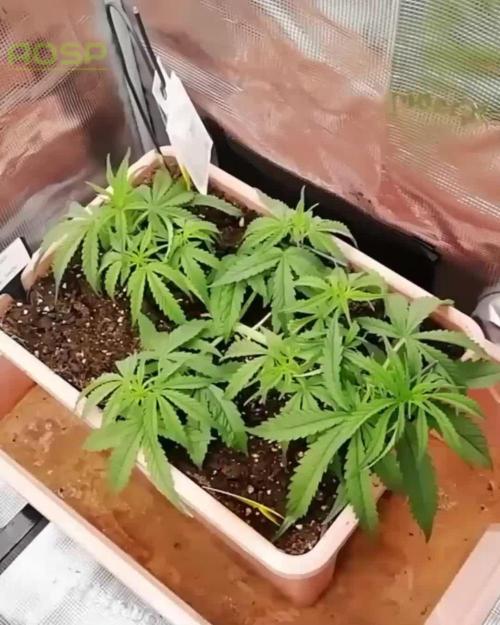
Week 4 and my plant is growing well but I think it has indica type leaves and not going to tall like sativa plants.
Some leave are touching soil

Likes
22
Share


@knnabisgrower
Follow
En el transcurso de la 7ma semana hicimos una defoliación general, trasplantes a 16 lts cargando el sustrato con nutrientes de asimilación lenta, enfocados en la etapa de flora, sacamos 2 clones de la parte baja a cada planta y ajustamos el p.H a 6.2. Dejaremos un par de días que se adapten al nuevo espacio y mandamos a florar.

Likes
14
Share


@Italy_Grower
Follow
12/02/2022 - are still lengthening, growth does not stop, they have gained +5 cm from yesterday to today. Some advice?
13/02/2022 - Hello everyone and happy Sunday, this morning I irrigated with a little flora grow, micro flora and calmag just a little fertilizer, not too much, very light to give a touch of color to this painting.
Humidity is always under control at 45% now. Tomorrow I will clean up and raise the 8cm lamps to favor the light intensity for all the girls. The smell it releases is shocking and we are still at the beginning. 🌲
14/02/2022 - it’s impressive how buds develop day in and day out 😮
16/02/2022 - first of all I did general cleaning of the growbox and then I defoliated the branches and the lowest buds, what do you think? Was this operation successful? 🙂


Likes
7
Share


@Dsif90
Follow
It was a great week for her she has started budding in full force. I have been battling with humidity issues because of trying to make more space inside the tent and moving the humidifier around but I think I got it straightened out now


Likes
2
Share


@Organic473
Follow
So many seeds lol…these girls are all doing excellent with deeds ripening no complaints this week just feeding these girls 3 gallons daily for maximum seed growth and drowning


Likes
60
Share


@Drgreenthumb627
Follow
half way through the first week of flower and the stretch is in full effect. canopy is going to be completely full in a few days, scared for my dwarf white runtz in the middle of the group, itll get swallowed


Likes
30
Share

@All_our_small_plants
Follow
Bewässerung: 500 ml jeden 3 Tag in der siebten Woche
pH-Wert: 6
EC-Wert: 1,8 mS/cm
Temperatur: 30ºC
Luftfeuchtigkeit: 55%
Schädlingsbekämpfung: im Moment haben wir keine Anzeichen das es was zu bekämpfen gibt, sobald die ersten Anzeichen da sind werden wir handeln :), aber zur Sicherheit haben wir wieder ein paar Raubmilben an die Pflanzen gehenkt.
PPFD: 600 µmol/m²/s
DLI: 38 mol/m²/Tag
Düngemittel: Sie bekommt CalMag von BioBizz zu Prävention. Ab Tag 18 haben wir angefangen sie mit einem Mineralischen NPK Dünger (NPK 10-4-7) zu Gießen .
Besonderheiten: Sie ist nun seit einer Woche im Großen Zelt und macht sich ganz gut.
-Tag 37 heute wurde sie wieder entlaubt und wir haben das LST fortgeführt, sie sieht sehr gut aus. Außerdem hat sie wieder Wasser mit Dünger bekommen 😌
-Tag 40 wie man auf den Bilder erkennen kann ist sie nun in der Vorblüte und wird die nächsten Tage in die Blüte wechseln.
-Tag 41 Letztes LST angewendet nun wird nur noch entlaubt und Gegossen :)
-Tag 42 Heute nur Wasser gegeben.

Likes
10
Share


@Pechu420
Follow
The best plant I have ever grown. Very resistant, and great flowering, fat buds, large flowers and beautiful colors on top of a whitish resin. This week there is no fertilizer, so as not to have problems with the harvest regarding taste. The leaves turn yellow quickly.
Likes
11
Share


Likes
14
Share


@wolfvb
Follow
Vegetation – The Stretch Begins
Overview
Entering Week 3 and the Devil Cookies One is showing some solid vigor. The leaf structure is coming in thick with that classic Indica-leaning serration, though the nodes are staying nice and tight under the 100w LED. No signs of major stress, just steady growth as she finishes up her time in the solo cup.
Environment & Nutrients:
Light: Keeping the Agyrochy 100w at about 18 inches to prevent stretching.
Feeding: Started a light dose of BioBizz (Bio-Grow) this week. She seems to be taking the nutrients well with no burnt tips.
Watering: Soil is drying out faster now that the root mass is filling the cup. I’m watering every 2 days or whenever the cup feels light.
Plant Development
Structure: The third and fourth sets of true leaves are fully established.
Health: Stems are showing some slight purple hues—could be genetics (Devil Cookies often shows color) or just a slight reaction to the environment, but the growth hasn't slowed down.
Next Steps: I’ll be looking to transplant into the final pot soon. The roots are likely circling the bottom of the cup by now, and I want to avoid her getting root-bound before the real vegetative explosion happens.
Note: Keeping a close eye on the humidity in the Agyrochy tent to make sure it stays in that 60-65% sweet spot for early veg.
Update: 25.03.26
I have transplanted her today to her final pot
She live now in mix of biobizz cocos and generic cocos from the Rewe super market with extra compost and monster buds mix


Likes
24
Share


@Seedler
Follow
i used a low dose because for my plants even half strength is often too much, this saves nutrients tho.
Around 825ppm, 18 DLI, Ph 6-6,25
thanks to FastBuds and Terra Power!


Likes
4
Share


@pzwags420
Follow
Day 1 week 1 flower I switched my lights to 12/12 as my clones were getting taller then I would like so I flipped them a little earlier then intended. On day 3 I defoliated lower growth(suckers) to focus growth towards top of the canopy. On day 4 I changed out my reservoir and added my flower nutes. On day 6 I defoliated my plants to increase air flow lower in the canopy. On day 7 of week 1 flower the clones are doing well. They are still stretching, the leaves look really healthy and I can see the beginning of flower clusters forming.
Likes
5
Share


@Rizza78
Follow
2 weeks to flower in main tent. Red Hot May have had a little nute burn. Lighting is at 628 on Par meter. 78deg avg. Malt was accidentally super cropped. Healing from splitting her branch. Oozecake aka Judy is my prize now. She fought through some mold 1st week. Transplanted her with only 1 node. Then her 2nd transplant to 1 gallon she was stunted for a week.
Likes
25
Share


@Elpicor
Follow
I added some soil to reduce the length of the stems and make them more stable to the fans, sprayed once with mineral water after the lamp goes out and put some sticky traps because as usual there are some gnats in the soil, nothing to worry about so far.