
Likes
Comments
Share


@hooolian
Follow
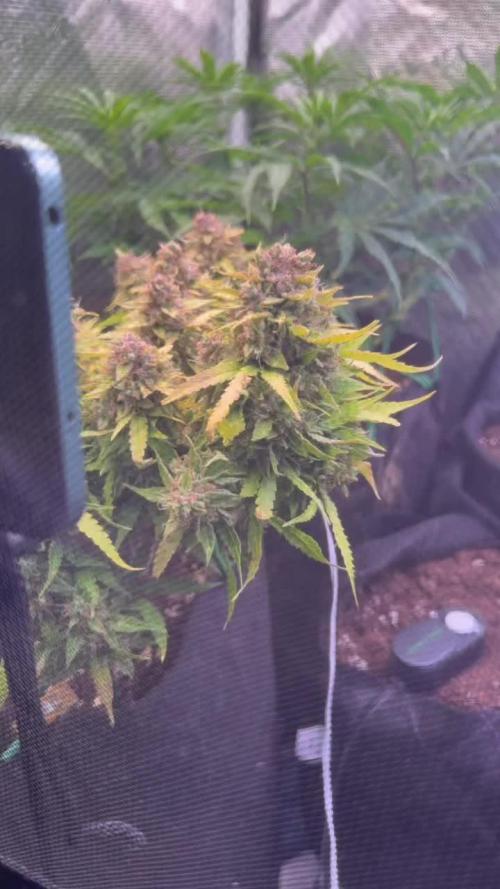
24/02: Colas again have become real heavy in places and have had to strap them together to prevent the stalks from falling and snapping. Over all blooming well have been on maximum dose of nutrients now for a few weeks. lots of orange hairs. water now for a week and then to harvest. the topping in this grow really paid off.

Likes
15
Share


@Kardo
Follow
Es ist die Zeit gekommen und die Lemonberry ist ab ich trockne sie jetzt noch 10 Tage und dann kommt sie in die Gläser sie riecht sehr fruchtig

Likes
11
Share


@PanGrower
Follow
Day 36: I bend the branches even more, cut off the top leaf that covered 2 buds, one of them is very small, I hope to give it at least a little chance to grow. This is a victim of a broken branch.
Likes
5
Share


@LeedsCityFarmz
Follow
Plants Flipped to flower on a 12/12 light schedule. EC dropped slightly to try and reduce any major stretch. These plants should have been lollipoped last week before putting them into a scrog but unfortunately I was unable to, so I have to remove the Scrog to make it easy to lollipop and then place them back into a Scrog once lollipoped. When the Scrog was placed back on it was more for support as I'd already built the structure of the plant the prior weeks. Although a few lanky branches did get bended back over. Another Scrog layer will probably added later in flower for further support when buds start forming.
Likes
17
Share


@MG2009
Follow
07/15/2025
Started veg week by transplanting an AK 2.0 into a 20 gallon fabric pot others will be going into 3 gallon nursery pot.
The 20 gallon fabric pot is in second year of growing, is amended with Carbon G (Lesco) worm castings and other organic stuff I can't remember,
(Coast of Maine Stonington Blend 5-2-4) plant food and top pot off with Coast of Maine Stonington Blend soil, but I want to make it a no till type bed. I've also been watering pots with BIO-REMEDY to insure plenty of microbial activity in plants root zone and nemetodes too! See ya next week.

Likes
47
Share


@SirDillton
Follow
Day 30 of flower. Master kush strain. Plants in back right and front left. Roughly 30 days left to go in flower.
Lights 1212 par value roughly 1000. I keep lowering my light no signs of light burn yet at 19 inches. Day temp 21-26 night 17-21. Rh% is set to 45-55%. Watering every third day. 4L per plant . No runoff. Every third water I give technaflora nutrients at 1400ppm. Water ph 6.2
Ive learned my plants love a water ph around 6.2. Even slightly altering this to 6.7 you can tell they don’t grow as much. Very excited for the next few weeks as you just sit back and watch them fatten up.
See y’all next week.

Likes
Comments
Share

@hassehujasse
Follow
All My Lights on To all my plants.Lemon Cherry Gelato by @Barneys going well after transplantación, topping,LST
Lemon Cherry Gelato de @Barneys esta empesando dar su poder

Likes
3
Share


@BLAZED
Follow
Week 11 (26-8 to 1-9)
26-8
Temps: 20.5 to 26.1 degrees
Humidity: 50% to 56%
27-8
Temps: 20.7 to 27.3 degrees
Humidity: 50% to 56%
Watering: Both 1500 ml. (Only Calcium) EC: 0.4 PH: 5.6
Dry Weight: Both 2.7 kg.
28-8
Temps: 21.5 to 28 degrees
Humidity: 51% to 56%
29-8
Temps: 23.3 to 27.4 degrees
Humidity: 55% to 62%
30-8
Temps: 19.9 to 27.7 degrees
Humidity: 50% to 60%
31-8
Temps: 20.2 to 26.6 degrees
Humidity: 50% to 55%
1-9
Temps: 21.1 to 29.1 degrees
Humidity: 49% to 55%
Watering: Both 1000 ml. EC: 1.4 PH: 5.6
Dry Weight: Both 2.4 kg.
Recalibrated my PH pen and it was only 0.1 off, so i dont think the leaf problems are PH related.

Likes
16
Share


@smallscaleorganics54
Follow
I fed the Serious Kush with 10 ml of Bio PK for the first time this week. The Mango Lassi is definitely catching up and is a really fast grower.
I defoliated the plants on day 21 of flower.

Likes
18
Share


@valiotoro
Follow
Hello everyone 😎
Week 6 of flower for the Amnesia Zkittlez🍭
Only 1 plant left then finito✔️
Very nice smell super sweet🤤
The buds are super sticky🔥

Likes
17
Share


@Naujas
Follow
This is my second growth in a suitcase, I got 30 grams of dry flowers from the first growth, but this growth together with FastBuds is obviously much better than the first one :) although the girl's leaves burn from the light, which is only 10-15 cm from the flowers, but the girl copes with it perfectly :) good luck to everyone.
Likes
29
Share


@Prilyfe13
Follow
April 26, 2024 Day 71
This week we focus on watering and nutrients. A secondary focus will be on a changing environment and light intensity changes.
Both ladies had their reservoirs cleaned out and have fresh nutrients. It's also the start of late flower, so things will be changing with the nutrient dosage. I'll most likely keep the nutrients the same for this week, but I may start to drop the dosage a little for each watering until the flush period starts. So depending on how they look, I may change the dosage for this week's last watering. I'll be bringing it down 25%. So 8 ml goes down to 6 ml and 4 ml goes down to 3 ml. I'll change this for the next 2 weeks until it's just plain water for 2 waterings and then Flawless Finish. It should play out quite well.
The lighting will also be changing a bit this week. I'll be dropping the DLI to 43 mol/m²/d mid week and will then lower it to 40 mol/m²/d beginning next week. I'll then drop it to 36 mol/m²/d the week after and finally 32 mol/m²/d for the final week.
The environment will also be dropped from 77° to 75° during the day and from 68° to 65° at night. The humidity is solid at 47% and I think that's the best I can do for the rest of the grow.
Both plants look great. They have tons of orange pistils and tons of trichomes. I'll be taking trichome pics every few days. One for each plant. I feel like it'll be a better comparison than daily pics. For the trichomes anyway. Anyway, they both still have time to swell their buds more. I'm not expecting big buds from these two. Medium sized maybe, but definitely not big. They just don't look like they will get that big.
Grow System Environment:
Temp: 74.2°
RH: 47.7%
VPD: 1.49 kPa
April 27, 2024
Almost all of the pistils are orange now on both plants, but the buds are still swelling. Interesting. I'll be taking trichome pics today at some point. I was going to yesterday, but got distracted with video games. Whoops. There's tons of trichomes. They are definitely frosty and continuing to get frostier.
Nothing much to do today. Each plant got an inspection and passed with flying colors. There were some loose tie downs as well. Mostly from the crowding in the tent. So those got removed.
Tropicana Cookies is looking super good now with her buds being everywhere and them swelling up finally. She could stand to get a few leaves taken off, but I'd rather just leave it alone now. No sense in undue stress.
Tropicana C also looks great. She has to be the biggest of the two. Not the tallest, but definitely the most girthy. Lots of buds and also starting to finally swell up.
I'd also like to mention the colors coming from both plants where the buds are nearly done. Lots of purple hues. You can't really see them from the small sugar leaves and frost covering it. But it's there.
The lighting as I said will stay the same for the first half of this week. Then I'll drop it. However, I may leave it to next week. We shall see.
The environment is looking pretty good. The temp is a bit high currently at 77.8°. the humidity is still at 47%, but I managed to get it down to 44% for most of yesterday afternoon.
The DLI is a bit high today at 1.66 kPa. Nothing a small adjustment won't fix.
Grow System Environment:
Temp: 74.5°
RH: 45.7%
VPD: 1.55 kPa
April 28, 2024
Not a lot going on today. I'll be refilling the reservoirs later this afternoon. That's about it.
I have a bit of a concern. Both ladies have really small buds, and I think they may have stopped swelling. I'm wondering if I have nutrient lockout or something. They are showing signs of stress. So I've already started dropping the nutrients down by cutting Overdrive in half as it seemed to have been the original cause of the nutrient burn. And the next watering will have all nutrients cut in half. Next week I'll drop it to 25% and leave it til flush, which may be next week anyway. We shall see.
Other than that, both plants are covered in trichomes. They smell wonderful as well. Like orange and some other light citrus and gas. Smells super good as well as sweet. There is also a hint of cookies.
The DLI will be dropped to 40 mol/m²/d tomorrow. I'm assuming it will only be a 10% drop on power, so I shouldn't lose much penetration.
The environment is off today. It's warm and super humid with bouts of rain. So naturally, the tent environment is all wonky. The temp is at 75.5° with the humidity way up at 60%. I turned the AC on and now it's just a matter of tweaking and waiting. I may have to crank it and sacrifice some temp for lower humidity. It should be fine that way, but the humidity is definitely too high.
Update: I ended up adding about a half gallon of plain water to both reservoirs. Just Incase I have nutrient lockout or something. They should go through that by tomorrow afternoon. Maybe late evening.
Grow System Environment:
Temp: 75.6°
RH: 52.8%
VPD: 1.39 kPa
April 29, 2024
No watering today. The plants are both still going through the half gallon of plain water from yesterday. Let's hope it clears up the nutrient burn.
They look great with their trichome coverage. The only thing I'm pretty disappointed about is the size of the buds for both plants. I wonder what I did wrong. I'm guessing the introduction to Overdrive was about 2 weeks too early. Removing the Big Bud was also a major mistake I think. It should have stayed in the mix for 2 more weeks. Lesson learned, make adjustments to any feeding schedule to match the plants growth stage. Maybe I'll ask that question.
The lighting was changed today. I dropped the power level down to 70% to get a DLI of 40 mol/m²/d. It's not perfect as the plants do not have level canopies, so some of the spots go all the way up to 45 mol/m²/d still. It's not a bad thing I think. The DLI was a bit high for those tops anyway.
The environment is still wonky. The temp is fine at 76° to 77°. A bit high from what I want, but not out of range. I'd still like it down to 75° or 74°. The humidity is what's out of whack at 60% and it doesn't seem to want to drop. I have a heater on to clear out the room humidity and a dehumidifier in the tent working it's hardest. Which isn't very hard. I believe the fans are going on it. It may be time for another one. Something the same size but more powerful.
Grow System Environment:
Temp: 74.2°
RH: 59.8%
VPD: 1.15 kPa
April 30, 2024
Watering day. Both ladies got their full gallon of nutrients. I'm going to cut it when it drains down some with plain water.
Both plants look good even though they have small buds. They are everywhere and seem pretty dense. So it's just a matter of time. Maybe another 2 weeks. Maybe less. Hopefully less. The nutrient burn was an issue, but now I think it's good. I dropped the Overdrive significantly, but I think I can plainly say, I have ruined my yield for these two plants. Lesson learned. Plain water at the first signs of stress.
The scent is super strong now and smells like oranges and candy. Or something like that. All I know is that it smells great.
The lighting is pretty good. No reaching yet, so it's definitely not too low. I may just leave it here for the rest of the grow. I read that lights don't need to be dimmed for autoflowers. It could be right. I've never dimmed the lights before. We shall see I guess.
The environment is still wonky with the humidity being high still at 57%. I can control the temp pretty easily, but the humidity will not budge. I'll keep trying.
Grow System Environment:
Temp: 75.5°
RH: 57.0%
VPD: 1.26 kPa
May 1, 2024
Nothing to do today with these two. No watering needed, no light changes, nothing.
I pulled them out, tooky pictures and checked them over. No issues pest or fungus or anything.
The only issue I have is the nutrient burn. Some of the leaves are getting yellow spots on them and frankly I have no idea what to do here. Keep the nutrients the same? Cut the nutrients down some over the next week or 2? Go with plain water? Not too sure. I still see many stresses. And I think that is the cause of my tiny buds. It seems that I did take the Big Bud out too early and added the Overdrive way too soon. Oops. Lesson learned with this run. I don't think it's a matter of an over abundance of nutrients, but the wrong ones at the wrong time when the plants weren't ready for it. I'm guessing that's what has happened here.
Both ladies smell fantastic. Super sweet and strong. Crisp, and not pungent. Refreshing even.
Tropicana Cookies has some pretty hard buds and lots of them. Of course, larger buds are preferred, but as long as these come out fire, I'll be happy. Her branches also seem to be holding up nicely.
Tropicana C on the other hand has weaker branches and the tallest top is starting to lean pretty heavily. A great sign for bud density.
Both plants have phenomenal trichome production. It's getting better everyday. Tons of clear with a mix of cloudy and amber, definitely not ready yet, but soon I think. Very soon. Maybe another week and a half? Maybe 2.
As I said before, I didn't change the lighting at all. It's current DLI is 40 mol/m²/d through most of the central canopy. The outside of the canopy is roughly 38 mol/m²/d. So it's all good now.
The environment is still wonky with the humidity being at 59%. It's maddening. The room is 49% and the temp is fine at 75°. I'll sacrifice up to 77° if I can get the humidity around 50%. Not ideal for this stage in life, but it will have to do of I can even get it there. I do have a large dehumidifier, but it doesn't work right. When the compressor shuts off, it blows are that humid air right back into the room. I need a new one.
Grow System Environment:
Temp: 75.2°
RH: 56.1%
VPD: 1.27 kPa
May 2, 2024
Not a lot going on today. No watering, no trimming, nothing.
I did change the light last night to 80% power.
Tropicana Cookies looks great! She has purple coming out all over her buds. No fade yet though. I can assume that will be coming through in the next week or so. Her tops buds are getting slightly fatter and heavier than before. I hope it will continue to do so over the next 2 weeks.
Tropicana C is slightly behind. She doesn't have nearly as many orange pistils and the purple is just starting to come through. However, she has tons of trichomes covering everything top to bottom. Her buds are about the same size as her sister, so they may end up swelling bigger than Tropicana Cookies when all is said and done. We shall see.
As I said earlier in today's post, I changed the light power from 70% back up to 80%. I think I dropped it too early and need to adjust it accordingly. I'll drop it again in a week or so. Maybe less. Now the DLI is at 43 mol/m²/d inside and 40 mol/m²/d on the outside.
The environment is still off, but not as much. The humidity continues to be high, but only at 55% verses the 60% it's been stuck at for the last few days. The temp is fine at 74.5°, but I think I can increase that a bit and hopefully drop the humidity down in turn.
Grow System Environment:
Temp: 73.7°
RH: 55.2%
VPD: 1.24 kPa
Likes
3
Share


@Qaggy
Follow
Gave them all a defol as they was getting to bushy at the bottom.
They all look great apart from number 3. I can’t seem to perk her up. Tried straight water for a week, ph is 6.3. Then tried her with nutes but nothing’s making her happy. Think she’s just 1 of them doom and gloom girls, we all have known them haha.

Likes
47
Share


@pheverone
Follow
Gave them their 3rd and final heavy defoliation this week. Had lots of useless side branching that will just shadow out the good stuff and cause them to not ripen properly, a lot of this growth was due to the unintended extra 10 days they had in VEG before I noticed the timer wasn't doing what I asked it to do, just one of those things. Always a surprise in the grow room no matter how much you try to prepare and problem solve. I also had an air line manifold blow out this week which was very strange to see. Caught it early so girls didn't go without air for to long and I have 2 air pumps running so 1 going down is only a minor issue but still a great example of the random mishaps that occur when growing.
If its one thing that experience has taught me its that less is more when it comes to how many colas you try to fit into a space. Do to many and you'll just end up with a load of mids, battling humidity problems and stress of keeping tons of half ripe colas falling all over onto each other come week 6 or 7.
Everything is going great so far, no issues, although I have noticed some of the white hairs on the budlets have slight ginger tops (only a very small few) I have read in the past that this can be a sign of stress and potentially they might flip the hermie but I've done nothing to stress them so I am hoping this is just a abnormality from growing under LED.
Boosted the nutrients up to 1000PPM now to let them feed heavy and pump those buds up.
Hope you enjoy watching my grow and thank you all for the lovely comments and feedback, it is much appreciated ✌️

Likes
3
Share

@BlunthumbMD
Follow
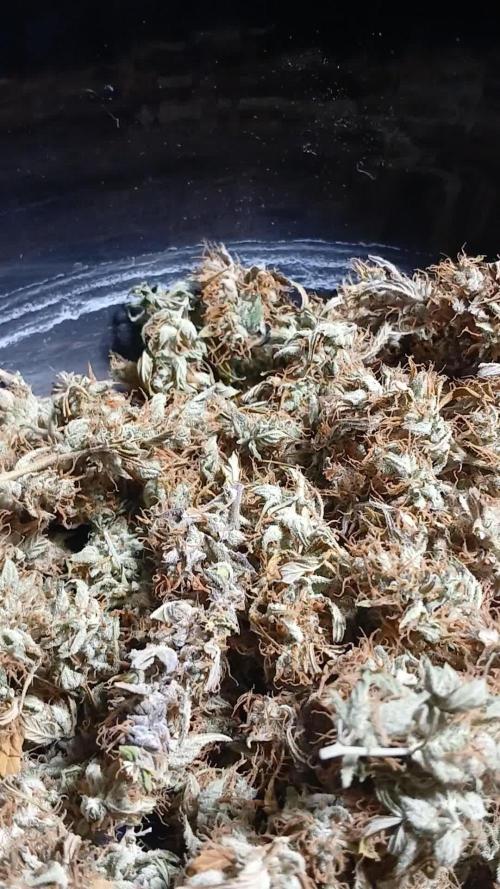
In the dark for 48 hours on day 89, chopped day 91. After full dry and cure I ended up with 80 grams dry yield buds. She out stretched my tent (60") twice, still yielded very well. Flower came out as tight, slightly dark purple to green flower with orange hairs. Smells earthy, herbal, nothing overwhelming. Smokes great, flavor is very similar to the nose earthy, slightly herbal with a gassy finish faintly present. Feels fairly potent, definitely a heady high, and unfortunately munchies induced activity increased. Overall a great first run with Zamnesia seeds autoflower, if and when running again SCROG almost seems required.

Likes
46
Share


@eldruida_lamota
Follow
Vamos familia que ya actualizamos la cosecha de estas Candy Rain de Zamnesia, para el concurso POWER BUDS Plagron x Zamnesia CONTEST.
Ya era hora de cosechar, estoy bastante contento con los resultados.
Vaya flores que se han marcado repletas de tricomas, y las flores se marcan aromas dulces y afrutados.
Es una variedad bastante fácil de cultivar y muy resistente, crecieron desde el principio bien vigorosas, sin problemas y al final de todo recompensó.
Las condiciones ambiéntales han sido máximas en 25 y mínimas en 20 y una humedad estable en torno al 36% al final de floración y en el secado.
Os comento que tengo un descuento y para que compréis en la web de Zamnesia de un 20%, el código es ZAMMIGD2023
The discount 20% and the code is ZAMMIGD2023
https://www.zamnesia.com/
Espero que disfruteis este diario, buenos humos 💨💨
Likes
9
Share


@barrychopsticks
Follow
New ventilation is working well
Got the RH down by around 10%
Microscope from Amazon doesn't work well for checking trichomes as quality and focus is to shitty for my restless hands, iPhone works better atm

Processing
Likes
10
Share


@BodyByVio
Follow
This week I Supercrop all the plants and spred them out over both lights. One more week of Veg and they are ready to explode
Check me out on Instagram @growmorestressless

Likes
10
Share


@Jbcultivates
Follow
Week 9 of flower, the buds are still showing white hairs and 50/50 clear/cloudy trichomes. Buds getting too heavy to hold themselves up! Tried out using a single scrog, I would definitely use two nets going forward.


Likes
9
Share


@TheGreenGroomer
Follow
Week 5 of veg honestly do not have a clue how I’ve managed to get this far with her looking half happy have come across a few slight issues along the way but seems to have cleared up I think, ppms haven’t been reading what I exactly except feeding with 600ppms ph 5.5 all the time as it rises a few points I should be in the safe zone and the run off when measured is way lower (180ppms) and I’m sure my ec pen is fine so I’m so confused I don’t bother testing the ph run off as it fluctuates all the time aslong as it’s ideal what got put in I should be fine I heard i just done get why I can’t seem to get
