
Likes
Comments
Share


@EBxAH
Follow
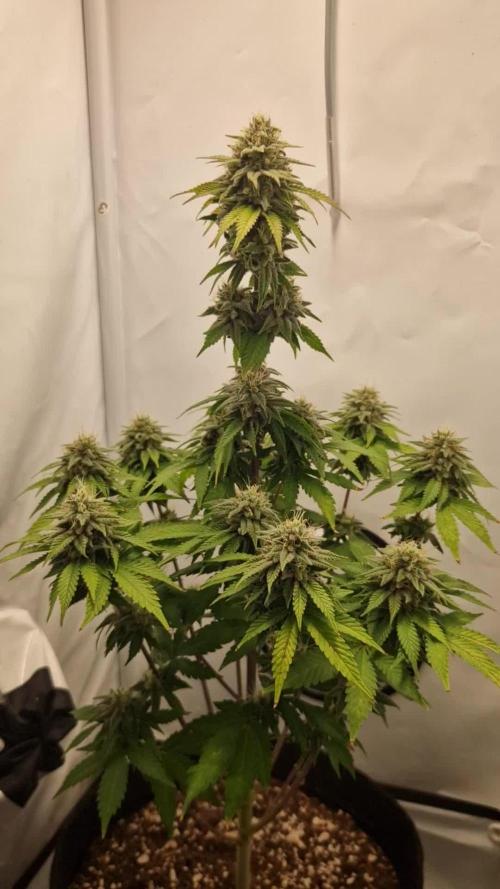
Well week 7 has started and 1 full week into 12-12. This time of year is perfect for winter time flowering. Basha is 26" Steffa is 36" and Wandzia is 27" so I average the height at 30". I think they look pretty damn good for 50 days old, lol. These ladies are currently taking in a gallon a piece every two days now, different from last grow. Also I've been bottom feeding these girls. That's about it for now.
Happy Growing Everyone
✌️❤️😁🍀🎶👽
EB

Likes
141
Share


@Tropicannibis_Todd
Follow
💩Holy Crap Growmies We Are Back💩
Well growmies we are 63 days in and everything is going as good as it can👌 Afraid she's had some major issues but that's just how it goes folks 😉 she's definitely on the mend 👈
👉 Shes a short chunky little plant,😉
Lights being readjusted and chart updated .........👍 Even with early major issues due to the soil/medium she's come a long way 👈
👉I used NutriNPK for nutrients for my grows and welcome anyone to give them a try .👈
👉 www.nutrinpk.com 👈
NutriNPK Cal MAG 14-0-14
NutriNPK Grow 28-14-14
NutriNPK Bloom 8-20-30
NutriNPK Bloom Booster 0-52-34
I GOT MULTIPLE DIARIES ON THE GO 😱 please check them out 😎
👉THANKS FOR TAKING THE TIME TO GO OVER MY DIARIES 👈


Processing
Likes
103
Share


@MG2009
Follow
09/20/2018
Today's the day we flip to 12-12 and full strength nutes, roots have filled in nicely,and she is growing,I fear if I don't flower now she may get to big for my tent, I'm hoping that she only stretches 1.5-2 x,but if she got the sweet pink grapefruit genes it could be a 3x stretch that I hoped for.
But we will see .let the magic begin!
09/24/2018
Supercropping, and scrog day 4 after flip stretched,4-6" ,canopy will fill out quickly. The 9fingered leaves i am guessing are from grapefruit genes,as I have not previously had more than 7 fingered leaves on Captains Cake,Star Cookie,or Mystery Cookie plants. Might get nice stretch from their offspring,, which is partly why I chose these plants to Breed improve the stretch of Captains Cake as she didn't stretch much after 12-12 flip. Time will tell whether or not it worked.
Likes
16
Share


@MrWolfe
Follow
Last week of veg for this round, next Monday they will start 12/12 in the flower room and get stripped.
Watering daily and they are growing fast and looking great, can't wait to see how flower goes for these ladies.

Likes
14
Share
@paetel
Follow
Apart from struggling to maintain an optimal VPD, it’s smooth sailing right now. The buds are swelling up nicely. According to the breeder, we still have at least four weeks of flowering to go before harvest.
Likes
21
Share


@Elcoolmagnifico
Follow
Over all this has been my best grow so far. Was worried about my stuff getting stolen so I chopped them . I probly could have left them another 2 weeks but it was getting really cold here


Likes
7
Share


@Skinnytalls420
Follow
Day 73-25/5/23 So only got 3.30g wet of this tiny pot! It’s a very small pot probably a joint after drying 😅😂 we will try again!!! But does smell amazing 🤩
Likes
5
Share


@OntarioAutoGrower
Follow
03.03.23: Started in glass of water in a dark warm area for 17 hours when the seeds sank.
03.04.23: Then put them in a damp paper towel for 24/48 hrs in a dark warm area. Checking on them to keep them from drying up.
03.05.23: Seed taproots were 3/4 inches and were ready to go into the pots. I then poked a small hole into the soil with my finger and carefully put the seeds in and gently covered them with dirt. Then sprayed a little water onto them and then covered them with a dome to keep them humid. Now we wait until they pop out of the ground.
Likes
134
Share


@DogDoctorOfficial
Follow
I know its kind a impossible but this girl is already smelling like she is ready to harvest lol crazy , the trichomes are popping al over the place in big numbers and with beautiful structure. Completely in love with this beautiful Mama
She still growing so i am keeping my food regime for now, once she stop i will had K to the recipe like i said last week, but for now she is still not needing it .
Love my PPFD numbers at 666 hahaha i will increase this numbers once she stop growing to help her make bigger fruits, and then in the last weeks i bring my PPFD numbers down again and finish her with something 500 PPFD
Love the colors , love the structure, love how strong against pests she is, this one will be a keeper thats for sure, so glad she is not an autoflower hahaha Thank you Dutch Passion for this opportunity and for the amazing genetics that she is turning out to be, much respect great job !!!
Still waiting on some beneficial bugs to apply as IPM , they should be here some point this week lets see
As always thank you all for stoping by, for your time, your love and for it all, i am truly blessed with you all.
All info and full product details can be find in can find @
https://dutch-passion.com/
https://aptus-holland.com/
#aptus #aptusplanttech #aptusgang #aptusfamily #aptustrueplantscience #inbalancewithnature #trueplantscience #dutchpassion #dogdoctorofficial #growerslove
With true love comes happiness , Always believe in your self and always do things expecting
nothing and with an open heart , be a giver and the universe will give back to you in ways you could not even imagine so
More info and full updates @
https://growdiaries.com/grower/dogdoctor
Growers love to you all

Likes
6
Share


@rvabudman
Follow
Graduated, and am off from work for a few weeks, so went overboard on photos. Plant is doing well, leaves are starting to turn yellow (strain trait).
Can't wait for the harvest and being able legally gift my xmas ornaments to my cousins during our "cousins walk" at our family xmas party.
Likes
Comments
Share


@MRSGROW
Follow
Buenas, esta semana las plantas fueron defoliadas solo para mejorar la ventilación ya que e presentado problemas de temperaturas durante el ciclo diurno dado que en me encuentro en verano, se regó con 6 litros en total dividido en dos días de riego siendo el primero con ph de 5.8 y ec de 900ppm y el segundo con ph de 6.2 y 1200 ppm de ec.


Likes
15
Share


@38PLAN
Follow
Stiamo ancora raccogliendo,ancora nessuna pianta é morta,sto rimuovendo piano piano le cime più mature,così facendo evitiamo le cime popcorn e diamo il tempo alla pianta di riempire anche le cime inferiori,per adesso levando quella fumata e venduta siamo all'incirca sui 780g,però aspettiamo anche il nuovo stendino,alla fine del raccolto dovremmo arrivare a quasi 2 Kili con 7 piante e 6 vasi,con una media di 333g a pianta,ho pubblicato tutto quello che potevo,ogni procedimento,spero vi piaccia e mi seguiate
Likes
14
Share


@JUNGLE_B4RNS
Follow
The Sensi Seeds Research breeding project has created eleven cannabis seed varieties.
How? By combining new cannabis cultivars with a selection of strains from their long-established cannabis gene bank. For the first time in thirty-six years, they are opening the doors of the Sensi Seeds Research and Development Department.
Week #6
Transplanted the plants into their final pots (18l). Last week feeding was a bit too light, some plants started to move their Nitrogen, their bottom leaves turned light green/ slightly yellow. But the problem has been solved in 3 days after transplanting and watering with some nootz.
Adding some more light. The Mars-Hydro SP250 has done an excellent job on its own during 5 weeks but it’s time to give some more light coverage to grow bigger plants, by switching on an MH light under a wing reflector.
Using Cellmax Product-X* into their BIO Soil with some BIO 8-2-2 and some RootBooster makes this crop a 100% bio organic growth.
*Using 0.7gr / plants in the transplanting hole in contact with the roots (and not 1ml/1l).
(I’m looking for a job in the Cannabis industry as Master Grower, Mineralogist, Quality Control)

Likes
24
Share


@DarkVarein
Follow
This is the last week for white widow's and I'm really happy about results, the plant are very quick, and the smell is insane. Can't wait to smoke that 😀
Likes
56
Share


@Prilyfe13
Follow
April 26, 2024 Day 71
It's a new week and the start of late flower. It was also cleaning day. Both reservoirs have been cleaned out and are freshly loaded with new water.
This week we are focusing on watering and nutrients. I may start to drop the dose until flush, over this week and the next.
The light power will also be gradually dropped down over the next 2 weeks. Not much this week, I think I'll drop the DLI down to 43 mol/m²/d in the middle of the week. Next week I'll drop it down to 38 mol/m²/d. It all depends on what the plants look like.
The plants are getting ready to hunker down and finish up. Both have decent sized buds and just need to finish swelling. I'd say another 2 weeks maybe? Flushing will start at some point over the next 2 weeks as well. Flushing won't be much of a big deal as it's just cleaning the reservoirs and running a week of Flawless Finish.
The environment is changing a bit as well. I dropped the day temp down to 75° and the night temps to 65° or lower. Not cold enough to cause stress, but enough to get some purple I hope. The humidity is sitting at 47% and I'll be leaving it there unless somehow I can get it to go lower. For now it's pretty solid at 47% and everything looks great, so no need to worry.
I'll be taking trichome pics every few days. One pic for each plant. No point in loading up the whole photo gallery with even more daily pics. Plus, the progression of trichomes isn't fast enough to really notice daily. So every 3 days should be fine.
Grow System Environment:
Temp: 74.2°
RH: 47.7%
VPD: 1.49 kPa
April 27, 2024
Nothing happening today. Both ladies were inspected with no issues. I snipped a single leaf off of Banana Purple Punch B. Just one. Blocking bud sites.
Banana Purple Punch A has some massive buds. About the size of golf balls. Maybe a bit smaller. They are still swelling and have a good 2 weeks left. Pistils are still mostly white, so that's a good sign for larger buds and more trichomes.
Banana Purple Punch B is looking wonderful as ever. She doesn't seem to be suffering any issues with nutrient burn unlike her sister plant. She's perfectly healthy and has very nice bud production. The buds aren't quite as big as Banana Purple Punch A, but still nice and sizeable.
The nutrient burn seems to have stopped for Banana Purple Punch A. So that's good. It should be perfectly fine now.
Lighting is staying the same for the next couple of days. Although, I may keep it the same for the rest of the week.
The environment is excellent now. It's raining today and the humidity is still at 47%. I did get it down to 44% for most of the afternoon yesterday, so I may be able to keep it down after the rain stops. Or just wait for the afternoon and see what happens. Either way, the humidity is now at 47% and the temp is at 76.8°. The VPD is at 1.57 kPa. A tiny bit high, but still well within range. Last night's temp was a little high at 69°. I'll have to drop the temp lower again to get that 65° sweet spot.
Grow System Environment:
Temp: 74.4°
RH: 45.7%
VPD: 1.55 kPa
April 28, 2024
Not much to do today. I mixed a new batch of nutrients for both plants. The only difference is that I cut the Overdrive in half down to 2 ml/gal. Neither plant needs it, but now it's mixed and ready to go. I may end up filling the reservoirs tonight as it stands. Or later this afternoon. I don't think they will last til tomorrow morning.
Both plants are putting off a wonderful aroma. I honestly can't describe it. Like sweet and kind of a hint of banana and a bit heady.
Trichome production is picking up quickly. The pistils are starting to turn orange as well. They are definitely in the late flowering stage.
I think I'll start dropping the nutrients for the next watering. And I'll drop the DLI down to 40 mol/m²/d tomorrow I think. Not much else to say about nutrients or lighting, so moving on to the environment.
It's a warm humid day out and raining off and on. My whole environment is wonky, with humidity being at 57% and the temp at 77°. I turned the AC on about an hour ago and the temp went down to 75°, and humidity up to 60%. I think I'll crank the AC all the way down. And hopefully get rid of the humidity with the temp being a bit lower than perfect.
Update: I ended up adding about a half gallon of plain water to both reservoirs. Just Incase I have nutrient lockout or something. They should go through that by tomorrow afternoon. Maybe late evening.
Grow System Environment:
Temp: 75.6°
RH: 52.8%
VPD: 1.39 kPa
April 29, 2024
No watering today. I'm still waiting for the plain water work it's way through. However, I did drop the light power.
Both ladies look great. Big buds, great scent and nice color. I'm not seeing any fade yet, but the nutrient burn is still there. I hope it will fix itself with the plain water. And then maybe fading will start. These two need a good 2 weeks or so before harvest.
The lighting, as I said, was changed today. I dropped the power down to 70% to get as close as possible to 40 mol/m²/d. I may have to drop it another 10%. I'm not too sure. I'll check the DLI again when I'm more awake. (I'm finally on my second cup of coffee. Lol) Looks good though. Just around where I want it to be.
But there are a lot of spots where the DLI is a bit high at 43 mol/m²/d. The tallest tops are also kind of high at 45 mol/m²/d. Again, I'll double check on a couple hours, but it should be fine.
The environment is wonky again today. The temp is fine, but the humidity is still high at 60% and I don't see a way to drop it again. Not with the current weather. Hopefully I can get it down with some heat. The AC method did not work. Well, it maybe will work tonight. I'll be dropping that bad boy down to 59° tonight and hopefully it will do what I need it to.
Grow System Environment:
Temp: 74.2°
RH: 59.8%
VPD: 1.15 kPa
April 30, 2024
Watering day. The reservoirs were both nearly empty and there was just enough space for a full gallon in each one. It's the normal nutrient dose with Overdrive being at 2 ml/gal.
These two plants are looking mighty fine. Excellent bud swelling and trichome production. I'm definitely going to be wet trimming them instead of my normal dry trim. I may leave the bods on the branches and do a partial wet trim, or I guess mostly wet trim.
They smell great! Very strong aroma now. I swear they smell like artificial grape. I can't describe it any other way. Grape and pungent. Awesome.
So far the light seems to be fine. No reaching or showing any signs of lack of lighting. They look pretty happy. Although, Banana Purple Punch A is a bit sad from nutrient burn. Banana Purple Punch B however didn't seem to have much of a problem with the burn.
The environment is still pretty wonky. High humidity again. I can control the temp pretty easily, but the humidity is another issue. It's currently sitting at 56% and I'm holding the temp at 76°.
Grow System Environment:
Temp: 75.5°
RH: 57.0%
VPD: 1.26 kPa
May 1, 2024
Not a whole lot going on today. No water needed, no light changes. I rotated both ladies 180° so now they are getting light on other sides. I'll leave them like this for the rest of the grow I think.
Banana Purple Punch A actually fits better in the new position. Less wall touching and about the same neighboring plant touching. I also removed 3 leaves. Ones that were misshapen from being crushed against the tent walls.
Banana Purple Punch B seems to fit a little better in the new position, mostly because of her sister plant. More room on the outside and a little less room inside. No leaves were removed today. I'll reserve that for the last 2 days of the grow cycle. Then I'll do a massive defoliation and then a wet trim.
It's humid here right now and I need the space. Otherwise I'd stick with dry trimming. But I can't hold up the tent for 3 more weeks. I have other plants getting ready to be planted in their final containers. Like a week for that, I might be able to squeeze a week and a half, but that's it. They will have a space, but the main tent is where they will need to be. Not a 2x2 dry tent. I'll work it how I need to I guess.
Anyway, both ladies look great! Trichome production is coming along nicely as well. They are very smelly now and I love it. They are also still packing on weight I think. Not a ton, but the buds are clearly getting denser now that some of the pistils are starting to turn orange. I'd say another 2 weeks on these two.
As I said, the lighting hasn't changed at all. Not for another few days to a week. Then it will have another power drop. Until then, we are staying at a DLI of 40 mol/m²/d. It's roughly 38 mol/m²/d on the outer part of the canopy.
The environment is STILL wonky. I cannot for the life of me get that damned humidity down at all. Not with a dehumidifier, not with the heat cranked, not with the AC cranked. I'll try my big dehumidifier in my room, but the humidity is like 49% and frankly I'd rather the room humidity stay there. Much easier to breathe. However, the humidity in the tent is suffering at 59% while the temp is hanging out still at 76°
Grow System Environment:
Temp: 75.2°
RH: 56.1%
VPD: 1.27 kPa
May 2, 2024
Not a lot going on today. No watering needed, no trimming, nothing.
I found a broken bud on Banana Purple Punch A. It must have been from when it was against the wall, or too close to the other plants and got stuck on a branch while I was rotating. Oh well. It's a lower bud, so not huge.
It's also the last day of the week and that means new videos!
For the rest of the grow, I'll be making weekly videos of the individual plants. So that will.be this week and the next 2 weeks or so.
Banana Purple Punch A looks great aside from that one broken bud. Her buds are fat and thick. Super dense from what I can see. I would like to note that the fade hasn't started yet, so we still have that 2 weeks left. Unless it starts in the next day or 2, I'll be banking on 2 weeks.
Banana Purple Punch B is still compact as ever, but her buds are getting fatter everyday and of all the plants in the tent, she has done the best with the nutrients. Very little burn and didn't seem to be bothered by it. Maybe I did something early on to have such a small plant, but still. I think I can bank on 2 oz from each plant. Maybe 3 oz. It's really nothing compared to previous grows, but as I said before, as long as it's fire, I'm happy.
Trichome production on both plants is fantastic. They are loaded from top to bottom. And building more and more everyday. There's still plenty of time left for there 2 as well. Most of the trichomes are clear with about 20% being cloudy and sparsely amber. That's another sign that they need another couple of weeks. Maybe slightly less.
I increased the light power yesterday back up to 80%. I think I was a bit early on the intensity drop, so I'll drop it again in a few days I think. Around mid week coming up. Now we are running a DLI of 43 mol/m²/d inside and 40 mol/m²/d on the outside.
The environment kinda fixed itself, but not to the ideal climate. It's still at 55% humidity. Better than 60%, but still not good enough. It needs to be below 50%. However, I can still control the temp and I have it at 74.5°. I'll turn it up a bit and see if I can clear out the last 5% of the humidity.
Grow System Environment:
Temp: 73.7°
RH: 55.2%
VPD: 1.24 kPa
Update: I added a couple test videos to see if they would upload. Success!
Likes
6
Share


@Mr_nugs_lover_David
Follow
Looks suuper frosty at the beginning of third week,producing resin even in the fan leafs,crazy gorilla strain by original sensible seeds,already starting to stink man,she's being grown 100% organically. I'll start using bio pk by biotabs from the 25th day of flower

Likes
37
Share


@iii2e
Follow
29.11.2021 : I gave her fertile water. I applied neemazal to the leaves. organisms were eating leaves, so I took precautions. In one of my plants, the development is slow and the other two do not seem to have a problem.
02.12.2021 : everything is going well, I increased the watering to 2 liters.

Likes
7
Share


@GrowFOUR
Follow
ppm at 1100 Second flush 3 days after first because ppm's were still rising after each day. Brought ppm down to 850 for second round of defoliation at day 49. I wanted to do it at day 42 but I didn't want to stress her more after me being away for 12 days.
